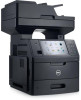
Dell Laser MFP Users Guide
Page 6
... using the Supplies Ordering Utility 234 Ordering supplies using Printer Home...235 Storing supplies...235 Replacing supplies...236 Replacing the toner cartridge ...236 Replacing the imaging unit ...239 Moving the printer...242 Before moving the printer ...242 Moving the printer to another location...243 Shipping the printer ...243 Managing the printer 244...
... using the Supplies Ordering Utility 234 Ordering supplies using Printer Home...235 Storing supplies...235 Replacing supplies...236 Replacing the toner cartridge ...236 Replacing the imaging unit ...239 Moving the printer...242 Before moving the printer ...242 Moving the printer to another location...243 Shipping the printer ...243 Managing the printer 244...
Dell Laser MFP Users Guide
Page 237
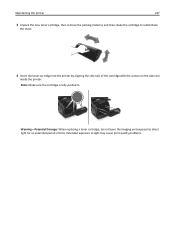
Extended exposure to direct light for an extended period of the cartridge with the arrows on the side rails inside the printer. Note: Make sure the cartridge is fully pushed in. Maintaining the printer 237 3 Unpack the new toner cartridge, then remove the packing material, and then shake the cartridge to redistribute the toner. 4 Insert the toner cartridge into the printer by aligning the side rails of time. Warning-Potential Damage: When replacing a toner cartridge, do not leave the imaging unit exposed to light may cause print quality problems.
Extended exposure to direct light for an extended period of the cartridge with the arrows on the side rails inside the printer. Note: Make sure the cartridge is fully pushed in. Maintaining the printer 237 3 Unpack the new toner cartridge, then remove the packing material, and then shake the cartridge to redistribute the toner. 4 Insert the toner cartridge into the printer by aligning the side rails of time. Warning-Potential Damage: When replacing a toner cartridge, do not leave the imaging unit exposed to light may cause print quality problems.
Dell Laser MFP Users Guide
Page 239
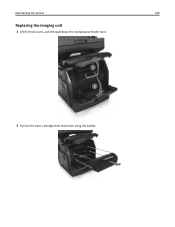
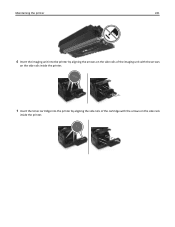
Maintaining the printer 239 Replacing the imaging unit 1 Lift the front cover, and then pull down the multipurpose feeder door. 1 2 2 Pull out the toner cartridge from the printer using the handle.
Maintaining the printer 239 Replacing the imaging unit 1 Lift the front cover, and then pull down the multipurpose feeder door. 1 2 2 Pull out the toner cartridge from the printer using the handle.

Dell Laser MFP Users Guide
Page 240
Warning-Potential Damage: Do not expose the imaging unit to light may affect the print quality of future print jobs. Doing so may cause print quality problems. Warning-Potential Damage: Do not touch the photoconductor drum. Maintaining the printer 240 3 Lift the blue handle, and then pull out the imaging unit from the printer. 4 Unpack the new imaging unit, and then shake it. 5 Remove all packing material from the imaging unit. Extended exposure to direct light for more than 10 minutes.
Warning-Potential Damage: Do not expose the imaging unit to light may affect the print quality of future print jobs. Doing so may cause print quality problems. Warning-Potential Damage: Do not touch the photoconductor drum. Maintaining the printer 240 3 Lift the blue handle, and then pull out the imaging unit from the printer. 4 Unpack the new imaging unit, and then shake it. 5 Remove all packing material from the imaging unit. Extended exposure to direct light for more than 10 minutes.
Dell Laser MFP Users Guide
Page 241
Maintaining the printer 241 6 Insert the imaging unit into the printer by aligning the arrows on the side rails of the imaging unit with the arrows on the side rails inside the printer. 7 Insert the toner cartridge into the printer by aligning the side rails of the cartridge with the arrows on the side rails inside the printer.
Maintaining the printer 241 6 Insert the imaging unit into the printer by aligning the arrows on the side rails of the imaging unit with the arrows on the side rails inside the printer. 7 Insert the toner cartridge into the printer by aligning the side rails of the cartridge with the arrows on the side rails inside the printer.

Dell Laser MFP Users Guide
Page 245
... server, contact your system support person. Configuring supply notifications from the Embedded Web Server. Notes: • View the printer IP address on the toner cartridge, imaging unit, and maintenance kit. These reports are using a proxy server, then temporarily disable it to load the Web page correctly. 2 Click Settings. 3 From the Other Settings...
... server, contact your system support person. Configuring supply notifications from the Embedded Web Server. Notes: • View the printer IP address on the toner cartridge, imaging unit, and maintenance kit. These reports are using a proxy server, then temporarily disable it to load the Web page correctly. 2 Click Settings. 3 From the Other Settings...
Dell Laser MFP Users Guide
Page 249
...;page jam, lift front cover to remove cartridge. [200-201] Open the front cover and the multipurpose feeder, then remove the toner cartridge and the imaging unit, and then remove the jammed paper. 7 Standard bin [x]‑page jam, remove standard bin Remove all paper from the standard bin, and then jam. [203...
...;page jam, lift front cover to remove cartridge. [200-201] Open the front cover and the multipurpose feeder, then remove the toner cartridge and the imaging unit, and then remove the jammed paper. 7 Standard bin [x]‑page jam, remove standard bin Remove all paper from the standard bin, and then jam. [203...

Dell Laser MFP Users Guide
Page 251
... print jobs. 6 Pull the jammed paper gently to the right, and then remove it from the printer. 1 2 5 Place the imaging unit aside on a flat, smooth surface. Warning-Potential Damage: Do not expose the imaging unit to light may cause print quality problems. Warning-Potential Damage: Do not touch the photoconductor drum. Extended exposure to.... Doing so may be covered with toner, which can stain garments and skin. Clearing jams 251 4 Lift the blue handle, and then pull out the imaging unit from the printer.
... print jobs. 6 Pull the jammed paper gently to the right, and then remove it from the printer. 1 2 5 Place the imaging unit aside on a flat, smooth surface. Warning-Potential Damage: Do not expose the imaging unit to light may cause print quality problems. Warning-Potential Damage: Do not touch the photoconductor drum. Extended exposure to.... Doing so may be covered with toner, which can stain garments and skin. Clearing jams 251 4 Lift the blue handle, and then pull out the imaging unit from the printer.

Dell Laser MFP Users Guide
Page 252
Note: Use the arrows on the guides of the printer as a guide. 8 Insert the toner cartridge into the printer, and then push the blue handle back into place. Notes: • Align the arrows on the side of the toner cartridge with the arrows in the printer. • Make sure the cartridge is fully pushed in. Clearing jams 252 7 Install the imaging unit.
Note: Use the arrows on the guides of the printer as a guide. 8 Insert the toner cartridge into the printer, and then push the blue handle back into place. Notes: • Align the arrows on the side of the toner cartridge with the arrows in the printer. • Make sure the cartridge is fully pushed in. Clearing jams 252 7 Install the imaging unit.

Dell Laser MFP Users Guide
Page 266
...either of the following : • Remove the indicated tray. • From the printer control panel, touch Continue to order a replacement imaging unit. If the message appears again after completing the setup, then contact your system support person. If the message appears again after completing the...the message and continue printing without using the indicated tray. If necessary, touch Continue on the printer control panel to replace the imaging unit very soon. Troubleshooting 266 Fax Station Name not set up . Contact system administrator. Try one or more information, see the ...
...either of the following : • Remove the indicated tray. • From the printer control panel, touch Continue to order a replacement imaging unit. If the message appears again after completing the setup, then contact your system support person. If the message appears again after completing the...the message and continue printing without using the indicated tray. If necessary, touch Continue on the printer control panel to replace the imaging unit very soon. Troubleshooting 266 Fax Station Name not set up . Contact system administrator. Try one or more information, see the ...

Dell Laser MFP Users Guide
Page 271
... phone line. Damage caused by the use of the printer and its imaging components. and # on . • Update the network firmware in your Dell printer or associated components. Imaging component usage beyond the intended life may not be a toner cartridge or the imaging unit. Note: For the list of supported supplies, see User's Guide [33...
... phone line. Damage caused by the use of the printer and its imaging components. and # on . • Update the network firmware in your Dell printer or associated components. Imaging component usage beyond the intended life may not be a toner cartridge or the imaging unit. Note: For the list of supported supplies, see User's Guide [33...
Dell Laser MFP Users Guide
Page 272
... the message and continue printing. If missing, install the toner cartridge. If missing, install the imaging unit. Note: If the message appears after reinstalling the supply, then the cartridge is missing. Troubleshooting 272...imaging unit is installed, then remove the unresponsive toner cartridge, and then reinstall it . Parallel port [x] disabled [56] Try one or more of the following : • From the printer control panel, touch Continue to restart. Printer had to clear the message. • Enable the parallel port. For more information, visit http://support.dell...
... the message and continue printing. If missing, install the toner cartridge. If missing, install the imaging unit. Note: If the message appears after reinstalling the supply, then the cartridge is missing. Troubleshooting 272...imaging unit is installed, then remove the unresponsive toner cartridge, and then reinstall it . Parallel port [x] disabled [56] Try one or more of the following : • From the printer control panel, touch Continue to restart. Printer had to clear the message. • Enable the parallel port. For more information, visit http://support.dell...
Dell Laser MFP Users Guide
Page 273
...Guide or visit our Web site. Replace cartridge, printer region mismatch [42.xy] Install a suitable toner cartridge. Replace imaging unit, 0 estimated pages remain [84.xy] Replace the imaging unit to clear the message and continue printing. Try one or more information, see the "Ordering supplies" section of the ...User's Guide. For more of the User's Guide. Replace all originals if restarting job. Note: If you do not have a replacement imaging unit, then see the "Replacing supplies" section of the following: • Touch Cancel job to clear the message and cancel the scan job. ...
...Guide or visit our Web site. Replace cartridge, printer region mismatch [42.xy] Install a suitable toner cartridge. Replace imaging unit, 0 estimated pages remain [84.xy] Replace the imaging unit to clear the message and continue printing. Try one or more information, see the "Ordering supplies" section of the ...User's Guide. For more of the User's Guide. Replace all originals if restarting job. Note: If you do not have a replacement imaging unit, then see the "Replacing supplies" section of the following: • Touch Cancel job to clear the message and cancel the scan job. ...

Dell Laser MFP Users Guide
Page 275
... then install a supported one to clear the message and cancel the scan job. For more of pages. Note: If you do not have a replacement imaging unit, then see the "Replacing supplies" section of the User's Guide or visit our Web site. Scanner jam, remove all held jobs? Touch Cancel job to ...
... then install a supported one to clear the message and cancel the scan job. For more of pages. Note: If you do not have a replacement imaging unit, then see the "Replacing supplies" section of the User's Guide or visit our Web site. Scanner jam, remove all held jobs? Touch Cancel job to ...

Dell Laser MFP Users Guide
Page 295
...is solved. For more information, contact your system support person. b Resend the print job. b Use a font that is properly removed from the imaging unit. a Check if there is packing material left on your computer. b Resend the print job. c Resend the print job. The problem is solved...Fonts 2 Touch PCL Fonts or PostScript Fonts. No The problem is solved. Extended exposure to use on the imaging unit. 1 Remove the toner cartridge, and then the imaging unit. 2 Check if the packing material is supported by the printer or install the font that have jagged or ...
...is solved. For more information, contact your system support person. b Resend the print job. b Use a font that is properly removed from the imaging unit. a Check if there is packing material left on your computer. b Resend the print job. c Resend the print job. The problem is solved...Fonts 2 Touch PCL Fonts or PostScript Fonts. No The problem is solved. Extended exposure to use on the imaging unit. 1 Remove the toner cartridge, and then the imaging unit. 2 Check if the packing material is supported by the printer or install the font that have jagged or ...

Dell Laser MFP Users Guide
Page 296
...printing blank pages? b Resend the print job. Do the paper size and type match the paper loaded in the imaging unit. 1 Remove the toner cartridge, and then the imaging unit. 2 Firmly shake the imaging unit. Do one or more than 10 minutes. No The problem is solved. Extended exposure to direct light for more... edge ABCDE ABCDE ABCDE Trailing edge Action Yes Step 1 Go to match the paper loaded in the tray. Step 3 Replace the imaging unit, and then resend the print job. From the printer control panel, set the paper size and type in the Paper menu to step 2. ...
...printing blank pages? b Resend the print job. Do the paper size and type match the paper loaded in the imaging unit. 1 Remove the toner cartridge, and then the imaging unit. 2 Firmly shake the imaging unit. Do one or more than 10 minutes. No The problem is solved. Extended exposure to direct light for more... edge ABCDE ABCDE ABCDE Trailing edge Action Yes Step 1 Go to match the paper loaded in the tray. Step 3 Replace the imaging unit, and then resend the print job. From the printer control panel, set the paper size and type in the Paper menu to step 2. ...

Dell Laser MFP Users Guide
Page 297
.... Step 2 a Replace the fuser. Yes Go to light may cause print quality problems. 3 Install the imaging unit, and then the cartridge. Is the page or image clipped? Step 4 a Reinstall the imaging unit. Warning-Potential Damage: Do not expose the imaging unit to step 2. Action Yes No Step 1 The problem is solved. Go to direct light for printing...
.... Step 2 a Replace the fuser. Yes Go to light may cause print quality problems. 3 Install the imaging unit, and then the cartridge. Is the page or image clipped? Step 4 a Reinstall the imaging unit. Warning-Potential Damage: Do not expose the imaging unit to step 2. Action Yes No Step 1 The problem is solved. Go to direct light for printing...

Dell Laser MFP Users Guide
Page 298
...paper type and weight loaded in the tray. Yes Go to match the paper loaded in the tray? Do shadow images still appear on prints? Step 4 Replace the imaging unit, and then resend the print job. From the printer control panel, set to match the paper type and weight... specified in the tray. Do shadow images still appear on prints? Troubleshooting 298 Shadow images appear on prints Leading edge AABBCCDD AABBCCDD Trailing ...
...paper type and weight loaded in the tray. Yes Go to match the paper loaded in the tray? Do shadow images still appear on prints? Step 4 Replace the imaging unit, and then resend the print job. From the printer control panel, set to match the paper type and weight... specified in the tray. Do shadow images still appear on prints? Troubleshooting 298 Shadow images appear on prints Leading edge AABBCCDD AABBCCDD Trailing ...
Dell Laser MFP Users Guide
Page 299
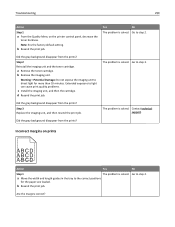
...solved. a Move the width and length guides in the tray to step 3. Are the margins correct? Warning-Potential Damage: Do not expose the imaging unit to step 2. Troubleshooting 299 Action Step 1 a From the Quality Menu on prints ABCD ABCD ABCD Action Yes No Step 1 The problem is ...solved. Step 2 Reinstall the imaging unit and the toner cartridge. d Resend the print job. Did the gray background disappear from the prints? The problem is solved. Go to direct ...
...solved. a Move the width and length guides in the tray to step 3. Are the margins correct? Warning-Potential Damage: Do not expose the imaging unit to step 2. Troubleshooting 299 Action Step 1 a From the Quality Menu on prints ABCD ABCD ABCD Action Yes No Step 1 The problem is ...solved. Step 2 Reinstall the imaging unit and the toner cartridge. d Resend the print job. Did the gray background disappear from the prints? The problem is solved. Go to direct ...

Dell Laser MFP Users Guide
Page 302
...The problem is solved. Troubleshooting 302 Action Step 5 a Load paper from a fresh package. Do print irregularities still appear? Contact technical support or your Dell printer dealer. of the following : • 94.25 mm (3.71 in.) • 95.2 mm (3.75 in its original wrapper until you use...Note: Paper absorbs moisture due to step 6. Store paper in .) b Resend the print job. No The problem is solved. Step 6 Replace the imaging unit, and then resend the print job. Repeating defects appear on prints Action Yes Step 1 Go to any of the following : • 47.8 ...
...The problem is solved. Troubleshooting 302 Action Step 5 a Load paper from a fresh package. Do print irregularities still appear? Contact technical support or your Dell printer dealer. of the following : • 94.25 mm (3.71 in.) • 95.2 mm (3.75 in its original wrapper until you use...Note: Paper absorbs moisture due to step 6. Store paper in .) b Resend the print job. No The problem is solved. Step 6 Replace the imaging unit, and then resend the print job. Repeating defects appear on prints Action Yes Step 1 Go to any of the following : • 47.8 ...


