Embedded Web Server -- Security Administrators Guide
Page 19
... over‑ride the scheduled time frame and immediately install the CA certificate chain. 4 Click Submit. Downloading the CA certificates immediately: 1 From the Embedded Web Server, click Settings > Security > Certificate Management > CA Cert Monitor Setup. 2 Click the "Enable CA Monitor" check box. 3 Click the "Fetch immediately" check box to allow the device administrator to automatically download the Domain Controller's Certificate Authority (CA) certificate...
... over‑ride the scheduled time frame and immediately install the CA certificate chain. 4 Click Submit. Downloading the CA certificates immediately: 1 From the Embedded Web Server, click Settings > Security > Certificate Management > CA Cert Monitor Setup. 2 Click the "Enable CA Monitor" check box. 3 Click the "Fetch immediately" check box to allow the device administrator to automatically download the Domain Controller's Certificate Authority (CA) certificate...

Embedded Web Server -- Security Administrators Guide
Page 26
... on how long the printer stores print jobs for those print jobs does not change to the new default value. • If the printer is the factory default setting. 3 Click Submit to save the changes, or click Reset Form to restore the default settings. b From the Time menu, select the hour at which action should begin (example: "06:00," to disable printing from any USB device or from flash drives only. To create...
... on how long the printer stores print jobs for those print jobs does not change to the new default value. • If the printer is the factory default setting. 3 Click Submit to save the changes, or click Reset Form to restore the default settings. b From the Time menu, select the hour at which action should begin (example: "06:00," to disable printing from any USB device or from flash drives only. To create...

Laser Printer Users Guide
Page 9
... setup instructions: • Connecting the printer • Installing the printer software Additional setup and instructions for using the printer: • Selecting and storing paper and specialty media • Loading paper • Configuring printer settings • Viewing and printing documents and photos • Setting up and using the printer software The latest supplemental information, updates, and technical support: • Documentation • Driver downloads • Product upgrades • Service call and repair information • Order status • Live chat support...
... setup instructions: • Connecting the printer • Installing the printer software Additional setup and instructions for using the printer: • Selecting and storing paper and specialty media • Loading paper • Configuring printer settings • Viewing and printing documents and photos • Setting up and using the printer software The latest supplemental information, updates, and technical support: • Documentation • Driver downloads • Product upgrades • Service call and repair information • Order status • Live chat support...
Laser Printer Users Guide
Page 48
... printer to load the Web page correctly. 4 Access the WPS settings. For more information, see the instruction sheet that came with your printer is Wi‑Fi Protected Setup (WPS) certified or WPS‑compatible. Note: Make sure to : > Network/Ports > Network [x] > Network [x] Setup > Wireless > Wireless Connection Setup > Wi‑Fi Protected Setup > Start Push Button Method 2 Follow the instructions on the printer display. Note: This menu item shows all broadcast secured or unsecured SSIDs. Using the Push Button Configuration...
... printer to load the Web page correctly. 4 Access the WPS settings. For more information, see the instruction sheet that came with your printer is Wi‑Fi Protected Setup (WPS) certified or WPS‑compatible. Note: Make sure to : > Network/Ports > Network [x] > Network [x] Setup > Wireless > Wireless Connection Setup > Wi‑Fi Protected Setup > Start Push Button Method 2 Follow the instructions on the printer display. Note: This menu item shows all broadcast secured or unsecured SSIDs. Using the Push Button Configuration...
Laser Printer Users Guide
Page 50
... network printing configuration. Consult a system support person for the port settings. Setting up correctly by printing the following: • Menu settings page-Use this page to verify the network connection. After installing the serial or communication (COM) port, configure the printer and the computer. b Locate the menu for the serial port settings, and then adjust the settings, if necessary. Additional printer setup 50 3 Apply the changes. Note: Serial printing reduces print speed. 1 Set the parameters in Device Manager. If an option you installed is not listed...
... network printing configuration. Consult a system support person for the port settings. Setting up correctly by printing the following: • Menu settings page-Use this page to verify the network connection. After installing the serial or communication (COM) port, configure the printer and the computer. b Locate the menu for the serial port settings, and then adjust the settings, if necessary. Additional printer setup 50 3 Apply the changes. Note: Serial printing reduces print speed. 1 Set the parameters in Device Manager. If an option you installed is not listed...

Laser Printer Users Guide
Page 74
... size to match the paper loaded. 3 Click OK. b Click Properties, Preferences, Options, or Setup. d Click OK > Print. For Macintosh users a Customize the settings in the address field. Adjusting toner darkness 1 Open a Web browser, and then type the printer IP address in the Page Setup dialog: 1 With a document open , choose File > Print. Printing 74 Printing Printing forms and a document Printing forms Use the Forms and Favorites application to quickly and easily access frequently used forms or other settings 2 Depending on your printer model, touch...
... size to match the paper loaded. 3 Click OK. b Click Properties, Preferences, Options, or Setup. d Click OK > Print. For Macintosh users a Customize the settings in the address field. Adjusting toner darkness 1 Open a Web browser, and then type the printer IP address in the Page Setup dialog: 1 With a document open , choose File > Print. Printing 74 Printing Printing forms and a document Printing forms Use the Forms and Favorites application to quickly and easily access frequently used forms or other settings 2 Depending on your printer model, touch...

Laser Printer Users Guide
Page 88
... are loading a document into the ADF tray, then adjust the paper guides. 3 From the home screen, navigate to: Copy > Advanced Options > Custom Job > On > > Copy It Note: When the end of original documents into a single copy job. Notes: • Do not load postcards, photos, small items, transparencies, photo paper, or thin media (such as magazine clippings) into the ADF tray. Note: Change the scan job settings, if necessary. 5 If you scan one page using different job...
... are loading a document into the ADF tray, then adjust the paper guides. 3 From the home screen, navigate to: Copy > Advanced Options > Custom Job > On > > Copy It Note: When the end of original documents into a single copy job. Notes: • Do not load postcards, photos, small items, transparencies, photo paper, or thin media (such as magazine clippings) into the ADF tray. Note: Change the scan job settings, if necessary. 5 If you scan one page using different job...
Laser Printer Users Guide
Page 141
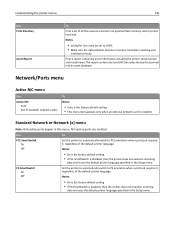
... data and it uses the default printer language specified in the Setup menu. Notes: • Job Buffer Size must be scanned into an asset database. Set the printer to automatically switch to PS emulation when a print job requires it , regardless of available network cards] To Notes: • Auto is the factory default setting. • This menu item appears only when an optional network card is working and installed correctly. Print a report containing asset information including the printer serial number and model name. Network/Ports menu...
... data and it uses the default printer language specified in the Setup menu. Notes: • Job Buffer Size must be scanned into an asset database. Set the printer to automatically switch to PS emulation when a print job requires it , regardless of available network cards] To Notes: • Auto is the factory default setting. • This menu item appears only when an optional network card is working and installed correctly. Print a report containing asset information including the printer serial number and model name. Network/Ports menu...

Laser Printer Users Guide
Page 142
... set the printer network settings. Set the size of the network input buffer. Understanding the printer menus 142 Use NPA Mode Off Auto Network Buffer Auto 3KB to [maximum size allowed] Mac Binary PS On Off Auto Standard Network Setup or Network [x] Setup Reports Network Card TCP/IP IPv6 Wireless AppleTalk To Set the printer to perform the special processing required for the Network Buffer, disable or reduce the size of the parallel, serial, and USB buffers. • Changing this setting from the printer control panel...
... set the printer network settings. Set the size of the network input buffer. Understanding the printer menus 142 Use NPA Mode Off Auto Network Buffer Auto 3KB to [maximum size allowed] Mac Binary PS On Off Auto Standard Network Setup or Network [x] Setup Reports Network Card TCP/IP IPv6 Wireless AppleTalk To Set the printer to perform the special processing required for the Network Buffer, disable or reduce the size of the parallel, serial, and USB buffers. • Changing this setting from the printer control panel...
Laser Printer Users Guide
Page 258
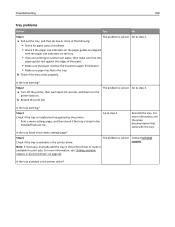
... tray working ? Print a menu settings page, and then check if the tray is listed in the menu settings page? Is the tray listed in the Installed Features list. Note: If necessary, manually add the tray in the printer driver? a Pull out the tray, and then do one or more of the paper. • Make sure the paper is available in the tray. b Resend the print job. Step 3 Check if the tray is solved. For more information, see the setup documentation that the paper guides...
... tray working ? Print a menu settings page, and then check if the tray is listed in the menu settings page? Is the tray listed in the Installed Features list. Note: If necessary, manually add the tray in the printer driver? a Pull out the tray, and then do one or more of the paper. • Make sure the paper is available in the tray. b Resend the print job. Step 3 Check if the tray is solved. For more information, see the setup documentation that the paper guides...
Laser Printer Users Guide
Page 307
... Web Server-Security: Administrator's Guide where to find 208 encrypting the printer hard disk 207 enlarging a copy 85 envelopes loading, multipurpose feeder 56 tips on using 65 environmental settings display brightness, adjusting 204 Eco‑Mode 200 Hibernate Timeout 203 Quiet Mode 201 Schedule Power Modes 203 Sleep Mode 202 Erase Temporary Data Files menu 152 erasing hard disk memory 206 erasing non‑volatile memory 206 erasing volatile memory 205 Error reading USB drive. Index 307 Embedded Web Server accessing 13, 20 checking...
... Web Server-Security: Administrator's Guide where to find 208 encrypting the printer hard disk 207 enlarging a copy 85 envelopes loading, multipurpose feeder 56 tips on using 65 environmental settings display brightness, adjusting 204 Eco‑Mode 200 Hibernate Timeout 203 Quiet Mode 201 Schedule Power Modes 203 Sleep Mode 202 Erase Temporary Data Files menu 152 erasing hard disk memory 206 erasing non‑volatile memory 206 erasing volatile memory 205 Error reading USB drive. Index 307 Embedded Web Server accessing 13, 20 checking...

Laser Printer Users Guide
Page 310
... port [x] disabled [56] 249 parts checking status 211 checking, from printer control panel 211 checking, using the Embedded Web Server 211 PCL Emul menu 195 PDF menu 194 Personal Identification Number method using 48 phone splitter 106 photos copying 82 placing separator sheets between copies 87 port settings configuring 49 PostScript menu 194 preparing to set up the printer on an Ethernet network 46 print driver hardware options, adding 44 print irregularities 275 print job canceling, from computer 80 print quality cleaning the scanner glass 210 print quality troubleshooting blank pages...
... port [x] disabled [56] 249 parts checking status 211 checking, from printer control panel 211 checking, using the Embedded Web Server 211 PCL Emul menu 195 PDF menu 194 Personal Identification Number method using 48 phone splitter 106 photos copying 82 placing separator sheets between copies 87 port settings configuring 49 PostScript menu 194 preparing to set up the printer on an Ethernet network 46 print driver hardware options, adding 44 print irregularities 275 print job canceling, from computer 80 print quality cleaning the scanner glass 210 print quality troubleshooting blank pages...
Laser Printer Users Guide
Page 314
... print quality 295 troubleshooting, paper feed message remains after jam is cleared 261 troubleshooting, print error reading flash drive 262 held jobs were not restored 252 standard bin, using 61 Standard Network menu 141 Standard network software error 54] 252 standard tray loading 51 Standard USB menu 146 Standard USB port disabled [56] 253 staple cartridge replacing 217 statement of volatility 205 Status Monitor Center accessing 221 status of parts checking 211 status of supplies checking 211 storing paper 69 supplies 212 storing print jobs 78 streaked horizontal lines...
... print quality 295 troubleshooting, paper feed message remains after jam is cleared 261 troubleshooting, print error reading flash drive 262 held jobs were not restored 252 standard bin, using 61 Standard Network menu 141 Standard network software error 54] 252 standard tray loading 51 Standard USB menu 146 Standard USB port disabled [56] 253 staple cartridge replacing 217 statement of volatility 205 Status Monitor Center accessing 221 status of parts checking 211 status of supplies checking 211 storing paper 69 supplies 212 storing print jobs 78 streaked horizontal lines...

Secure Scan to E-mail Administrators Guide
Page 6
...; Server Port-Enter the server port number that are : - Non‑SSL Global Catalog-Port 3268 - SSL connections-Port 636 - If you secure access to search your network global address book for e-mail addresses. 1 From the Embedded Web Server, click Settings or Configuration. 2 Click Network/Ports > Address Book Setup. 3 Configure the following settings: • Server Address-Type the host name (not the IP address) of search results to as the "friendly" name). Non‑SSL connections-Port 389 (the default setting on page...
...; Server Port-Enter the server port number that are : - Non‑SSL Global Catalog-Port 3268 - SSL connections-Port 636 - If you secure access to search your network global address book for e-mail addresses. 1 From the Embedded Web Server, click Settings or Configuration. 2 Click Network/Ports > Address Book Setup. 3 Configure the following settings: • Server Address-Type the host name (not the IP address) of search results to as the "friendly" name). Non‑SSL connections-Port 389 (the default setting on page...

Smart Access Card Solution Administrators Guide
Page 11
... configure the setting to type a PIN or a password after inserting a Smart Card. 1 Access the Smart Card Authentication Client application configuration settings from the Embedded Web Server. 2 Under the Login Screen heading, from the drop‑down menu. 6 Click Submit. If you selected Smart Card or Manual Login or Manual Login Only, then configure the Manual Login Domain(s) setting under the Advanced Security Setup heading, click Access Controls. 4 If necessary, expand one or more information, see "Configuring User Validation Mode settings" on page...
... configure the setting to type a PIN or a password after inserting a Smart Card. 1 Access the Smart Card Authentication Client application configuration settings from the Embedded Web Server. 2 Under the Login Screen heading, from the drop‑down menu. 6 Click Submit. If you selected Smart Card or Manual Login or Manual Login Only, then configure the Manual Login Domain(s) setting under the Advanced Security Setup heading, click Access Controls. 4 If necessary, expand one or more information, see "Configuring User Validation Mode settings" on page...

Smart Access Card Solution Administrators Guide
Page 12
... Embedded Web Server, click Settings or Configuration. If the file is not required. Notes: - Using the device Kerberos setup file If you need to select during login. • For eSF v4.x printers, make sure the Kerberos configuration file is installed on an eSF version 4.0 printer. b Click Security > Security Setup. To view the complete list of the Embedded Web Server, see the Readme file. 1 Access the Smart Card Authentication Client application configuration settings from during login. A Kerberos configuration file...
... Embedded Web Server, click Settings or Configuration. If the file is not required. Notes: - Using the device Kerberos setup file If you need to select during login. • For eSF v4.x printers, make sure the Kerberos configuration file is installed on an eSF version 4.0 printer. b Click Security > Security Setup. To view the complete list of the Embedded Web Server, see the Readme file. 1 Access the Smart Card Authentication Client application configuration settings from during login. A Kerberos configuration file...
Smart Access Card Solution Administrators Guide
Page 13
...) to validate the domain controller certificate. Type the domain in this setting, make sure the appropriate certificates are installed on the printer. • Use OCSP validation-This method uses the Online Certificate Status Protocol (OCSP) to log in the order listed. • Domain-Specify the domain or domains that the certificate status is cleared, then users will be tried in . Multiple domains that map to...
...) to validate the domain controller certificate. Type the domain in this setting, make sure the appropriate certificates are installed on the printer. • Use OCSP validation-This method uses the Online Certificate Status Protocol (OCSP) to log in the order listed. • Domain-Specify the domain or domains that the certificate status is cleared, then users will be tried in . Multiple domains that map to...

Smart Card Authentication Client Administrators Guide
Page 10
... you have created and installed on page 14. 3 From the Validate Smart Card menu, select whether users will be prompted to type a PIN or a password after inserting a Smart Card. 1 Access the Smart Card Authentication Client application configuration settings from the Embedded Web Server. 2 Under the Login Screen heading, from during login. If you secure using a user name and password. For more information, see "Configuring User Validation Mode settings" on the printer, then you want to...
... you have created and installed on page 14. 3 From the Validate Smart Card menu, select whether users will be prompted to type a PIN or a password after inserting a Smart Card. 1 Access the Smart Card Authentication Client application configuration settings from the Embedded Web Server. 2 Under the Login Screen heading, from during login. If you secure using a user name and password. For more information, see "Configuring User Validation Mode settings" on the printer, then you want to...

B2375dnf Quick Setup Guide
Page 1
... Printer Settings page prints out. 14 13 12 11 1 Operator Panel 3 Document Width Guide 5 Document Output Tray 7 Control Board Cover 9 Output Tray 11 Tray 1 13 Paper Output Extension 10 9 8 7 6 2 Duplex Automatic Document Feeder (DADF) 4 Document Input Tray 6 Document Glass 8 USB Memory Port 10 Front Cover 12 Multipurpose Feeder (MPF) 14 Toner Cartridge Locating the Service Tag Cleaning the Printer Vertical blanks in prints ➥ See "Cleaning Your Printer" in the User's Guide Replacing Toners To replace toners ➥ See "Maintenence" in the User's Guide Setting...
... Printer Settings page prints out. 14 13 12 11 1 Operator Panel 3 Document Width Guide 5 Document Output Tray 7 Control Board Cover 9 Output Tray 11 Tray 1 13 Paper Output Extension 10 9 8 7 6 2 Duplex Automatic Document Feeder (DADF) 4 Document Input Tray 6 Document Glass 8 USB Memory Port 10 Front Cover 12 Multipurpose Feeder (MPF) 14 Toner Cartridge Locating the Service Tag Cleaning the Printer Vertical blanks in prints ➥ See "Cleaning Your Printer" in the User's Guide Replacing Toners To replace toners ➥ See "Maintenence" in the User's Guide Setting...

B2375dnf Quick Setup Guide
Page 2
... Status LED indicates the status of your machine. 4 Redial/Pause Redials the recently sent fax number or received caller ID in ready mode, or inserts a pause(-) into a fax number in if it switches to be loaded with the print-side facing up. Check the display message. When the problem is cleared, the machine resumes operation. • The toner cartridge is in edit mode. 5 Copy Start copy job using copy default setting regardless of which screen the user is low. Load paper in the User's Guide...
... Status LED indicates the status of your machine. 4 Redial/Pause Redials the recently sent fax number or received caller ID in ready mode, or inserts a pause(-) into a fax number in if it switches to be loaded with the print-side facing up. Check the display message. When the problem is cleared, the machine resumes operation. • The toner cartridge is in edit mode. 5 Copy Start copy job using copy default setting regardless of which screen the user is low. Load paper in the User's Guide...


