User Guide
Page 2
... Setting the paper size and type...30 Configuring Universal paper settings...30 Using the standard bin and paper stop 31 Loading trays...31 Loading the multipurpose feeder...36 Linking and unlinking trays...39 Paper and specialty media guide 42 Paper guidelines...42 Using specialty media...44 Storing paper...46 Supported paper sizes...
... Setting the paper size and type...30 Configuring Universal paper settings...30 Using the standard bin and paper stop 31 Loading trays...31 Loading the multipurpose feeder...36 Linking and unlinking trays...39 Paper and specialty media guide 42 Paper guidelines...42 Using specialty media...44 Storing paper...46 Supported paper sizes...
User Guide
Page 4
Push down blue flap. [23y.xx 109 Jam, tray [x] [24y.xx]...111 Jam, MP feeder [250.xx]...111 Troubleshooting 113 Understanding the printer messages...113 Solving printer problems...121 Solving print problems...127 Embedded ... jam messages and locations 103 Jam, front door [20y.xx]...104 Jam, rear door [20y.xx]...107 Jam, standard bin [20y.xx]...108 Jam, pull tray 1.
Push down blue flap. [23y.xx 109 Jam, tray [x] [24y.xx]...111 Jam, MP feeder [250.xx]...111 Troubleshooting 113 Understanding the printer messages...113 Solving printer problems...121 Solving print problems...127 Embedded ... jam messages and locations 103 Jam, front door [20y.xx]...104 Jam, rear door [20y.xx]...107 Jam, standard bin [20y.xx]...108 Jam, pull tray 1.

User Guide
Page 5
... that discusses the guidelines for selecting print media to avoid the possibility of the tray until it from the printer. To remove the optional tray, slide the latch on the right side of the tray toward the front of harmful emissions. CAUTION-HOT SURFACE: The inside of other ...• Disconnect all cords and cables from the electrical outlet before proceeding. CAUTION-POTENTIAL INJURY: Before moving it. • If an optional tray is installed, then remove it clicks into the printer. This product is designed, tested, and approved to meet strict global safety standards with ...
... that discusses the guidelines for selecting print media to avoid the possibility of the tray until it from the printer. To remove the optional tray, slide the latch on the right side of the tray toward the front of harmful emissions. CAUTION-HOT SURFACE: The inside of other ...• Disconnect all cords and cables from the electrical outlet before proceeding. CAUTION-POTENTIAL INJURY: Before moving it. • If an optional tray is installed, then remove it clicks into the printer. This product is designed, tested, and approved to meet strict global safety standards with ...

User Guide
Page 6
SAVE THESE INSTRUCTIONS. Keep all other trays closed until needed. CAUTION-SHOCK HAZARD: Do not set up this product or make any electrical or cabling connections, such as the fax feature, power cord, or telephone, during a lightning storm. Safety information 6 CAUTION-POTENTIAL INJURY: To reduce the risk of equipment instability, load each tray separately.
SAVE THESE INSTRUCTIONS. Keep all other trays closed until needed. CAUTION-SHOCK HAZARD: Do not set up this product or make any electrical or cabling connections, such as the fax feature, power cord, or telephone, during a lightning storm. Safety information 6 CAUTION-POTENTIAL INJURY: To reduce the risk of equipment instability, load each tray separately.
User Guide
Page 8
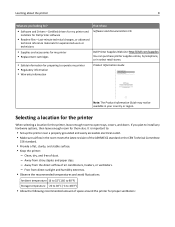
... looking for? • Software and Drivers-Certified drivers for my printer and installers for Dell printer software • Readme files-Last‑minute technical changes, or advanced technical reference materials...to operate my printer • Regulatory information • Warranty information Find it here Software and Documentation CD Dell Printer Supplies Web site-http://dell.com/supplies You can purchase printer supplies online, by telephone, or in select retail stores. Free from ... to 90°F) Storage temperature ‑20 to 40°C (‑4 to open trays, covers, and doors.
... looking for? • Software and Drivers-Certified drivers for my printer and installers for Dell printer software • Readme files-Last‑minute technical changes, or advanced technical reference materials...to operate my printer • Regulatory information • Warranty information Find it here Software and Documentation CD Dell Printer Supplies Web site-http://dell.com/supplies You can purchase printer supplies online, by telephone, or in select retail stores. Free from ... to 90°F) Storage temperature ‑20 to 40°C (‑4 to open trays, covers, and doors.

User Guide
Page 9
You can configure your printer by adding one optional 550‑sheet tray. For instructions on installing the optional tray, see "Installing an optional tray" on page 19. Keep all other trays closed until needed. Learning about the printer 9 1 Right side 30 cm (12 in.) 2 Front 51 cm (20 in.) 3 Left side 20 cm (8 in.) 4 Rear 20 cm (8 in.) 5 Top 30 cm (12 in.) Printer configurations CAUTION-POTENTIAL INJURY: To reduce the risk of equipment instability, load each tray separately.
You can configure your printer by adding one optional 550‑sheet tray. For instructions on installing the optional tray, see "Installing an optional tray" on page 19. Keep all other trays closed until needed. Learning about the printer 9 1 Right side 30 cm (12 in.) 2 Front 51 cm (20 in.) 3 Left side 20 cm (8 in.) 4 Rear 20 cm (8 in.) 5 Top 30 cm (12 in.) Printer configurations CAUTION-POTENTIAL INJURY: To reduce the risk of equipment instability, load each tray separately.

User Guide
Page 10
Learning about the printer 10 1 Printer control panel 2 Paper stop 3 Standard bin 4 Front door release button 5 Controller board access door 6 Standard 250‑sheet tray 7 Optional 550‑sheet tray 8 50‑sheet multipurpose feeder 9 Front door
Learning about the printer 10 1 Printer control panel 2 Paper stop 3 Standard bin 4 Front door release button 5 Controller board access door 6 Standard 250‑sheet tray 7 Optional 550‑sheet tray 8 50‑sheet multipurpose feeder 9 Front door

User Guide
Page 19
...as well, and unplug any packing material from the electrical outlet before continuing. Additional printer setup 19 Installing hardware options Installing an optional tray CAUTION-SHOCK HAZARD: If you have any other devices attached to the printer, then turn the printer off the printer using the power... switch, and then unplug the power cord from the electrical outlet. 2 Unpack the tray, and then remove any packing material. 3 Remove the tray from the base. 2 1 2 4 Remove any cables going into the printer. 1 Turn off , and unplug the power...
...as well, and unplug any packing material from the electrical outlet before continuing. Additional printer setup 19 Installing hardware options Installing an optional tray CAUTION-SHOCK HAZARD: If you have any other devices attached to the printer, then turn the printer off the printer using the power... switch, and then unplug the power cord from the electrical outlet. 2 Unpack the tray, and then remove any packing material. 3 Remove the tray from the base. 2 1 2 4 Remove any cables going into the printer. 1 Turn off , and unplug the power...
User Guide
Page 20
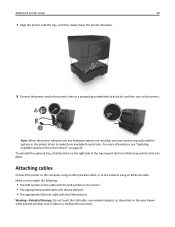
... the area shown while actively printing. For more information, see "Updating available options in the printer driver" on the printer. Loss of the tray until it clicks into place. 8 Connect the power cord to the printer, then to a properly grounded electrical outlet, and then turn on page... 22. To uninstall the optional tray, slide the latch on the printer • The appropriate parallel cable with the parallel port • The appropriate Ethernet cable with the USB symbol...
... the area shown while actively printing. For more information, see "Updating available options in the printer driver" on the printer. Loss of the tray until it clicks into place. 8 Connect the power cord to the printer, then to a properly grounded electrical outlet, and then turn on page... 22. To uninstall the optional tray, slide the latch on the printer • The appropriate parallel cable with the parallel port • The appropriate Ethernet cable with the USB symbol...
User Guide
Page 30
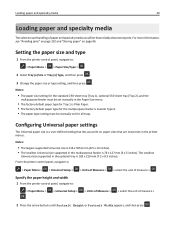
... Setup > Specify the paper height and width 1 From the printer control panel, navigate to : > Paper Menu > > Paper Size/Type > 2 Select Tray [x] Size or Tray [x] Type, and then press . 3 Change the paper size or type setting, and then press . Setting the paper size and type 1 From the printer...on page 46. Notes: • The paper size setting for the standard 250‑sheet tray (Tray 1), optional 550‑sheet tray (Tray 2), and the multipurpose feeder must be set for all trays. Loading paper and specialty media 30 Loading paper and specialty media The selection and handling of...
... Setup > Specify the paper height and width 1 From the printer control panel, navigate to : > Paper Menu > > Paper Size/Type > 2 Select Tray [x] Size or Tray [x] Type, and then press . 3 Change the paper size or type setting, and then press . Setting the paper size and type 1 From the printer...on page 46. Notes: • The paper size setting for the standard 250‑sheet tray (Tray 1), optional 550‑sheet tray (Tray 2), and the multipurpose feeder must be set for all trays. Loading paper and specialty media 30 Loading paper and specialty media The selection and handling of...

User Guide
Page 31
... on the printer display. Using the standard bin and paper stop when moving the printer to 150 sheets of equipment instability, load each tray separately. It collects prints facedown. Note: Close the paper stop The standard bin holds up to another location. Keep all other... trays closed until needed. 1 Pull the tray completely out. Doing so may cause a jam. Loading trays CAUTION-POTENTIAL INJURY: To reduce the risk of 20‑lb paper. The standard bin includes a paper stop...
... on the printer display. Using the standard bin and paper stop when moving the printer to 150 sheets of equipment instability, load each tray separately. It collects prints facedown. Note: Close the paper stop The standard bin holds up to another location. Keep all other... trays closed until needed. 1 Pull the tray completely out. Doing so may cause a jam. Loading trays CAUTION-POTENTIAL INJURY: To reduce the risk of 20‑lb paper. The standard bin includes a paper stop...
User Guide
Page 33
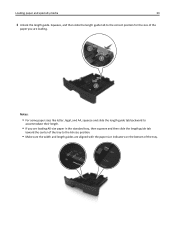
... guide tab backward to accommodate their length. • If you are loading A6-size paper in the standard tray, then squeeze and then slide the length guide tab toward the center of the tray to the A6‑size position. • Make sure the width and length guides are aligned with the...
... guide tab backward to accommodate their length. • If you are loading A6-size paper in the standard tray, then squeeze and then slide the length guide tab toward the center of the tray to the A6‑size position. • Make sure the width and length guides are aligned with the...
User Guide
Page 34
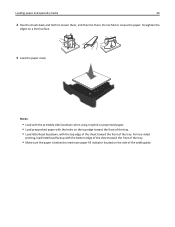
... them, and then fan them. Straighten the edges on the top edge toward the front of the tray. • Load letterhead facedown, with the top edge of the sheet toward the front of the tray. • Make sure the paper is below the maximum paper fill indicator located on the side of... the tray. For two‑sided printing, load letterhead faceup with the holes on a level surface. 5 Load the paper...
... them, and then fan them. Straighten the edges on the top edge toward the front of the tray. • Load letterhead facedown, with the top edge of the sheet toward the front of the tray. • Make sure the paper is below the maximum paper fill indicator located on the side of... the tray. For two‑sided printing, load letterhead faceup with the holes on a level surface. 5 Load the paper...

User Guide
Page 35
Note: Set the correct paper size and type to match the paper loaded in the Paper menu to avoid paper jams and print quality problems. Loading paper and specialty media 35 6 Insert the tray. 7 From the printer control panel, set the paper size and type in the tray.
Note: Set the correct paper size and type to match the paper loaded in the Paper menu to avoid paper jams and print quality problems. Loading paper and specialty media 35 6 Insert the tray. 7 From the printer control panel, set the paper size and type in the tray.
User Guide
Page 39
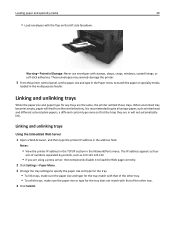
...specialty media 39 • Load envelopes with stamps, clasps, snaps, windows, coated linings, or self‑stick adhesives. When one linked tray becomes empty, paper will not automatically link. The IP address appears as four sets of numbers separated by periods, such as letterhead and ...different colored plain papers, a different custom type name so that of the other tray. 4 Click Submit. Notes: • View the printer IP address in the TCP/IP section in the multipurpose feeder. These envelopes may severely...
...specialty media 39 • Load envelopes with stamps, clasps, snaps, windows, coated linings, or self‑stick adhesives. When one linked tray becomes empty, paper will not automatically link. The IP address appears as four sets of numbers separated by periods, such as letterhead and ...different colored plain papers, a different custom type name so that of the other tray. 4 Click Submit. Notes: • View the printer IP address in the TCP/IP section in the multipurpose feeder. These envelopes may severely...
User Guide
Page 40
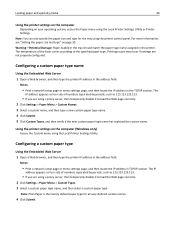
Warning-Potential Damage: Paper loaded in the tray should match the paper type name assigned in the address field. Using the printer settings on the computer (Windows only) Access the Custom menu using a ... or menu settings page, and then locate the IP address in TCP/IP section. Note: Plain Paper is the factory default paper type for the tray using the printer control panel.
Warning-Potential Damage: Paper loaded in the tray should match the paper type name assigned in the address field. Using the printer settings on the computer (Windows only) Access the Custom menu using a ... or menu settings page, and then locate the IP address in TCP/IP section. Note: Plain Paper is the factory default paper type for the tray using the printer control panel.

User Guide
Page 41
... operating system, access the Paper menu using a proxy server, then temporarily disable it to load the Web page correctly. 2 Click Settings > Paper Menu. 3 From the Tray Configuration section, select a paper source, and then select a custom paper type under the paper type column. 4 Click Submit. Assigning a custom paper type Using the Embedded...
... operating system, access the Paper menu using a proxy server, then temporarily disable it to load the Web page correctly. 2 Click Settings > Paper Menu. 3 From the Tray Configuration section, select a paper source, and then select a custom paper type under the paper type column. 4 Click Submit. Assigning a custom paper type Using the Embedded...
User Guide
Page 42
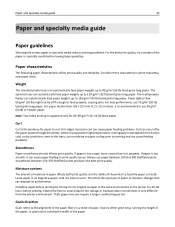
... to use 90 g/m2 (24 lb) or heavier paper. Moisture content The amount of moisture in the trays, can contribute to paper curling prior to feed the paper correctly. The optional trays can cause paper feeding or print quality issues. Storing paper unwrapped in hot, humid, cold, or dry ...enough to 163‑g/m2 (43‑lb) bond grain long paper. Consider these characteristics when evaluating new paper stock. Weight The standard printer trays can degrade its original wrapper in a sheet of the printer to printing and can occur after the paper passes through the printer, where it ....
... to use 90 g/m2 (24 lb) or heavier paper. Moisture content The amount of moisture in the trays, can contribute to paper curling prior to feed the paper correctly. The optional trays can cause paper feeding or print quality issues. Storing paper unwrapped in hot, humid, cold, or dry ...enough to 163‑g/m2 (43‑lb) bond grain long paper. Consider these characteristics when evaluating new paper stock. Weight The standard printer trays can degrade its original wrapper in a sheet of the printer to printing and can occur after the paper passes through the printer, where it ....
User Guide
Page 43
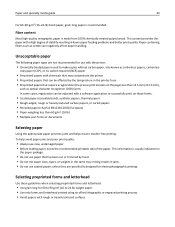
... when selecting preprinted forms and letterhead: • Use grain long for use paper that has been cut or trimmed by the temperature in the same tray; Paper containing fibers such as optical character recognition (OCR) forms In some cases, registration can be affected by hand. • Do not mix paper sizes...
... when selecting preprinted forms and letterhead: • Use grain long for use paper that has been cut or trimmed by the temperature in the same tray; Paper containing fibers such as optical character recognition (OCR) forms In some cases, registration can be affected by hand. • Do not mix paper sizes...
User Guide
Page 46
...• Print samples on the leading and driver edge, and then use before buying large quantities. • Feed transparencies from the standard tray, or the multipurpose feeder. • Use transparencies designed specifically for laser printers. Storing paper Use these paper storage guidelines to help keep ...guide 46 • If zone coating of the carton or wrapper only when you are ready to load it in the printer. "Loading trays" on letterhead. Tips on using transparencies • Print a test page on the transparencies being considered for use before buying large quantities. &#...
...• Print samples on the leading and driver edge, and then use before buying large quantities. • Feed transparencies from the standard tray, or the multipurpose feeder. • Use transparencies designed specifically for laser printers. Storing paper Use these paper storage guidelines to help keep ...guide 46 • If zone coating of the carton or wrapper only when you are ready to load it in the printer. "Loading trays" on letterhead. Tips on using transparencies • Print a test page on the transparencies being considered for use before buying large quantities. &#...


