

Getting Started Guide
Page 1
... smartphone tutorials, setup, and on-line technical support chat for assistance with your service or device. Important Icons Icon Description AGPS is available Missed call Outgoing call Silent mode is enabled Vibrate mode is enabled Battery charge level is 60% Battery is charging Roaming is enabled Network signal strength Icon Description Wi-Fi is in range Wi-Fi signal strength Bluetooth® is enabled SD card is installed Flight mode is enabled USB device is connected New voicemail received EDGE is enabled 3G is enabled Find More...
... smartphone tutorials, setup, and on-line technical support chat for assistance with your service or device. Important Icons Icon Description AGPS is available Missed call Outgoing call Silent mode is enabled Vibrate mode is enabled Battery charge level is 60% Battery is charging Roaming is enabled Network signal strength Icon Description Wi-Fi is in range Wi-Fi signal strength Bluetooth® is enabled SD card is installed Flight mode is enabled USB device is connected New voicemail received EDGE is enabled 3G is enabled Find More...

Getting Started Guide
Page 2
... setting up and using your smartphone. A00 Dell™ Aero Key Functions 1 Power button - Use to charge the phone and connect to zoom-in or zoom-out in trademarks and trade names other AT&T marks contained herein are the property of their products. Press and hold to 4 view the Home screen. Your Dell™ smartphone is subject to change without notice. disclaims any proprietary interest in camera mode...
... setting up and using your smartphone. A00 Dell™ Aero Key Functions 1 Power button - Use to charge the phone and connect to zoom-in or zoom-out in trademarks and trade names other AT&T marks contained herein are the property of their products. Press and hold to 4 view the Home screen. Your Dell™ smartphone is subject to change without notice. disclaims any proprietary interest in camera mode...

Getting Started Guide
Page 3
Table of Contents What's in the Box 4 Set Up Your Smartphone 5 Basic Functions 9 Contacts 13 Ringtones and Sounds 14 Connection Manager 15 Text Messages 16 Camera and Multimedia Messages 17 Web/Internet 18 Email 19 Bluetooth 22 Wi-Fi 23 AT&T Provisioned Services 24 3
Table of Contents What's in the Box 4 Set Up Your Smartphone 5 Basic Functions 9 Contacts 13 Ringtones and Sounds 14 Connection Manager 15 Text Messages 16 Camera and Multimedia Messages 17 Web/Internet 18 Email 19 Bluetooth 22 Wi-Fi 23 AT&T Provisioned Services 24 3
User's Manual
Page 18
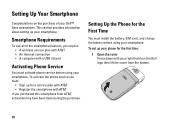
... your right thumb on the purchase of the smartphone features, you must: • Sign up for the First Time You must activate phone service before using your Dell™ Aero smartphone. To activate the phone service you require: • A wireless service plan with AT&T • An Internet connection • A computer with a USB 2.0 port Activating Phone Service You must install the battery, SIM card, and charge the battery before using your smartphone. To set up your smartphone.
... your right thumb on the purchase of the smartphone features, you must: • Sign up for the First Time You must activate phone service before using your Dell™ Aero smartphone. To activate the phone service you require: • A wireless service plan with AT&T • An Internet connection • A computer with a USB 2.0 port Activating Phone Service You must install the battery, SIM card, and charge the battery before using your smartphone. To set up your smartphone.
User's Manual
Page 24
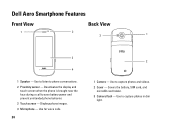
Displays phone images. 3 Microphone - Covers the battery, SIM card, and microSD card holder. 3 Camera flash - Use to listen to capture photos in dim light. Use to phone conversations. 2 Proximity sensor - Deactivates the display and touch screen when the phone is brought near the face during a call to capture photos and videos. 2 Cover - Use to save battery power and prevent unintended phone behavior. 2 Touch screen - Dell Aero Smartphone Features Front View 1 Back View 2 3 1 3 4 1 Speaker - Use for voice calls. 24 2 1 Camera -
Displays phone images. 3 Microphone - Covers the battery, SIM card, and microSD card holder. 3 Camera flash - Use to listen to capture photos in dim light. Use to phone conversations. 2 Proximity sensor - Deactivates the display and touch screen when the phone is brought near the face during a call to capture photos and videos. 2 Cover - Use to save battery power and prevent unintended phone behavior. 2 Touch screen - Dell Aero Smartphone Features Front View 1 Back View 2 3 1 3 4 1 Speaker - Use for voice calls. 24 2 1 Camera -

User's Manual
Page 40
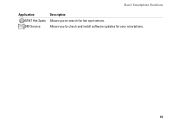
... record voice and store it in the microSD card. Allows you to use and manage the files on your smartphone. Basic Smartphone Functions Application Video Editor File Mgr Backup Calculator Notes Recorder Tasks Mobile Banking Quickoffice YPmobile GPS Description Allows you to add time, date, priority, and status to your tasks. Time management program that allows you to edit video clips. Allows you to backup the data on your phone...
... record voice and store it in the microSD card. Allows you to use and manage the files on your smartphone. Basic Smartphone Functions Application Video Editor File Mgr Backup Calculator Notes Recorder Tasks Mobile Banking Quickoffice YPmobile GPS Description Allows you to add time, date, priority, and status to your tasks. Time management program that allows you to edit video clips. Allows you to backup the data on your phone...
User's Manual
Page 41
Allows you to check and install software updates for hot spot venues. Basic Smartphone Functions Application AT&T Hot Spots DM Service Description Allows you to search for your smartphone. 41
Allows you to check and install software updates for hot spot venues. Basic Smartphone Functions Application AT&T Hot Spots DM Service Description Allows you to search for your smartphone. 41

User's Manual
Page 53
1 2 1 Screen 2 Suggestion area Basic Smartphone Functions Using the Phone Keypad In the Phone Keypad mode, you type with the words in a note or new contact, to touch a key on the box. Continue touching the key to toggle different characters, numbers, or symbols. 4 Tap the desired character, number or symbol to insert it immediately. 5 If Auto completion is on (see page "Default Input Method Setting" on page 63), as you tap the keys, the smartphone...
1 2 1 Screen 2 Suggestion area Basic Smartphone Functions Using the Phone Keypad In the Phone Keypad mode, you type with the words in a note or new contact, to touch a key on the box. Continue touching the key to toggle different characters, numbers, or symbols. 4 Tap the desired character, number or symbol to insert it immediately. 5 If Auto completion is on (see page "Default Input Method Setting" on page 63), as you tap the keys, the smartphone...
User's Manual
Page 57
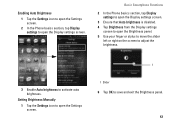
... is disabled. 4 Tap Brightness from the Display settings screen to open the Display settings screen. Enabling Auto Brightness 1 Tap the Settings icon to open the Settings screen. 2 In the Phone basics section, tap Display settings to open the Brightness panel. 5 Use your finger or stylus to move the slider left or right on the screen to adjust the brightness. 1 3 Enable Auto brightness to activate auto brightness. Setting Brightness Manually 1 Tap the Settings icon to open the Settings screen. 1 Slider 6 Tap OK to save...
... is disabled. 4 Tap Brightness from the Display settings screen to open the Display settings screen. Enabling Auto Brightness 1 Tap the Settings icon to open the Settings screen. 2 In the Phone basics section, tap Display settings to open the Brightness panel. 5 Use your finger or stylus to move the slider left or right on the screen to adjust the brightness. 1 3 Enable Auto brightness to activate auto brightness. Setting Brightness Manually 1 Tap the Settings icon to open the Settings screen. 1 Slider 6 Tap OK to save...

User's Manual
Page 60
..., and Year. 6 Tap Save to save your changes and exit the Change time panel. Basic Smartphone Functions Setting the Date Manually 1 Tap the Settings icon to open the Settings screen. 2 In the Phone basics section, tap Date & time settings to open the Date & time settings screen. 3 Tap the Automatic box to disable setting the date and time by network. 4 Tap Set time to save your changes and exit the Change date panel. 60 6 Tap Save to open the Change date panel.
..., and Year. 6 Tap Save to save your changes and exit the Change time panel. Basic Smartphone Functions Setting the Date Manually 1 Tap the Settings icon to open the Settings screen. 2 In the Phone basics section, tap Date & time settings to open the Date & time settings screen. 3 Tap the Automatic box to disable setting the date and time by network. 4 Tap Set time to save your changes and exit the Change date panel. 60 6 Tap Save to open the Change date panel.

User's Manual
Page 83
Select to enter another prefix number. 3 To save settings, tap the Options menu button, then tap Save. 83 To exit this screen, tap the Home/Back button. My SIM number The My SIM number option allows you are already on a call waiting is determined by your Call forwarding settings. • Auto answer - Tap the next text field to answer incoming calls automatically without performing any action. • Auto redial - Using the Smartphone Dialing Prefix Number The Dialing Prefix Number option allows...
Select to enter another prefix number. 3 To save settings, tap the Options menu button, then tap Save. 83 To exit this screen, tap the Home/Back button. My SIM number The My SIM number option allows you are already on a call waiting is determined by your Call forwarding settings. • Auto answer - Tap the next text field to answer incoming calls automatically without performing any action. • Auto redial - Using the Smartphone Dialing Prefix Number The Dialing Prefix Number option allows...

User's Manual
Page 84
Using the Smartphone Speed Dial The speed dialing option allows you to set up your most frequently used numbers for quick dialing. 1 Setting Up Speed Dialing Tap the Add icon to add a name from Contacts or tap a number icon to call Speed dial #1. For example, tap and hold the Speed dial number. To exit this screen, tap the Home/Back button. 1 Add icon 84 Using Speed Dialing Tap the Phone icon, and then tap and hold 1 to enter the phone number directly.
Using the Smartphone Speed Dial The speed dialing option allows you to set up your most frequently used numbers for quick dialing. 1 Setting Up Speed Dialing Tap the Add icon to add a name from Contacts or tap a number icon to call Speed dial #1. For example, tap and hold the Speed dial number. To exit this screen, tap the Home/Back button. 1 Add icon 84 Using Speed Dialing Tap the Phone icon, and then tap and hold 1 to enter the phone number directly.

User's Manual
Page 85
... view your SIM card. You can set . You can also use this option to enable or disable the in-call timer function. 1 Tap Settings > Call Settings > In-call timer. 2 Tap the appropriate in -call timer option from the list. 1 Tap Settings > Call Settings > Voice mail. 2 When you to 30, 60, 90, or 120 seconds. You will hear a tone at the interval set the timer to monitor the duration of your calls. Voicemail Your Voicemail number...
... view your SIM card. You can set . You can also use this option to enable or disable the in-call timer function. 1 Tap Settings > Call Settings > In-call timer. 2 Tap the appropriate in -call timer option from the list. 1 Tap Settings > Call Settings > Voice mail. 2 When you to 30, 60, 90, or 120 seconds. You will hear a tone at the interval set the timer to monitor the duration of your calls. Voicemail Your Voicemail number...
User's Manual
Page 91
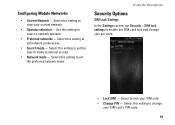
...view your SIM card. • Change PIN - Select this setting to lock your current network. • Operator selection - Select this setting to enable the SIM card lock and change your pin code. • Lock SIM - Using the Smartphone Security Options SIM Lock Settings In the Settings screen, tap Security > SIM lock settings to change your SIM card's PIN code. 91 Select this setting to set the search mode to select a network operator. • Preferred networks - Use this setting to set network preferences. • Search mode - Select this setting to manual or auto...
...view your SIM card. • Change PIN - Select this setting to lock your current network. • Operator selection - Select this setting to enable the SIM card lock and change your pin code. • Lock SIM - Using the Smartphone Security Options SIM Lock Settings In the Settings screen, tap Security > SIM lock settings to change your SIM card's PIN code. 91 Select this setting to set the search mode to select a network operator. • Preferred networks - Use this setting to set network preferences. • Search mode - Select this setting to manual or auto...

User's Manual
Page 103
... this setting to set the data network to delete all cached page contents. • Clear history - Select this setting to set the character encoding type. • Block pop-up windows from the Browser screen, tap the Options menu button and select Settings. Enable this setting to enable JavaScript. • Set home page - Select this setting to clear the browser navigation history. • Accept cookies - Enable this setting to set the size of the text displayed on web pages. Select this setting to connect. • Clear...
... this setting to set the data network to delete all cached page contents. • Clear history - Select this setting to set the character encoding type. • Block pop-up windows from the Browser screen, tap the Options menu button and select Settings. Enable this setting to enable JavaScript. • Set home page - Select this setting to clear the browser navigation history. • Accept cookies - Enable this setting to set the size of the text displayed on web pages. Select this setting to connect. • Clear...

User's Manual
Page 117
... setting to select the authentication type for data connection. • Reply with the original - Select this setting to set the read limit for outgoing traffic. Select this setting to enter your Email. • Data Connection - Select this setting to choose how often automatic POP3 retrievals are the available Email Account settings: • Email Address - Select this setting to edit your service provider for information. • Server - Contact your Email address. • User Name - Select this setting to Emails...
... setting to select the authentication type for data connection. • Reply with the original - Select this setting to set the read limit for outgoing traffic. Select this setting to enter your Email. • Data Connection - Select this setting to choose how often automatic POP3 retrievals are the available Email Account settings: • Email Address - Select this setting to edit your service provider for information. • Server - Contact your Email address. • User Name - Select this setting to Emails...

User's Manual
Page 119
Managing Email Messages Sending Emails 1 Tap the Email icon and tap an Email account to open the Email screen. 2 Press the Options key, and then tap Compose to send message and exit this screen. Using Email Features 3 Enter the recipient's address or tap the icon to add a contact from the Phonebook. 4 Enter a subject. 5 Enter your message. 6 Tap the Options menu button to select Attach, Save to Draft, Add/Hide Cc, Add/Hide Bcc, Discard or Priority. 7 Tap Send to open the Email screen. 119 Receiving Emails NOTE...
Managing Email Messages Sending Emails 1 Tap the Email icon and tap an Email account to open the Email screen. 2 Press the Options key, and then tap Compose to send message and exit this screen. Using Email Features 3 Enter the recipient's address or tap the icon to add a contact from the Phonebook. 4 Enter a subject. 5 Enter your message. 6 Tap the Options menu button to select Attach, Save to Draft, Add/Hide Cc, Add/Hide Bcc, Discard or Priority. 7 Tap Send to open the Email screen. 119 Receiving Emails NOTE...

User's Manual
Page 137
... before deleting pictures from the Video Editor menu. 3 Tap the Select Media tab. 4 Tap the images that you want to include in & out, Slide left-right, Slide up-down, and Random selection. • Repeat slideshow - Using the Storyboard 1 Tap the Video Editor icon to open the Video Editor screen. 2 Tap Storyboard from the phone memory and the microSD card. • Slideshow interval - Enable this setting to...
... before deleting pictures from the Video Editor menu. 3 Tap the Select Media tab. 4 Tap the images that you want to include in & out, Slide left-right, Slide up-down, and Random selection. • Repeat slideshow - Using the Storyboard 1 Tap the Video Editor icon to open the Video Editor screen. 2 Tap Storyboard from the phone memory and the microSD card. • Slideshow interval - Enable this setting to...

User's Manual
Page 148
... tips have been read to start using this application. NOTE: Before using AllSport GPS, enable GPS satellites in Settings > My location > Enable GPS satellites and disable Wi-Fi in Settings > WLAN. 1 Tap the GPS icon to open the AT&T Music screen. 2 Tap AT&T Radio. 148 Press the Options key, and then tap Next. 5 Read the Privacy Information. Using Network Features Using AllSport GPS AllSport GPS monitors your outdoor fitness activities, record distance, time, speed, calories, and route, allows...
... tips have been read to start using this application. NOTE: Before using AllSport GPS, enable GPS satellites in Settings > My location > Enable GPS satellites and disable Wi-Fi in Settings > WLAN. 1 Tap the GPS icon to open the AT&T Music screen. 2 Tap AT&T Radio. 148 Press the Options key, and then tap Next. 5 Read the Privacy Information. Using Network Features Using AllSport GPS AllSport GPS monitors your outdoor fitness activities, record distance, time, speed, calories, and route, allows...
User's Manual
Page 198
... Month view, 171 Week view, 173 Calendar Settings Hide declined events, 175 Set alerts & notifications, 176 Set default reminder, 176 Set default view, 175 Camera Camera mode, 140 Using the camera, 141 Using the video recorder, 142 Video recording mode, 142 Contacts, 76 198 D Delivery reports, 168 Display settings Set brightness manually, 57 Set up screen time out, 58 Turn on the auto brightness, 57 E Entering text Activating the Keyboard, 45 Changing the language, 51 FullScreenHandWriting, 51 Numbers or symbols, 51 Phone Keypad, 53 QWERTY, 49 Select input method, 47 F File Manager
... Month view, 171 Week view, 173 Calendar Settings Hide declined events, 175 Set alerts & notifications, 176 Set default reminder, 176 Set default view, 175 Camera Camera mode, 140 Using the camera, 141 Using the video recorder, 142 Video recording mode, 142 Contacts, 76 198 D Delivery reports, 168 Display settings Set brightness manually, 57 Set up screen time out, 58 Turn on the auto brightness, 57 E Entering text Activating the Keyboard, 45 Changing the language, 51 FullScreenHandWriting, 51 Numbers or symbols, 51 Phone Keypad, 53 QWERTY, 49 Select input method, 47 F File Manager


