
User Guide
Page 26
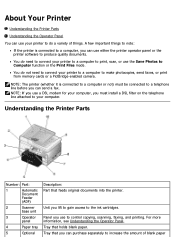
... panel or the printer software to produce quality documents. You do not need to connect your computer, you lift to gain access to the ink cartridges. Understanding the Printer Parts Number: Part: 1 Automatic Document Feeder (ADF) 2 Scanner base unit 3 Operator panel 4 Paper tray 5 Optional Description: Part that holds blank paper. Tray...
... panel or the printer software to produce quality documents. You do not need to connect your computer, you lift to gain access to the ink cartridges. Understanding the Printer Parts Number: Part: 1 Automatic Document Feeder (ADF) 2 Scanner base unit 3 Operator panel 4 Paper tray 5 Optional Description: Part that holds blank paper. Tray...
User Guide
Page 27
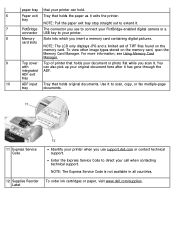
... or contact technical support. NOTE: The Express Service Code is not available in all countries. 12 Supplies Reorder Label To order ink cartridges or paper, visit www.dell.com/supplies. Use it to your printer can also pick up your call when contacting technical support. You with can hold. 6 Paper exit Tray...
... or contact technical support. NOTE: The Express Service Code is not available in all countries. 12 Supplies Reorder Label To order ink cartridges or paper, visit www.dell.com/supplies. Use it to your printer can also pick up your call when contacting technical support. You with can hold. 6 Paper exit Tray...

User Guide
Page 30
When the printer is on or in the Power Save state, press and hold the Power button for 2 seconds to turn your printer on. When the printer is off, it requires up to 1 watt of power to perform regular maintenance on cartridges. NOTE: Do not unplug your printer off , press the Power button to turn your printer from the electrical outlet when not in this state. Your printer consumes minimal power in use. 9 Power button When the printer is on, press the Power button to put your printer in a Power Save state. When the printer is off .
When the printer is on or in the Power Save state, press and hold the Power button for 2 seconds to turn your printer on. When the printer is off, it requires up to 1 watt of power to perform regular maintenance on cartridges. NOTE: Do not unplug your printer off , press the Power button to turn your printer from the electrical outlet when not in this state. Your printer consumes minimal power in use. 9 Power button When the printer is on, press the Power button to put your printer in a Power Save state. When the printer is off .
User Guide
Page 35
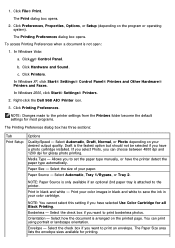
...: Changes made to save the ink in your color images in black and white - Paper Source - Print your color cartridge. Borderless - c. Right-click the Dell 968 AIO Printer icon. 3. Draft is attached to print an envelope. Paper Size - NOTE: You cannot select this setting ...if you have selected Use Color Cartridge for glossy photo printing. Orientation - Click File® Print. To access Printing ...
...: Changes made to save the ink in your color images in black and white - Paper Source - Print your color cartridge. Borderless - c. Right-click the Dell 968 AIO Printer icon. 3. Draft is attached to print an envelope. Paper Size - NOTE: You cannot select this setting ...if you have selected Use Color Cartridge for glossy photo printing. Orientation - Click File® Print. To access Printing ...
User Guide
Page 36
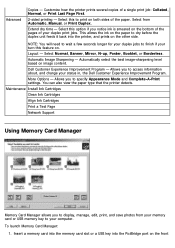
..., Manual, or Print Duplex. You can also view the paper type that the printer detects. Maintenance Install Ink Cartridges Clean Ink Cartridges Align Ink Cartridges Print a Test Page Network Support Using Memory Card Manager Memory Card Manager allows you to your turn this option if... level based on the bottom of the pages of your status in, the Dell Customer Experience Improvement Program. Automatic Image Sharpening - Customize how the printer prints several copies of the paper. Dell Customer Experience Improvement Program - Allows you notice ink is smeared on image content...
..., Manual, or Print Duplex. You can also view the paper type that the printer detects. Maintenance Install Ink Cartridges Clean Ink Cartridges Align Ink Cartridges Print a Test Page Network Support Using Memory Card Manager Memory Card Manager allows you to your turn this option if... level based on the bottom of the pages of your status in, the Dell Customer Experience Improvement Program. Automatic Image Sharpening - Customize how the printer prints several copies of the paper. Dell Customer Experience Improvement Program - Allows you notice ink is smeared on image content...
User Guide
Page 37
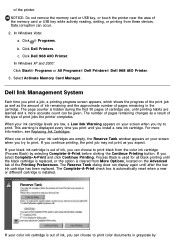
... empty, the Reserve Tank window appears on the Advanced tab of the Printing Preferences. Click Dell 968 AIO Printer. The number of cartridge use, until the black cartridge is replaced, or the option is out of the memory card or USB key while actively reading, writing, or printing from...50 pages of pages remaining changes as you expect. Click Dell Printers. of ink, you can choose to print color documents in the cartridge. In Windows XP and 2000: Click Start® Programs or All Programs® Dell Printers® Dell 968 AIO Printer. 3. Select Activate Memory Card Manager. The...
... empty, the Reserve Tank window appears on the Advanced tab of the Printing Preferences. Click Dell 968 AIO Printer. The number of cartridge use, until the black cartridge is replaced, or the option is out of the memory card or USB key while actively reading, writing, or printing from...50 pages of pages remaining changes as you expect. Click Dell Printers. of ink, you can choose to print color documents in the cartridge. In Windows XP and 2000: Click Start® Programs or All Programs® Dell Printers® Dell 968 AIO Printer. 3. Select Activate Memory Card Manager. The...

User Guide
Page 38
... replaced. The Complete-A-Print check box is automatically reset when a new or different cartridge is an optional printer driver designed to complete the installation. Click Uninstall Dell 968 AIO Printer. 3. b. selecting Complete-A-Print before clicking the Continue Printing button. Click Dell 968 AIO Printer. If the installation screen does not appear: a. In Windows 2000, double...
... replaced. The Complete-A-Print check box is automatically reset when a new or different cartridge is an optional printer driver designed to complete the installation. Click Uninstall Dell 968 AIO Printer. 3. b. selecting Complete-A-Print before clicking the Continue Printing button. Click Dell 968 AIO Printer. If the installation screen does not appear: a. In Windows 2000, double...
User Guide
Page 75
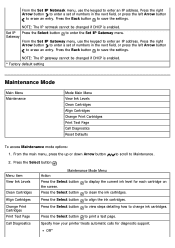
... view steps detailing how to display the current ink level for diagnostic support. Specify how your printer treats automatic calls for each cartridge on the screen. NOTE: The IP netmask cannot be changed if DHCP is enabled. * Factory default setting Maintenance Mode Main... Menu Maintenance Mode Main Menu View Ink Levels Clean Cartridges Align Cartridges Change Print Cartridges Print Test Page Call Diagnostics Reset Defaults To access Maintenance mode options: 1. NOTE: The IP gateway cannot be changed ...
... view steps detailing how to display the current ink level for diagnostic support. Specify how your printer treats automatic calls for each cartridge on the screen. NOTE: The IP netmask cannot be changed if DHCP is enabled. * Factory default setting Maintenance Mode Main... Menu Maintenance Mode Main Menu View Ink Levels Clean Cartridges Align Cartridges Change Print Cartridges Print Test Page Call Diagnostics Reset Defaults To access Maintenance mode options: 1. NOTE: The IP gateway cannot be changed ...
User Guide
Page 87
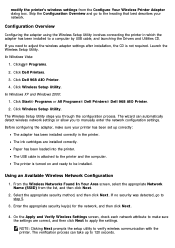
... All Programs® Dell Printers® Dell 968 AIO Printer. 2. NOTE: Clicking Next prompts the setup utility to make sure your network. Click Dell Printers. 3. Before configuring the adapter, make sure the settings are installed correctly. The ink cartridges are correct, and ...network configuration settings. The verification process can automatically detect wireless network settings or allow you to 120 seconds. Click Dell 968 AIO Printer. 4. Configuration Overview Configuring the adapter using the Wireless Setup Utility involves connecting the printer in the printer...
... All Programs® Dell Printers® Dell 968 AIO Printer. 2. NOTE: Clicking Next prompts the setup utility to make sure your network. Click Dell Printers. 3. Before configuring the adapter, make sure the settings are installed correctly. The ink cartridges are correct, and ...network configuration settings. The verification process can automatically detect wireless network settings or allow you to 120 seconds. Click Dell 968 AIO Printer. 4. Configuration Overview Configuring the adapter using the Wireless Setup Utility involves connecting the printer in the printer...
User Guide
Page 92
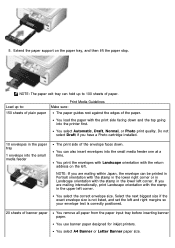
... left and right margins so your envelope text is correctly positioned. 20 sheets of paper. You select the correct envelope size. If you have a Photo cartridge installed. 10 envelopes in the lower left corner. You print the envelopes with Landscape orientation with the stamp in the paper tray 1 envelope into the...
... left and right margins so your envelope text is correctly positioned. 20 sheets of paper. You select the correct envelope size. If you have a Photo cartridge installed. 10 envelopes in the lower left corner. You print the envelopes with Landscape orientation with the stamp in the paper tray 1 envelope into the...

User Guide
Page 97
... Setup tab, select the paper size. 4. On the Print Setup tab, select the paper type. 4. Paper type Quality/Speed settings Black and Color Cartridges Installed Photo and Color Cartridges Installed Plain/heavyweight matte Normal Photo Transparency Normal Photo Photo/glossy Photo Photo NOTE: Your printer cannot detect paper size. In Windows Vista...
... Setup tab, select the paper size. 4. On the Print Setup tab, select the paper type. 4. Paper type Quality/Speed settings Black and Color Cartridges Installed Photo and Color Cartridges Installed Plain/heavyweight matte Normal Photo Transparency Normal Photo Photo/glossy Photo Photo NOTE: Your printer cannot detect paper size. In Windows Vista...
User Guide
Page 101
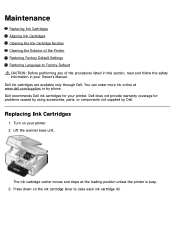
... procedures listed in this section, read and follow the safety information in your Owner's Manual. The ink cartridge carrier moves and stops at www.dell.com/supplies or by Dell. Dell ink cartridges are available only through Dell. Dell recommends Dell ink cartridges for problems caused by using accessories, parts, or components not supplied by phone. You can order...
... procedures listed in this section, read and follow the safety information in your Owner's Manual. The ink cartridge carrier moves and stops at www.dell.com/supplies or by Dell. Dell ink cartridges are available only through Dell. Dell recommends Dell ink cartridges for problems caused by using accessories, parts, or components not supplied by phone. You can order...
User Guide
Page 102
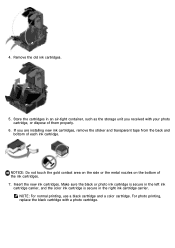
... gold contact area on the side or the metal nozzles on the bottom of each ink cartridge. Make sure the black or photo ink cartridge is secure in the left ink cartridge carrier, and the color ink cartridge is secure in an air-tight container, such as the storage unit you are installing new...
... gold contact area on the side or the metal nozzles on the bottom of each ink cartridge. Make sure the black or photo ink cartridge is secure in the left ink cartridge carrier, and the color ink cartridge is secure in an air-tight container, such as the storage unit you are installing new...
User Guide
Page 103
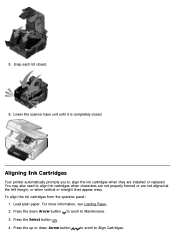
... 4. To align the ink cartridges from the operator panel: 1. Press the down Arrow button to scroll to Maintenance. 3. Press the up or down Arrow button to scroll to Align Cartridges. For more information, see Loading Paper. 2. Aligning Ink Cartridges Your printer automatically prompts you to... align ink cartridges when characters are not properly formed or are installed or replaced. Lower ...
... 4. To align the ink cartridges from the operator panel: 1. Press the down Arrow button to scroll to Maintenance. 3. Press the up or down Arrow button to scroll to Align Cartridges. For more information, see Loading Paper. 2. Aligning Ink Cartridges Your printer automatically prompts you to... align ink cartridges when characters are not properly formed or are installed or replaced. Lower ...
User Guide
Page 104
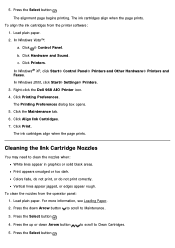
... the operator panel: 1. Load plain paper. 2. b. The Printing Preferences dialog box opens. 5. Press the Select button . The ink cartridges align when the page prints. Click Hardware and Sound. Right-click the Dell 968 AIO Printer icon. 4. Click Printing Preferences. Press the up or down Arrow button to scroll to Maintenance. 3. In Windows Vista...
... the operator panel: 1. Load plain paper. 2. b. The Printing Preferences dialog box opens. 5. Press the Select button . The ink cartridges align when the page prints. Click Hardware and Sound. Right-click the Dell 968 AIO Printer icon. 4. Click Printing Preferences. Press the up or down Arrow button to scroll to Maintenance. 3. In Windows Vista...
User Guide
Page 105
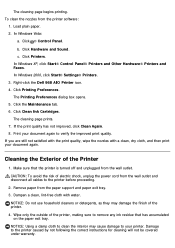
... your printer. The cleaning page begins printing. To clean the nozzles from the paper support and paper exit tray. 3. Right-click the Dell 968 AIO Printer icon. 4. Click Clean Ink Cartridges. Click Printing Preferences. Click Hardware and Sound. c. Cleaning the Exterior of electric shock, unplug the power cord from the wall outlet. NOTICE...
... your printer. The cleaning page begins printing. To clean the nozzles from the paper support and paper exit tray. 3. Right-click the Dell 968 AIO Printer icon. 4. Click Clean Ink Cartridges. Click Printing Preferences. Click Hardware and Sound. c. Cleaning the Exterior of electric shock, unplug the power cord from the wall outlet. NOTICE...
User Guide
Page 106
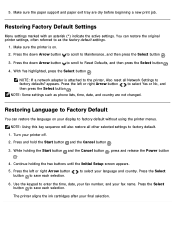
... or right Arrow button to select your printer off. 2. to select Yes or No, and then press the Select button . The printer aligns the ink cartridges after your fax name. Make sure the printer is attached to the printer, Also reset all other selected settings to as phone lists, time, date...
... or right Arrow button to select your printer off. 2. to select Yes or No, and then press the Select button . The printer aligns the ink cartridges after your fax name. Make sure the printer is attached to the printer, Also reset all other selected settings to as phone lists, time, date...

User Guide
Page 107
... paper. For more information, see Loading Paper. 3. The Printing Preferences dialog box opens. 5. The Printing Preferences dialog box closes. 7. Printing Photos NOTE: Dell recommends you use a color cartridge and a photo cartridge for printing photos. 3. The Printing Preferences dialog box opens. The Print dialog box opens. 4. Click Preferences, Properties, Options, or Setup (depending on...
... paper. For more information, see Loading Paper. 3. The Printing Preferences dialog box opens. 5. The Printing Preferences dialog box closes. 7. Printing Photos NOTE: Dell recommends you use a color cartridge and a photo cartridge for printing photos. 3. The Printing Preferences dialog box opens. The Print dialog box opens. 4. Click Preferences, Properties, Options, or Setup (depending on...
User Guide
Page 119
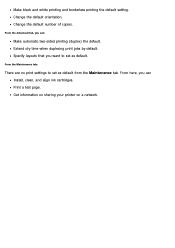
Make black and white printing and borderless printing the default setting. Specify layouts that you want to set as default from the Maintenance tab. Print a test page. Change the default number of copies. From here, you can Install, clean, and align ink cartridges. From the Maintenance tab: There are no print settings to set as default. Get information on sharing your printer on a network. Change the default orientation. Extend dry time when duplexing print jobs by default. From the Advanced tab, you can : Make automatic two-sided printing (duplex) the default.
Make black and white printing and borderless printing the default setting. Specify layouts that you want to set as default from the Maintenance tab. Print a test page. Change the default number of copies. From here, you can Install, clean, and align ink cartridges. From the Maintenance tab: There are no print settings to set as default. Get information on sharing your printer on a network. Change the default orientation. Extend dry time when duplexing print jobs by default. From the Advanced tab, you can : Make automatic two-sided printing (duplex) the default.
User Guide
Page 122
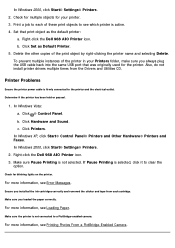
...which printer is active. 4. Set that was originally used for the printer. Click Printers. Make sure Pause Printing is not connected to each cartridge. b. Click Set as the default printer: a. Printer Problems Ensure the printer power cable is selected, click it to the printer and the... the printer name and selecting Delete. Determine if the printer has been held or paused. 1. In Windows Vista: a. Right-click the Dell 968 AIO Printer icon. 3. If Pause Printing is firmly connected to clear the option. Check for your Printers folder, make sure you loaded ...
...which printer is active. 4. Set that was originally used for the printer. Click Printers. Make sure Pause Printing is not connected to each cartridge. b. Click Set as the default printer: a. Printer Problems Ensure the printer power cable is selected, click it to the printer and the... the printer name and selecting Delete. Determine if the printer has been held or paused. 1. In Windows Vista: a. Right-click the Dell 968 AIO Printer icon. 3. If Pause Printing is firmly connected to clear the option. Check for your Printers folder, make sure you loaded ...


