
User Guide
Page 1
... the problem. Corel Snapfire and WordPerfect are registered trademarks of Dell Inc.; Double-click the icon on your printer. and is a registered trademark of Microsoft Corporation in this document is either the entities claiming the marks and names or their products. Finding Information About Your Printer Understanding the Operator Panel Menus Loading Paper and Originals Printing Printing From a Memory Card or USB Key Copying Scanning Faxing Understanding the Software Networking Maintenance Troubleshooting Specifications...
... the problem. Corel Snapfire and WordPerfect are registered trademarks of Dell Inc.; Double-click the icon on your printer. and is a registered trademark of Microsoft Corporation in this document is either the entities claiming the marks and names or their products. Finding Information About Your Printer Understanding the Operator Panel Menus Loading Paper and Originals Printing Printing From a Memory Card or USB Key Copying Scanning Faxing Understanding the Software Networking Maintenance Troubleshooting Specifications...
User Guide
Page 4
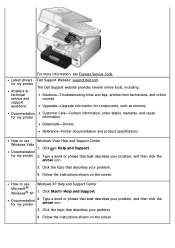
...174; Help and Support. Documentation for my printer 2. Follow the instructions shown on the screen. Dell Support Website: support.dell.com The Dell Support website provides several online tools, including: Solutions-Troubleshooting hints and tips, articles from technicians, and online courses Upgrades-Upgrade information for components, such as memory Documentation for my printer Customer Care-Contact information, order status, warranty, and repair information Downloads-Drivers Reference-Printer documentation and product specifications How to use Windows XP Help and Support...
...174; Help and Support. Documentation for my printer 2. Follow the instructions shown on the screen. Dell Support Website: support.dell.com The Dell Support website provides several online tools, including: Solutions-Troubleshooting hints and tips, articles from technicians, and online courses Upgrades-Upgrade information for components, such as memory Documentation for my printer Customer Care-Contact information, order status, warranty, and repair information Downloads-Drivers Reference-Printer documentation and product specifications How to use Windows XP Help and Support...
User Guide
Page 17
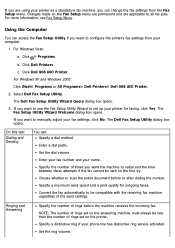
... Dell 968 AIO Printer. Specify a maximum send speed and a print quality for faxing, click Yes. Specify a distinctive ring if your name. For more information, see Fax Setup Menu. Enter your fax number and your phone line has distinctive ring service activated. If you want to use the Fax Setup Utility Wizard to set on the Fax Setup menu are permanent and are using your printer as a standalone fax machine, you want the machine to manually adjust your printer...
... Dell 968 AIO Printer. Specify a maximum send speed and a print quality for faxing, click Yes. Specify a distinctive ring if your name. For more information, see Fax Setup Menu. Enter your fax number and your phone line has distinctive ring service activated. If you want to use the Fax Setup Utility Wizard to set on the Fax Setup menu are permanent and are using your printer as a standalone fax machine, you want the machine to manually adjust your printer...
User Guide
Page 34
Create a fax report. To access the Dell Fax Solutions Software: 1. c. Using Printing Preferences You can customize, add logos to a network using a wireless or Ethernet connection, you want to open : Click View cover pages to create. View fax history. NOTE: If your printer is open the Cover Pages dialog. In Windows Vista: a. You can change your printer settings in Printing Preferences depending on the type of project you must start a scanned fax from a variety of the Dell Fax Solutions Software. Click View full activity...
Create a fax report. To access the Dell Fax Solutions Software: 1. c. Using Printing Preferences You can customize, add logos to a network using a wireless or Ethernet connection, you want to open : Click View cover pages to create. View fax history. NOTE: If your printer is open the Cover Pages dialog. In Windows Vista: a. You can change your printer settings in Printing Preferences depending on the type of project you must start a scanned fax from a variety of the Dell Fax Solutions Software. Click View full activity...
User Guide
Page 36
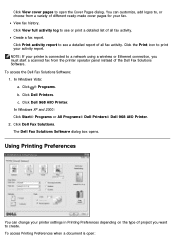
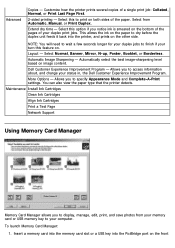
... of the pages of your duplex print jobs. Automatic Image Sharpening - Maintenance Install Ink Cartridges Clean Ink Cartridges Align Ink Cartridges Print a Test Page Network Support Using Memory Card Manager Memory Card Manager allows you to access information about, and change your memory card or USB memory key to dry before the duplex unit feeds it back into the PictBridge port on the front Select from your status in, the Dell Customer Experience Improvement Program. Advanced Copies - Extend dry time - This allows the ink on both sides of a single print job: Collated...
... of the pages of your duplex print jobs. Automatic Image Sharpening - Maintenance Install Ink Cartridges Clean Ink Cartridges Align Ink Cartridges Print a Test Page Network Support Using Memory Card Manager Memory Card Manager allows you to access information about, and change your memory card or USB memory key to dry before the duplex unit feeds it back into the PictBridge port on the front Select from your status in, the Dell Customer Experience Improvement Program. Advanced Copies - Extend dry time - This allows the ink on both sides of a single print job: Collated...

User Guide
Page 38
... your printer, you install your computer. 5. Installing the Optional XPS Driver The XML Paper Specification (XPS) driver is installed. The Complete-A-Print check box is automatically reset when a new or different cartridge is an optional printer driver designed to use of the Printing Preferences. In Windows Vista: a. Click Dell Printers. In Windows XP, click Start® My Computer. selecting Complete-A-Print before clicking the Continue Printing button. b. When the printer software installation screen appears, click Using a USB cable, Using a wireless network, or Using an...
... your printer, you install your computer. 5. Installing the Optional XPS Driver The XML Paper Specification (XPS) driver is installed. The Complete-A-Print check box is automatically reset when a new or different cartridge is an optional printer driver designed to use of the Printing Preferences. In Windows Vista: a. Click Dell Printers. In Windows XP, click Start® My Computer. selecting Complete-A-Print before clicking the Continue Printing button. b. When the printer software installation screen appears, click Using a USB cable, Using a wireless network, or Using an...
User Guide
Page 39
...a USB connection, make sure the printer is connected to the XPS driver files on the printer. From the Use an existing port: drop-down menu, select Virtual printer port for USB, and then click Next. e. b. Click ® Computer. 3. Click ® Control Panel. 2. Click Add a network, wireless or Bluetooth printer. c. The Install From Disk dialog box opens. 5. To install the driver: 1. If your printer IP address, print a Network Setup Page from the Network Setup menu under the Setup menu on your printer model number, and then double-click Drivers. To locate your...
...a USB connection, make sure the printer is connected to the XPS driver files on the printer. From the Use an existing port: drop-down menu, select Virtual printer port for USB, and then click Next. e. b. Click ® Computer. 3. Click ® Control Panel. 2. Click Add a network, wireless or Bluetooth printer. c. The Install From Disk dialog box opens. 5. To install the driver: 1. If your printer IP address, print a Network Setup Page from the Network Setup menu under the Setup menu on your printer model number, and then double-click Drivers. To locate your...
User Guide
Page 51
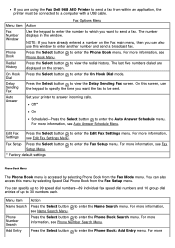
... last five numbers dialed are using the Fax Dell 968 AIO Printer to a computer with a USB cable. For more information, see Auto Answer Schedule Menu. Auto Answer Set your printer to enter another number and send a broadcast fax. For more Press the Select button to send a fax. The number displays in the window. On this screen, use this menu by selecting Phone Book from within an application, the printer must be sent. Menu item Action Fax Options Menu Fax Number Window Use the...
... last five numbers dialed are using the Fax Dell 968 AIO Printer to a computer with a USB cable. For more information, see Auto Answer Schedule Menu. Auto Answer Set your printer to enter another number and send a broadcast fax. For more Press the Select button to send a fax. The number displays in the window. On this screen, use this menu by selecting Phone Book from within an application, the printer must be sent. Menu item Action Fax Options Menu Fax Number Window Use the...

User Guide
Page 83
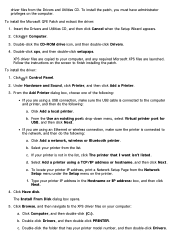
... Power button . Make sure your computer is on configuring your adapter, see the wireless network administrator or your network documentation. The CD launches automatically. NOTE: Have your USB cable ready for wireless configuration or your Ethernet cable (sold separately). Connect the USB cable between the port on the back of this setup wizard. Select Using a wireless network, and then click Next. 6. On the Configure Your Wireless Printer Adapter dialog box, select Create or modify the printer's wireless settings...
... Power button . Make sure your computer is on configuring your adapter, see the wireless network administrator or your network documentation. The CD launches automatically. NOTE: Have your USB cable ready for wireless configuration or your Ethernet cable (sold separately). Connect the USB cable between the port on the back of this setup wizard. Select Using a wireless network, and then click Next. 6. On the Configure Your Wireless Printer Adapter dialog box, select Create or modify the printer's wireless settings...
User Guide
Page 84
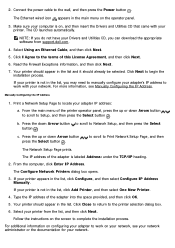
... have your Drivers and Utilities CD, you may need to manually configure your adapter's IP address to Print Network Setup Page, and then The Network Setup Page prints. Print a Network Setup Page to the terms of the printer operator panel, press the up or down Arrow button press the Select button . c. The CD launches automatically. Click I Agree to locate your printer is not in the list. If your adapter IP address: a. to scroll to work on the...
... have your Drivers and Utilities CD, you may need to manually configure your adapter's IP address to Print Network Setup Page, and then The Network Setup Page prints. Print a Network Setup Page to the terms of the printer operator panel, press the up or down Arrow button press the Select button . c. The CD launches automatically. Click I Agree to locate your printer is not in the list. If your adapter IP address: a. to scroll to work on the...
User Guide
Page 86
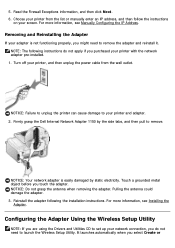
... the antenna when removing the adapter. Choose your printer with the network adapter pre-installed. 1. Turn off your printer, and then unplug the power cable from the list or manually enter an IP address, and then follow the instructions on your printer and adapter. 2. NOTICE: Failure to unplug the printer can cause damage to launch the Wireless Setup Utility. Reinstall the adapter following instructions do not need to remove.
... the antenna when removing the adapter. Choose your printer with the network adapter pre-installed. 1. Turn off your printer, and then unplug the power cable from the list or manually enter an IP address, and then follow the instructions on your printer and adapter. 2. NOTICE: Failure to unplug the printer can cause damage to launch the Wireless Setup Utility. Reinstall the adapter following instructions do not need to remove.
User Guide
Page 95
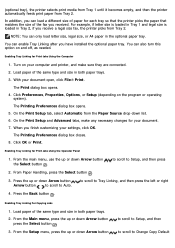
... operating system). Click Preferences, Properties, Options, or Setup (depending on and off, as needed. On the Print Setup tab, select Automatic from Tray 2. On the Print Setup and Advanced tabs, make sure they are connected. 2. From the main menu, use the up or down Arrow button Arrow button to scroll to Setup, and then press 2. Press the Back button . to scroll to Change Copy Default Load paper of the same type and size...
... operating system). Click Preferences, Properties, Options, or Setup (depending on and off, as needed. On the Print Setup tab, select Automatic from Tray 2. On the Print Setup and Advanced tabs, make sure they are connected. 2. From the main menu, use the up or down Arrow button Arrow button to scroll to Setup, and then press 2. Press the Back button . to scroll to Change Copy Default Load paper of the same type and size...
User Guide
Page 101
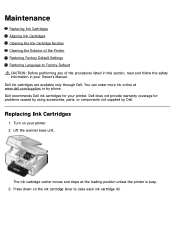
... for your Owner's Manual. Lift the scanner base unit. Replacing Ink Cartridges 1. The ink cartridge carrier moves and stops at www.dell.com/supplies or by Dell. Dell recommends Dell ink cartridges for problems caused by using accessories, parts, or components not supplied by phone. Maintenance Replacing Ink Cartridges Aligning Ink Cartridges Cleaning the Ink Cartridge Nozzles Cleaning the Exterior of the Printer Restoring Factory Default Settings Restoring Language to raise each ink cartridge lid. Turn on the ink cartridge lever to Factory Default CAUTION...
... for your Owner's Manual. Lift the scanner base unit. Replacing Ink Cartridges 1. The ink cartridge carrier moves and stops at www.dell.com/supplies or by Dell. Dell recommends Dell ink cartridges for problems caused by using accessories, parts, or components not supplied by phone. Maintenance Replacing Ink Cartridges Aligning Ink Cartridges Cleaning the Ink Cartridge Nozzles Cleaning the Exterior of the Printer Restoring Factory Default Settings Restoring Language to raise each ink cartridge lid. Turn on the ink cartridge lever to Factory Default CAUTION...
User Guide
Page 120
...the Drivers and Utilities CD. 2. Ensure the USB cable is firmly connected to your printer and your screen to the electrical outlet and computer, if using a computer. Troubleshooting Setup Problems Error Messages Avoiding Jams and Misfeeds Paper Problems Printing Problems Copying Problems Scanning Problems Faxing Problems Networking Problems Memory Card Problems Improving Print Quality General Guidelines for Selecting or Loading Print Media If the printer does not work, ensure that the printer is properly connected to complete the installation. Follow the instructions on...
...the Drivers and Utilities CD. 2. Ensure the USB cable is firmly connected to your printer and your screen to the electrical outlet and computer, if using a computer. Troubleshooting Setup Problems Error Messages Avoiding Jams and Misfeeds Paper Problems Printing Problems Copying Problems Scanning Problems Faxing Problems Networking Problems Memory Card Problems Improving Print Quality General Guidelines for Selecting or Loading Print Media If the printer does not work, ensure that the printer is properly connected to complete the installation. Follow the instructions on...
User Guide
Page 122
..., click Start® Settings® Printers. 2. Make sure you always plug the USB cable back into the same USB port that print object as Default Printer. 5. Right-click the Dell 968 AIO Printer icon. 3. Click ® Control Panel. For more information, see Error Messages. In Windows 2000, click Start® Settings® Printers. 2. If Pause Printing is active. 4. Printer Problems Ensure the printer power cable is firmly connected to each cartridge. For more information, see Loading Paper. Click Set as the default printer: a.
..., click Start® Settings® Printers. 2. Make sure you always plug the USB cable back into the same USB port that print object as Default Printer. 5. Right-click the Dell 968 AIO Printer icon. 3. Click ® Control Panel. For more information, see Error Messages. In Windows 2000, click Start® Settings® Printers. 2. If Pause Printing is active. 4. Printer Problems Ensure the printer power cable is firmly connected to each cartridge. For more information, see Loading Paper. Click Set as the default printer: a.

User Guide
Page 124
... Fax Mode Unrecoverable Fax Error Fax mode is not enough ink to print process black Cartridge Missing Color Cartridge missing. option is a working fax number. For more information, see Dialing and Sending Scan After Dial Menu. No Answer Fax Mode The broadcast fax job was too big Set the printer to Scan After Dial to for the printer memory to a Contact Customer Support. information, see Replacing Ink Cartridges. information, go to Print. Critically Low Ink Document in the right cartridge carrier. Replace Cartridge to support.dell.com. The printer can only fax using...
... Fax Mode Unrecoverable Fax Error Fax mode is not enough ink to print process black Cartridge Missing Color Cartridge missing. option is a working fax number. For more information, see Dialing and Sending Scan After Dial Menu. No Answer Fax Mode The broadcast fax job was too big Set the printer to Scan After Dial to for the printer memory to a Contact Customer Support. information, see Replacing Ink Cartridges. information, go to Print. Critically Low Ink Document in the right cartridge carrier. Replace Cartridge to support.dell.com. The printer can only fax using...
User Guide
Page 131
... Select button . 5. Make sure you remove individual sheets from the printer. 3. To make this feature on. For more information, see Replacing Ink Cartridges. Resend your duplex print jobs, extend the time for the printed side to dry before the duplex unit feeds the paper back into the printer, and prints on the bottom of the pages of your print job to wait a few seconds longer for all duplex print jobs: 1. Printing Problems Check the ink levels, and install new print cartridges if necessary. Click ® Control Panel. In Windows...
... Select button . 5. Make sure you remove individual sheets from the printer. 3. To make this feature on. For more information, see Replacing Ink Cartridges. Resend your duplex print jobs, extend the time for the printed side to dry before the duplex unit feeds the paper back into the printer, and prints on the bottom of the pages of your print job to wait a few seconds longer for all duplex print jobs: 1. Printing Problems Check the ink levels, and install new print cartridges if necessary. Click ® Control Panel. In Windows...
User Guide
Page 138
... one memory card at a time. For more information, see Printing From a Memory Card or USB Key. For example, use Dell™ Premium Photo Paper if you are supported. Make sure the USB cable is connected to improve the print quality. Only TIFF formats created directly from the electrical outlet. 2. Only images in the printer. For more information, see Printing Photos From a PictBridge-Enabled Camera. Make sure the printer is not connected. Check your documents, there are printing photos Use the appropriate paper...
... one memory card at a time. For more information, see Printing From a Memory Card or USB Key. For example, use Dell™ Premium Photo Paper if you are supported. Make sure the USB cable is connected to improve the print quality. Only TIFF formats created directly from the electrical outlet. 2. Only images in the printer. For more information, see Printing Photos From a PictBridge-Enabled Camera. Make sure the printer is not connected. Check your documents, there are printing photos Use the appropriate paper...
User Guide
Page 157
... printer and all Dell-installed hardware. Support for restoration of the Operating System, application software and hardware drivers to the original default configuration as shipped from Dell, as well as your region on the WELCOME TO DELL SUPPORT page, and fill in the troubleshooting process and provides for third-party software and peripherals is available at support.dell.com. Electronic Support Service mobile_support@us.dell.com support@us.dell.com You can access Dell Support...
... printer and all Dell-installed hardware. Support for restoration of the Operating System, application software and hardware drivers to the original default configuration as shipped from Dell, as well as your region on the WELCOME TO DELL SUPPORT page, and fill in the troubleshooting process and provides for third-party software and peripherals is available at support.dell.com. Electronic Support Service mobile_support@us.dell.com support@us.dell.com You can access Dell Support...
User Guide
Page 162
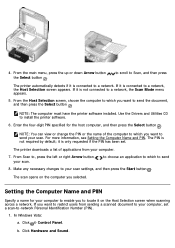
... required by default; If you want to -network Personal Identification Number (PIN). 1. 4. Use the Drivers and Utilities CD to a network, the Scan Mode menu appears. 5. b. Click ® Control Panel. to scroll to Scan, and then press The printer automatically detects if it is connected to , press the left or right Arrow button your scan. NOTE: The computer must have the printer software installed. The PIN is connected to send the document, and...
... required by default; If you want to -network Personal Identification Number (PIN). 1. 4. Use the Drivers and Utilities CD to a network, the Scan Mode menu appears. 5. b. Click ® Control Panel. to scroll to Scan, and then press The printer automatically detects if it is connected to , press the left or right Arrow button your scan. NOTE: The computer must have the printer software installed. The PIN is connected to send the document, and...


