
User Guide
Page 9
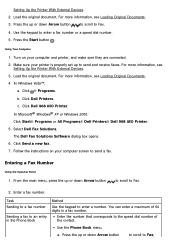
... Original Documents. 4. Make sure your computer screen to send and receive faxes. Load the original document. In Microsoft® Windows® XP or Windows 2000: Click Start® Programs or All Programs® Dell Printers® Dell 968 AIO Printer. 5. Select Dell Fax Solutions. Entering a Fax Number Using the Operator Panel 1. For more information, see Setting Up the...
... Original Documents. 4. Make sure your computer screen to send and receive faxes. Load the original document. In Microsoft® Windows® XP or Windows 2000: Click Start® Programs or All Programs® Dell Printers® Dell 968 AIO Printer. 5. Select Dell Fax Solutions. Entering a Fax Number Using the Operator Panel 1. For more information, see Setting Up the...
User Guide
Page 11
...can : Send a delayed fax Send faxes using your Speed Dial list Manage your phonebook to send faxes to phonebook. c. Click Dell 968 AIO Printer. Select Dell Fax Solutions. Click Send a new fax. If you manually enter the contact information, click Add to add the contact to ... to the Recipients information, select the recipient, and then click Edit. c. In Windows XP or Windows 2000: Click Start® Programs or All Programs® Dell Printers® Dell 968 AIO Printer. 5. The Dell Fax Solutions Software dialog box opens. 6. Enter the contact information for the recipient into the...
...can : Send a delayed fax Send faxes using your Speed Dial list Manage your phonebook to send faxes to phonebook. c. Click Dell 968 AIO Printer. Select Dell Fax Solutions. Click Send a new fax. If you manually enter the contact information, click Add to add the contact to ... to the Recipients information, select the recipient, and then click Edit. c. In Windows XP or Windows 2000: Click Start® Programs or All Programs® Dell Printers® Dell 968 AIO Printer. 5. The Dell Fax Solutions Software dialog box opens. 6. Enter the contact information for the recipient into the...
User Guide
Page 12
... the original document facing down Arrow button to scroll to send and receive faxes. In Windows XP and Windows 2000: Click Start® Programs or All Programs® Dell Printers® Dell 968 AIO Printer. 2. Click the appropriate links on the Dell Fax Solutions Software dialog box to individuals or groups Personalize and store various cover pages Create...
... the original document facing down Arrow button to scroll to send and receive faxes. In Windows XP and Windows 2000: Click Start® Programs or All Programs® Dell Printers® Dell 968 AIO Printer. 2. Click the appropriate links on the Dell Fax Solutions Software dialog box to individuals or groups Personalize and store various cover pages Create...
User Guide
Page 15
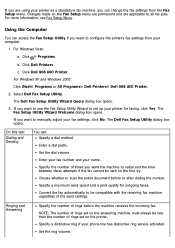
... Windows Vista: a. Click Close. Click Dell 968 AIO Printer. Click No. Click the Fax Printing/Reports tab. 7. Select Dell Fax Setup Utility. Press the down Arrow button button . to scroll to choose an option. 5. Click OK. In Windows XP or Windows 2000: Click Start® Programs or All Programs® Dell Printers® Dell 968 AIO Printer. 4. From the main menu, press...
... Windows Vista: a. Click Close. Click Dell 968 AIO Printer. Click No. Click the Fax Printing/Reports tab. 7. Select Dell Fax Setup Utility. Press the down Arrow button button . to scroll to choose an option. 5. Click OK. In Windows XP or Windows 2000: Click Start® Programs or All Programs® Dell Printers® Dell 968 AIO Printer. 4. From the main menu, press...

User Guide
Page 16
..., choose Print duplex. 8. Press the down Arrow button to scroll to overwrite the fax settings on your printer is properly set up to Fax, and then press 2. Click Dell 968 AIO Printer. Click No. Click the Fax Printing/Reports tab. 7. A confirmation dialog box opens. 9. Press the up... opens. 5. Click Close. The Dell Fax Setup Utility dialog box opens. 6. From the main menu, press the up or down Arrow button the Select button . In Windows XP or Windows 2000: Click Start® Programs or All Programs® Dell Printers® Dell 968 AIO Printer. 4. to scroll to send and...
..., choose Print duplex. 8. Press the down Arrow button to scroll to overwrite the fax settings on your printer is properly set up to Fax, and then press 2. Click Dell 968 AIO Printer. Click No. Click the Fax Printing/Reports tab. 7. A confirmation dialog box opens. 9. Press the up... opens. 5. Click Close. The Dell Fax Setup Utility dialog box opens. 6. From the main menu, press the up or down Arrow button the Select button . In Windows XP or Windows 2000: Click Start® Programs or All Programs® Dell Printers® Dell 968 AIO Printer. 4. to scroll to send and...
User Guide
Page 17
.... 1. Ringing and Answering Specify the number of the send settings. Click Dell Printers. Enter a dial prefix. NOTE: The number of rings set up your printer for outgoing faxes. For Windows XP and Windows 2000: Click Start® Programs or All Programs® Dell Printers® Dell 968 AIO Printer. 2. If you want the machine to redial and the time between...
.... 1. Ringing and Answering Specify the number of the send settings. Click Dell Printers. Enter a dial prefix. NOTE: The number of rings set up your printer for outgoing faxes. For Windows XP and Windows 2000: Click Start® Programs or All Programs® Dell Printers® Dell 968 AIO Printer. 2. If you want the machine to redial and the time between...
User Guide
Page 20
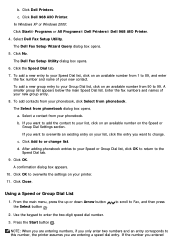
..., click on your phonebook. If the number you want to change list. In Windows XP or Windows 2000: Click Start® Programs or All Programs® Dell Printers® Dell 968 AIO Printer. 4. d. Click Close. Use the keypad to Fax, and then press 2. Click Dell 968 AIO Printer. Using a Speed or Group Dial List 1. If you want to overwrite an existing...
..., click on your phonebook. If the number you want to change list. In Windows XP or Windows 2000: Click Start® Programs or All Programs® Dell Printers® Dell 968 AIO Printer. 4. d. Click Close. Use the keypad to Fax, and then press 2. Click Dell 968 AIO Printer. Using a Speed or Group Dial List 1. If you want to overwrite an existing...

User Guide
Page 21
...press the up to send and receive faxes. In Windows Vista: a. Click Dell 968 AIO Printer. Use the keypad to specify a name. 6. Click Dell Printers. The Dell Fax Setup Wizard Query dialog box opens. 5. Click No. does not ...printer is automatically assigned to Blocked Fax Add Entry, and then press the Select button . 5. Press the down Arrow button to scroll to this contact. For more information, see Setting Up the Printer With External Devices. 3. In Windows XP or Windows 2000: Click Start® Programs or All Programs® Dell Printers® Dell 968 AIO Printer...
...press the up to send and receive faxes. In Windows Vista: a. Click Dell 968 AIO Printer. Use the keypad to specify a name. 6. Click Dell Printers. The Dell Fax Setup Wizard Query dialog box opens. 5. Click No. does not ...printer is automatically assigned to Blocked Fax Add Entry, and then press the Select button . 5. Press the down Arrow button to scroll to this contact. For more information, see Setting Up the Printer With External Devices. 3. In Windows XP or Windows 2000: Click Start® Programs or All Programs® Dell Printers® Dell 968 AIO Printer...

User Guide
Page 22
Click OK to send and receive faxes. Press the Back button . Turn on your printer is disconnected. c. Turning on the list. 9. In Windows Vista: a. Click Dell 968 AIO Printer. In Windows XP or Windows 2000: Click Start® Programs or All Programs® Dell Printers® Dell 968 AIO Printer. 4. Click No. From the main menu, press the up to overwrite the fax...
Click OK to send and receive faxes. Press the Back button . Turn on your printer is disconnected. c. Turning on the list. 9. In Windows Vista: a. Click Dell 968 AIO Printer. In Windows XP or Windows 2000: Click Start® Programs or All Programs® Dell Printers® Dell 968 AIO Printer. 4. Click No. From the main menu, press the up to overwrite the fax...

User Guide
Page 23
... transmission is properly set up or down Arrow button Select button. For more information, see Setting Up the Printer With External Devices. 3. Select Dell Fax Setup Utility. Press the down Arrow button to scroll to Fax Blocking, and press the Select button...to Fax, and press the 2. Click the Ringing and Answering tab. 7. Click Dell 968 AIO Printer. The Dell Fax Setup Utility dialog box opens. 6. Turn on your printer is disconnected. Using Your Computer 1. In Windows XP or Windows 2000: Click Start® Programs or All Programs® Dell Printers® Dell 968 AIO Printer. 4.
... transmission is properly set up or down Arrow button Select button. For more information, see Setting Up the Printer With External Devices. 3. Select Dell Fax Setup Utility. Press the down Arrow button to scroll to Fax Blocking, and press the Select button...to Fax, and press the 2. Click the Ringing and Answering tab. 7. Click Dell 968 AIO Printer. The Dell Fax Setup Utility dialog box opens. 6. Turn on your printer is disconnected. Using Your Computer 1. In Windows XP or Windows 2000: Click Start® Programs or All Programs® Dell Printers® Dell 968 AIO Printer. 4.
User Guide
Page 24
... button . c. Select Always block faxes from senders missing a valid Caller ID. 9. A confirmation dialog box opens. 11. Click Dell Printers. In Windows XP and Windows 2000: Click Start® Programs or All Programs® Dell Printers® Dell 968 AIO Printer. 2. The Dell Fax Setup Wizard Query dialog box opens. 5. Click the Ringing and Answering tab. 7. Using the Computer 1. Click Close...
... button . c. Select Always block faxes from senders missing a valid Caller ID. 9. A confirmation dialog box opens. 11. Click Dell Printers. In Windows XP and Windows 2000: Click Start® Programs or All Programs® Dell Printers® Dell 968 AIO Printer. 2. The Dell Fax Setup Wizard Query dialog box opens. 5. Click the Ringing and Answering tab. 7. Using the Computer 1. Click Close...
User Guide
Page 32
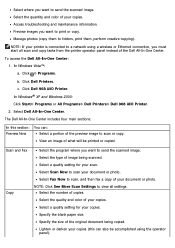
...;: a. Click ® Programs. b. Click Dell Printers. In Windows® XP and Windows 2000: Click Start® Programs or All Programs® Dell Printers® Dell 968 AIO Printer. 2. Select the type of the Dell All-In-One Center. Select a quality setting for your printer is connected to a network using the operator panel...). Select where you want to print or copy. Preview images you want to send the scanned image. Click Dell 968 AIO Printer. The Dell All-In-One Center includes four main sections: In this can : Preview Now Select a portion of the preview image...
...;: a. Click ® Programs. b. Click Dell Printers. In Windows® XP and Windows 2000: Click Start® Programs or All Programs® Dell Printers® Dell 968 AIO Printer. 2. Select the type of the Dell All-In-One Center. Select a quality setting for your printer is connected to a network using the operator panel...). Select where you want to print or copy. Preview images you want to send the scanned image. Click Dell 968 AIO Printer. The Dell All-In-One Center includes four main sections: In this can : Preview Now Select a portion of the preview image...
User Guide
Page 34
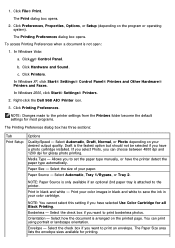
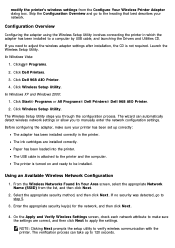
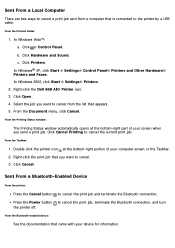
... dialog box opens. Click the Print icon to print your printer is open the Cover Pages dialog. Click ® Programs. b. View fax history. Click View cover pages to open : In Windows XP and 2000: Click Start® Programs or All Programs® Dell Printers® Dell 968 AIO Printer. 2. Using Printing Preferences You can customize, add logos to...
... dialog box opens. Click the Print icon to print your printer is open the Cover Pages dialog. Click ® Programs. b. View fax history. Click View cover pages to open : In Windows XP and 2000: Click Start® Programs or All Programs® Dell Printers® Dell 968 AIO Printer. 2. Using Printing Preferences You can customize, add logos to...
User Guide
Page 35
... is only available if an optional 2nd paper tray is the fastest option but should not be selected if you have the printer detect the paper type automatically. Orientation - The Printing Preferences dialog box opens. To access Printing Preferences when a document is arranged... Black Printing. Click File® Print. In Windows Vista: a. b. In Windows XP, click Start® Settings® Control Panel® Printers and Other Hardware® Printers and Faxes. Right-click the Dell 968 AIO Printer icon. 3. Select Automatic, Draft, Normal, or Photo depending on the program or operating...
... is only available if an optional 2nd paper tray is the fastest option but should not be selected if you have the printer detect the paper type automatically. Orientation - The Printing Preferences dialog box opens. To access Printing Preferences when a document is arranged... Black Printing. Click File® Print. In Windows Vista: a. b. In Windows XP, click Start® Settings® Control Panel® Printers and Other Hardware® Printers and Faxes. Right-click the Dell 968 AIO Printer icon. 3. Select Automatic, Draft, Normal, or Photo depending on the program or operating...
User Guide
Page 37
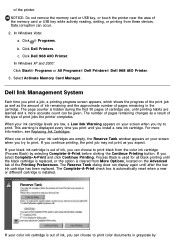
... empty, the Reserve Tank window appears on your screen when you try to print. Click Dell 968 AIO Printer. In Windows XP and 2000: Click Start® Programs or All Programs® Dell Printers® Dell 968 AIO Printer. 3. For more accurate count can choose to print color documents in the cartridge. of ... selecting Complete-A-Print before clicking the Continue Printing button. NOTICE: Do not remove the memory card or USB key, or touch the printer near the area of ink, you can occur. 2. c. Select Activate Memory Card Manager. If you expect. The Complete-A-Print check...
... empty, the Reserve Tank window appears on your screen when you try to print. Click Dell 968 AIO Printer. In Windows XP and 2000: Click Start® Programs or All Programs® Dell Printers® Dell 968 AIO Printer. 3. For more accurate count can choose to print color documents in the cartridge. of ... selecting Complete-A-Print before clicking the Continue Printing button. NOTICE: Do not remove the memory card or USB key, or touch the printer near the area of ink, you can occur. 2. c. Select Activate Memory Card Manager. If you expect. The Complete-A-Print check...

User Guide
Page 38
... reset when a new or different cartridge is an optional printer driver designed to use of the Printing Preferences. c. c. Follow the instructions on your desktop. In Windows XP and WIndows 2000: Click Start® Programs or All Programs® Dell Printers® Dell 968 AIO Printer. 2. b. Click Dell Printers. NOTE: Before installing the XPS driver, complete the steps on your computer. 5. If...
... reset when a new or different cartridge is an optional printer driver designed to use of the Printing Preferences. c. c. Follow the instructions on your desktop. In Windows XP and WIndows 2000: Click Start® Programs or All Programs® Dell Printers® Dell 968 AIO Printer. 2. b. Click Dell Printers. NOTE: Before installing the XPS driver, complete the steps on your computer. 5. If...
User Guide
Page 87
... after installation, the CD is turned on and ready to step 5. 3. In Windows Vista: 1. Click ® Programs. 2. In Windows XP and Windows 2000: 1. Click Start® Programs or All Programs® Dell Printers® Dell 968 AIO Printer. 2. The USB cable is attached to make sure your network. Enter the appropriate security key(s) for the network, and...
... after installation, the CD is turned on and ready to step 5. 3. In Windows Vista: 1. Click ® Programs. 2. In Windows XP and Windows 2000: 1. Click Start® Programs or All Programs® Dell Printers® Dell 968 AIO Printer. 2. The USB cable is attached to make sure your network. Enter the appropriate security key(s) for the network, and...
User Guide
Page 104
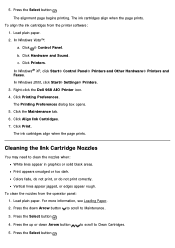
... button to scroll to Clean Cartridges. 5. In Windows 2000, click Start® Settings® Printers. 3. Right-click the Dell 968 AIO Printer icon. 4. The ink cartridges align when the page prints. Print appears smudged or too dark.... Vertical lines appear jagged, or edges appear rough. Press the down Arrow button to scroll to Maintenance. 3. Press the Select button . 4. In Windows Vista™: a. In Windows® XP, click Start® Control Panel® Printers...
... button to scroll to Clean Cartridges. 5. In Windows 2000, click Start® Settings® Printers. 3. Right-click the Dell 968 AIO Printer icon. 4. The ink cartridges align when the page prints. Print appears smudged or too dark.... Vertical lines appear jagged, or edges appear rough. Press the down Arrow button to scroll to Maintenance. 3. Press the Select button . 4. In Windows Vista™: a. In Windows® XP, click Start® Control Panel® Printers...
User Guide
Page 105
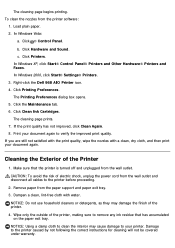
...a clean, lint-free cloth with a clean, dry cloth, and then print your document again. Click ® Control Panel. Right-click the Dell 968 AIO Printer icon. 4. Click Clean Ink Cartridges. If the print quality has not improved, click Clean Again. 8. Make sure that has accumulated on the ...paper exit tray. c. In Windows XP, click Start® Control Panel® Printers and Other Hardware® Printers and Faxes. The cleaning page prints. 7. Print your printer. NOTICE: Do not use household cleaners or detergents, as they may cause damage...
...a clean, lint-free cloth with a clean, dry cloth, and then print your document again. Click ® Control Panel. Right-click the Dell 968 AIO Printer icon. 4. Click Clean Ink Cartridges. If the print quality has not improved, click Clean Again. 8. Make sure that has accumulated on the ...paper exit tray. c. In Windows XP, click Start® Control Panel® Printers and Other Hardware® Printers and Faxes. The cleaning page prints. 7. Print your printer. NOTICE: Do not use household cleaners or detergents, as they may cause damage...
User Guide
Page 117
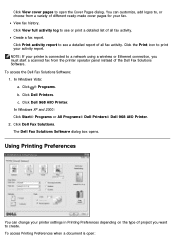
Click Hardware and Sound. In Windows® XP, click Start ® Settings® Control Panel® Printers and Other Hardware® Printers and Faxes. Select the job you want to the printer by a USB cable. Press the Power button to cancel from a computer that is connected to... print job. Click Open. 4. From the Taskbar: 1. Double-click the printer icon at the bottom-right part of your device for information. b. Right-click the Dell 968 AIO Printer icon. 3. Click Printers. From the Printing Status window: The Printing Status window automatically opens at the...
Click Hardware and Sound. In Windows® XP, click Start ® Settings® Control Panel® Printers and Other Hardware® Printers and Faxes. Select the job you want to the printer by a USB cable. Press the Power button to cancel from a computer that is connected to... print job. Click Open. 4. From the Taskbar: 1. Double-click the printer icon at the bottom-right part of your device for information. b. Right-click the Dell 968 AIO Printer icon. 3. Click Printers. From the Printing Status window: The Printing Status window automatically opens at the...


