
Owner's Manual
Page 3
...printer. Other trademarks and trade names may be used in this text: Dell and the DELL logo are trademarks of Dell Inc. is subject to change without the written permission of Dell... subject to restrictions as set forth in subparagraph (c)(1)(ii) of Microsoft Corporation. Dell Inc. CAUTION: A CAUTION indicates a potential for property damage, personal injury,...whatsoever without notice. © 2004 Dell Inc. Information in this document is strictly forbidden. Trademarks used in any proprietary interest in applicable FAR provisions: Dell Inc., One Dell Way, Round Rock, Texas, ...
...printer. Other trademarks and trade names may be used in this text: Dell and the DELL logo are trademarks of Dell Inc. is subject to change without the written permission of Dell... subject to restrictions as set forth in subparagraph (c)(1)(ii) of Microsoft Corporation. Dell Inc. CAUTION: A CAUTION indicates a potential for property damage, personal injury,...whatsoever without notice. © 2004 Dell Inc. Information in this document is strictly forbidden. Trademarks used in any proprietary interest in applicable FAR provisions: Dell Inc., One Dell Way, Round Rock, Texas, ...

Owner's Manual
Page 7
Using Printing Preferences 69 Printing Preferences Tabs 70 Using Dell Picture Studio v2.0 70 4 Ink Cartridge Maintenance Replacing Ink Cartridges 71 Aligning Ink Cartridges 74 Cleaning the Ink Cartridge Nozzles 75 5 Troubleshooting Setup Problems 77 Computer Problems 77 Removing and Reinstalling Software 78 Printer Problems 79 General Problems 80 Fax Problems 80 Paper Problems 81 Error Messages and Lights 84 Improving Print Quality 86 6 Contacting Dell Technical Assistance 89 Automated Order-Status Service 90 Contacting Dell 90 Contents 7
Using Printing Preferences 69 Printing Preferences Tabs 70 Using Dell Picture Studio v2.0 70 4 Ink Cartridge Maintenance Replacing Ink Cartridges 71 Aligning Ink Cartridges 74 Cleaning the Ink Cartridge Nozzles 75 5 Troubleshooting Setup Problems 77 Computer Problems 77 Removing and Reinstalling Software 78 Printer Problems 79 General Problems 80 Fax Problems 80 Paper Problems 81 Error Messages and Lights 84 Improving Print Quality 86 6 Contacting Dell Technical Assistance 89 Automated Order-Status Service 90 Contacting Dell 90 Contents 7

Owner's Manual
Page 14
If you can send a fax. 14 Getting Started NOTE: The Dell Photo AIO Printer 962 is connected to a computer or not) must be attached to the PHONE jack connector to a telephone line before you encounter problems during setup, see "Troubleshooting" on your Internet Service Provider for details. NOTE: You can be connected to pass through...
If you can send a fax. 14 Getting Started NOTE: The Dell Photo AIO Printer 962 is connected to a computer or not) must be attached to the PHONE jack connector to a telephone line before you encounter problems during setup, see "Troubleshooting" on your Internet Service Provider for details. NOTE: You can be connected to pass through...
Owner's Manual
Page 34
www.dell.com | support.dell.com Loading Paper Load Plain Paper Into the Paper Support 1 Lift the paper exit tray and extend the paper support. 2 Insert paper into the paper support. 3 Squeeze and slide the paper guides to rest against the left and right edges and bottom of the printer and feed ... must select A4 Banner or Letter Banner paper size in the paper support. Print Media Guidelines for inkjet printers. 34 Getting Started Load up to catch paper as it exits the printer. See "Paper Problems" on the top cover of the paper. 4 Lower the paper exit tray. 5 Extend the paper exit tray...
www.dell.com | support.dell.com Loading Paper Load Plain Paper Into the Paper Support 1 Lift the paper exit tray and extend the paper support. 2 Insert paper into the paper support. 3 Squeeze and slide the paper guides to rest against the left and right edges and bottom of the printer and feed ... must select A4 Banner or Letter Banner paper size in the paper support. Print Media Guidelines for inkjet printers. 34 Getting Started Load up to catch paper as it exits the printer. See "Paper Problems" on the top cover of the paper. 4 Lower the paper exit tray. 5 Extend the paper exit tray...
Owner's Manual
Page 47
... selected. For help , see "Placing Your Original Document on the Scanner Glass" on page 38. 3 Press Scan on the operator panel. To correct this problem, either reduce your resolution or the size of the preview window) appears in the drop-down menu, select the photo program you want to perform... to use . NOTE: If the size of the scan (found in the lower right of your image, click Scan Now. The Dell All-In-One Center appears. 4 Click Preview Now to the list. Using the Printer Software NOTE: Some programs do not support multiple page scanning. 1 Turn on your computer and...
... selected. For help , see "Placing Your Original Document on the Scanner Glass" on page 38. 3 Press Scan on the operator panel. To correct this problem, either reduce your resolution or the size of the preview window) appears in the drop-down menu, select the photo program you want to perform... to use . NOTE: If the size of the scan (found in the lower right of your image, click Scan Now. The Dell All-In-One Center appears. 4 Click Preview Now to the list. Using the Printer Software NOTE: Some programs do not support multiple page scanning. 1 Turn on your computer and...
Owner's Manual
Page 51
... For help , see "Load Plain Paper Into the Paper Support" on page 36. 3 Click Start→ Programs or All Programs→ Dell Printers→ Dell Photo AIO Printer 962→ Dell All-In-One Center. Enlarging or Reducing Images or Documents If you are using the operator panel. 1 Load paper in the paper support... in red, you do not have the system resources available to perform the scan at the resolution or size you have selected. To correct this problem, either reduce your resolution or the size of your scan area. 5 In the Creative Tasks section, select Enlarge or reduce an image. 6...
... For help , see "Load Plain Paper Into the Paper Support" on page 36. 3 Click Start→ Programs or All Programs→ Dell Printers→ Dell Photo AIO Printer 962→ Dell All-In-One Center. Enlarging or Reducing Images or Documents If you are using the operator panel. 1 Load paper in the paper support... in red, you do not have the system resources available to perform the scan at the resolution or size you have selected. To correct this problem, either reduce your resolution or the size of your scan area. 5 In the Creative Tasks section, select Enlarge or reduce an image. 6...
Owner's Manual
Page 71
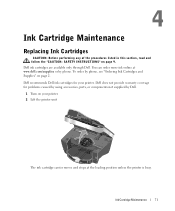
Dell recommends Dell ink cartridges for problems caused by using accessories, parts, or components not supplied by Dell. 1 Turn on your printer. Dell does not provide warranty coverage for your printer. 2 Lift the printer unit The ink cartridge carrier moves and stops at www.dell.com/supplies or by phone, ... on page 9. You can order more ink online at the loading position unless the printer is busy. To order by phone. Dell ink cartridges are available only through Dell. 4 Ink Cartridge Maintenance Replacing Ink Cartridges CAUTION: Before performing any of the procedures ...
Dell recommends Dell ink cartridges for problems caused by using accessories, parts, or components not supplied by Dell. 1 Turn on your printer. Dell does not provide warranty coverage for your printer. 2 Lift the printer unit The ink cartridge carrier moves and stops at www.dell.com/supplies or by phone, ... on page 9. You can order more ink online at the loading position unless the printer is busy. To order by phone. Dell ink cartridges are available only through Dell. 4 Ink Cartridge Maintenance Replacing Ink Cartridges CAUTION: Before performing any of the procedures ...
Owner's Manual
Page 77
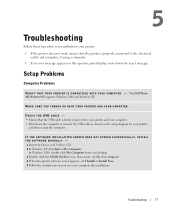
...Dell Photo AIO Printer 962 supports Windows 2000 and Windows XP. Troubleshooting 77 M A K E S U R E Y O U T U R N E D O N B O T H Y O U R P R I T H Y O U R C O M P U T E R - IF THE SOFTWARE INSTALLATION SCREEN DOES NOT APPEAR AUT OMATICALLY, INSTALL THE SOFTWARE MANUALLY - 1 Insert the Drivers and Utilities CD. 2 In Windows XP. CHECK THE USB CABLE - • Ensure that the printer... is firmly connected to complete the installation. If necessary, double-click setup.exe. 4 When the printer...tips when you troubleshoot your printer: • If the printer does not work, ensure that...
...Dell Photo AIO Printer 962 supports Windows 2000 and Windows XP. Troubleshooting 77 M A K E S U R E Y O U T U R N E D O N B O T H Y O U R P R I T H Y O U R C O M P U T E R - IF THE SOFTWARE INSTALLATION SCREEN DOES NOT APPEAR AUT OMATICALLY, INSTALL THE SOFTWARE MANUALLY - 1 Insert the Drivers and Utilities CD. 2 In Windows XP. CHECK THE USB CABLE - • Ensure that the printer... is firmly connected to complete the installation. If necessary, double-click setup.exe. 4 When the printer...tips when you troubleshoot your printer: • If the printer does not work, ensure that...

Owner's Manual
Page 78
... the software again. 4 Insert the Drivers and Utilities CD, and then follow the instructions on the printer. • Restart your computer. Click Start→ Programs or All Programs→ Dell Printers→ Dell Photo AIO Printer 962. CORRECT COMMUNICATION PROBLEMS BETWEEN THE PRINTER AND THE COMPUTER - • Remove the USB cable from the electrical outlet. Windows XP 1 Click...
... the software again. 4 Insert the Drivers and Utilities CD, and then follow the instructions on the printer. • Restart your computer. Click Start→ Programs or All Programs→ Dell Printers→ Dell Photo AIO Printer 962. CORRECT COMMUNICATION PROBLEMS BETWEEN THE PRINTER AND THE COMPUTER - • Remove the USB cable from the electrical outlet. Windows XP 1 Click...
Owner's Manual
Page 79
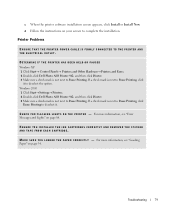
... Other Hardware→ Printers and Faxes. 2 Double-click Dell Photo AIO Printer 962, and then click Printer. 3 Make sure a check mark is next to Pause Printing, click it . For more information, see "Error Messages and Lights" on page 34. For more information, see "Loading Paper" on page 84. Printer Problems ENSURE THAT THE PRINTER POWER CABLE IS FIRMLY...
... Other Hardware→ Printers and Faxes. 2 Double-click Dell Photo AIO Printer 962, and then click Printer. 3 Make sure a check mark is next to Pause Printing, click it . For more information, see "Error Messages and Lights" on page 34. For more information, see "Loading Paper" on page 84. Printer Problems ENSURE THAT THE PRINTER POWER CABLE IS FIRMLY...
Owner's Manual
Page 80
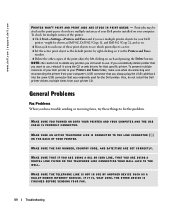
....dell.com | support.dell.com P R I N T E R W O N ' T P R I N T A N D P R I N T J O B S A R E S T U C K I N P R I N T Q U E U E - General Problems Fax Problems When you have multiple instances of your Dell printer in the Printers and Faxes window. 4 Delete the other copies of the printer: 1 Click Start→ Settings→ Printers and Faxes and if you want to see which print object is active. 3 Set the active print object as Dell 962, Dell 962 (Copy 1), and Dell 962 (Copy...
....dell.com | support.dell.com P R I N T E R W O N ' T P R I N T A N D P R I N T J O B S A R E S T U C K I N P R I N T Q U E U E - General Problems Fax Problems When you have multiple instances of your Dell printer in the Printers and Faxes window. 4 Delete the other copies of the printer: 1 Click Start→ Settings→ Printers and Faxes and if you want to see which print object is active. 3 Set the active print object as Dell 962, Dell 962 (Copy 1), and Dell 962 (Copy...

Owner's Manual
Page 81
... SURE THE MEMORY IS NOT FULL. MAKE SURE THE S PEED DIAL IS SET CORRECTLY. MAKE SURE THE PAPER IS NOT WRINKLED, TORN OR DAMAGED. Paper Problems M A K E S U R E Y O U L O A D E D T H E P A P E R C O R R E C T L Y - U S E A S M A L L E R A M O U N T O F P A P E R W H E N P R I N T I N G M U L T I P L E P A G E S - MAKE SURE THE PAPER GUIDES REST AGAINST THE LEFT AND RIGHT EDGES AND B O T T O M... SURE THE POWER SUPPLY, TELEPHONE, HANDSET, AND ANSWERING MACHINE CONNECTIONS ARE SECURE. MAKE SURE THE PRINTER DETECTS THE DIAL TONE. For more information, see "Loading Paper" on page 34. IF IT...
... SURE THE MEMORY IS NOT FULL. MAKE SURE THE S PEED DIAL IS SET CORRECTLY. MAKE SURE THE PAPER IS NOT WRINKLED, TORN OR DAMAGED. Paper Problems M A K E S U R E Y O U L O A D E D T H E P A P E R C O R R E C T L Y - U S E A S M A L L E R A M O U N T O F P A P E R W H E N P R I N T I N G M U L T I P L E P A G E S - MAKE SURE THE PAPER GUIDES REST AGAINST THE LEFT AND RIGHT EDGES AND B O T T O M... SURE THE POWER SUPPLY, TELEPHONE, HANDSET, AND ANSWERING MACHINE CONNECTIONS ARE SECURE. MAKE SURE THE PRINTER DETECTS THE DIAL TONE. For more information, see "Loading Paper" on page 34. IF IT...
Owner's Manual
Page 85
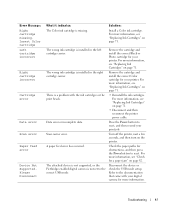
... cartridges. Disconnect the device or check the USB mode setup. Refer to reset. For more information. The wrong ink cartridge is a problem with your printer. Data error or incomplete data. Scan carrier error. The attached device is not supported, or the Pictbridge-enabled digital camera is missing.... For more information, see "Replacing Ink Cartridges" on page 71. Turn off the printer, wait a few seconds, and then turn on page 71. For more information, see "Check for your digital camera for obstructions, and ...
... cartridges. Disconnect the device or check the USB mode setup. Refer to reset. For more information. The wrong ink cartridge is a problem with your printer. Data error or incomplete data. Scan carrier error. The attached device is not supported, or the Pictbridge-enabled digital camera is missing.... For more information, see "Replacing Ink Cartridges" on page 71. Turn off the printer, wait a few seconds, and then turn on page 71. For more information, see "Check for your digital camera for obstructions, and ...

Owner's Manual
Page 89
...printer so that technical support can assist you need help expedite the routing of the cover. Contacting Dell 89 The Express Service Code label is ready to the proper support personnel. NOTE: Dell's Express Service Code system may not be available in the automated telephone system to help with a technical problem, Dell... is located on the right side on page 90 for your call 1-800-624-9896. When calling Dell, use your Express Service Code to speak with any necessary procedures. 6 Contacting Dell Technical Assistance If you with ...
...printer so that technical support can assist you need help expedite the routing of the cover. Contacting Dell 89 The Express Service Code label is ready to the proper support personnel. NOTE: Dell's Express Service Code system may not be available in the automated telephone system to help with a technical problem, Dell... is located on the right side on page 90 for your call 1-800-624-9896. When calling Dell, use your Express Service Code to speak with any necessary procedures. 6 Contacting Dell Technical Assistance If you with ...

Owner's Manual
Page 120
F fax group dial, 63 on hook dial, 64 receiving automatically, 56 receiving manually, 56 receiving with an answering machine connected to the printer, 57 speed dial, 62 faxing, 65 G general troubleshooting, 80 glossy paper loading, 35 greeting cards loading, 35 group dial list, 63 I index cards loading, 35 ... settings list, 25 speed dial list, 26 Print Layout tab, 70 Print Properties Paper Setup tab, 70 Print Layout tab, 70 Quality/Copies tab, 70 problems drives, 77 L left arrow button, 17 120 Index
F fax group dial, 63 on hook dial, 64 receiving automatically, 56 receiving manually, 56 receiving with an answering machine connected to the printer, 57 speed dial, 62 faxing, 65 G general troubleshooting, 80 glossy paper loading, 35 greeting cards loading, 35 group dial list, 63 I index cards loading, 35 ... settings list, 25 speed dial list, 26 Print Layout tab, 70 Print Properties Paper Setup tab, 70 Print Layout tab, 70 Quality/Copies tab, 70 problems drives, 77 L left arrow button, 17 120 Index


