User's Guide
Page 2
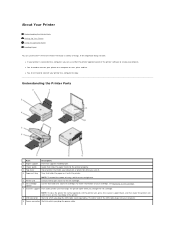
... into your computer. 9 Power connector Slot into the printer properly. About Your Printer Understanding the Printer Parts Setting Up Your Printer Using the Operator Panel Loading Paper You can use the Dell™ All-In-One Printer 810 to do not need to connect your printer to a computer to scan, print, and fax. The other end of printer that helps the paper feed into which you scan it rests on your cartridge, see Replacing an Ink Cartridge. 7 Scanner support Part under printer unit that holds one color ink cartridge. Tray that supports loaded paper.
... into your computer. 9 Power connector Slot into the printer properly. About Your Printer Understanding the Printer Parts Setting Up Your Printer Using the Operator Panel Loading Paper You can use the Dell™ All-In-One Printer 810 to do not need to connect your printer to a computer to scan, print, and fax. The other end of printer that helps the paper feed into which you scan it rests on your cartridge, see Replacing an Ink Cartridge. 7 Scanner support Part under printer unit that holds one color ink cartridge. Tray that supports loaded paper.
User's Guide
Page 3
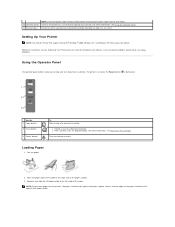
.... l Print, and then scan, an alignment page. Loading Paper 1. For more information, see Aligning an Ink Cartridge. Use the 1 Copy button 2 Scan button 3 Power button To Make a copy of the paper. Fan the paper. 2. Turn your printer on the printer you place your Setting Up Your Printer poster to install the hardware and software. Panel on or off. Surface on when the Power button is on which you use to the left edge of a document or photo. For more information, see Setup Problems. Using the Operator Panel The operator panel buttons...
.... l Print, and then scan, an alignment page. Loading Paper 1. For more information, see Aligning an Ink Cartridge. Use the 1 Copy button 2 Scan button 3 Power button To Make a copy of the paper. Fan the paper. 2. Turn your printer on the printer you place your Setting Up Your Printer poster to install the hardware and software. Panel on or off. Surface on when the Power button is on which you use to the left edge of a document or photo. For more information, see Setup Problems. Using the Operator Panel The operator panel buttons...
User's Guide
Page 5
... support options may be available for the printer and any Dell-installed software and peripherals. Support for Latin American countries) l Anonymous file transfer protocol (FTP) ftp.dell.com/ Log in as user: anonymous, and use your region on the WELCOME TO DELL SUPPORT page, and fill in the requested details to new in the troubleshooting process and provides for restoration of the printer and all Dell-installed hardware. l Electronic Support Service...
... support options may be available for the printer and any Dell-installed software and peripherals. Support for Latin American countries) l Anonymous file transfer protocol (FTP) ftp.dell.com/ Log in as user: anonymous, and use your region on the WELCOME TO DELL SUPPORT page, and fill in the requested details to new in the troubleshooting process and provides for restoration of the printer and all Dell-installed hardware. l Electronic Support Service...

User's Guide
Page 7
... document or photo aligns with the arrow on your printer. 2. Place the document or photo you can use the printer operator panel or your computer and printer, and make copies, you want to copy face down on the scanner glass. For more information, see Loading Paper. 3. Click Start® Programs or All Programs® Dell Printers® Dell AIO 810® Dell All-In-One Center. Using Your Computer 1. Copying Copying Documents or Photos Copying 4x6 Photos Using the Operator Panel Changing Copy Settings To make sure they are connected. 2. Copying Documents or Photos Using...
... document or photo aligns with the arrow on your printer. 2. Place the document or photo you can use the printer operator panel or your computer and printer, and make copies, you want to copy face down on the scanner glass. For more information, see Loading Paper. 3. Click Start® Programs or All Programs® Dell Printers® Dell AIO 810® Dell All-In-One Center. Using Your Computer 1. Copying Copying Documents or Photos Copying 4x6 Photos Using the Operator Panel Changing Copy Settings To make sure they are connected. 2. Copying Documents or Photos Using...

User's Guide
Page 8
... Programs® Dell Printers® Dell AIO 810® Dell All-In-One Center. l Select the print quality. l Auto-crop the scanned image. 7. Select the number of the photo aligns with the print side facing up. Open the top cover. 4. On the operator panel, press and hold the Copy button for three seconds. Click this tab: Print Scan To: l Select the paper size and type. If you want to change options such as paper size and quality. 5. The Dell All-In-One Center opens. 2. To make any changes...
... Programs® Dell Printers® Dell AIO 810® Dell All-In-One Center. l Select the print quality. l Auto-crop the scanned image. 7. Select the number of the photo aligns with the print side facing up. Open the top cover. 4. On the operator panel, press and hold the Copy button for three seconds. Click this tab: Print Scan To: l Select the paper size and type. If you want to change options such as paper size and quality. 5. The Dell All-In-One Center opens. 2. To make any changes...
User's Guide
Page 10
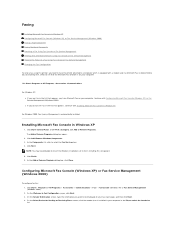
... (Windows 2000) Faxing a Paper Document Faxing Electronic Documents Receiving a Fax Using Fax Console or Fax Service Management Viewing Sent and Received Faxes Using Fax Console or Fax Service Management Viewing the Status of a Fax Using Fax Console or Fax Service Management Changing the Fax Configuration To send a fax using this printer, you need to have Microsoft Fax on your computer. Under Pick a Category, click Add or Remove Programs. The Add or Remove Programs dialog box opens. 2. NOTE: You may be displayed on your fax cover page, and then click Next. 4. On the Select Device...
... (Windows 2000) Faxing a Paper Document Faxing Electronic Documents Receiving a Fax Using Fax Console or Fax Service Management Viewing Sent and Received Faxes Using Fax Console or Fax Service Management Viewing the Status of a Fax Using Fax Console or Fax Service Management Changing the Fax Configuration To send a fax using this printer, you need to have Microsoft Fax on your computer. Under Pick a Category, click Add or Remove Programs. The Add or Remove Programs dialog box opens. 2. NOTE: You may be displayed on your fax cover page, and then click Next. 4. On the Select Device...
User's Guide
Page 11
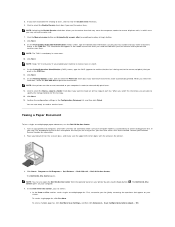
... multiple-page paper document, use the Dell All-In-One Center. 1. or multiple-page fax. To send a single-page fax, click Fax Now. If you want to disable the sending of the faxes you can also open the Dell All-In-One Center from the operator panel on check box if you are using to receive faxes in order to receive faxes. Click the Manual answer button or Automatically answer after (user-defined number of each received fax to be on and connected to your document on your screen...
... multiple-page paper document, use the Dell All-In-One Center. 1. or multiple-page fax. To send a single-page fax, click Fax Now. If you want to disable the sending of the faxes you can also open the Dell All-In-One Center from the operator panel on check box if you are using to receive faxes in order to receive faxes. Click the Manual answer button or Automatically answer after (user-defined number of each received fax to be on and connected to your document on your screen...

User's Guide
Page 12
... screen. NOTE: One of the questions on the Tools menu to scan another page. If you may cause the computer modem to view the status, and then click Preferences or Properties. 6. Click Start® Programs or All Programs® Accessories® Communications® Fax. 2. Click the General tab, and view the Status line. 7. With the file open, click File® Print. 2. Viewing Sent and Received Faxes Using Fax Console or Fax Service...
... screen. NOTE: One of the questions on the Tools menu to scan another page. If you may cause the computer modem to view the status, and then click Preferences or Properties. 6. Click Start® Programs or All Programs® Accessories® Communications® Fax. 2. Click the General tab, and view the Status line. 7. With the file open, click File® Print. 2. Viewing Sent and Received Faxes Using Fax Console or Fax Service...
User's Guide
Page 13
... l Downloads - Printer documentation and product specifications l How to use the CD to your printer or advanced technical reference material for components, such as memory l Customer Care - Follow the instructions shown on the screen. Troubleshooting hints and tips, articles from technicians, and online courses l Upgrades - l Drivers for my printer l My User's Guide Find it here Drivers and Utilities CD How to technical service and support questions l Documentation for my printer Windows XP Help and Support Center 1. Type...
... l Downloads - Printer documentation and product specifications l How to use the CD to your printer or advanced technical reference material for components, such as memory l Customer Care - Follow the instructions shown on the screen. Troubleshooting hints and tips, articles from technicians, and online courses l Upgrades - l Drivers for my printer l My User's Guide Find it here Drivers and Utilities CD How to technical service and support questions l Documentation for my printer Windows XP Help and Support Center 1. Type...

User's Guide
Page 18
..., you changed the files and the date of any portion of it, thus forming a work based on the Library (independent of the use of the object file is unrestricted, regardless of whether it is part of running a program using the Library is not restricted, and output from such a program is covered only if its purpose remains meaningful. (For example, a function in a given copy, it...
..., you changed the files and the date of any portion of it, thus forming a work based on the Library (independent of the use of the object file is unrestricted, regardless of whether it is part of running a program using the Library is not restricted, and output from such a program is covered only if its purpose remains meaningful. (For example, a function in a given copy, it...

User's Guide
Page 19
... corresponding machine-readable source code for enforcing compliance by modifying or distributing the Library (or any other proprietary libraries that you do these , write to the author to do one , as long as a consequence you wish to incorporate parts of software distributed through any later version published by the Free Software Foundation. Verify that the user has already received a copy...
... corresponding machine-readable source code for enforcing compliance by modifying or distributing the Library (or any other proprietary libraries that you do these , write to the author to do one , as long as a consequence you wish to incorporate parts of software distributed through any later version published by the Free Software Foundation. Verify that the user has already received a copy...
User's Guide
Page 22
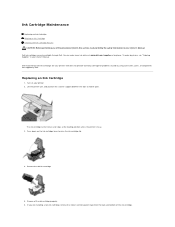
... and stops at www.dell.com/supplies or by phone. Dispose of the old cartridge properly. 6. Dell recommends Dell ink cartridges for problems caused by using accessories, parts, or components not supplied by phone, see "Ordering Supplies" in your Owner's Manual. Dell ink cartridges are installing a new ink cartridge, remove the sticker and transparent tape from the back and bottom of the ink cartridge. Turn on the ink cartridge lever to hold it open. Ink Cartridge Maintenance Replacing an Ink Cartridge Aligning an Ink Cartridge Cleaning the Ink Cartridge Nozzles...
... and stops at www.dell.com/supplies or by phone. Dispose of the old cartridge properly. 6. Dell recommends Dell ink cartridges for problems caused by using accessories, parts, or components not supplied by phone, see "Ordering Supplies" in your Owner's Manual. Dell ink cartridges are installing a new ink cartridge, remove the sticker and transparent tape from the back and bottom of the ink cartridge. Turn on the ink cartridge lever to hold it open. Ink Cartridge Maintenance Replacing an Ink Cartridge Aligning an Ink Cartridge Cleaning the Ink Cartridge Nozzles...

User's Guide
Page 37
... use . Place the first object you want to locate and add your scan destination. Open the Dell All-In-One Center by clicking Start® Programs or All Programs® Dell Printers® Dell AIO 810® Dell All-In-One Center. 4. Turn on the printer. On the next screen, click Add to scan face down on the scanner glass. In the Send scanned image to: drop-down menu. Change any settings. 10. The Dell All-In-One Center opens. in the drop-down menu...
... use . Place the first object you want to locate and add your scan destination. Open the Dell All-In-One Center by clicking Start® Programs or All Programs® Dell Printers® Dell AIO 810® Dell All-In-One Center. 4. Turn on the printer. On the next screen, click Add to scan face down on the scanner glass. In the Send scanned image to: drop-down menu. Change any settings. 10. The Dell All-In-One Center opens. in the drop-down menu...

User's Guide
Page 41
... scan, copy, fax, and print operations with newly scanned and previously saved documents and images. The Dell All-In-One Center includes four main sections: Scan and Fax, Copy, Productivity Tools, and Preview. l Access troubleshooting and maintenance information. To access the Dell All-In-One Center: Click Start® Programs or All Programs® Dell Printers® Dell AIO 810® Dell All-In-One Center. Understanding the Software Using the Dell All-In-One Center Using Printing Preferences Using Dell Picture Studio Dell Ink Management System Removing and Reinstalling the Software...
... scan, copy, fax, and print operations with newly scanned and previously saved documents and images. The Dell All-In-One Center includes four main sections: Scan and Fax, Copy, Productivity Tools, and Preview. l Access troubleshooting and maintenance information. To access the Dell All-In-One Center: Click Start® Programs or All Programs® Dell Printers® Dell AIO 810® Dell All-In-One Center. Understanding the Software Using the Dell All-In-One Center Using Printing Preferences Using Dell Picture Studio Dell Ink Management System Removing and Reinstalling the Software...

User's Guide
Page 42
... times on one page. In Windows XP, click Start® Control Panel® Printers and Other Hardware®Printers and Faxes. In this section: Preview Now Scan and Fax Copy Productivity Tools You can change the various printer settings. l Enlarge or reduce an image. With your document open : 1. Using Printing Preferences Printing Preferences allows you want to change your printer settings in Printing Preferences depending on the type of project you want to send the scanned image. To access Printing Preferences when a document...
... times on one page. In Windows XP, click Start® Control Panel® Printers and Other Hardware®Printers and Faxes. In this section: Preview Now Scan and Fax Copy Productivity Tools You can change the various printer settings. l Enlarge or reduce an image. With your document open : 1. Using Printing Preferences Printing Preferences allows you want to change your printer settings in Printing Preferences depending on the type of project you want to send the scanned image. To access Printing Preferences when a document...

User's Guide
Page 43
... a new ink cartridge. Tab Print Setup Advanced Options Quality/Speed - Media Type - Select how the document is empty, the Reserve Tank window appears on your screen when you can print using portrait or landscape orientation. Customize how the printer prints several copies of paper. Select Automatic, Draft, Normal, or Photo depending on image content. When your ink cartridge is arranged on both sides of print jobs the printer completes. Maintenance Install Print Cartridge Clean Print Cartridge Align Print Cartridge Print a Test Page Network Support Using Dell...
... a new ink cartridge. Tab Print Setup Advanced Options Quality/Speed - Media Type - Select how the document is empty, the Reserve Tank window appears on your screen when you can print using portrait or landscape orientation. Customize how the printer prints several copies of paper. Select Automatic, Draft, Normal, or Photo depending on image content. When your ink cartridge is arranged on both sides of print jobs the printer completes. Maintenance Install Print Cartridge Clean Print Cartridge Align Print Cartridge Print a Test Page Network Support Using Dell...
User's Guide
Page 44
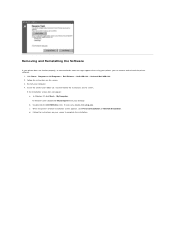
... setup.exe. c. Insert the Drivers and Utilities CD, and then follow the instructions on the screen. 3. When the printer software installation screen appears, click Personal Installation or Network Installation. Click Start® Programs or All Programs® Dell Printers® Dell AIO 810® Uninstall Dell AIO 810. 2. Restart your desktop. Follow the instructions on the screen. If the installation screen does not appear: a. d. Removing and Reinstalling the Software If your printer does not function properly, or communication error messages...
... setup.exe. c. Insert the Drivers and Utilities CD, and then follow the instructions on the screen. 3. When the printer software installation screen appears, click Personal Installation or Network Installation. Click Start® Programs or All Programs® Dell Printers® Dell AIO 810® Uninstall Dell AIO 810. 2. Restart your desktop. Follow the instructions on the screen. If the installation screen does not appear: a. d. Removing and Reinstalling the Software If your printer does not function properly, or communication error messages...
User's Guide
Page 47
..., Normal, or Photo print quality. l The paper guide rests against the right side of banner paper l You remove any paper from the paper support before inserting banner paper. Failure to : 100 sheets of plain paper Make sure: l The paper is not listed, and set the left edge of the envelopes faces up . l You use banner paper designed for inkjet printers. 10 envelopes l The print side of the cards. l The envelopes are mailing within Japan, the envelope can load a single...
..., Normal, or Photo print quality. l The paper guide rests against the right side of banner paper l You remove any paper from the paper support before inserting banner paper. Failure to : 100 sheets of plain paper Make sure: l The paper is not listed, and set the left edge of the envelopes faces up . l You use banner paper designed for inkjet printers. 10 envelopes l The print side of the cards. l The envelopes are mailing within Japan, the envelope can load a single...
User's Guide
Page 49
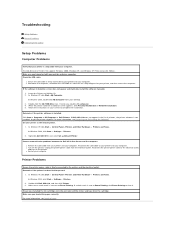
...l Remove the USB cable from your printer as Default Printer. Troubleshooting Setup Problems General Problems Improving Print Quality Setup Problems Computer Problems Verify that your printer is compatible with your computer. Set your desktop. 3. l Restart your computer. The Dell All-In-One Printer 810 supports Windows 2000, Windows XP, and Windows XP Professional x64 Edition. If the software installation screen does not appear automatically, install the software manually. 1. Reconnect the printer power cable to Pause Printing. In Windows XP, click Start® Control Panel...
...l Remove the USB cable from your printer as Default Printer. Troubleshooting Setup Problems General Problems Improving Print Quality Setup Problems Computer Problems Verify that your printer is compatible with your computer. Set your desktop. 3. l Restart your computer. The Dell All-In-One Printer 810 supports Windows 2000, Windows XP, and Windows XP Professional x64 Edition. If the software installation screen does not appear automatically, install the software manually. 1. Reconnect the printer power cable to Pause Printing. In Windows XP, click Start® Control Panel...
User's Guide
Page 50
Ensure the computer is centered in the paper support: 1. Paper Problems Make sure you are printing photos. For more information, see Loading Paper. Make sure the paper is connected to keep it open , click File® Print. Using your printer and your computer Follow the instructions on the screen for your printer. Turn on the printer, and print the document again. If the paper jam is properly connected. l Use the appropriate paper. Use Dell Premium Photo Paper if you loaded the paper correctly. l Select a higher print quality. Firmly...
Ensure the computer is centered in the paper support: 1. Paper Problems Make sure you are printing photos. For more information, see Loading Paper. Make sure the paper is connected to keep it open , click File® Print. Using your printer and your computer Follow the instructions on the screen for your printer. Turn on the printer, and print the document again. If the paper jam is properly connected. l Use the appropriate paper. Use Dell Premium Photo Paper if you loaded the paper correctly. l Select a higher print quality. Firmly...


