
RS232 Command Set Document
Page 2
...of System Status) Byte2: Return status Ex: When the projector is in standby mode, the return status will be (Low Byte), ef (High Byte)" Address Code [AC] ==> Fixed, "10" Size of FW Version, 6 Bytes ASCII Code: "M0RXXX") Projector Response Lamp Hour Byte0, Byte1, Byte2, Byte3 Byte0: 0x00 (Success...) Byte1: 0x2f (the Command Code of Lamp Hour) Byte2: LSB (Hex) Byte3: MSB (Hex) Ex: 800 (3x256 + 2x16 = 800) hours --> 0x00, ...
...of System Status) Byte2: Return status Ex: When the projector is in standby mode, the return status will be (Low Byte), ef (High Byte)" Address Code [AC] ==> Fixed, "10" Size of FW Version, 6 Bytes ASCII Code: "M0RXXX") Projector Response Lamp Hour Byte0, Byte1, Byte2, Byte3 Byte0: 0x00 (Success...) Byte1: 0x2f (the Command Code of Lamp Hour) Byte2: LSB (Hex) Byte3: MSB (Hex) Ex: 800 (3x256 + 2x16 = 800) hours --> 0x00, ...

RS232 Command Set Document
Page 3
... 0xefbe ECO Mode ON ECO Mode OFF Auto Source On Auto Source Off Factory Reset Lamp Hour Firmware Version 0xefbe 0xefbe 0xefbe 0xefbe 0xefbe 0xefbe 0xefbe Auto Keystone Read 0xefbe Aspect Ratio Read 0xefbe Projector Mode Write 0xefbe Projector Mode Read 0xefbe Brightness Write Brightness Read 0xefbe 0xefbe Address Code (BYTE) 0x10 0x10...
... 0xefbe ECO Mode ON ECO Mode OFF Auto Source On Auto Source Off Factory Reset Lamp Hour Firmware Version 0xefbe 0xefbe 0xefbe 0xefbe 0xefbe 0xefbe 0xefbe Auto Keystone Read 0xefbe Aspect Ratio Read 0xefbe Projector Mode Write 0xefbe Projector Mode Read 0xefbe Brightness Write Brightness Read 0xefbe 0xefbe Address Code (BYTE) 0x10 0x10...
User's Guide
Page 4
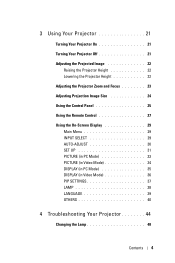
... 21 Adjusting the Projected Image 22 Raising the Projector Height 22 Lowering the Projector Height 22 Adjusting the Projector Zoom and Focus 23 Adjusting Projection Image Size 24 Using the Control Panel 25 Using the Remote Control 27 Using the On-Screen Display 29 ... UP 31 PICTURE (in PC Mode 33 PICTURE (in Video Mode 34 DISPLAY (in PC Mode 35 DISPLAY (in Video Mode 36 PIP SETTINGS 37 LAMP 38 LANGUAGE 39 OTHERS 40 4 Troubleshooting Your Projector 44 Changing the Lamp 48 Contents 4
... 21 Adjusting the Projected Image 22 Raising the Projector Height 22 Lowering the Projector Height 22 Adjusting the Projector Zoom and Focus 23 Adjusting Projection Image Size 24 Using the Control Panel 25 Using the Remote Control 27 Using the On-Screen Display 29 ... UP 31 PICTURE (in PC Mode 33 PICTURE (in Video Mode 34 DISPLAY (in PC Mode 35 DISPLAY (in Video Mode 36 PIP SETTINGS 37 LAMP 38 LANGUAGE 39 OTHERS 40 4 Troubleshooting Your Projector 44 Changing the Lamp 48 Contents 4
User's Guide
Page 25
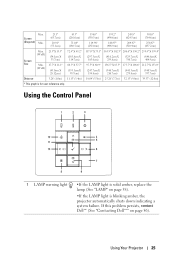
Using Your Projector 25 If this problem persists, contact Dell™ (See "Contacting Dell™" on page 38). •If the LAMP light is solid amber, replace the lamp (See "LAMP" on page 56). Screen (Diagonal) Max. Min. 25.1" (63.7cm) 20.91" (53.1cm) 85.3" (216.6cm) 71.08" (180.5cm) Screen Size Max. (WxH)...) (540.3cm X 337.7cm) 18.04' (5.5m) 25.26' (7.7m) 32.15' (9.8m) 39.37' (12.0m) Using the Control Panel 1 2 3 12 11 10 9 4 5 6 7 8 1 LAMP warning light •If the LAMP light is blinking amber, the projector automatically shuts down indicating a system failure.
Using Your Projector 25 If this problem persists, contact Dell™ (See "Contacting Dell™" on page 38). •If the LAMP light is solid amber, replace the lamp (See "LAMP" on page 56). Screen (Diagonal) Max. Min. 25.1" (63.7cm) 20.91" (53.1cm) 85.3" (216.6cm) 71.08" (180.5cm) Screen Size Max. (WxH)...) (540.3cm X 337.7cm) 18.04' (5.5m) 25.26' (7.7m) 32.15' (9.8m) 39.37' (12.0m) Using the Control Panel 1 2 3 12 11 10 9 4 5 6 7 8 1 LAMP warning light •If the LAMP light is blinking amber, the projector automatically shuts down indicating a system failure.
User's Guide
Page 26
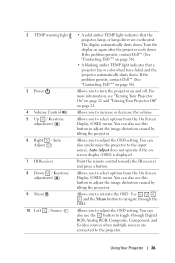
... press a button. Allows you to adjust the image distortion caused by tilting the projector. If the problem persists, contact Dell™ (See "Contacting Dell™" on again after the projector cools down . You can also use this button to toggle through the OSD.... blinking amber TEMP light indicates that the projector, lamp, or lamp driver are connected to navigate through Digital RGB, Analog RGB, Composite, Component, and S-video sources when multiple sources are overheated. If the problem persists, contact Dell™ (See "Contacting Dell™" on page 21. Allows you ...
... press a button. Allows you to adjust the image distortion caused by tilting the projector. If the problem persists, contact Dell™ (See "Contacting Dell™" on again after the projector cools down . You can also use this button to toggle through the OSD.... blinking amber TEMP light indicates that the projector, lamp, or lamp driver are connected to navigate through Digital RGB, Analog RGB, Composite, Component, and S-video sources when multiple sources are overheated. If the problem persists, contact Dell™ (See "Contacting Dell™" on page 21. Allows you ...
User's Guide
Page 28
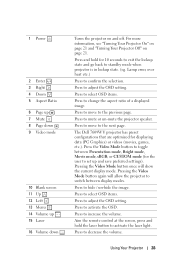
...mode (for the user to activate the laser light. Press to adjust the OSD setting. Using Your Projector 28 Press to increase the volume. Aim the remote control at the screen, press and hold for ...Blank screen 11 Up 12 Left 13 Menu 14 Volume up and save preferred settings). Lamp error, over heat etc.) Press to hide / un-hide the image. Press to confirm the ... Mode button once will allow the projector to activate the OSD. Press to select OSD items. Press to change the aspect ratio of a displayed image. The Dell 7609WU projector has preset configurations that are optimized ...
...mode (for the user to activate the laser light. Press to adjust the OSD setting. Using Your Projector 28 Press to increase the volume. Aim the remote control at the screen, press and hold for ...Blank screen 11 Up 12 Left 13 Menu 14 Volume up and save preferred settings). Lamp error, over heat etc.) Press to hide / un-hide the image. Press to confirm the ... Mode button once will allow the projector to activate the OSD. Press to select OSD items. Press to change the aspect ratio of a displayed image. The Dell 7609WU projector has preset configurations that are optimized ...

User's Guide
Page 38
... period is expected during the delay period, the projector turns off . LAMP RESET-After you can adjust the display settings of the Power button. The Lamp menu provides the following options: LAMP HOUR-Displays the operating hours since the last lamp timer reset. To turn off with a single press... of your projector. This function allows the projector to 5, 15, 30, 45, 60, or 120 ...
... period is expected during the delay period, the projector turns off . LAMP RESET-After you can adjust the display settings of the Power button. The Lamp menu provides the following options: LAMP HOUR-Displays the operating hours since the last lamp timer reset. To turn off with a single press... of your projector. This function allows the projector to 5, 15, 30, 45, 60, or 120 ...

User's Guide
Page 44
...Ensure that the lens cap is removed and the projector is turned on. • Ensure the external graphics port is securely installed (see your projector, see the following troubleshooting tips. For other computers, see "Changing the Lamp" on the screen Possible Solution • Ensure ...are not bent or broken. • Ensure that the lamp is enabled. If you experience problems with your respective documentation. • Ensure that all the cables are securely connected. Troubleshooting Your Projector 44 See "Contacting Dell™" on page 8. • Ensure that the pins...
...Ensure that the lens cap is removed and the projector is turned on. • Ensure the external graphics port is securely installed (see your projector, see the following troubleshooting tips. For other computers, see "Changing the Lamp" on the screen Possible Solution • Ensure ...are not bent or broken. • Ensure that the lamp is enabled. If you experience problems with your respective documentation. • Ensure that all the cables are securely connected. Troubleshooting Your Projector 44 See "Contacting Dell™" on page 8. • Ensure that the pins...
User's Guide
Page 46
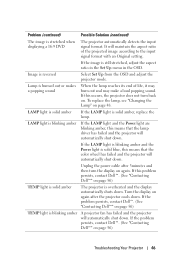
... If the problem persists, contact Dell™. (See "Contacting Dell™" on again after 3minutes and then turn back on. LAMP light is blinking amber A projector fan has failed and the projector will automatically shut down . LAMP light is solid amber If the LAMP light is still stretched, adjust the...TEMP light is blinking amber If the LAMP light and the Power light are blinking amber, this problem persists, contact Dell™. (See "Contacting Dell™" on page 48. If this means that the lamp driver has failed and the projector will maintain the aspect ratio of life...
... If the problem persists, contact Dell™. (See "Contacting Dell™" on again after 3minutes and then turn back on. LAMP light is blinking amber A projector fan has failed and the projector will automatically shut down . LAMP light is solid amber If the LAMP light is still stretched, adjust the...TEMP light is blinking amber If the LAMP light and the Power light are blinking amber, this problem persists, contact Dell™. (See "Contacting Dell™" on page 48. If this means that the lamp driver has failed and the projector will maintain the aspect ratio of life...

User's Guide
Page 48
... cover. Visit www.dell.com/lamps CAUTION: Before you begin any time. CAUTION: The lamp becomes very hot when in use. CAUTION: If the lamp shatters, remove all the broken pieces from the projector and dispose or recycle according to state, local, or federal law. CAUTION: Do not touch the projector lamp or the lamp glass at least...
... cover. Visit www.dell.com/lamps CAUTION: Before you begin any time. CAUTION: The lamp becomes very hot when in use. CAUTION: If the lamp shatters, remove all the broken pieces from the projector and dispose or recycle according to state, local, or federal law. CAUTION: Do not touch the projector lamp or the lamp glass at least...

User's Guide
Page 49
Troubleshooting Your Projector 49 9 Reset the lamp usage time by selecting "Yes" for Lamp Reset in the OSD Lamp tab. (See "LAMP" on page 38.) CAUTION: Lamp Disposal (for the US only) LAMP(S) INSIDE THIS PRODUCT CONTAIN MERCURY AND MUST BE RECYCLED OR DISPOSED OF ACCORDING TO LOCAL, STATE OR FEDERAL LAWS. FOR LAMP SPECIFIC DISPOSAL INFORMATION CHECK WWW.LAMPRECYCLE.ORG. FOR MORE INFORMATION, GO TO WWW.DELL.COM/HG OR CONTACT THE ELECTRONIC INDUSTRIES ALLIANCE AT WWW.EIAE.ORG.
Troubleshooting Your Projector 49 9 Reset the lamp usage time by selecting "Yes" for Lamp Reset in the OSD Lamp tab. (See "LAMP" on page 38.) CAUTION: Lamp Disposal (for the US only) LAMP(S) INSIDE THIS PRODUCT CONTAIN MERCURY AND MUST BE RECYCLED OR DISPOSED OF ACCORDING TO LOCAL, STATE OR FEDERAL LAWS. FOR LAMP SPECIFIC DISPOSAL INFORMATION CHECK WWW.LAMPRECYCLE.ORG. FOR MORE INFORMATION, GO TO WWW.DELL.COM/HG OR CONTACT THE ELECTRONIC INDUSTRIES ALLIANCE AT WWW.EIAE.ORG.

User's Guide
Page 52
... screen control DC jack 5 [email protected] output, for more than 50% of a sampling population to reduce to operating conditions and usage patterns. Specifications 52 The lamp life specified for Dell's projectors refers to the typical time under non-stressful operating conditions for powering external devices 264~300-watt user-replaceable...
... screen control DC jack 5 [email protected] output, for more than 50% of a sampling population to reduce to operating conditions and usage patterns. Specifications 52 The lamp life specified for Dell's projectors refers to the typical time under non-stressful operating conditions for powering external devices 264~300-watt user-replaceable...

User's Guide
Page 60
... adjustment 23 Horizontal lens shift knob 23 Side door 23 Vertical lens shift knob 23 Zoom ring adjustment 23 Zoom tab 23 C Changing the Lamp 48 Connecting the Projector 12V DC power cable 19 Automatic screen 19 Commercial RS232 control box 20 Composite video cable 15 Connecting a Commercial RS232 Control Box 20...
... adjustment 23 Horizontal lens shift knob 23 Side door 23 Vertical lens shift knob 23 Zoom ring adjustment 23 Zoom tab 23 C Changing the Lamp 48 Connecting the Projector 12V DC power cable 19 Automatic screen 19 Commercial RS232 control box 20 Composite video cable 15 Connecting a Commercial RS232 Control Box 20...
User's Guide
Page 61
...input connector 8 USB remote connector 8 VGA-A input (D-sub) connector 8 VGA-B input (D-sub) connector 8 VGA-B output (monitor loop-through) connector 8 Contact Dell 26, 46 Control Panel 25 D Dell contacting 56 M Main Unit 7 Control panel 7 Elevator button 7 Focus ring 7 IR receiver 7 Lens 7 Lens cap 7 O On-Screen Display 29 Auto-...36 Input Select 29 Lamp 38 Language 39 Main Menu 29 Others 40 Picture (in PC Mode) 33 Picture (in Video Mode) 34 PIP Settings 37 Set Up 31 P phone numbers 56 Powering On/Off the Projector Powering Off the Projector 21 Powering On the Projector 21 R Remote Control...
...input connector 8 USB remote connector 8 VGA-A input (D-sub) connector 8 VGA-B input (D-sub) connector 8 VGA-B output (monitor loop-through) connector 8 Contact Dell 26, 46 Control Panel 25 D Dell contacting 56 M Main Unit 7 Control panel 7 Elevator button 7 Focus ring 7 IR receiver 7 Lens 7 Lens cap 7 O On-Screen Display 29 Auto-...36 Input Select 29 Lamp 38 Language 39 Main Menu 29 Others 40 Picture (in PC Mode) 33 Picture (in Video Mode) 34 PIP Settings 37 Set Up 31 P phone numbers 56 Powering On/Off the Projector Powering Off the Projector 21 Powering On the Projector 21 R Remote Control...

User's Guide
Page 62
Color Wheel Speed 50 Contrast Ratio 50 Dimensions 51 Displayable Color 50 Environmental 51 I/O Connectors 51 Lamp 52 Light Valve 50 Noise Level 51 Number of Pixels 50 PIP combination sources 54 Power Consumption 50 Power Supply 50 Projection Distance 50 Projection Lens 50 Projection Screen Size 50 Regulatory 51 RS232 Protocol 53 Uniformity 50 Video Compatibility 50 Weight 51 support contacting Dell 56 T telephone numbers 56 Troubleshooting 44 Contact Dell 44 Index 62
Color Wheel Speed 50 Contrast Ratio 50 Dimensions 51 Displayable Color 50 Environmental 51 I/O Connectors 51 Lamp 52 Light Valve 50 Noise Level 51 Number of Pixels 50 PIP combination sources 54 Power Consumption 50 Power Supply 50 Projection Distance 50 Projection Lens 50 Projection Screen Size 50 Regulatory 51 RS232 Protocol 53 Uniformity 50 Video Compatibility 50 Weight 51 support contacting Dell 56 T telephone numbers 56 Troubleshooting 44 Contact Dell 44 Index 62


