
RS232 Command Set Document
Page 3
...Factory Reset Lamp Hour Firmware Version 0xefbe 0xefbe 0xefbe 0xefbe 0xefbe 0xefbe 0xefbe Auto Keystone Read 0xefbe Aspect Ratio Read 0xefbe Projector Mode Write 0xefbe Projector Mode Read 0xefbe Brightness Write Brightness Read 0xefbe 0xefbe Address Code (BYTE) 0x10 0x10 0x10 0x10 0x10 0x10 0x10 ...0x27 0x28 0x29 0x2a 0x2b 0x2c 0x2d 0x2e 0x2f 0x30 0x31 0x32 0x33 0x34 0x35 0x36 Toggle 0x00~0x01 0x01: VGA-A 0x02: VGA-B 0x03: S-Video 0x04: CVBS 0x05: Component 0x06: DisplayPort 0x07: HDMI-A 0x08: HDMI-B Range (0xa8~0x58) Range (0xb5~0x4b) 0x00: Yes. On 0x01: No. Off 0x00: Origin...
...Factory Reset Lamp Hour Firmware Version 0xefbe 0xefbe 0xefbe 0xefbe 0xefbe 0xefbe 0xefbe Auto Keystone Read 0xefbe Aspect Ratio Read 0xefbe Projector Mode Write 0xefbe Projector Mode Read 0xefbe Brightness Write Brightness Read 0xefbe 0xefbe Address Code (BYTE) 0x10 0x10 0x10 0x10 0x10 0x10 0x10 ...0x27 0x28 0x29 0x2a 0x2b 0x2c 0x2d 0x2e 0x2f 0x30 0x31 0x32 0x33 0x34 0x35 0x36 Toggle 0x00~0x01 0x01: VGA-A 0x02: VGA-B 0x03: S-Video 0x04: CVBS 0x05: Component 0x06: DisplayPort 0x07: HDMI-A 0x08: HDMI-B Range (0xa8~0x58) Range (0xb5~0x4b) 0x00: Yes. On 0x01: No. Off 0x00: Origin...
User's Guide
Page 3
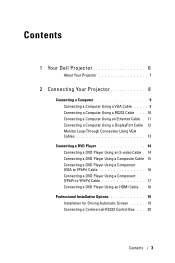
...Dell Projector 6 About Your Projector 7 2 Connecting Your Projector 8 Connecting a Computer 9 Connecting a Computer Using a VGA Cable . . . . . 9 Connecting a Computer Using a RS232 Cable . . . 10 Connecting a Computer Using an Ethernet Cable . 11 Connecting a Computer Using a DisplayPort Cable 12 Monitor Loop-Through Connection Using VGA Cables 13 Connecting a DVD Player 14 Connecting a DVD Player Using an S-video... Cable . 14 Connecting a DVD Player Using a Composite Cable 15 Connecting a DVD Player Using a Component (VGA to YPbPr) Cable 16 Connecting a DVD Player Using a Component...
...Dell Projector 6 About Your Projector 7 2 Connecting Your Projector 8 Connecting a Computer 9 Connecting a Computer Using a VGA Cable . . . . . 9 Connecting a Computer Using a RS232 Cable . . . 10 Connecting a Computer Using an Ethernet Cable . 11 Connecting a Computer Using a DisplayPort Cable 12 Monitor Loop-Through Connection Using VGA Cables 13 Connecting a DVD Player 14 Connecting a DVD Player Using an S-video... Cable . 14 Connecting a DVD Player Using a Composite Cable 15 Connecting a DVD Player Using a Component (VGA to YPbPr) Cable 16 Connecting a DVD Player Using a Component...
User's Guide
Page 8
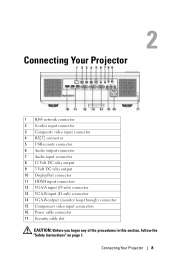
Connecting Your Projector 8 2 Connecting Your Projector 1 RJ45 network connector 2 S-video input connector 3 Composite video input connector 4 RS232 connector 5 USB remote connector 6 Audio output connector 7 Audio input connector 8 12 Volt DC relay output 9 5 Volt DC relay ...11 HDMI input connectors 12 VGA-A input (D-sub) connector 13 VGA-B input (D-sub) connector 14 VGA-B output (monitor loop-through) connector 15 Component video input connectors 16 Power cable connector 17 Security cable slot CAUTION: Before you begin any of the procedures in this section, follow the "Safety Instructions...
Connecting Your Projector 8 2 Connecting Your Projector 1 RJ45 network connector 2 S-video input connector 3 Composite video input connector 4 RS232 connector 5 USB remote connector 6 Audio output connector 7 Audio input connector 8 12 Volt DC relay output 9 5 Volt DC relay ...11 HDMI input connectors 12 VGA-A input (D-sub) connector 13 VGA-B input (D-sub) connector 14 VGA-B output (monitor loop-through) connector 15 Component video input connectors 16 Power cable connector 17 Security cable slot CAUTION: Before you begin any of the procedures in this section, follow the "Safety Instructions...
User's Guide
Page 26
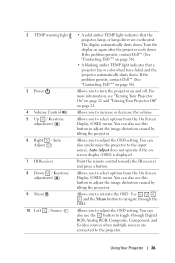
...the OSD setting. Using Your Projector 26 Allows you to adjust the OSD setting. You can also use the button to toggle through the OSD. Allows you to navigate through Digital RGB, Analog RGB, Composite, Component, and S-video sources when multiple sources are ...overheated. The display automatically shuts down . If the problem persists, contact Dell™ (See "Contacting Dell™" on again after the projector cools down . For more information, see "Turning Your Projector On" on page 21 and "Turning Your Projector Off...
...the OSD setting. Using Your Projector 26 Allows you to adjust the OSD setting. You can also use the button to toggle through the OSD. Allows you to navigate through Digital RGB, Analog RGB, Composite, Component, and S-video sources when multiple sources are ...overheated. The display automatically shuts down . If the problem persists, contact Dell™ (See "Contacting Dell™" on again after the projector cools down . For more information, see "Turning Your Projector On" on page 21 and "Turning Your Projector Off...

User's Guide
Page 29
... press the Enter button on your projector's control panel or remote control. Using Your Projector 29 Press to adjust image distortion caused by tilting the projector. (±30 degrees) Press to switch between Digital RGB, Analog RGB, Composite, S-video and Component sources. To select an option, ...press the or on your projector's control panel or remote control. 17 Keystone adjustment...
... press the Enter button on your projector's control panel or remote control. Using Your Projector 29 Press to adjust image distortion caused by tilting the projector. (±30 degrees) Press to switch between Digital RGB, Analog RGB, Composite, S-video and Component sources. To select an option, ...press the or on your projector's control panel or remote control. 17 Keystone adjustment...
User's Guide
Page 30
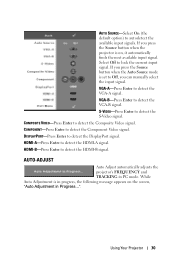
...the HDMI-A signal. HDMI-A-Press Enter to detect the Component Video signal. VGA-B-Press Enter to detect the DisplayPort signal. DISPLAYPORT-Press Enter to detect the VGA-B signal. If you press the Source button when the projector is on the screen, "Auto Adjustment in Progress...". ... the Auto Source mode is in PC mode. VGA-A-Press Enter to detect the S-Video signal. S-VIDEO-Press Enter to detect the VGA-A signal. AUTO-ADJUST Auto Adjust automatically adjusts the projector's FREQUENCY and TRACKING in progress, the following message appears on , it automatically finds...
...the HDMI-A signal. HDMI-A-Press Enter to detect the Component Video signal. VGA-B-Press Enter to detect the DisplayPort signal. DISPLAYPORT-Press Enter to detect the VGA-B signal. If you press the Source button when the projector is on the screen, "Auto Adjustment in Progress...". ... the Auto Source mode is in PC mode. VGA-A-Press Enter to detect the S-Video signal. S-VIDEO-Press Enter to detect the VGA-A signal. AUTO-ADJUST Auto Adjust automatically adjusts the projector's FREQUENCY and TRACKING in progress, the following message appears on , it automatically finds...

User's Guide
Page 50
... - JBMA) 1920x 1200 (WUXGA) Up to 1.07B colors (with Dithering) 2X F-Stop: F/ 2.6~2.9 Focal length, f=39.12~46.94 mm 1.2X manual Zoom Lens 20.9-301.0 inches (diagonal) 3.28~39.37 ft (1 m~12 m) Composite Video, S-Video, NTSC (J/M/ 4.43MHz), PAL (B/D/G/H/I/M/N/ Nc/60), SECAM (B/D/G/K/K1/L), HDMI, and Component video (1080i/p, 720p, 576i/p, 480i/p) compatibility Composite video, Component video (via VGA and...
... - JBMA) 1920x 1200 (WUXGA) Up to 1.07B colors (with Dithering) 2X F-Stop: F/ 2.6~2.9 Focal length, f=39.12~46.94 mm 1.2X manual Zoom Lens 20.9-301.0 inches (diagonal) 3.28~39.37 ft (1 m~12 m) Composite Video, S-Video, NTSC (J/M/ 4.43MHz), PAL (B/D/G/H/I/M/N/ Nc/60), SECAM (B/D/G/K/K1/L), HDMI, and Component video (1080i/p, 720p, 576i/p, 480i/p) compatibility Composite video, Component video (via VGA and...

User's Guide
Page 51
..., ICES003, GOST, NOM, SABS, SASO Power: AC power input socket Computer input: two D-sub for analog/component, HDTV input signals Computer output: one 15-pin D-sub Video input: one composite video RCA, one S-video, and one set of component video RCA Audio input: one phone jack (diameter 3.5 mm) Audio output: one phone jack (diameter 3.5 mm) USB...
..., ICES003, GOST, NOM, SABS, SASO Power: AC power input socket Computer input: two D-sub for analog/component, HDTV input signals Computer output: one 15-pin D-sub Video input: one composite video RCA, one S-video, and one set of component video RCA Audio input: one phone jack (diameter 3.5 mm) Audio output: one phone jack (diameter 3.5 mm) USB...

User's Guide
Page 57
... measured by the projection industry to fit the native resolution of the projector is lost. The brightness of the projector. Component video is available on a single wire pair. Range of delivering quality video in a picture, or the ratio between their maximum and minimum values. Component Video-A method of light and dark values in a format that combines the...
... measured by the projection industry to fit the native resolution of the projector is lost. The brightness of the projector. Component video is available on a single wire pair. Range of delivering quality video in a picture, or the ratio between their maximum and minimum values. Component Video-A method of light and dark values in a format that combines the...

User's Guide
Page 60
... shift knob 23 Zoom ring adjustment 23 Zoom tab 23 C Changing the Lamp 48 Connecting the Projector 12V DC power cable 19 Automatic screen 19 Commercial RS232 control box 20 Composite video cable 15 Connecting a Commercial RS232 Control Box 20 Connecting a Computer with a DisplayPort cable 12,...9 Connecting a Computer with an Ethernet cable 11 Connecting with a Component (VGA to YPbPr) Cable 16 Connecting with a Component (YPbPr to YPbPr) Cable 17 Connecting with a Composite Cable 15 Connecting with an HDMI Cable 18 Connecting with an S-video Cable 14 Ethernet (RJ45) cable 11, 12 HDMI cable 18 ...
... shift knob 23 Zoom ring adjustment 23 Zoom tab 23 C Changing the Lamp 48 Connecting the Projector 12V DC power cable 19 Automatic screen 19 Commercial RS232 control box 20 Composite video cable 15 Connecting a Commercial RS232 Control Box 20 Connecting a Computer with a DisplayPort cable 12,...9 Connecting a Computer with an Ethernet cable 11 Connecting with a Component (VGA to YPbPr) Cable 16 Connecting with a Component (YPbPr to YPbPr) Cable 17 Connecting with a Composite Cable 15 Connecting with an HDMI Cable 18 Connecting with an S-video Cable 14 Ethernet (RJ45) cable 11, 12 HDMI cable 18 ...
User's Guide
Page 61
...Component video input connector 8 Composite video input connector 8 DisplayPort connector 8 DVI-D input connector 8 HDMI input connector 8 Power cable connector 8 RS232 connector 8 Security cable slot 8 S-video input connector 8 USB remote connector 8 VGA-A input (D-sub) connector 8 VGA-B input (D-sub) connector 8 VGA-B output (monitor loop-through) connector 8 Contact Dell...40 Picture (in PC Mode) 33 Picture (in Video Mode) 34 PIP Settings 37 Set Up 31 P phone numbers 56 Powering On/Off the Projector Powering Off the Projector 21 Powering On the Projector 21 R Remote Control 27 IR receiver 26 S...
...Component video input connector 8 Composite video input connector 8 DisplayPort connector 8 DVI-D input connector 8 HDMI input connector 8 Power cable connector 8 RS232 connector 8 Security cable slot 8 S-video input connector 8 USB remote connector 8 VGA-A input (D-sub) connector 8 VGA-B input (D-sub) connector 8 VGA-B output (monitor loop-through) connector 8 Contact Dell...40 Picture (in PC Mode) 33 Picture (in Video Mode) 34 PIP Settings 37 Set Up 31 P phone numbers 56 Powering On/Off the Projector Powering Off the Projector 21 Powering On the Projector 21 R Remote Control 27 IR receiver 26 S...