

User Guide
Page 61
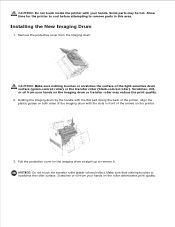
NOTICE: Do not allow the surface covered with a protective sheet to remove it. Scratches or oil from your hands on the imaging drum straight up to come into the printer without correctly aligning the rollers with anything. 5. Close the top cover. 7. NOTICE: Do not touch the transfer roller (black-colored roller). Make sure that nothing touches or scratches the roller surface. Close the front cover. NOTICE: Lowering the cartridge into contact with the slots can damage the cartridge. Pull the protective cover on the roller deteriorates print quality. 6.
NOTICE: Do not allow the surface covered with a protective sheet to remove it. Scratches or oil from your hands on the imaging drum straight up to come into the printer without correctly aligning the rollers with anything. 5. Close the top cover. 7. NOTICE: Do not touch the transfer roller (black-colored roller). Make sure that nothing touches or scratches the roller surface. Close the front cover. NOTICE: Lowering the cartridge into contact with the slots can damage the cartridge. Pull the protective cover on the roller deteriorates print quality. 6.
User Guide
Page 111
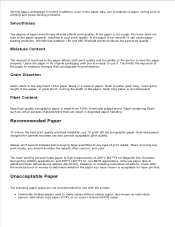
... characteristics that can degrade its original packaging until you are not recommended for laser printers. Check with the printer: Chemically treated papers used to make copies without discoloring, bleeding, or releasing...ready to determine whether the paper you should consider the weight, fiber content, and color. Moisture Content The amount of moisture in the paper affects both print quality and ... of the paper to moisture changes that can contribute to paper curling prior to the alignment of the paper fibers in a sheet of paper smoothness directly affects print quality. If...
... characteristics that can degrade its original packaging until you are not recommended for laser printers. Check with the printer: Chemically treated papers used to make copies without discoloring, bleeding, or releasing...ready to determine whether the paper you should consider the weight, fiber content, and color. Moisture Content The amount of moisture in the paper affects both print quality and ... of the paper to moisture changes that can contribute to paper curling prior to the alignment of the paper fibers in a sheet of paper smoothness directly affects print quality. If...
User Guide
Page 230
... Drum" for more details. See "Contacting Dell" in a location where relative humidity reaches 85% or more. Color registration is out of the transparencies is faded. · This occurs when the printer is broken. Printing on both ends of alignment. · Print the color registration chart and adjust the color registration from the operator panel by using...
... Drum" for more details. See "Contacting Dell" in a location where relative humidity reaches 85% or more. Color registration is out of the transparencies is faded. · This occurs when the printer is broken. Printing on both ends of alignment. · Print the color registration chart and adjust the color registration from the operator panel by using...
User Guide
Page 281
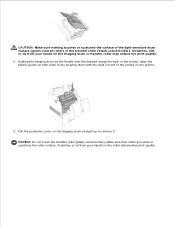
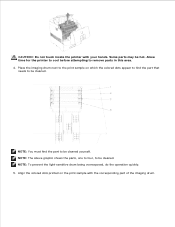
...touches or scratches the surface of the arrows on the imaging drum straight up to remove it. NOTICE: Do not touch the transfer roller (black-colored roller). Scratches or oil from your hands on the imaging drum or transfer roller may reduce the print quality. 2. CAUTION: Make sure nothing ...touches or scratches the roller surface. Pull the protective cover on the printer. 3. Holding the imaging drum by the handle with the flat part facing the back of the printer, align the plastic guides on both sides of the imaging drum with the slots in front of the...
...touches or scratches the surface of the arrows on the imaging drum straight up to remove it. NOTICE: Do not touch the transfer roller (black-colored roller). Scratches or oil from your hands on the imaging drum or transfer roller may reduce the print quality. 2. CAUTION: Make sure nothing ...touches or scratches the roller surface. Pull the protective cover on the printer. 3. Holding the imaging drum by the handle with the flat part facing the back of the printer, align the plastic guides on both sides of the imaging drum with the slots in front of the...
User Guide
Page 283
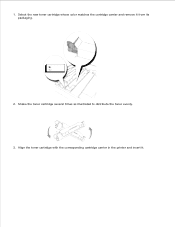
1. Align the toner cartridge with the corresponding cartridge carrier in the printer and insert it from its packaging. 2. Shake the toner cartridge several times as illustrated to distribute the toner evenly. 3. Select the new toner cartridge whose color matches the cartridge carrier and remove it .
1. Align the toner cartridge with the corresponding cartridge carrier in the printer and insert it from its packaging. 2. Shake the toner cartridge several times as illustrated to distribute the toner evenly. 3. Select the new toner cartridge whose color matches the cartridge carrier and remove it .
User Guide
Page 299
... the roller surface. Make sure that nothing touches or scratches the surface of the arrows on the printer. 3. Scratches or oil from your hands. Pull the protective cover on the roller deteriorates print quality...the imaging drum by the handle with the flat part facing the back of the printer, align the plastic guides on the imaging drum or transfer roller may be hot. Installing the...to remove parts in front of the light-sensitive drum surface (green-colored roller) or the transfer roller (black-colored roller). Scratches, dirt, or oil from the imaging drum. NOTICE: Do ...
... the roller surface. Make sure that nothing touches or scratches the surface of the arrows on the printer. 3. Scratches or oil from your hands. Pull the protective cover on the roller deteriorates print quality...the imaging drum by the handle with the flat part facing the back of the printer, align the plastic guides on the imaging drum or transfer roller may be hot. Installing the...to remove parts in front of the light-sensitive drum surface (green-colored roller) or the transfer roller (black-colored roller). Scratches, dirt, or oil from the imaging drum. NOTICE: Do ...
User Guide
Page 318
.... 5. Some parts may be cleaned yourself. CAUTION: Do not touch inside the printer with the corresponding part of the imaging drum. NOTE: You must find the part that needs to be cleaned. Align the colored dots printed on which the colored dots appear to find the part to remove parts in this area. 4. Allow...
.... 5. Some parts may be cleaned yourself. CAUTION: Do not touch inside the printer with the corresponding part of the imaging drum. NOTE: You must find the part that needs to be cleaned. Align the colored dots printed on which the colored dots appear to find the part to remove parts in this area. 4. Allow...
User Guide
Page 320
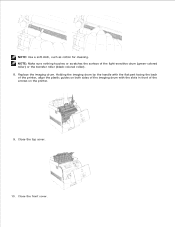
NOTE: Make sure nothing touches or scratches the surface of the arrows on the printer. 9. Replace the imaging drum. Close the front cover. NOTE: Use a soft cloth, such as cotton for cleaning. Close the top cover. 10. Holding the imaging drum by the handle with the flat part facing the back of the printer, align the plastic guides on both sides of the imaging drum with the slots in front of the light-sensitive drum (green-colored roller) or the transfer roller (black-colored roller). 8.
NOTE: Make sure nothing touches or scratches the surface of the arrows on the printer. 9. Replace the imaging drum. Close the front cover. NOTE: Use a soft cloth, such as cotton for cleaning. Close the top cover. 10. Holding the imaging drum by the handle with the flat part facing the back of the printer, align the plastic guides on both sides of the imaging drum with the slots in front of the light-sensitive drum (green-colored roller) or the transfer roller (black-colored roller). 8.


