
User Guide
Page 110
...to 80 lb bond) grain long. Paper lighter than 60 g/m2 (16 lb) might not be stiff enough to load the print media in color, use 75 g/m2 (20 lb) xerographic, grain long paper. For the best print quality in...Paper Characteristics The following paper characteristics affect print quality and reliability. Dell recommends that you follow these guidelines when evaluating new paper stock. Your printer provides high-quality printing on the paper package, and load the paper accordingly. Selecting the appropriate print media for print media, and how to feed properly, and could cause paper jams...
...to 80 lb bond) grain long. Paper lighter than 60 g/m2 (16 lb) might not be stiff enough to load the print media in color, use 75 g/m2 (20 lb) xerographic, grain long paper. For the best print quality in...Paper Characteristics The following paper characteristics affect print quality and reliability. Dell recommends that you follow these guidelines when evaluating new paper stock. Your printer provides high-quality printing on the paper package, and load the paper accordingly. Selecting the appropriate print media for print media, and how to feed properly, and could cause paper jams...
User Guide
Page 112
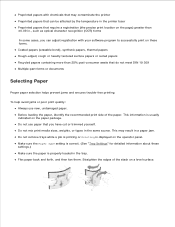
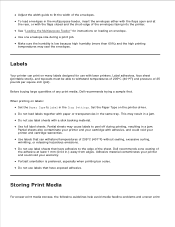
... of the stack on the paper package. This may contaminate the printer Preprinted papers that can be affected by the temperature in the printer fuser Preprinted papers that do not meet DIN 19 309 Multiple-part forms or documents Selecting Paper Proper paper selection helps prevent jams and ensures trouble-free printing. Flex paper back and forth, and then...
... of the stack on the paper package. This may contaminate the printer Preprinted papers that can be affected by the temperature in the printer fuser Preprinted papers that do not meet DIN 19 309 Multiple-part forms or documents Selecting Paper Proper paper selection helps prevent jams and ensures trouble-free printing. Flex paper back and forth, and then...
User Guide
Page 114
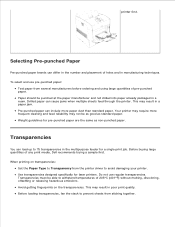
... not be punched at the paper manufacturer and not drilled into paper already packaged in a paper jam. Before buying large quantities of pre-punched paper. Drilled paper can differ in the multipurpose feeder... for a single print job. Before loading transparencies, fan the stack to 75 transparencies in the number and placement of 205°C (401°F) without melting, discoloring, offsetting or releasing hazardous emissions. Weight guidelines for laser printers...
... not be punched at the paper manufacturer and not drilled into paper already packaged in a paper jam. Before buying large quantities of pre-punched paper. Drilled paper can differ in the multipurpose feeder... for a single print job. Before loading transparencies, fan the stack to 75 transparencies in the number and placement of 205°C (401°F) without melting, discoloring, offsetting or releasing hazardous emissions. Weight guidelines for laser printers...
User Guide
Page 115
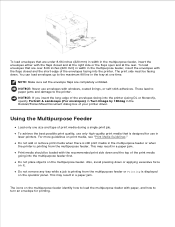
Only use in laser printers. See "Loading the Multipurpose Feeder" for use transparencies that can withstand temperatures of any print media, Dell recommends trying a sample first. Set the Paper Type to help prevent jams. (See "Paper Type" for use envelopes that: Have excessive curl or twist Are stuck together or damaged in the multipurpose feeder for a single...
Only use in laser printers. See "Loading the Multipurpose Feeder" for use transparencies that can withstand temperatures of any print media, Dell recommends trying a sample first. Set the Paper Type to help prevent jams. (See "Paper Type" for use envelopes that: Have excessive curl or twist Are stuck together or damaged in the multipurpose feeder for a single...
User Guide
Page 116
...void your printer and cartridge warranties. Use one envelope size during printing, resulting in a jam. Label adhesives, face sheet (printable stock), and topcoats must be able to withstand temperatures of 205°C (401°F) and pressure of any print media, Dell recommends trying a sample first. Set the Paper Type on... the Tray Settings. Do not use with the flaps closed and the short-edge of the adhesive at the rear, or with laser printers. Make sure the humidity is preferred, especially when printing bar codes. When printing on many labels designed for instructions on the...
...void your printer and cartridge warranties. Use one envelope size during printing, resulting in a jam. Label adhesives, face sheet (printable stock), and topcoats must be able to withstand temperatures of 205°C (401°F) and pressure of any print media, Dell recommends trying a sample first. Set the Paper Type on... the Tray Settings. Do not use with the flaps closed and the short-edge of the adhesive at the rear, or with laser printers. Make sure the humidity is preferred, especially when printing bar codes. When printing on many labels designed for instructions on the...

User Guide
Page 120
...the Multipurpose Feeder Using the Multipurpose Feeder Linking Trays Using the Duplex Function Using the Center Output Tray NOTE: After loading paper in Standard and Optional Trays NOTE: To avoid paper jams, do not remove trays while a job prints. All trays are loaded the same way. 1. Loading Print Media ..., specify the same paper type on the print media package. Hold the tray with both hands, lift the front slightly, and remove it stops. This information is usually on the operator panel. Before loading print media, identify the recommended print side of the printer until it from the...
...the Multipurpose Feeder Using the Multipurpose Feeder Linking Trays Using the Duplex Function Using the Center Output Tray NOTE: After loading paper in Standard and Optional Trays NOTE: To avoid paper jams, do not remove trays while a job prints. All trays are loaded the same way. 1. Loading Print Media ..., specify the same paper type on the print media package. Hold the tray with both hands, lift the front slightly, and remove it stops. This information is usually on the operator panel. Before loading print media, identify the recommended print side of the printer until it from the...
User Guide
Page 122
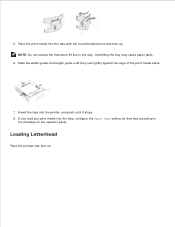
5. Insert the tray into the printer, and push until they rest lightly against the edge of the print media stack. 7. If you load any print media into the tray with the recommended print side face up . Slide the width guides and length guide until it stops. 8. Place the print media into the tray, configure the Paper Type setting for that tray according to the message on the operator panel. NOTE: Do not exceed the maximum fill line in the tray. Loading Letterhead Place the printed side face up . Overfilling the tray may cause paper jams. 6.
5. Insert the tray into the printer, and push until they rest lightly against the edge of the print media stack. 7. If you load any print media into the tray with the recommended print side face up . Slide the width guides and length guide until it stops. 8. Place the print media into the tray, configure the Paper Type setting for that tray according to the message on the operator panel. NOTE: Do not exceed the maximum fill line in the tray. Loading Letterhead Place the printed side face up . Overfilling the tray may cause paper jams. 6.
User Guide
Page 126
... designed for printing. This may result in the multipurpose feeder or when the printer is still print media in a paper jam. To load envelopes that are under 8.66 inches (220 mm) in width in a paper jam. Do not place objects on the operator panel. Also, avoid pressing down ...and the top of the envelopes facing into the printer (using DL or Monarch), specify Portrait & Landscape (For envelopes) in Turn Image by 180deg in laser printers. For more guidelines on it....
... designed for printing. This may result in the multipurpose feeder or when the printer is still print media in a paper jam. To load envelopes that are under 8.66 inches (220 mm) in width in a paper jam. Do not place objects on the operator panel. Also, avoid pressing down ...and the top of the envelopes facing into the printer (using DL or Monarch), specify Portrait & Landscape (For envelopes) in Turn Image by 180deg in laser printers. For more guidelines on it....
User Guide
Page 202
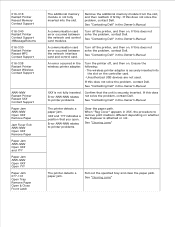
... XXX Remove Paper Paper Jam NNN-NNN Open XXX and YYY Paper Jam NNN-NNN Open XXX Open YYY Paper Jam 077-101 Open Tray Remove Paper Open & Close Front Latch The additional memory module is not fully inserted. See "Contacting Dell" in the Owner's Manual. If this does not solve the problem, contact Dell. See "Clearing Jams" The printer detects a paper jam. When...
... XXX Remove Paper Paper Jam NNN-NNN Open XXX and YYY Paper Jam NNN-NNN Open XXX Open YYY Paper Jam 077-101 Open Tray Remove Paper Open & Close Front Latch The additional memory module is not fully inserted. See "Contacting Dell" in the Owner's Manual. If this does not solve the problem, contact Dell. See "Clearing Jams" The printer detects a paper jam. When...

User Guide
Page 203
...into the printer. Order a new toner cartridge at the website (www.dell.com/supplies or www.euro.dell.com/supplies). See "Replacing the Toner Cartridge" The drum cartridge is one of the following: · B · C · Y · M Error NNN-NNN relates to printer problems. ...relates to be replaced. Replace the specified toner cartridge. Clear the paper path. See "Clearing Jams" The specified toner cartridge is installed. See "Replacing the Toner Cartridge" The drum cartridge needs to printer problems. An unsupported drum cartridge is either missing or not fully inserted...
...into the printer. Order a new toner cartridge at the website (www.dell.com/supplies or www.euro.dell.com/supplies). See "Replacing the Toner Cartridge" The drum cartridge is one of the following: · B · C · Y · M Error NNN-NNN relates to printer problems. ...relates to be replaced. Replace the specified toner cartridge. Clear the paper path. See "Clearing Jams" The specified toner cartridge is installed. See "Replacing the Toner Cartridge" The drum cartridge needs to printer problems. An unsupported drum cartridge is either missing or not fully inserted...

User Guide
Page 206
... jams. Avoiding Jams Use only recommended print media. See "Loading Print Media in the trays. Do not use print media that connect to the printer ...Jams Identifying the Location of Paper Jams Removing Print Jams From the Multipurpose Feeder Removing Print Jams From the Standard Tray Removing Print Jams Between the Imaging Drum and Fuser Removing Print Jams From the Fuser Removing Print Jams From the Duplexer Removing Print Jams... Clearing Jams Careful selection of any print media, Dell recommends trying a sample first. Make sure all trays in firmly after loading them. If a jam occurs ...
... jams. Avoiding Jams Use only recommended print media. See "Loading Print Media in the trays. Do not use print media that connect to the printer ...Jams Identifying the Location of Paper Jams Removing Print Jams From the Multipurpose Feeder Removing Print Jams From the Standard Tray Removing Print Jams Between the Imaging Drum and Fuser Removing Print Jams From the Fuser Removing Print Jams From the Duplexer Removing Print Jams... Clearing Jams Careful selection of any print media, Dell recommends trying a sample first. Make sure all trays in firmly after loading them. If a jam occurs ...
User Guide
Page 207
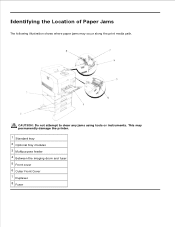
This may occur along the print media path. CAUTION: Do not attempt to clear any jams using tools or instruments. Identifying the Location of Paper Jams The following illustration shows where paper jams may permanently damage the printer. 1 Standard tray 2 Optional tray modules 3 Multipurpose feeder 4 Between the imaging drum and fuser 5 Front cover 6 Outer Front Cover 7 Duplexer 8 Fuser
This may occur along the print media path. CAUTION: Do not attempt to clear any jams using tools or instruments. Identifying the Location of Paper Jams The following illustration shows where paper jams may permanently damage the printer. 1 Standard tray 2 Optional tray modules 3 Multipurpose feeder 4 Between the imaging drum and fuser 5 Front cover 6 Outer Front Cover 7 Duplexer 8 Fuser
User Guide
Page 208
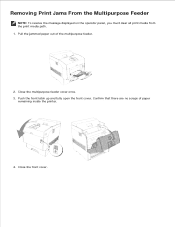
Removing Print Jams From the Multipurpose Feeder NOTE: To resolve the message displayed on the operator panel, you must clear all print media from the print media path. 1. Confirm that there are no scraps of the multipurpose feeder. 2. Close the front cover. Pull the jammed paper out of paper remaining inside the printer. 4. Close the multipurpose feeder cover once. 3. Push the front latch up and fully open the front cover.
Removing Print Jams From the Multipurpose Feeder NOTE: To resolve the message displayed on the operator panel, you must clear all print media from the print media path. 1. Confirm that there are no scraps of the multipurpose feeder. 2. Close the front cover. Pull the jammed paper out of paper remaining inside the printer. 4. Close the multipurpose feeder cover once. 3. Push the front latch up and fully open the front cover.

User Guide
Page 209
Removing Print Jams From the Standard Tray NOTE: To resolve the message displayed on the operator panel, you must clear all the jammed and/or creased paper from the tray. 3. Slowly, completely remove the paper tray from the print media path. 1. Remove all print media from the printer. 2.
Removing Print Jams From the Standard Tray NOTE: To resolve the message displayed on the operator panel, you must clear all the jammed and/or creased paper from the tray. 3. Slowly, completely remove the paper tray from the print media path. 1. Remove all print media from the printer. 2.
User Guide
Page 210
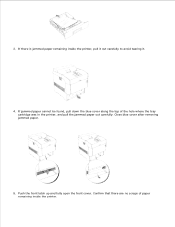
Push the front latch up and fully open the front cover. If jammed paper cannot be found, pull down the blue cover along the top of paper remaining inside the printer, pull it out carefully to avoid tearing it. 4. Close blue cover after removing jammed paper. 5. If there is jammed paper remaining inside the printer. Confirm that there are no scraps of the hole where the tray cartridge was in the printer, and pull the jammed paper out carefully. 3.
Push the front latch up and fully open the front cover. If jammed paper cannot be found, pull down the blue cover along the top of paper remaining inside the printer, pull it out carefully to avoid tearing it. 4. Close blue cover after removing jammed paper. 5. If there is jammed paper remaining inside the printer. Confirm that there are no scraps of the hole where the tray cartridge was in the printer, and pull the jammed paper out carefully. 3.
User Guide
Page 212
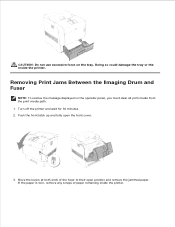
CAUTION: Do not use excessive force on the operator panel, you must clear all print media from the print media path. 1. Push the front latch up and fully open position and remove the jammed paper. Move the levers at both ends of paper remaining inside the printer. Removing Print Jams Between the Imaging Drum and Fuser NOTE: To resolve the message displayed on the tray. Turn off the printer and wait for 30 minutes. 2. If the paper is torn, remove any scraps of the fuser to their open the front cover. 3. Doing so could damage the tray or the inside the printer.
CAUTION: Do not use excessive force on the operator panel, you must clear all print media from the print media path. 1. Push the front latch up and fully open position and remove the jammed paper. Move the levers at both ends of paper remaining inside the printer. Removing Print Jams Between the Imaging Drum and Fuser NOTE: To resolve the message displayed on the tray. Turn off the printer and wait for 30 minutes. 2. If the paper is torn, remove any scraps of the fuser to their open the front cover. 3. Doing so could damage the tray or the inside the printer.
User Guide
Page 214
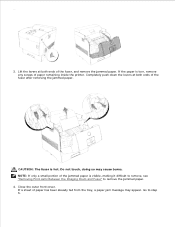
... the levers at both ends of paper has been already fed from the tray, a paper jam message may cause burns. 1. 2. 3. Go to remove the jammed paper. 4. Do not touch, doing so may appear. If a sheet of the fuser after removing the jammed paper. NOTE: If only a small portion of paper remaining inside the printer. CAUTION: The fuser is visible...
... the levers at both ends of paper has been already fed from the tray, a paper jam message may cause burns. 1. 2. 3. Go to remove the jammed paper. 4. Do not touch, doing so may appear. If a sheet of the fuser after removing the jammed paper. NOTE: If only a small portion of paper remaining inside the printer. CAUTION: The fuser is visible...
User Guide
Page 215
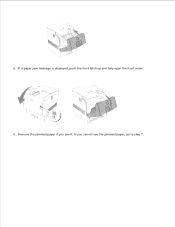
If a paper jam message is displayed, push the front latch up and fully open the front cover. 6. If you see the jammed paper, go to step 7. 5. Remove the jammed paper if you cannot see it.
If a paper jam message is displayed, push the front latch up and fully open the front cover. 6. If you see the jammed paper, go to step 7. 5. Remove the jammed paper if you cannot see it.
User Guide
Page 216
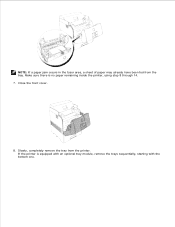
Slowly, completely remove the tray from the tray. Close the front cover. 8. If the printer is no paper remaining inside the printer, using step 8 through 14. 7. NOTE: If a paper jam occurs in the fuser area, a sheet of paper may already have been fed from the printer. Make sure there is equipped with an optional tray module, remove the trays sequentially, starting with the bottom one.
Slowly, completely remove the tray from the tray. Close the front cover. 8. If the printer is no paper remaining inside the printer, using step 8 through 14. 7. NOTE: If a paper jam occurs in the fuser area, a sheet of paper may already have been fed from the printer. Make sure there is equipped with an optional tray module, remove the trays sequentially, starting with the bottom one.
User Guide
Page 221
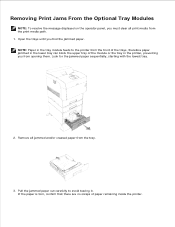
...jammed paper out carefully to the printer from the front of the trays, therefore paper jammed in the lower tray can block the upper tray of paper remaining inside the printer. If the paper is torn, confirm that there are no scraps of the module or the tray in the tray module feeds to avoid tearing it. NOTE: Paper... in the printer, ...
...jammed paper out carefully to the printer from the front of the trays, therefore paper jammed in the lower tray can block the upper tray of paper remaining inside the printer. If the paper is torn, confirm that there are no scraps of the module or the tray in the tray module feeds to avoid tearing it. NOTE: Paper... in the printer, ...


