Owner's Manual
Page 6
www.dell.com/supplies | support.dell.com 5 Using Your Printer 33 Changing Printer Settings 34 Initializing NVRAM ...35 Setting of Panel Lock 35 Adjusting the Language 36 Printing a Job ...36 Canceling a Job From the Printer Operator Panel 36 Canceling the Job From a Computer 36 ...Status Monitor Console 37 Dell Supplies Management System 38 User Setup Disk Creating Tool 38 Software Update ...38 6 Maintenance 39 Replacing the Imaging Drum 40 Removing the Used Imaging Drum 40 Installing the New Imaging Drum 41 Replacing the Toner Cartridge 43 Removing the Used Toner Cartridge...
www.dell.com/supplies | support.dell.com 5 Using Your Printer 33 Changing Printer Settings 34 Initializing NVRAM ...35 Setting of Panel Lock 35 Adjusting the Language 36 Printing a Job ...36 Canceling a Job From the Printer Operator Panel 36 Canceling the Job From a Computer 36 ...Status Monitor Console 37 Dell Supplies Management System 38 User Setup Disk Creating Tool 38 Software Update ...38 6 Maintenance 39 Replacing the Imaging Drum 40 Removing the Used Imaging Drum 40 Installing the New Imaging Drum 41 Replacing the Toner Cartridge 43 Removing the Used Toner Cartridge...
Owner's Manual
Page 40
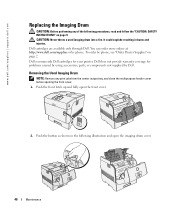
... in the following procedures, read and follow the "CAUTION: SAFETY INSTRUCTIONS" on page 2. Dell does not provide warranty coverage for your printer. You can order more online at http://www.dell.com/supplies or by phone. Removing the Used Imaging Drum NOTE: Remove any of the following illustration and open the front cover. 2. Push the front latch...
... in the following procedures, read and follow the "CAUTION: SAFETY INSTRUCTIONS" on page 2. Dell does not provide warranty coverage for your printer. You can order more online at http://www.dell.com/supplies or by phone. Removing the Used Imaging Drum NOTE: Remove any of the following illustration and open the front cover. 2. Push the front latch...
Owner's Manual
Page 41
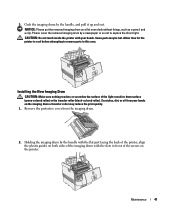
... (black-colored roller). Scratches, dirt, or oil from the imaging drum. 2. Holding the imaging drum by the handle, and pull it up and out. 3. Installing the New Imaging Drum CAUTION: Make sure nothing touches or scratches the surface of the imaging drum with your hands on the imaging drum or transfer roller may be hot. NOTICE: Please put the removed imaging drum on the printer...
... (black-colored roller). Scratches, dirt, or oil from the imaging drum. 2. Holding the imaging drum by the handle, and pull it up and out. 3. Installing the New Imaging Drum CAUTION: Make sure nothing touches or scratches the surface of the imaging drum with your hands on the imaging drum or transfer roller may be hot. NOTICE: Please put the removed imaging drum on the printer...
Owner's Manual
Page 42
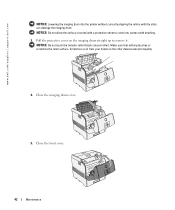
... cover. 42 Maintenance www.dell.com/supplies | support.dell.com NOTICE: Lowering the imaging drum into contact with the slots can damage the imaging drum. NOTICE: Do not allow the surface covered with a protective sheet to remove it. Scratches or oil from your hands on the imaging drum straight up to come into the printer without correctly aligning the rollers...
... cover. 42 Maintenance www.dell.com/supplies | support.dell.com NOTICE: Lowering the imaging drum into contact with the slots can damage the imaging drum. NOTICE: Do not allow the surface covered with a protective sheet to remove it. Scratches or oil from your hands on the imaging drum straight up to come into the printer without correctly aligning the rollers...


