
Owner's Manual
Page 14
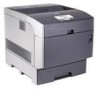
Insert the tray into the tray, configure the Paper Type settings for that tray according to the message on the operator panel. 14 Loading Paper If you load any print media into the printer, and push until they rest lightly against the edge of the print media stack. 7. Slide the width guides and length guide until it stops. 8. www.dell.com/supplies | support.dell.com 6.
Insert the tray into the tray, configure the Paper Type settings for that tray according to the message on the operator panel. 14 Loading Paper If you load any print media into the printer, and push until they rest lightly against the edge of the print media stack. 7. Slide the width guides and length guide until it stops. 8. www.dell.com/supplies | support.dell.com 6.
Owner's Manual
Page 16
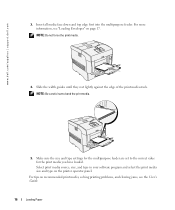
... Slide the width guides until they rest lightly against the edge of the print media stack. For tips on page 17. NOTE: Be careful not to the correct value for the print media you have loaded. NOTE: Do not force the print media. 4. Select print media source, size, and type in ...your software program and select the print media size and type on the printer operator panel. www.dell.com/supplies | support...
... Slide the width guides until they rest lightly against the edge of the print media stack. For tips on page 17. NOTE: Be careful not to the correct value for the print media you have loaded. NOTE: Do not force the print media. 4. Select print media source, size, and type in ...your software program and select the print media size and type on the printer operator panel. www.dell.com/supplies | support...
Owner's Manual
Page 41
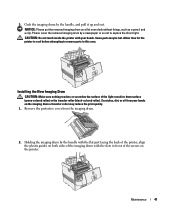
... on the imaging drum or transfer roller may be hot. NOTICE: Please put the removed imaging drum on the printer. Some parts may reduce the print quality. 1. Installing the New Imaging Drum CAUTION: Make sure nothing touches or scratches the surface of the arrows... on a flat even desk without things, such as a pencil and a clip. Grab the imaging drum by a newspaper or so not to remove parts in front of the light-sensitive drum surface (green-colored...
... on the imaging drum or transfer roller may be hot. NOTICE: Please put the removed imaging drum on the printer. Some parts may reduce the print quality. 1. Installing the New Imaging Drum CAUTION: Make sure nothing touches or scratches the surface of the arrows... on a flat even desk without things, such as a pencil and a clip. Grab the imaging drum by a newspaper or so not to remove parts in front of the light-sensitive drum surface (green-colored...


