
OwnersManual.book
Page 6
www.dell.com/supplies | support.dell.com 5 Using Your Printer 33 Changing Printer Settings 34 Initializing NVRAM ...35 Setting of Panel Lock 35 Adjusting the Language 36 Printing a Job ...36 Canceling a Job From the Printer Operator Panel 36 Canceling the Job From a Computer 36 Canceling a Job From the ... 37 Dell Supplies Management System 38 User Setup Disk Creating Tool 38 Software Update ...38 6 Maintenance 39 Replacing the Imaging Drum 40 Removing the Used Imaging Drum 40 Installing the New Imaging Drum 41 Replacing the Toner Cartridge 43 Removing the Used Toner Cartridge 43 ...
www.dell.com/supplies | support.dell.com 5 Using Your Printer 33 Changing Printer Settings 34 Initializing NVRAM ...35 Setting of Panel Lock 35 Adjusting the Language 36 Printing a Job ...36 Canceling a Job From the Printer Operator Panel 36 Canceling the Job From a Computer 36 Canceling a Job From the ... 37 Dell Supplies Management System 38 User Setup Disk Creating Tool 38 Software Update ...38 6 Maintenance 39 Replacing the Imaging Drum 40 Removing the Used Imaging Drum 40 Installing the New Imaging Drum 41 Replacing the Toner Cartridge 43 Removing the Used Toner Cartridge 43 ...

OwnersManual.book
Page 7
... ...93 U.S. Cleaning the Automatic Density Control (ADC) Sensor 56 7 Appendix 61 Technical Assistance ...62 Automated Order-Status Service 62 Contacting Dell ...63 U.S. Ink and Toner Cartridges Limited Warranties 91 Ink and Toner Cartridges Limited Warranty (U.S. Government Restricted Rights 94 General ...94 Regulatory ...94 Index ...97 7 Terms and Conditions of Sale 79 Limited Warranties...
... ...93 U.S. Cleaning the Automatic Density Control (ADC) Sensor 56 7 Appendix 61 Technical Assistance ...62 Automated Order-Status Service 62 Contacting Dell ...63 U.S. Ink and Toner Cartridges Limited Warranties 91 Ink and Toner Cartridges Limited Warranty (U.S. Government Restricted Rights 94 General ...94 Regulatory ...94 Index ...97 7 Terms and Conditions of Sale 79 Limited Warranties...
OwnersManual.book
Page 39
Section 6 Maintenance Replacing the Imaging Drum Replacing the Toner Cartridge Replacing the Transfer Roller Replacing the Fuser and Separator Roller Cleaning the Automatic Density Control (ADC) Sensor 6 Maintenance
Section 6 Maintenance Replacing the Imaging Drum Replacing the Toner Cartridge Replacing the Transfer Roller Replacing the Fuser and Separator Roller Cleaning the Automatic Density Control (ADC) Sensor 6 Maintenance

OwnersManual.book
Page 40
... resulting in the following procedures, read and follow the "CAUTION: SAFETY INSTRUCTIONS" on page 2. Dell does not provide warranty coverage for your printer. Dell cartridges are available only through Dell. Push the front latch up and fully open the imaging drum cover. 40 Maintenance www....dell.com/supplies | support.dell.com Replacing the Imaging Drum CAUTION: Before performing any print jobs from...
... resulting in the following procedures, read and follow the "CAUTION: SAFETY INSTRUCTIONS" on page 2. Dell does not provide warranty coverage for your printer. Dell cartridges are available only through Dell. Push the front latch up and fully open the imaging drum cover. 40 Maintenance www....dell.com/supplies | support.dell.com Replacing the Imaging Drum CAUTION: Before performing any print jobs from...
OwnersManual.book
Page 43
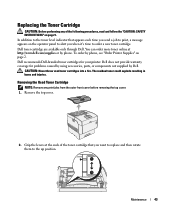
...Printer Supplies" on the operator panel to alert you when it's time to order a new toner cartridge. Dell toner cartridge are available only through Dell. You can order more toner online at the ends of the following procedures, read and follow the "CAUTION: SAFETY INSTRUCTIONS" on page 9. Dell recommends Dell-branded toner cartridges.... Removing the Used Toner Cartridge NOTE: Remove any of the toner cartridge that appears each time you want to replace and then rotate them to the up position. Dell does not provide warranty coverage for your printer. Remove the top cover....
...Printer Supplies" on the operator panel to alert you when it's time to order a new toner cartridge. Dell toner cartridge are available only through Dell. You can order more toner online at the ends of the following procedures, read and follow the "CAUTION: SAFETY INSTRUCTIONS" on page 9. Dell recommends Dell-branded toner cartridges.... Removing the Used Toner Cartridge NOTE: Remove any of the toner cartridge that appears each time you want to replace and then rotate them to the up position. Dell does not provide warranty coverage for your printer. Remove the top cover....
OwnersManual.book
Page 44
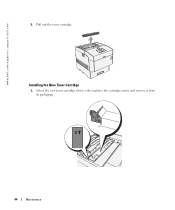
Installing the New Toner Cartridge 1. Pull out the toner cartridge. Select the new toner cartridge whose color matches the cartridge carrier and remove it from its packaging. 44 Maintenance www.dell.com/supplies | support.dell.com 3.
Installing the New Toner Cartridge 1. Pull out the toner cartridge. Select the new toner cartridge whose color matches the cartridge carrier and remove it from its packaging. 44 Maintenance www.dell.com/supplies | support.dell.com 3.

OwnersManual.book
Page 45
Maintenance 45 Align the toner cartridge with the corresponding cartridge carrier in the printer and insert it. 4. 2. Gently shake the cartridge to rotate the levers forward. Grip the levers at each end of the toner cartridge, then push down firmly to distribute the toner evenly. 3.
Maintenance 45 Align the toner cartridge with the corresponding cartridge carrier in the printer and insert it. 4. 2. Gently shake the cartridge to rotate the levers forward. Grip the levers at each end of the toner cartridge, then push down firmly to distribute the toner evenly. 3.

OwnersManual.book
Page 46
Pulling the toner seal diagonally may appear. In this case, perform step 4 again, or turn the printer off once and then on again. 6. Pull the toner seal straight up . NOTE: If it . www.dell.com/supplies | support.dell.com 5. Replace the top cover by inserting its front side into the printer first. 46 Maintenance NOTE: Pull the toner seal straight up to remove it takes more than five seconds to remove the toner seal after inserting the toner cartridge in the printer, an error message may tear the seal.
Pulling the toner seal diagonally may appear. In this case, perform step 4 again, or turn the printer off once and then on again. 6. Pull the toner seal straight up . NOTE: If it . www.dell.com/supplies | support.dell.com 5. Replace the top cover by inserting its front side into the printer first. 46 Maintenance NOTE: Pull the toner seal straight up to remove it takes more than five seconds to remove the toner seal after inserting the toner cartridge in the printer, an error message may tear the seal.
OwnersManual.book
Page 61
Ink and Toner Cartridges Limited Warranties Dell™ Software License Agreement Regulatory 7 Appendix Terms and Conditions of Sale Limited Warranties and Return Policy Dell Inc. Section 7 Appendix Technical Assistance Automated Order-Status Service Contacting Dell U.S.
Ink and Toner Cartridges Limited Warranties Dell™ Software License Agreement Regulatory 7 Appendix Terms and Conditions of Sale Limited Warranties and Return Policy Dell Inc. Section 7 Appendix Technical Assistance Automated Order-Status Service Contacting Dell U.S.
OwnersManual.book
Page 91
...MORE THAN THE AMOUNT YOU PAID FOR THE PRODUCT THAT IS THE SUBJECT OF A CLAIM. Ink and Toner Cartridges Limited Warranty (Latin America Only) Dell Inc. DELL'S RESPONSIBILITY FOR MALFUNCTIONS AND DEFECTS IN HARDWARE IS LIMITED TO REPLACEMENT AS SET FORTH IN THIS WARRANTY STATEMENT. If...TERMINATES IF YOU SELL OR OTHERWISE TRANSFER THIS PRODUCT TO ANOTHER PARTY. For the original purchaser of genuine Dell-branded ink cartridges, Dell warrants that for genuine Dell-branded ink cartridges they will be free from defects resulting from ordinary use. In the U.S., call our toll-free number ...
...MORE THAN THE AMOUNT YOU PAID FOR THE PRODUCT THAT IS THE SUBJECT OF A CLAIM. Ink and Toner Cartridges Limited Warranty (Latin America Only) Dell Inc. DELL'S RESPONSIBILITY FOR MALFUNCTIONS AND DEFECTS IN HARDWARE IS LIMITED TO REPLACEMENT AS SET FORTH IN THIS WARRANTY STATEMENT. If...TERMINATES IF YOU SELL OR OTHERWISE TRANSFER THIS PRODUCT TO ANOTHER PARTY. For the original purchaser of genuine Dell-branded ink cartridges, Dell warrants that for genuine Dell-branded ink cartridges they will be free from defects resulting from ordinary use. In the U.S., call our toll-free number ...
OwnersManual.book
Page 92
...emotional or any other kind of damage caused to the consumer and/or to a third party, which either the production of the cartridge has been discontinued or the cartridge is limited to either in this product to a third party. This limited warranty does not apply to ink or Toner... Cartridges that may apply. 92 Appendix Dell's liability for the purchase cost. This warranty coverage terminates if you sell or otherwise transfer this limited warranty or in which ...
...emotional or any other kind of damage caused to the consumer and/or to a third party, which either the production of the cartridge has been discontinued or the cartridge is limited to either in this product to a third party. This limited warranty does not apply to ink or Toner... Cartridges that may apply. 92 Appendix Dell's liability for the purchase cost. This warranty coverage terminates if you sell or otherwise transfer this limited warranty or in which ...

OwnersManual.book
Page 97
... panel , 34 Connecting the printer Locally , 20 D Dell supplies management system , 38 Disable menus from the operator panel , 35 Drivers, Installing , 20 F Factory defaults, Restoring , 35 I Imaging drum Installing , 41 Replacing , 40 Installing Imaging drum , 41 PPD file , 31 Printer drivers For local printing , 20 on Macintosh , 27 Toner cartridge , 44 L Loading paper Multipurpose...
... panel , 34 Connecting the printer Locally , 20 D Dell supplies management system , 38 Disable menus from the operator panel , 35 Drivers, Installing , 20 F Factory defaults, Restoring , 35 I Imaging drum Installing , 41 Replacing , 40 Installing Imaging drum , 41 PPD file , 31 Printer drivers For local printing , 20 on Macintosh , 27 Toner cartridge , 44 L Loading paper Multipurpose...
OwnersManual.book
Page 98
www.dell.com/supplies | support.dell.com Software applications Software update , 38 Status monitor , 37 Toner re-order , 38 Software update , 38 Status monitor , 37 Supplies, Ordering , 2 T Toner cartridge Installing , 44 Replacing , 43 Toner re-order window, Using , 38 Toner, Ordering , 2 W warranty , 81 98
www.dell.com/supplies | support.dell.com Software applications Software update , 38 Status monitor , 37 Toner re-order , 38 Software update , 38 Status monitor , 37 Supplies, Ordering , 2 T Toner cartridge Installing , 44 Replacing , 43 Toner re-order window, Using , 38 Toner, Ordering , 2 W warranty , 81 98
ugtoc.html
Page 1
Dell Laser Printer 5100cn User's Guide Finding Information Dell Printer Configuration Web Tool About Your Printer Installing the Toner Cartridges and Imaging Drum Connecting Your Printer Enterprise Console Management Modules Installing the Optional Tray Module and Installing Cards Print Media Guidelines Loading Print Media Operator Panel Printer Settings Understanding Printer Menus Understanding Your Printer Software Printing Setting Up for Shared Printing Understanding Fonts...
Dell Laser Printer 5100cn User's Guide Finding Information Dell Printer Configuration Web Tool About Your Printer Installing the Toner Cartridges and Imaging Drum Connecting Your Printer Enterprise Console Management Modules Installing the Optional Tray Module and Installing Cards Print Media Guidelines Loading Print Media Operator Panel Printer Settings Understanding Printer Menus Understanding Your Printer Software Printing Setting Up for Shared Printing Understanding Fonts...

ugtoc.html
Page 2
... in this document is subject to avoid the problem. Double-click the icon on your Dell printer Service Tag available. For help locating your printer. Visit Dell's website, or order Dell printer supplies by pushing the side button. (standard 500-sheet tray, optional 500-sheet tray ...4 Multipurpose feeder 5 Front latch 6 Printer 7 Side button 8 Front cover NOTE: The front cover opens by pushing the front latch up. 9 Outer Front Cover NOTE: The outer front cover opens by phone. To order replacement toner cartridges or supplies from Dell: 1. NOTICE: A NOTICE indicates either...
... in this document is subject to avoid the problem. Double-click the icon on your Dell printer Service Tag available. For help locating your printer. Visit Dell's website, or order Dell printer supplies by pushing the side button. (standard 500-sheet tray, optional 500-sheet tray ...4 Multipurpose feeder 5 Front latch 6 Printer 7 Side button 8 Front cover NOTE: The front cover opens by pushing the front latch up. 9 Outer Front Cover NOTE: The outer front cover opens by phone. To order replacement toner cartridges or supplies from Dell: 1. NOTICE: A NOTICE indicates either...

ugtoc.html
Page 7
... the Order Supplies link on the network just by typing each printer's IP address. Printer Status Get immediate feedback on Job List page and Completed Jobs page. Copy Printer Settings Quickly copy the printer's settings to be a network administrator to order additional toner cartridges. Printer Information Get the information you selected. E-Mail Alert Receive an e-mail...
... the Order Supplies link on the network just by typing each printer's IP address. Printer Status Get immediate feedback on Job List page and Completed Jobs page. Copy Printer Settings Quickly copy the printer's settings to be a network administrator to order additional toner cartridges. Printer Information Get the information you selected. E-Mail Alert Receive an e-mail...

ugtoc.html
Page 17
...button to use a refilled toner cartridge. Non-Dell Toner Non-Dell Toner Displays whether to print the Documents page. MPF Paper Type Displays the type of reports and lists. Values: Printer Settings Click Start button to ...Printer Settings tab includes Basic Settings, Parallel Settings, Network Settings, USB Settings, PCL Settings, PS Settings, and Security Settings pages. MPF Paper Size Displays the size of paper loaded in the multipurpose feeder. Label Displays the temperature settings of the fuser for envelopes. Panel Settings Click Start button to adjust the color...
...button to use a refilled toner cartridge. Non-Dell Toner Non-Dell Toner Displays whether to print the Documents page. MPF Paper Type Displays the type of reports and lists. Values: Printer Settings Click Start button to ...Printer Settings tab includes Basic Settings, Parallel Settings, Network Settings, USB Settings, PCL Settings, PS Settings, and Security Settings pages. MPF Paper Size Displays the size of paper loaded in the multipurpose feeder. Label Displays the temperature settings of the fuser for envelopes. Panel Settings Click Start button to adjust the color...

ugtoc.html
Page 23
... more of the same model of only the same items are simultaneously copied to printers of your printer. Copy Printer Settings The Copy Printer Settings menu includes the Copy Printer Settings and Copy Printer Settings Report pages. Dell recommends only new Dell-brand toner cartridges for Secure Print and Proof Print stored in the above list and reboot the...
... more of the same model of only the same items are simultaneously copied to printers of your printer. Copy Printer Settings The Copy Printer Settings menu includes the Copy Printer Settings and Copy Printer Settings Report pages. Dell recommends only new Dell-brand toner cartridges for Secure Print and Proof Print stored in the above list and reboot the...

ugtoc.html
Page 38
Pull the toner seal for each toner cartridge straight up . NOTE: Pull the toner seal straight up to remove it. Remove the top cover. 2. Pulling the toner seal diagonally may tear the seal. 3. Replace the top cover by inserting its front side into the printer first. Installing the Toner Cartridge 1. Installing the Toner Cartridges and Imaging Drum Installing the Toner Cartridge Installing the Imaging Drum CAUTION: Before performing any of the following procedures, read and follow the safety instructions in your Owner's Manual.
Pull the toner seal for each toner cartridge straight up . NOTE: Pull the toner seal straight up to remove it. Remove the top cover. 2. Pulling the toner seal diagonally may tear the seal. 3. Replace the top cover by inserting its front side into the printer first. Installing the Toner Cartridge 1. Installing the Toner Cartridges and Imaging Drum Installing the Toner Cartridge Installing the Imaging Drum CAUTION: Before performing any of the following procedures, read and follow the safety instructions in your Owner's Manual.

ugtoc.html
Page 40
... aligning the rollers with anything. 5. NOTICE: Do not allow the surface covered with a protective sheet to remove it. Pull the protective cover on the printer. NOTICE: Do not touch the transfer roller (black-colored roller). Holding the imaging drum by the handle with the flat part facing the back of the... printer, align the plastic guides on both sides of the imaging drum with the slots in front of the arrows on the imaging drum straight up to come into contact with the slots can damage the cartridge. Close the imaging drum cover. Make ...
... aligning the rollers with anything. 5. NOTICE: Do not allow the surface covered with a protective sheet to remove it. Pull the protective cover on the printer. NOTICE: Do not touch the transfer roller (black-colored roller). Holding the imaging drum by the handle with the flat part facing the back of the... printer, align the plastic guides on both sides of the imaging drum with the slots in front of the arrows on the imaging drum straight up to come into contact with the slots can damage the cartridge. Close the imaging drum cover. Make ...


