User Guide
Page 4
... Image 18 Raising the Projector Height 18 Lowering the Projector Height 18 Adjusting the Projector Zoom and Focus 19 Adjusting Projection Image Size 20 Using the Control Panel 21 Using the Remote Control 23 Using the On-Screen Display 26 Image Settings 26 Audio Menu 28 Management Menu 29 Language Menu 31 PIP Setting Menu 31 Network Settings Menu 32 Factory Reset Menu 33 Computer Source Menu 33 Video Source Menu 34 RF Learning Connections 34 To Manage the Projector from Web Management 37 4 Troubleshooting Your Projector 43 Self-diagnostic for Video 46 Changing the Lamp...
... Image 18 Raising the Projector Height 18 Lowering the Projector Height 18 Adjusting the Projector Zoom and Focus 19 Adjusting Projection Image Size 20 Using the Control Panel 21 Using the Remote Control 23 Using the On-Screen Display 26 Image Settings 26 Audio Menu 28 Management Menu 29 Language Menu 31 PIP Setting Menu 31 Network Settings Menu 32 Factory Reset Menu 33 Computer Source Menu 33 Video Source Menu 34 RF Learning Connections 34 To Manage the Projector from Web Management 37 4 Troubleshooting Your Projector 43 Self-diagnostic for Video 46 Changing the Lamp...
User Guide
Page 17
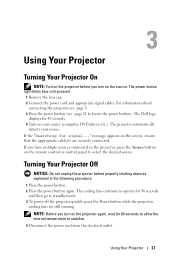
... power button light blinks blue until pressed. 1 Remove the lens cap. 2 Connect the power cord and appropriate signal cables. message appears on the screen, ensure that the appropriate cable(s) are still running. The cooling fans continue to operate for 30 seconds. 4 Turn on your source. Using Your Projector 17 If the "Searching for 60 seconds to allow the internal temperature to select the desired source. 3 Using Your Projector Turning Your Projector On NOTE: Turn on the projector before properly shutting...
... power button light blinks blue until pressed. 1 Remove the lens cap. 2 Connect the power cord and appropriate signal cables. message appears on the screen, ensure that the appropriate cable(s) are still running. The cooling fans continue to operate for 30 seconds. 4 Turn on your source. Using Your Projector 17 If the "Searching for 60 seconds to allow the internal temperature to select the desired source. 3 Using Your Projector Turning Your Projector On NOTE: Turn on the projector before properly shutting...
User Guide
Page 22
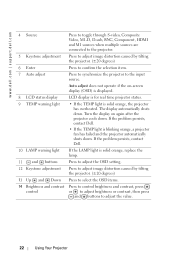
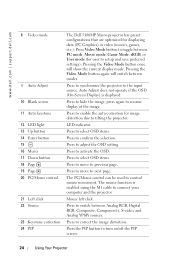
... solid orange, the projector has overheated. Auto adjust does not operate if the on again after the projector cools down. www.dell.com | support.dell.com 4 Source 5 Keystone adjustment 6 Enter 7 Auto adjust 8 LCD status display 9 TEMP warning light 10 LAMP warning light 11 and buttons 12 Keystone adjustment 13 Up and Down 14 Brightness and contrast control Press to toggle through S-video, Composite Video, M1-D, D-sub, BNC, Component, HDMI and M1 sources when multiple sources are connected to adjust the value. 22 Using Your Projector Press to adjust image...
... solid orange, the projector has overheated. Auto adjust does not operate if the on again after the projector cools down. www.dell.com | support.dell.com 4 Source 5 Keystone adjustment 6 Enter 7 Auto adjust 8 LCD status display 9 TEMP warning light 10 LAMP warning light 11 and buttons 12 Keystone adjustment 13 Up and Down 14 Brightness and contrast control Press to toggle through S-video, Composite Video, M1-D, D-sub, BNC, Component, HDMI and M1 sources when multiple sources are connected to adjust the value. 22 Using Your Projector Press to adjust image...
User Guide
Page 24
www.dell.com | support.dell.com 8 Video mode 9 Auto Adjust 10 Blank screen 11 Auto keystone 12 LED light 13 Up button 14 Enter button 15 16 Menu 17 Down button 18 Page 19 Page 20 PC/Mouse control 21 Left click 22 Source 23 Keystone correction 24 PIP The Dell 5100MP Micro-projector has preset configurations that are optimized for user to resume display of the image. Pressing the Video Mode button once will switch between modes. Press to synchronize...
www.dell.com | support.dell.com 8 Video mode 9 Auto Adjust 10 Blank screen 11 Auto keystone 12 LED light 13 Up button 14 Enter button 15 16 Menu 17 Down button 18 Page 19 Page 20 PC/Mouse control 21 Left click 22 Source 23 Keystone correction 24 PIP The Dell 5100MP Micro-projector has preset configurations that are optimized for user to resume display of the image. Pressing the Video Mode button once will switch between modes. Press to synchronize...
User Guide
Page 26
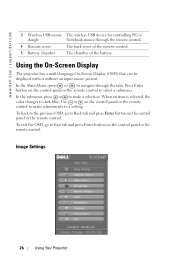
... cover of the remote control. 5 Battery chamber The chamber of the battery. Using the On-Screen Display The projector has a multi-language On-Screen Display (OSD) that can be displayed with or without an input source present. In the Main Menu, press or to Exit tab and press Enter button on the control panel or the remote control to a setting. When an item is selected, the color changes to select a submenu. Image Settings...
... cover of the remote control. 5 Battery chamber The chamber of the battery. Using the On-Screen Display The projector has a multi-language On-Screen Display (OSD) that can be displayed with or without an input source present. In the Main Menu, press or to Exit tab and press Enter button on the control panel or the remote control to a setting. When an item is selected, the color changes to select a submenu. Image Settings...
User Guide
Page 27
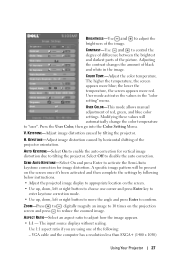
... higher the temperature, the screen appears more red. A specific image pattern will automatically change the color temperature to activate the Semi-Auto keystone correction for vertical image distortion due to reduce the zoomed image. COLOR TEMP.-Adjust the color temperature. USER COLOR-This mode allows manual adjustment of black and white in the "color setting" menu. KEYSTONE-Adjust image distortion caused by horizontal shifting of the picture. H. Select Off to confirm. SEMI-AUTO KEYSTONE-Select On and press Enter to "user". KEYSTONE-Adjust image distortion caused...
... higher the temperature, the screen appears more red. A specific image pattern will automatically change the color temperature to activate the Semi-Auto keystone correction for vertical image distortion due to reduce the zoomed image. COLOR TEMP.-Adjust the color temperature. USER COLOR-This mode allows manual adjustment of black and white in the "color setting" menu. KEYSTONE-Adjust image distortion caused by horizontal shifting of the picture. H. Select Off to confirm. SEMI-AUTO KEYSTONE-Select On and press Enter to "user". KEYSTONE-Adjust image distortion caused...
User Guide
Page 28
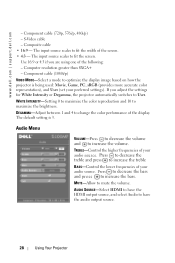
... HDMI output source, and select Audio to change the color performance of your audio source. Computer resolution greater than SXGA+ - Component cable (1080i/p) VIDEO MODE-Select a mode to optimize the display image based on how the projector is 3. MUTE-Allow to fit the width of your audio source. S-Video cable - The input source scales to mute the volume. Press to decrease the treble and press to User. Use 16:9 or 4:3 if you adjust the settings for White...
... HDMI output source, and select Audio to change the color performance of your audio source. Computer resolution greater than SXGA+ - Component cable (1080i/p) VIDEO MODE-Select a mode to optimize the display image based on how the projector is 3. MUTE-Allow to fit the width of your audio source. S-Video cable - The input source scales to mute the volume. Press to decrease the treble and press to User. Use 16:9 or 4:3 if you adjust the settings for White...
User Guide
Page 29
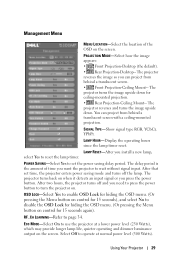
... reset the lamp timer. SIGNAL TYPE-Show signal type RGB, YCbCr, YPbPr. RF_CH LEARNING-Refer to set time, the projector enters power saving mode and turns off and you can project from behind a translucent screen with a ceiling-mounted projection. PROJECTION MODE-Select how the image appears: • Front Projection-Desktop (the default). • Rear Projection-Desktop-- The projector reverses and turns the image upside down for hiding the OSD menu. (Or pressing the Menu button on . LAMP HOUR-Display the operating hours since the lamp timer reset. LAMP RESET...
... reset the lamp timer. SIGNAL TYPE-Show signal type RGB, YCbCr, YPbPr. RF_CH LEARNING-Refer to set time, the projector enters power saving mode and turns off and you can project from behind a translucent screen with a ceiling-mounted projection. PROJECTION MODE-Select how the image appears: • Front Projection-Desktop (the default). • Rear Projection-Desktop-- The projector reverses and turns the image upside down for hiding the OSD menu. (Or pressing the Menu button on . LAMP HOUR-Display the operating hours since the lamp timer reset. LAMP RESET...
User Guide
Page 34
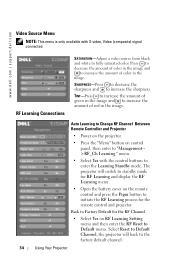
... Default menu. RF Learning Connections SATURATION-Adjust a video source from black and white to increase the sharpness. The projector will back to enter the Learning Standby mode. SHARPNESS-Press to decrease the sharpness and to fully saturated color. Select Reset to Default Channel, the projector will switch to standby mode for the remote control and projector. TINT-Press to increase the amount of green in the image. Auto Learning to Change RF Channel Between Remote Controller...
... Default menu. RF Learning Connections SATURATION-Adjust a video source from black and white to increase the sharpness. The projector will back to enter the Learning Standby mode. SHARPNESS-Press to decrease the sharpness and to fully saturated color. Select Reset to Default Channel, the projector will switch to standby mode for the remote control and projector. TINT-Press to increase the amount of green in the image. Auto Learning to Change RF Channel Between Remote Controller...
User Guide
Page 44
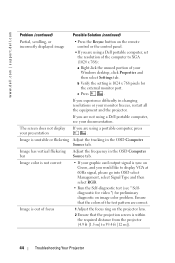
... the setting is unstable or flickering Adjust the tracking in changing resolutions or your monitor freezes, restart all the equipment and the projector. If you would like to 39.4 ft [12 m]). 44 Troubleshooting Your Projector Ensure that the projection screen is sync on Green, and you are using a Dell portable computer, see your graphic card output signal is within the required distance from the projector (4.9 ft [1.5 m] to display VGA...
... the setting is unstable or flickering Adjust the tracking in changing resolutions or your monitor freezes, restart all the equipment and the projector. If you would like to 39.4 ft [12 m]). 44 Troubleshooting Your Projector Ensure that the projection screen is sync on Green, and you are using a Dell portable computer, see your graphic card output signal is within the required distance from the projector (4.9 ft [1.5 m] to display VGA...
User Guide
Page 45
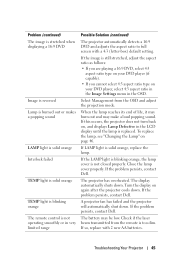
... full screen with 2 new AA batteries. A projector fan has failed and the projector will automatically shut down . If LAMP light is not closed properly. Problem (continued) The image is stretched when displaying a 16:9 DVD Image is reversed Lamp is burned out or makes a popping sound LAMP light is solid orange Interlock failed TEMP light is solid orange TEMP light is blinking orange The remote control is too dim. If the image is replaced. Close the lamp cover properly. The projector has overheated. Check...
... full screen with 2 new AA batteries. A projector fan has failed and the projector will automatically shut down . If LAMP light is not closed properly. Problem (continued) The image is stretched when displaying a 16:9 DVD Image is reversed Lamp is burned out or makes a popping sound LAMP light is solid orange Interlock failed TEMP light is solid orange TEMP light is blinking orange The remote control is too dim. If the image is replaced. Close the lamp cover properly. The projector has overheated. Check...
User Guide
Page 46
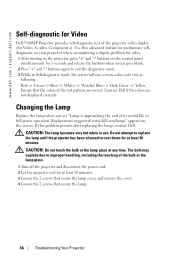
... Self-diagnostic mode, the screen will run a seven-color-cycle test as following: Red--> Green--> Blue--> White--> Watchet Blue--> Dark Green--> Yellow. Use this problem persists after replacing the lamp, contact Dell. CAUTION: The lamp becomes very hot when in full power operation. Changing the Lamp Replace the lamp when you see "Lamp is approaching the end of its useful life in use. www.dell.com | support.dell.com Self-diagnostic for Video Dell 5100MP Projector provides self-diagnostic test of the projector video display (for...
... Self-diagnostic mode, the screen will run a seven-color-cycle test as following: Red--> Green--> Blue--> White--> Watchet Blue--> Dark Green--> Yellow. Use this problem persists after replacing the lamp, contact Dell. CAUTION: The lamp becomes very hot when in full power operation. Changing the Lamp Replace the lamp when you see "Lamp is approaching the end of its useful life in use. www.dell.com | support.dell.com Self-diagnostic for Video Dell 5100MP Projector provides self-diagnostic test of the projector video display (for...

User Guide
Page 47
...: Dell may require that lamps replaced under warranty be returned to install the new lamp. 7 Reset the lamp by usage time selecting the left Lamp Reset icon in the OSD Management tab. FOR MORE INFORMATION, GO TO WWW.DELL.COM/HG OR CONTACT THE ELECTRONIC INDUSTRIES ALLIANCE AT WWW.EIAE.ORG. Otherwise, contact your local waste disposal agency for the US only) LAMP...
...: Dell may require that lamps replaced under warranty be returned to install the new lamp. 7 Reset the lamp by usage time selecting the left Lamp Reset icon in the OSD Management tab. FOR MORE INFORMATION, GO TO WWW.DELL.COM/HG OR CONTACT THE ELECTRONIC INDUSTRIES ALLIANCE AT WWW.EIAE.ORG. Otherwise, contact your local waste disposal agency for the US only) LAMP...
User Guide
Page 48
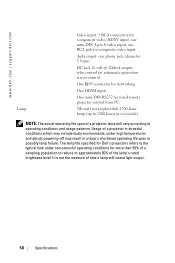
... AC 50-60Hz with PFC input 400 watts typical, 335 watts in eco mode 48 Specifications Frequency Power Supply Power Consumption Single-chip 0.95" SXGA+ DLP™ LVDS (low-voltage differential signaling) technology 3300 ANSI Lumens (Max.) 2500:1 Typical (Full On/Full Off) 80% Typical (Japan Standard - Frequency V. www.dell.com | support.dell.com 5 Specifications 5 Light Valve Brightness Contrast Ratio Uniformity Number of Pixels Displayable Color Color Wheel Speed Projection Lens Projection Screen Size Projection Distance Video Compatibility H.
... AC 50-60Hz with PFC input 400 watts typical, 335 watts in eco mode 48 Specifications Frequency Power Supply Power Consumption Single-chip 0.95" SXGA+ DLP™ LVDS (low-voltage differential signaling) technology 3300 ANSI Lumens (Max.) 2500:1 Typical (Full On/Full Off) 80% Typical (Japan Standard - Frequency V. www.dell.com | support.dell.com 5 Specifications 5 Light Valve Brightness Contrast Ratio Uniformity Number of Pixels Displayable Color Color Wheel Speed Projection Lens Projection Screen Size Projection Distance Video Compatibility H.
User Guide
Page 50
... typical time under high temperatures and abrupt powering-off may include dusty environments, under non-stressful operating conditions for wired remote projector control from PC 300-watt user-replaceable 1700-hour lamp (up to 2200 hours in a lamp's shortened operating life span or possibly lamp failure. Usage of a projector in stressful conditions which may result in eco mode) NOTE: The actual operating life span of a projector lamp will cease light output. 50 Specifications www.dell.com | support.dell.com Lamp Video input...
... typical time under high temperatures and abrupt powering-off may include dusty environments, under non-stressful operating conditions for wired remote projector control from PC 300-watt user-replaceable 1700-hour lamp (up to 2200 hours in a lamp's shortened operating life span or possibly lamp failure. Usage of a projector in stressful conditions which may result in eco mode) NOTE: The actual operating life span of a projector lamp will cease light output. 50 Specifications www.dell.com | support.dell.com Lamp Video input...
User Guide
Page 56
... 4:3 ratio of a computer image as DMD. Digital Visual Interface- It is the rate of light that is sent to the DLP mirrors which can be made that support DVI, a digital to determine the ANSI contrast ratio. Hz - Frequency of the black rectangles to digital connection can project a small, red (typically), high intensity beam of repetition in Hz. www.dell.com | support.dell.com Contrast Ratio...
... 4:3 ratio of a computer image as DMD. Digital Visual Interface- It is the rate of light that is sent to the DLP mirrors which can be made that support DVI, a digital to determine the ANSI contrast ratio. Hz - Frequency of the black rectangles to digital connection can project a small, red (typically), high intensity beam of repetition in Hz. www.dell.com | support.dell.com Contrast Ratio...
User Guide
Page 57
... Their whites are "extremely" white (with the zoom in a normal forward projection environment text, graphics, etc, are half as bright as Y/C. NTSC- Higher resolution than NTSC. S-Video-A video transmission standard that is usually limited by comparison. SECAM- The distance from the projector's control panel and also the remote control. Metal Halide Lamp- RGB- SXGA- The United States broadcast standard for each of 1000-2000 hours. Red, Green, Blue- Super Video...
... Their whites are "extremely" white (with the zoom in a normal forward projection environment text, graphics, etc, are half as bright as Y/C. NTSC- Higher resolution than NTSC. S-Video-A video transmission standard that is usually limited by comparison. SECAM- The distance from the projector's control panel and also the remote control. Metal Halide Lamp- RGB- SXGA- The United States broadcast standard for each of 1000-2000 hours. Red, Green, Blue- Super Video...
User Guide
Page 59
Index A Adjusting the Projected Image 18 Adjusting the Projector Height 18 lower the projector Elevator button 18 Elevator foot 18 Tilt adjustment wheel 18 Lowering the Projector Height 18 Adjusting the Projector Zoom and Focus 19 Focus ring 19 Zoom tab 19 C Changing the Lamp 46 Connecting the Projector 12V DC power cord 14 Automatic screen 14 BNC to VGA cable 13 Commercial RS232 control box 16 Composite video cable 13 Connecting a Computer with a D-sub to D-sub Cable 10 Connecting a Computer with...
Index A Adjusting the Projected Image 18 Adjusting the Projector Height 18 lower the projector Elevator button 18 Elevator foot 18 Tilt adjustment wheel 18 Lowering the Projector Height 18 Adjusting the Projector Zoom and Focus 19 Focus ring 19 Zoom tab 19 C Changing the Lamp 46 Connecting the Projector 12V DC power cord 14 Automatic screen 14 BNC to VGA cable 13 Commercial RS232 control box 16 Composite video cable 13 Connecting a Computer with a D-sub to D-sub Cable 10 Connecting a Computer with...
User Guide
Page 60
... Lamp 48 Light Valve 48 Networking Protocol 49 Noise Level 49 Number of Pixels 48 PIP combination sources 51 Power Consumption 49 Power Supply 48 S-video input connector 8 VGA input connector 8 VGA output connector 8 Video input connector 8 Contacting Dell 54 Control Panel 21 D Dell Contacting 54 M Main Unit 7 Control panel 7 Elevator button 7 Focus ring 7 Lens 7 Lens Cap 7 Remote control transceiver 7 Zoom tab 7 O On-Screen Display Audio Menu 28 Computer Source Menu 33 Factory Reset Menu 33 Image Settings Menu 26 Language Menu 31 Management Menu 29 Network Settings Menu 32 PIP Setting Menu...
... Lamp 48 Light Valve 48 Networking Protocol 49 Noise Level 49 Number of Pixels 48 PIP combination sources 51 Power Consumption 49 Power Supply 48 S-video input connector 8 VGA input connector 8 VGA output connector 8 Video input connector 8 Contacting Dell 54 Control Panel 21 D Dell Contacting 54 M Main Unit 7 Control panel 7 Elevator button 7 Focus ring 7 Lens 7 Lens Cap 7 Remote control transceiver 7 Zoom tab 7 O On-Screen Display Audio Menu 28 Computer Source Menu 33 Factory Reset Menu 33 Image Settings Menu 26 Language Menu 31 Management Menu 29 Network Settings Menu 32 PIP Setting Menu...

Protocol Document
Page 3
... strictly forbidden. Trademarks used in this document to refer to change without the written permission of Dell Inc. Control Commands List Command Description Header (WORD) Address Code (BYTE) Size Of The Payload (WORD) CRC16 For MsG ID The Entire (WORD) Packet (WORD) MsG Size (WORD) Command Value Code (BYTE) (BYTE) Comment Power 0xefbe 0x10 0x0005 0xffc6 0x1111 0x0001 0x01 Menu 0xefbe 0x10 0x0005 0xbfc7...
... strictly forbidden. Trademarks used in this document to refer to change without the written permission of Dell Inc. Control Commands List Command Description Header (WORD) Address Code (BYTE) Size Of The Payload (WORD) CRC16 For MsG ID The Entire (WORD) Packet (WORD) MsG Size (WORD) Command Value Code (BYTE) (BYTE) Comment Power 0xefbe 0x10 0x0005 0xffc6 0x1111 0x0001 0x01 Menu 0xefbe 0x10 0x0005 0xbfc7...


