
User's Guide
Page 4
... Projector 22 Turning Your Projector On 22 Turning Your Projector Off 22 Adjusting the Projected Image 23 Raising the Projector Height 23 Lowering the Projector Height 23 Adjusting the Projector Zoom and Focus 24 Adjusting Projection Image Size 25 Using the Control Panel 27 Using the Remote Control 29 Installing the Remote Control Batteries 32 Operating Range With Remote Control 33 Using the On-Screen Display 34 Main Menu 34 AUTO-ADJUST 34 INPUT SELECT 35 PICTURE (in PC Mode 36 PICTURE (in Video Mode 37 DISPLAY (in PC Mode 38 DISPLAY (in Video Mode 40 LAMP 41 SET...
... Projector 22 Turning Your Projector On 22 Turning Your Projector Off 22 Adjusting the Projected Image 23 Raising the Projector Height 23 Lowering the Projector Height 23 Adjusting the Projector Zoom and Focus 24 Adjusting Projection Image Size 25 Using the Control Panel 27 Using the Remote Control 29 Installing the Remote Control Batteries 32 Operating Range With Remote Control 33 Using the On-Screen Display 34 Main Menu 34 AUTO-ADJUST 34 INPUT SELECT 35 PICTURE (in PC Mode 36 PICTURE (in Video Mode 37 DISPLAY (in PC Mode 38 DISPLAY (in Video Mode 40 LAMP 41 SET...
User's Guide
Page 5
OTHERS 44 Wireless Networking Installation 51 4610X WIRELESS PLUS Wireless Application Software 55 Managing the Projector From Web Management . . . . 59 Configuring the Network Setting 59 Accessing Web Management 59 Make Application Token 78 4 Troubleshooting Your Projector 79 Guiding Signals 83 Changing the Lamp 85 5 Specifications 87 6 Contacting Dell 92 7 Appendix: Glossary 93 Contents 5
OTHERS 44 Wireless Networking Installation 51 4610X WIRELESS PLUS Wireless Application Software 55 Managing the Projector From Web Management . . . . 59 Configuring the Network Setting 59 Accessing Web Management 59 Make Application Token 78 4 Troubleshooting Your Projector 79 Guiding Signals 83 Changing the Lamp 85 5 Specifications 87 6 Contacting Dell 92 7 Appendix: Glossary 93 Contents 5
User's Guide
Page 7
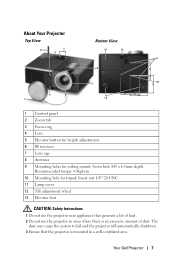
About Your Projector Top View Bottom View 8 1 6 11 13 9 2 3 10 5 4 7 12 1 Control panel 2 Zoom tab 3 Focus ring 4 Lens 5 Elevator button for height adjustments 6 IR receivers 7 Lens cap 8 Antenna 9 Mounting holes for ceiling mount: Screw hole M3 x 6.5mm depth. Recommended torque
About Your Projector Top View Bottom View 8 1 6 11 13 9 2 3 10 5 4 7 12 1 Control panel 2 Zoom tab 3 Focus ring 4 Lens 5 Elevator button for height adjustments 6 IR receivers 7 Lens cap 8 Antenna 9 Mounting holes for ceiling mount: Screw hole M3 x 6.5mm depth. Recommended torque
User's Guide
Page 8
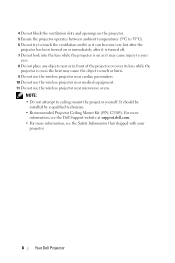
... not use the wireless projector near microwave ovens. NOTE: • Do not attempt to your projector. 8 Your Dell Projector For more information, see the Dell Support website at support.dell.com. • For more information, see the Safety Information that shipped with your eyes. 8 Do not place any objects near or in front of the projector or cover its lens while the projector is...
... not use the wireless projector near microwave ovens. NOTE: • Do not attempt to your projector. 8 Your Dell Projector For more information, see the Dell Support website at support.dell.com. • For more information, see the Safety Information that shipped with your eyes. 8 Do not place any objects near or in front of the projector or cover its lens while the projector is...

User's Guide
Page 22
... VGA-A. The Power button light blinks blue until pressed. 1 Remove the lens cap. 2 Connect the power cord and appropriate signal cables. For information about connecting the projector, see "Connecting Your Projector" on page 9. 3 Press the Power button (see "Using the Control Panel" on page 27 to locate the Power button). 4 Turn on your source (computer, DVD player, etc.) 5 Connect your source to the projector. 6 By default, the input source of projector if necessary. 7 If you have multiple sources connected to the projector, press the Source button on the remote control or control panel...
... VGA-A. The Power button light blinks blue until pressed. 1 Remove the lens cap. 2 Connect the power cord and appropriate signal cables. For information about connecting the projector, see "Connecting Your Projector" on page 9. 3 Press the Power button (see "Using the Control Panel" on page 27 to locate the Power button). 4 Turn on your source (computer, DVD player, etc.) 5 Connect your source to the projector. 6 By default, the input source of projector if necessary. 7 If you have multiple sources connected to the projector, press the Source button on the remote control or control panel...

User's Guide
Page 27
... "Troubleshooting Your Projector" on page 79 and "Guiding Signals" on page 83. Using Your Projector 27 If the TEMP amber indicator is on or blinking, one of the following problems could be occurring: • Internal temperature of usable life • Lamp module is too high • Color wheel failure For more information, see "Turning Your Projector On" on page 22 and "Turning Your Projector Off" on page 22. Using the Control Panel 1 2 3 4 10 9 5 6 8 1 LAMP warning light 2 TEMP warning light 3 Power 7 If...
... "Troubleshooting Your Projector" on page 79 and "Guiding Signals" on page 83. Using Your Projector 27 If the TEMP amber indicator is on or blinking, one of the following problems could be occurring: • Internal temperature of usable life • Lamp module is too high • Color wheel failure For more information, see "Turning Your Projector On" on page 22 and "Turning Your Projector Off" on page 22. Using the Control Panel 1 2 3 4 10 9 5 6 8 1 LAMP warning light 2 TEMP warning light 3 Power 7 If...

User's Guide
Page 35
INPUT SELECT The Input Select menu allows you to detect S-Video signal. S-VIDEO-Press to select your projector's input source. See page 43. Press to lock the current input signal. Using Your Projector 35 AUTO SOURCE-Select Off (the default) to access the projector's Wireless Guide screen. If you press the Source button when the Auto Source mode is on, it automatically finds the next available input signal. COMPOSITE VIDEO-Press to enable or disable VGA-B input. VGA-B-Use and to detect Composite Video signal. Select...
INPUT SELECT The Input Select menu allows you to detect S-Video signal. S-VIDEO-Press to select your projector's input source. See page 43. Press to lock the current input signal. Using Your Projector 35 AUTO SOURCE-Select Off (the default) to access the projector's Wireless Guide screen. If you press the Source button when the Auto Source mode is on, it automatically finds the next available input signal. COMPOSITE VIDEO-Press to enable or disable VGA-B input. VGA-B-Use and to detect Composite Video signal. Select...

User's Guide
Page 45
... press to capture the screen display, the following message appears on the screen. Select OFF to the projector is 1024 x 768 resolution. NOTE: To capture a full image, ensure the input signal that is connected to disable the Menu Lock. Using Your Projector 45 Select Captured to set back to change the transparency level of the OSD menu on the screen. If you to the default setting. The screen settings menu consists of non...
... press to capture the screen display, the following message appears on the screen. Select OFF to the projector is 1024 x 768 resolution. NOTE: To capture a full image, ensure the input signal that is connected to disable the Menu Lock. Using Your Projector 45 Select Captured to set back to change the transparency level of the OSD menu on the screen. If you to the default setting. The screen settings menu consists of non...

User's Guide
Page 46
.... By default, the projector is set to disable Power Saving mode. A warning message appears on . If an input signal is detected within two hours during the delay period, the projector turns off the lamp and goes into power saving mode. If an input signal is not detected during power saving mode, the projector switches from Power Saving mode to mute the sounds for audio input and audio output. To turn on the projector press the Power button. 46 Using Your Projector The delay...
.... By default, the projector is set to disable Power Saving mode. A warning message appears on . If an input signal is detected within two hours during the delay period, the projector turns off the lamp and goes into power saving mode. If an input signal is not detected during power saving mode, the projector switches from Power Saving mode to mute the sounds for audio input and audio output. To turn on the projector press the Power button. 46 Using Your Projector The delay...
User's Guide
Page 66
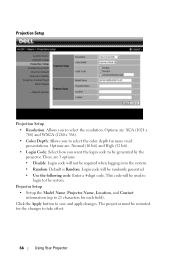
...) and High (32 bit). • Login Code: Select how you want the login code to be generated by the projector. Projector Setup • Setup the Model Name, Projector Name, Location, and Contact information (up to save and apply changes. Projection Setup Projection Setup • Resolution: Allows you to select the color depth for more vivid presentations. Login code will be used to login to the system. • Random: Default is...
...) and High (32 bit). • Login Code: Select how you want the login code to be generated by the projector. Projector Setup • Setup the Model Name, Projector Name, Location, and Contact information (up to save and apply changes. Projection Setup Projection Setup • Resolution: Allows you to select the color depth for more vivid presentations. Login code will be used to login to the system. • Random: Default is...

User's Guide
Page 71
... a more accurate color representation. - Using Your Projector 71 Presentation: Best for audio volume. • Speaker: Select On to enable the audio function or select Off to restore the factory defaults settings. Movie: For viewing movie & photo. - Custom: User preferred settings. • Blank Screen: You can select VGA-A, VGA-B, S-Video, Composite Video, HDMI, and Wireless/Network. • Video Mode: Select a mode to select your projector input source. Click the Auto Adjust button to adjust the display contrast. Click the Factory Reset button to disable...
... a more accurate color representation. - Using Your Projector 71 Presentation: Best for audio volume. • Speaker: Select On to enable the audio function or select Off to restore the factory defaults settings. Movie: For viewing movie & photo. - Custom: User preferred settings. • Blank Screen: You can select VGA-A, VGA-B, S-Video, Composite Video, HDMI, and Wireless/Network. • Video Mode: Select a mode to select your projector input source. Click the Auto Adjust button to adjust the display contrast. Click the Factory Reset button to disable...
User's Guide
Page 79
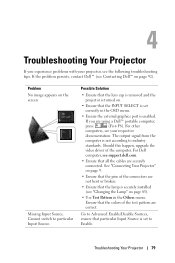
... particular Input Source is enabled. Should this happen, upgrade the video driver of the connectors are correct. Troubleshooting Your Projector 79 4 Troubleshooting Your Projector If you are securely connected. Problem No image appears on page 85). • Use Test Pattern in the OSD menu. • Ensure the external graphics port is set correctly in the Others menu. If the problem persists, contact Dell™ (see "Changing the Lamp" on the screen Missing Input Source.
... particular Input Source is enabled. Should this happen, upgrade the video driver of the connectors are correct. Troubleshooting Your Projector 79 4 Troubleshooting Your Projector If you are securely connected. Problem No image appears on page 85). • Use Test Pattern in the OSD menu. • Ensure the external graphics port is set correctly in the Others menu. If the problem persists, contact Dell™ (see "Changing the Lamp" on the screen Missing Input Source.

User's Guide
Page 80
... menu (in the OSD Display sub- Problem (continued) Possible Solution (continued) Partial, scrolling, or incorrectly displayed image 1 Press the Auto Adjust button on the projector lens. 2 Ensure that the projection screen is within the required distance from the projector (3.94 ft [1.2 m] to 32.81 ft [10 m]). 80 Troubleshooting Your Projector Should this happen, upgrade the video driver of the test pattern are using a Dell™ portable computer, see support.dell.com. The output signal...
... menu (in the OSD Display sub- Problem (continued) Possible Solution (continued) Partial, scrolling, or incorrectly displayed image 1 Press the Auto Adjust button on the projector lens. 2 Ensure that the projection screen is within the required distance from the projector (3.94 ft [1.2 m] to 32.81 ft [10 m]). 80 Troubleshooting Your Projector Should this happen, upgrade the video driver of the test pattern are using a Dell™ portable computer, see support.dell.com. The output signal...

User's Guide
Page 81
... shut down . The display automatically shuts down . If the image is properly installed. If this occurs, the projector does not turn back on page 85. When the lamp reaches its end of the projected image according to input signal format with an Original setting. The projector has overheated. If the LAMP light and the Power light are blinking amber and the Power light is blinking amber, Lamp module connection may make a loud popping sound. Please check the lamp...
... shut down . The display automatically shuts down . If the image is properly installed. If this occurs, the projector does not turn back on page 85. When the lamp reaches its end of the projected image according to input signal format with an Original setting. The projector has overheated. If the LAMP light and the Power light are blinking amber and the Power light is blinking amber, Lamp module connection may make a loud popping sound. Please check the lamp...

User's Guide
Page 83
... driver is not detected in two hours. If the problem persists, contact Dell. If this problem persists, contact Dell. Power Saving mode has been activated. The air vents may be above 35ºC. Color wheel cannot start. Guiding Signals Projector Status Description Control Buttons Power Menu Others Standby mode Warming up and power on . The projector will automatically enter standby mode, if an input signal is overheated. Turn the display on Cooling mode Power Saving mode Cooling before entering Power Saving mode. If the problem persists, contact Dell. BLUE Flashing...
... driver is not detected in two hours. If the problem persists, contact Dell. If this problem persists, contact Dell. Power Saving mode has been activated. The air vents may be above 35ºC. Color wheel cannot start. Guiding Signals Projector Status Description Control Buttons Power Menu Others Standby mode Warming up and power on . The projector will automatically enter standby mode, if an input signal is overheated. Turn the display on Cooling mode Power Saving mode Cooling before entering Power Saving mode. If the problem persists, contact Dell. BLUE Flashing...

User's Guide
Page 84
Lamp failure Fault - Replace the lamp. Lamp module connection may be disrupted. Check the lamp module and ensure that it is defective. Unplug the power cord after three minutes and then turn on the projector. Unplug the power cord after three minutes and then turn on the projector. If the problem persists, contact Dell. DC supply (+12V) Fault - DC supplies (secondary) Lamp module connection failed Lamp is properly installed. Power supply has been interrupted. If this problem persists...
Lamp failure Fault - Replace the lamp. Lamp module connection may be disrupted. Check the lamp module and ensure that it is defective. Unplug the power cord after three minutes and then turn on the projector. Unplug the power cord after three minutes and then turn on the projector. If the problem persists, contact Dell. DC supply (+12V) Fault - DC supplies (secondary) Lamp module connection failed Lamp is properly installed. Power supply has been interrupted. If this problem persists...

User's Guide
Page 85
Changing the Lamp CAUTION: Before you begin any time. Replace the lamp when the message "Lamp is approaching the end of the procedures in use. CAUTION: Do not touch the bulb or the lamp glass at any of its metal handle. For more information, see www.dell.com/hg. 1 Turn off the projector and disconnect the power cord. 2 Let the projector cool for at least 30 minutes...
Changing the Lamp CAUTION: Before you begin any time. Replace the lamp when the message "Lamp is approaching the end of the procedures in use. CAUTION: Do not touch the bulb or the lamp glass at any of its metal handle. For more information, see www.dell.com/hg. 1 Turn off the projector and disconnect the power cord. 2 Let the projector cool for at least 30 minutes...

User's Guide
Page 89
... projector control. Philips 280W user-replaceable lamp (up to 20 users at the same time. 4-to fail and cease light output. Allow 4 presentation slides to operating conditions and usage patterns. Specifications 89 The actual operating life span of a projector in a lamp's shortened operating life span or possible lamp failure. RJ45 port: One RJ45 connector for driving automatic screen. RS232 port: One mini-DIN 6-pins for remote support. USB port: One USB slave for RS232 communication. Wireless Lamp Variable audio...
... projector control. Philips 280W user-replaceable lamp (up to 20 users at the same time. 4-to fail and cease light output. Allow 4 presentation slides to operating conditions and usage patterns. Specifications 89 The actual operating life span of a projector in a lamp's shortened operating life span or possible lamp failure. RJ45 port: One RJ45 connector for driving automatic screen. RS232 port: One mini-DIN 6-pins for remote support. USB port: One USB slave for RS232 communication. Wireless Lamp Variable audio...

User's Guide
Page 95
... the smallest and largest image a lens can focus an image onto a screen. When used for each of 525 lines at 25 frames per second. are backwards. UXGA - Extended Video Graphics Array - 1024 x 768 pixels count. Lens with full zoom. For example, a 1.4:1 zoom lens ratio means that a 10 foot image without zoom would be decrypted by a third party. Minimum Distance - Red, Green, Blue - Super Video Graphics Array - 800 x 600...
... the smallest and largest image a lens can focus an image onto a screen. When used for each of 525 lines at 25 frames per second. are backwards. UXGA - Extended Video Graphics Array - 1024 x 768 pixels count. Lens with full zoom. For example, a 1.4:1 zoom lens ratio means that a 10 foot image without zoom would be decrypted by a third party. Minimum Distance - Red, Green, Blue - Super Video Graphics Array - 800 x 600...

User's Guide
Page 97
... Adapter 9 Dell contacting 92 H HDMI 9 M Main Unit 7 Control panel 7 Elevator button 7 Focus ring 7 IR receiver 7 Lens 7 Zoom tab 7 Menu Position 45 Menu Settings 44 Menu Timeout 45 Menu Transparency 45 Mute 46 O On-Screen Display 34 Auto-Adjust 36 Display (in PC Mode) 38 Display (in Video Mode) 40 Input Select 35 Lamp 41 Main Menu 34 Others 44 Picture (in PC Mode) 36 Picture (in Video Mode) 37 Set Up 41 P Password 47 phone numbers 92 Power Saving 46 Power Settings 46 Powering On/Off the Projector Powering Off...
... Adapter 9 Dell contacting 92 H HDMI 9 M Main Unit 7 Control panel 7 Elevator button 7 Focus ring 7 IR receiver 7 Lens 7 Zoom tab 7 Menu Position 45 Menu Settings 44 Menu Timeout 45 Menu Transparency 45 Mute 46 O On-Screen Display 34 Auto-Adjust 36 Display (in PC Mode) 38 Display (in Video Mode) 40 Input Select 35 Lamp 41 Main Menu 34 Others 44 Picture (in PC Mode) 36 Picture (in Video Mode) 37 Set Up 41 P Password 47 phone numbers 92 Power Saving 46 Power Settings 46 Powering On/Off the Projector Powering Off...


