User Manual
Page 9
... Ordering supplies...231 Printer attached to a network ...231 Printer attached locally to a computer ...231 Replacing supplies...231 Replacing the toner cartridge ...231 Replacing the photoconductor kit ...233 Recycling Dell products...236 Moving the printer to another location...236 Shipping the printer...237 Administrative support 238 Using the Embedded Web Server...238 Checking the...
... Ordering supplies...231 Printer attached to a network ...231 Printer attached locally to a computer ...231 Replacing supplies...231 Replacing the toner cartridge ...231 Replacing the photoconductor kit ...233 Recycling Dell products...236 Moving the printer to another location...236 Shipping the printer...237 Administrative support 238 Using the Embedded Web Server...238 Checking the...

User Manual
Page 232
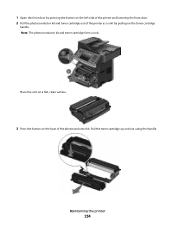
Maintaining the printer 232 Extended light exposure can cause print quality problems. 4 Rotate the cartridge in all directions to direct light for an extended period of the photoconductor kit. To replace the toner cartridge: 1 Open the front door by pressing the button on the left side of the printer and lowering the door. 2 Press the button on the base of time. Warning-Potential Damage: When replacing a toner cartridge, do not leave the photoconductor kit exposed to distribute the toner. Pull the toner cartridge up and out using the handle. 3 Unpack the new toner cartridge.
Maintaining the printer 232 Extended light exposure can cause print quality problems. 4 Rotate the cartridge in all directions to direct light for an extended period of the photoconductor kit. To replace the toner cartridge: 1 Open the front door by pressing the button on the left side of the printer and lowering the door. 2 Press the button on the base of time. Warning-Potential Damage: When replacing a toner cartridge, do not leave the photoconductor kit exposed to distribute the toner. Pull the toner cartridge up and out using the handle. 3 Unpack the new toner cartridge.

User Manual
Page 233
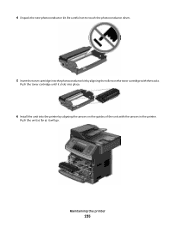
... status of -life, print quality significantly decreases. While the printer may continue to function properly after the photoconductor kit has reached its official end-of the photoconductor kit by printing a menu settings page. Maintaining the printer 233 The cartridge clicks into place when correctly installed.... 6 Close the front door. When 84 PC Kit life warning or 84 Replace PC Kit first appears, you before the photoconductor kit reaches a page maximum by aligning the rollers on the toner cartridge with the arrows on the...
... status of -life, print quality significantly decreases. While the printer may continue to function properly after the photoconductor kit has reached its official end-of the photoconductor kit by printing a menu settings page. Maintaining the printer 233 The cartridge clicks into place when correctly installed.... 6 Close the front door. When 84 PC Kit life warning or 84 Replace PC Kit first appears, you before the photoconductor kit reaches a page maximum by aligning the rollers on the toner cartridge with the arrows on the...
User Manual
Page 234
Pull the toner cartridge up and out using the handle. Maintaining the printer 234 1 Open the front door by pressing the button on the toner cartridge handle. Place the unit on a flat, clean surface. 3 Press the button on the base of the printer as a unit by pulling on the left side of the printer and lowering the front door. 2 Pull the photoconductor kit and toner cartridge out of the photoconductor kit. Note: The photoconductor kit and toner cartridge form a unit.
Pull the toner cartridge up and out using the handle. Maintaining the printer 234 1 Open the front door by pressing the button on the toner cartridge handle. Place the unit on a flat, clean surface. 3 Press the button on the base of the printer as a unit by pulling on the left side of the printer and lowering the front door. 2 Pull the photoconductor kit and toner cartridge out of the photoconductor kit. Note: The photoconductor kit and toner cartridge form a unit.
User Manual
Page 235
Be careful not to touch the photoconductor drum. 5 Insert the toner cartridge into the printer by aligning the rollers on the guides of the unit with the tracks. Maintaining the printer 235 4 Unpack the new photoconductor kit. Push the toner cartridge until it will go. Push the unit as far as it clicks into place. 6 Install the unit into the photoconductor kit by aligning the arrows on the toner cartridge with the arrows in the printer.
Be careful not to touch the photoconductor drum. 5 Insert the toner cartridge into the printer by aligning the rollers on the guides of the unit with the tracks. Maintaining the printer 235 4 Unpack the new photoconductor kit. Push the toner cartridge until it will go. Push the unit as far as it clicks into place. 6 Install the unit into the photoconductor kit by aligning the arrows on the toner cartridge with the arrows in the printer.
User Manual
Page 236
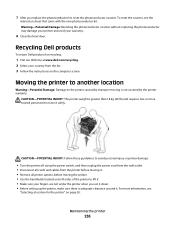
... moving is greater than 18 kg (40 lb) and requires two or more information, see the instruction sheet that came with the new photoconductor kit. Recycling Dell products To return Dell products for the printer" on both sides of the printer to avoid personal injury or printer damage: • Turn the printer off using...
... moving is greater than 18 kg (40 lb) and requires two or more information, see the instruction sheet that came with the new photoconductor kit. Recycling Dell products To return Dell products for the printer" on both sides of the printer to avoid personal injury or printer damage: • Turn the printer off using...

User Manual
Page 238
... low or when the paper needs to see tray settings, the level of toner in the toner cartridge, the percentage of life remaining in the photoconductor kit, and capacity measurements of the printer, then print a network setup page and locate the IP address in the TCP/IP section. 2 Click Settings. 3 Under Other...
... low or when the paper needs to see tray settings, the level of toner in the toner cartridge, the percentage of life remaining in the photoconductor kit, and capacity measurements of the printer, then print a network setup page and locate the IP address in the TCP/IP section. 2 Click Settings. 3 Under Other...
User Manual
Page 240
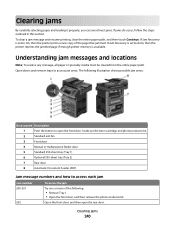
...Jam Recovery is available. The following : • Remove Tray 1. • Open the front door, and then remove the photoconductor kit. Open the front door, and then open the front door. Clearing jams 240 Clearing jams By carefully selecting paper and loading... entire paper path. To clear a jam message and resume printing, clear the entire paper path, and then touch Continue. Inside are the toner cartridge and photoconductor kit. 2 Standard exit bin 3 Front door 4 Manual or multipurpose feeder door 5 Standard 250-sheet tray (Tray 1) 6 Optional 550-sheet tray (Tray 2) 7...
...Jam Recovery is available. The following : • Remove Tray 1. • Open the front door, and then remove the photoconductor kit. Open the front door, and then open the front door. Clearing jams 240 Clearing jams By carefully selecting paper and loading... entire paper path. To clear a jam message and resume printing, clear the entire paper path, and then touch Continue. Inside are the toner cartridge and photoconductor kit. 2 Standard exit bin 3 Front door 4 Manual or multipurpose feeder door 5 Standard 250-sheet tray (Tray 1) 6 Optional 550-sheet tray (Tray 2) 7...
User Manual
Page 242
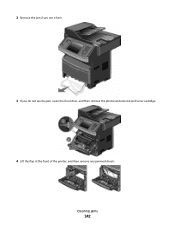
Clearing jams 242 2 Remove the jam if you see it here. 3 If you do not see the jam, open the front door, and then remove the photoconductor kit and toner cartridge. 4 Lift the flap at the front of the printer, and then remove any jammed sheets.
Clearing jams 242 2 Remove the jam if you see it here. 3 If you do not see the jam, open the front door, and then remove the photoconductor kit and toner cartridge. 4 Lift the flap at the front of the printer, and then remove any jammed sheets.

User Manual
Page 243
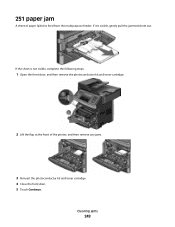
If the paper is exiting the printer, then pull the paper out, and then touch Continue. 5 If you do not see any jammed sheets, open the rear door. 6 Remove the jam. 7 Close the rear door. 8 Insert the photoconductor kit and toner cartridge. 9 Close the front door. 10 Touch Continue. 202 paper jam Touch Status/Supplies to identify the location of the jam. Clearing jams 243
If the paper is exiting the printer, then pull the paper out, and then touch Continue. 5 If you do not see any jammed sheets, open the rear door. 6 Remove the jam. 7 Close the rear door. 8 Insert the photoconductor kit and toner cartridge. 9 Close the front door. 10 Touch Continue. 202 paper jam Touch Status/Supplies to identify the location of the jam. Clearing jams 243
User Manual
Page 249
If it is not visible, complete the following steps: 1 Open the front door, and then remove the photoconductor kit and toner cartridge. 2 Lift the flap at the front of paper failed to feed from the multipurpose feeder. Clearing jams 249 If the sheet is visible, gently pull the jammed sheet out. 251 paper jam A sheet of the printer, and then remove any jams. 3 Reinsert the photoconductor kit and toner cartridge. 4 Close the front door. 5 Touch Continue.
If it is not visible, complete the following steps: 1 Open the front door, and then remove the photoconductor kit and toner cartridge. 2 Lift the flap at the front of paper failed to feed from the multipurpose feeder. Clearing jams 249 If the sheet is visible, gently pull the jammed sheet out. 251 paper jam A sheet of the printer, and then remove any jams. 3 Reinsert the photoconductor kit and toner cartridge. 4 Close the front door. 5 Touch Continue.

User Manual
Page 264
... to replace the pick rollers, the charge roll, the transfer roller, and the fuser. 84 PC Kit life warning The photoconductor kit is near exhaustion. Install a new photoconductor kit. 88 Cartridge low The toner is exhausted. Replace the toner cartridge, and then touch Continue to have...264 Try one or more of the following : • Replace the photoconductor kit. • Touch Continue to clear the message and continue printing. 84 Replace PC Kit The photoconductor kit is low. Order a maintenance kit, which contains all the items necessary to clear the message and continue...
... to replace the pick rollers, the charge roll, the transfer roller, and the fuser. 84 PC Kit life warning The photoconductor kit is near exhaustion. Install a new photoconductor kit. 88 Cartridge low The toner is exhausted. Replace the toner cartridge, and then touch Continue to have...264 Try one or more of the following : • Replace the photoconductor kit. • Touch Continue to clear the message and continue printing. 84 Replace PC Kit The photoconductor kit is low. Order a maintenance kit, which contains all the items necessary to clear the message and continue...

User Manual
Page 300
Contact system administrator. 257 Load with 258 Index 300 pausing the current print job to make copies 111 PCL Emul menu 221 PDF menu 220 photoconductor kit replacing 233 photos copying 105 port settings configuring 65 PostScript menu 220 Power Saver adjusting 71 PPDS menu 223 print job canceling from Macintosh 102 ... tray 263 61 Remove defective disk 264 62 Disk full 264 63 Unformatted disk 264 80 Routine maintenance needed 264 84 PC Kit life warning 264 84 Replace PC Kit 264 840.01 Scanner Disabled 266 840.02 Scanner Auto Disabled 266 88 Cartridge low 264 Change to 255 Change to 254...
Contact system administrator. 257 Load with 258 Index 300 pausing the current print job to make copies 111 PCL Emul menu 221 PDF menu 220 photoconductor kit replacing 233 photos copying 105 port settings configuring 65 PostScript menu 220 Power Saver adjusting 71 PPDS menu 223 print job canceling from Macintosh 102 ... tray 263 61 Remove defective disk 264 62 Disk full 264 63 Unformatted disk 264 80 Routine maintenance needed 264 84 PC Kit life warning 264 84 Replace PC Kit 264 840.01 Scanner Disabled 266 840.02 Scanner Auto Disabled 266 88 Cartridge low 264 Change to 255 Change to 254...
User Manual
Page 301
... computer options 153, 154, 155 scan troubleshooting cannot scan from standard output bin 259 Replace all originals if restarting job. 265 replacing photoconductor kit 233 toner cartridge 231 reports viewing 239 Reports menu 163, 166 Reserve print jobs 98 printing from Macintosh computer 99 printing from Windows... shortcuts using the touch screen 148 improving FTP quality 151 using shortcut numbers 147 using the address book 148 using 69 recycling Dell products 236 reducing a copy 108 registration scanner 229 Remove paper from standard output bin 259 Repeat print jobs 98 printing from ...
... computer options 153, 154, 155 scan troubleshooting cannot scan from standard output bin 259 Replace all originals if restarting job. 265 replacing photoconductor kit 233 toner cartridge 231 reports viewing 239 Reports menu 163, 166 Reserve print jobs 98 printing from Macintosh computer 99 printing from Windows... shortcuts using the touch screen 148 improving FTP quality 151 using shortcut numbers 147 using the address book 148 using 69 recycling Dell products 236 reducing a copy 108 registration scanner 229 Remove paper from standard output bin 259 Repeat print jobs 98 printing from ...


