User Manual
Page 3
Changing port settings after installing a new network Internal Solutions Port 65 Setting up serial printing...67 Minimizing your printer's environmental impact 69 Saving paper and toner...69 Using recycled paper and other office papers ...69 Conserving supplies...69 Saving energy...70 Using Eco-Mode ...70 Adjusting Power Saver...71 Adjusting the ...
Changing port settings after installing a new network Internal Solutions Port 65 Setting up serial printing...67 Minimizing your printer's environmental impact 69 Saving paper and toner...69 Using recycled paper and other office papers ...69 Conserving supplies...69 Saving energy...70 Using Eco-Mode ...70 Adjusting Power Saver...71 Adjusting the ...
User Manual
Page 9
... computer 230 Ordering supplies...231 Printer attached to a network ...231 Printer attached locally to a computer ...231 Replacing supplies...231 Replacing the toner cartridge ...231 Replacing the photoconductor kit ...233 Recycling Dell products...236 Moving the printer to another location...236 Shipping the printer...237 Administrative support 238 Using the Embedded Web Server...
... computer 230 Ordering supplies...231 Printer attached to a network ...231 Printer attached locally to a computer ...231 Replacing supplies...231 Replacing the toner cartridge ...231 Replacing the photoconductor kit ...233 Recycling Dell products...236 Moving the printer to another location...236 Shipping the printer...237 Administrative support 238 Using the Embedded Web Server...

User Manual
Page 13
... light ...287 Print is too dark...288 Solid color pages...289 Streaked vertical lines ...289 Streaked horizontal lines...290 Toner fog or background shading appears on the page 291 Toner rubs off...291 Toner specks...292 Transparency print quality is poor...292 Uneven print density...293 Embedded Web Server does not open...293...
... light ...287 Print is too dark...288 Solid color pages...289 Streaked vertical lines ...289 Streaked horizontal lines...290 Toner fog or background shading appears on the page 291 Toner rubs off...291 Toner specks...292 Transparency print quality is poor...292 Uneven print density...293 Embedded Web Server does not open...293...
User Manual
Page 25
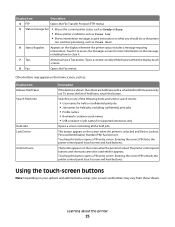
... File Transfer Protocol (FTP) menus 5 Status message bar • Shows the current printer status such as Ready or Busy. • Shows printer conditions such as Toner Low. • Shows intervention messages to give instructions on what you should do so the printer can continue processing, such as : Display item Release Held...
... File Transfer Protocol (FTP) menus 5 Status message bar • Shows the current printer status such as Ready or Busy. • Shows printer conditions such as Toner Low. • Shows intervention messages to give instructions on what you should do so the printer can continue processing, such as : Display item Release Held...

User Manual
Page 69
Before using these types of paper, consult your printer's environmental impact Saving paper and toner Using recycled paper and other office papers • Low moisture content (4-5%) • Suitable smoothness (100-200 Sheffield units, or 140-350 Bendtsen units, European) Note: ...
Before using these types of paper, consult your printer's environmental impact Saving paper and toner Using recycled paper and other office papers • Low moisture content (4-5%) • Suitable smoothness (100-200 Sheffield units, or 140-350 Bendtsen units, European) Note: ...

User Manual
Page 87
... stock. If paper is exposed to moisture changes that can automatically feed paper weights from the printer environment. Always use it is too rough, then toner cannot fuse to curl at its original wrapper in its edges. For paper heavier than 176 g/m2, grain short is the tendency for 24 to...
... stock. If paper is exposed to moisture changes that can automatically feed paper weights from the printer environment. Always use it is too rough, then toner cannot fuse to curl at its original wrapper in its edges. For paper heavier than 176 g/m2, grain short is the tendency for 24 to...

User Manual
Page 89
... up to 230°C (446°F) without melting or releasing hazardous emissions. Supported paper sizes, types, and weights Paper sizes supported by the resin in toner. Paper and specialty media guidelines 89 The ink must be able to withstand temperatures up to 230°C (446°F) without melting or releasing hazardous...
... up to 230°C (446°F) without melting or releasing hazardous emissions. Supported paper sizes, types, and weights Paper sizes supported by the resin in toner. Paper and specialty media guidelines 89 The ink must be able to withstand temperatures up to 230°C (446°F) without melting or releasing hazardous...

User Manual
Page 182
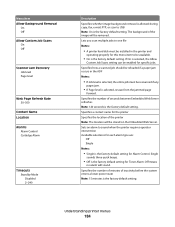
...; No is the factory default setting for Activate. • Default is the factory default setting. Specifies what is displayed on status screen On Off Black Toner When to Display Display Do not display Message to Display Default Alternate Default Message Alternate Message Displayed Information (continued) Paper Jam Load Paper Service Errors...
...; No is the factory default setting for Activate. • Default is the factory default setting. Specifies what is displayed on status screen On Off Black Toner When to Display Display Do not display Message to Display Default Alternate Default Message Alternate Message Displayed Information (continued) Paper Jam Load Paper Service Errors...
User Manual
Page 184
... rescanned if any pages jam. • If Page level is the factory default setting. Off means no alarm will be removed. Specifies a contact name for Toner Alarm. If On is the factory default setting for the printer Specifies the location of the image will be stored on the Embedded Web Server...
... rescanned if any pages jam. • If Page level is the factory default setting. Off means no alarm will be removed. Specifies a contact name for Toner Alarm. If On is the factory default setting for the printer Specifies the location of the image will be stored on the Embedded Web Server...

User Manual
Page 198
...a received fax Note: On is the factory default setting. Fax Receive Settings Menu item Enable Fax Receive On Off Fax Job Waiting None Toner Toner and Supplies Rings to Answer 1-25 Auto Reduction On Off Paper Source Auto Tray Multi-Purpose Feeder Separator Sheets None After job Before job Separator...Footer On Off Max Speed 2400 4800 9600 14400 33600 Fax Forwarding Forward Print Print and Forward Description Allows fax jobs to be held until toner or supplies are received Note: 33600 is the factory default setting. Enables duplex printing (two-sided printing) for the printer to another ...
...a received fax Note: On is the factory default setting. Fax Receive Settings Menu item Enable Fax Receive On Off Fax Job Waiting None Toner Toner and Supplies Rings to Answer 1-25 Auto Reduction On Off Paper Source Auto Tray Multi-Purpose Feeder Separator Sheets None After job Before job Separator...Footer On Off Max Speed 2400 4800 9600 14400 33600 Fax Forwarding Forward Print Print and Forward Description Allows fax jobs to be held until toner or supplies are received Note: 33600 is the factory default setting. Enables duplex printing (two-sided printing) for the printer to another ...

User Manual
Page 219
... as architectural drawings, maps, electrical circuit diagrams, and flow charts Notes: • Off is formatting. Understanding printer menus 219 Menu item Toner Darkness 1-10 Enhance Fine Lines On Off Gray Correction Auto Off Brightness -6 to be available. A positive value will darken text, images,...darkens the printed output Notes: • 8 is the factory default setting. • A negative value will lighten them and conserve toner. Adjusts the gray value of printed output Note: Auto is the factory default setting. • Higher settings show more difference between levels ...
... as architectural drawings, maps, electrical circuit diagrams, and flow charts Notes: • Off is formatting. Understanding printer menus 219 Menu item Toner Darkness 1-10 Enhance Fine Lines On Off Gray Correction Auto Off Brightness -6 to be available. A positive value will darken text, images,...darkens the printed output Notes: • 8 is the factory default setting. • A negative value will lighten them and conserve toner. Adjusts the gray value of printed output Note: Auto is the factory default setting. • Higher settings show more difference between levels ...

User Manual
Page 231
... covered under warranty. Printer attached locally to launch the Dell Configuration Web Tool. 2 Click www.dell.com/supplies. Note: All life estimates for printer supplies assume printing on letter- Replacing supplies Replacing the toner cartridge When 88 Cartridge low appears, or when you ...longer improves the print quality, replace the toner cartridge. Note: You can check to redistribute the toner, and then reinsert it and continue printing. Degraded print quality may result from the printer drop-down list. 5 Click Dell Printer Supplies Reorder Application. Maintaining the ...
... covered under warranty. Printer attached locally to launch the Dell Configuration Web Tool. 2 Click www.dell.com/supplies. Note: All life estimates for printer supplies assume printing on letter- Replacing supplies Replacing the toner cartridge When 88 Cartridge low appears, or when you ...longer improves the print quality, replace the toner cartridge. Note: You can check to redistribute the toner, and then reinsert it and continue printing. Degraded print quality may result from the printer drop-down list. 5 Click Dell Printer Supplies Reorder Application. Maintaining the ...

User Manual
Page 232
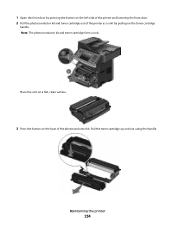
Warning-Potential Damage: When replacing a toner cartridge, do not leave the photoconductor kit exposed to distribute the toner. Extended light exposure can cause print quality problems. 4 Rotate the cartridge in all directions to direct light for an extended period of the photoconductor kit. Pull the toner cartridge up and out using the handle. 3 Unpack the new toner cartridge. Maintaining the printer 232 To replace the toner cartridge: 1 Open the front door by pressing the button on the left side of the printer and lowering the door. 2 Press the button on the base of time.
Warning-Potential Damage: When replacing a toner cartridge, do not leave the photoconductor kit exposed to distribute the toner. Extended light exposure can cause print quality problems. 4 Rotate the cartridge in all directions to direct light for an extended period of the photoconductor kit. Pull the toner cartridge up and out using the handle. 3 Unpack the new toner cartridge. Maintaining the printer 232 To replace the toner cartridge: 1 Open the front door by pressing the button on the left side of the printer and lowering the door. 2 Press the button on the base of time.

User Manual
Page 233
... front door. You can also see the status of -life, print quality significantly decreases. Maintaining the printer 233 5 Install the new toner cartridge by aligning the rollers on the toner cartridge with the arrows on the display. Note: The photoconductor kit is one item only. When 84 PC Kit life warning or...-of the photoconductor kit by showing 84 PC Kit life warning or 84 Replace PC Kit on the tracks of the photoconductor kit. Push the toner cartridge in as far as it will go.
... front door. You can also see the status of -life, print quality significantly decreases. Maintaining the printer 233 5 Install the new toner cartridge by aligning the rollers on the toner cartridge with the arrows on the display. Note: The photoconductor kit is one item only. When 84 PC Kit life warning or...-of the photoconductor kit by showing 84 PC Kit life warning or 84 Replace PC Kit on the tracks of the photoconductor kit. Push the toner cartridge in as far as it will go.
User Manual
Page 234
Pull the toner cartridge up and out using the handle. 1 Open the front door by pulling on the left side of the printer and lowering the front door. 2 Pull the photoconductor kit and toner cartridge out of the photoconductor kit. Place the unit on a flat, clean surface. 3 Press the button on the base of the printer as a unit by pressing the button on the toner cartridge handle. Maintaining the printer 234 Note: The photoconductor kit and toner cartridge form a unit.
Pull the toner cartridge up and out using the handle. 1 Open the front door by pulling on the left side of the printer and lowering the front door. 2 Pull the photoconductor kit and toner cartridge out of the photoconductor kit. Place the unit on a flat, clean surface. 3 Press the button on the base of the printer as a unit by pressing the button on the toner cartridge handle. Maintaining the printer 234 Note: The photoconductor kit and toner cartridge form a unit.
User Manual
Page 235
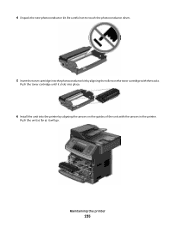
Push the unit as far as it clicks into place. 6 Install the unit into the photoconductor kit by aligning the arrows on the toner cartridge with the arrows in the printer. 4 Unpack the new photoconductor kit. Maintaining the printer 235 Push the toner cartridge until it will go. Be careful not to touch the photoconductor drum. 5 Insert the toner cartridge into the printer by aligning the rollers on the guides of the unit with the tracks.
Push the unit as far as it clicks into place. 6 Install the unit into the photoconductor kit by aligning the arrows on the toner cartridge with the arrows in the printer. 4 Unpack the new photoconductor kit. Maintaining the printer 235 Push the toner cartridge until it will go. Be careful not to touch the photoconductor drum. 5 Insert the toner cartridge into the printer by aligning the rollers on the guides of the unit with the tracks.

User Manual
Page 238
... the Embedded Web Server If the printer is installed on a network, the Embedded Web Server is possible to see tray settings, the level of toner in the toner cartridge, the percentage of life remaining in the photoconductor kit, and capacity measurements of the printer, then print a network setup page and locate the...
... the Embedded Web Server If the printer is installed on a network, the Embedded Web Server is possible to see tray settings, the level of toner in the toner cartridge, the percentage of life remaining in the photoconductor kit, and capacity measurements of the printer, then print a network setup page and locate the...
User Manual
Page 240
Inside are the toner cartridge and photoconductor kit. 2 Standard exit bin 3 Front door 4 Manual or multipurpose feeder door 5 Standard 250-sheet tray (Tray 1) 6 Optional 550-sheet tray (Tray 2) 7 Rear ...
Inside are the toner cartridge and photoconductor kit. 2 Standard exit bin 3 Front door 4 Manual or multipurpose feeder door 5 Standard 250-sheet tray (Tray 1) 6 Optional 550-sheet tray (Tray 2) 7 Rear ...
User Manual
Page 242
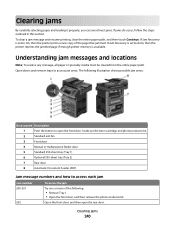
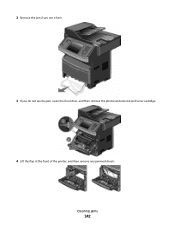
Clearing jams 242 2 Remove the jam if you see it here. 3 If you do not see the jam, open the front door, and then remove the photoconductor kit and toner cartridge. 4 Lift the flap at the front of the printer, and then remove any jammed sheets.
Clearing jams 242 2 Remove the jam if you see it here. 3 If you do not see the jam, open the front door, and then remove the photoconductor kit and toner cartridge. 4 Lift the flap at the front of the printer, and then remove any jammed sheets.

User Manual
Page 243
Clearing jams 243 5 If you do not see any jammed sheets, open the rear door. 6 Remove the jam. 7 Close the rear door. 8 Insert the photoconductor kit and toner cartridge. 9 Close the front door. 10 Touch Continue. 202 paper jam Touch Status/Supplies to identify the location of the jam. If the paper is exiting the printer, then pull the paper out, and then touch Continue.
Clearing jams 243 5 If you do not see any jammed sheets, open the rear door. 6 Remove the jam. 7 Close the rear door. 8 Insert the photoconductor kit and toner cartridge. 9 Close the front door. 10 Touch Continue. 202 paper jam Touch Status/Supplies to identify the location of the jam. If the paper is exiting the printer, then pull the paper out, and then touch Continue.


