
User Guide
Page 2
... Installing a flash memory or firmware card...23 Installing hardware options...25 Installing an optional drawer ...25 Attaching cables...26 Installing the printer on a wired network...27 Installing printer software...29 Verifying printer setup...30 Printing a menu settings page...30 Printing a network setup page ...30 Loading paper and specialty media 32 Setting the Paper...
... Installing a flash memory or firmware card...23 Installing hardware options...25 Installing an optional drawer ...25 Attaching cables...26 Installing the printer on a wired network...27 Installing printer software...29 Verifying printer setup...30 Printing a menu settings page...30 Printing a network setup page ...30 Loading paper and specialty media 32 Setting the Paper...
User Guide
Page 3
...Paper capacities...50 Software overview 51 Status Monitor Center...51 Driver Profiler...51 Dell Printer Alert Utility...51 Installing the optional XPS driver...52 Dell Toner Management System...53 Printing Status Window...53 Dell Printer Supplies Reorder Application ...53 Printing 54 Printing a document...54 Printing on ...Tips on using labels...57 Tips on using card stock...58 Printing confidential and other held jobs...58 Holding jobs in the printer ...58 Printing confidential and other held jobs...59 Printing information pages...60 Printing a font sample list...60 Printing a directory ...
...Paper capacities...50 Software overview 51 Status Monitor Center...51 Driver Profiler...51 Dell Printer Alert Utility...51 Installing the optional XPS driver...52 Dell Toner Management System...53 Printing Status Window...53 Dell Printer Supplies Reorder Application ...53 Printing 54 Printing a document...54 Printing on ...Tips on using labels...57 Tips on using card stock...58 Printing confidential and other held jobs...58 Holding jobs in the printer ...58 Printing confidential and other held jobs...59 Printing information pages...60 Printing a font sample list...60 Printing a directory ...
User Guide
Page 4
... 231 paper jam...69 233 paper jam...70 234 paper jam...70 235 paper jam...71 242 paper jam...71 251 paper jam...72 Understanding printer menus 74 Menus list...74 Paper menu...75 Default Source menu...75 Paper Size/Type menu ...75 Configure MP menu...78 Substitute Size menu...79...
... 231 paper jam...69 233 paper jam...70 234 paper jam...70 235 paper jam...71 242 paper jam...71 251 paper jam...72 Understanding printer menus 74 Menus list...74 Paper menu...75 Default Source menu...75 Paper Size/Type menu ...75 Configure MP menu...78 Substitute Size menu...79...

User Guide
Page 5
...menu...106 PCL Emul menu ...106 HTML menu...109 Image menu...110 Understanding printer messages 111 List of status and error messages...111 Maintaining the printer 125 Cleaning the exterior of the printer...125 Storing supplies...125 Conserving supplies...126 Checking the status of supplies from ...a computer ...127 Replacing supplies...127 Replacing the toner cartridge ...127 Replacing the photoconductor kit ...129 Moving the printer...132 Moving the printer to another location...132 Administrative support 133 Using the Embedded Web Server...133 Checking the virtual display...133 Checking the...
...menu...106 PCL Emul menu ...106 HTML menu...109 Image menu...110 Understanding printer messages 111 List of status and error messages...111 Maintaining the printer 125 Cleaning the exterior of the printer...125 Storing supplies...125 Conserving supplies...126 Checking the status of supplies from ...a computer ...127 Replacing supplies...127 Replacing the toner cartridge ...127 Replacing the photoconductor kit ...129 Moving the printer...132 Moving the printer to another location...132 Administrative support 133 Using the Embedded Web Server...133 Checking the virtual display...133 Checking the...
User Guide
Page 6
Restoring the factory default settings...136 Troubleshooting 137 Solving basic printer problems...137 Printer control panel display is blank or displays only diamonds 137 Solving printing problems...137 Jobs do not print...137 Confidential and other held jobs do ...
Restoring the factory default settings...136 Troubleshooting 137 Solving basic printer problems...137 Printer control panel display is blank or displays only diamonds 137 Solving printing problems...137 Jobs do not print...137 Confidential and other held jobs do ...
User Guide
Page 9
...during a lightning storm. CAUTION-POTENTIAL INJURY: Do not twist, bind, crush, or place heavy objects on the sides of the printer to lift it down. Do not subject the power cord to the manufacturer's instructions and local regulations. Remove the power cord from ...or adjustments or performance of the printer near the product and easily accessible. You must understand the section in the user documentation, to a professional service person. Discard used batteries according to abrasion or stress. CAUTION-POTENTIAL INJURY: This product uses a laser. If you replace a lithium ...
...during a lightning storm. CAUTION-POTENTIAL INJURY: Do not twist, bind, crush, or place heavy objects on the sides of the printer to lift it down. Do not subject the power cord to the manufacturer's instructions and local regulations. Remove the power cord from ...or adjustments or performance of the printer near the product and easily accessible. You must understand the section in the user documentation, to a professional service person. Discard used batteries according to abrasion or stress. CAUTION-POTENTIAL INJURY: This product uses a laser. If you replace a lithium ...

User Guide
Page 10
Note: Use the handholds located on both sides of trying to lift it off the optional drawer. • Lift the printer off of the optional drawer and set it aside instead of the printer to lift the drawer and printer at the same time. Safety information 10
Note: Use the handholds located on both sides of trying to lift it off the optional drawer. • Lift the printer off of the optional drawer and set it aside instead of the printer to lift the drawer and printer at the same time. Safety information 10

User Guide
Page 11
... support Find it here Setup documentation-The setup documentation came with the printer software. • The printer software is available on your printer. For updates, check our Web site at support.dell.com. Dell Support Web site-support.dell.com Note: Select your region, and then select your operating system.... Learning about the printer What are you faster: • Service Tag • Express Service Code Note: The Service Tag and ...
... support Find it here Setup documentation-The setup documentation came with the printer software. • The printer software is available on your printer. For updates, check our Web site at support.dell.com. Dell Support Web site-support.dell.com Note: Select your region, and then select your operating system.... Learning about the printer What are you faster: • Service Tag • Express Service Code Note: The Service Tag and ...
User Guide
Page 12
..., documentation and drivers for your technical reference material for experienced users or printer are already installed on your country or region. technicians • Supplies and accessories for my printer • Replacement cartridges Dell Printer Supplies Web site-dell.com/supplies You can purchase printer supplies online, by telephone, or in select retail stores. • Safety information...
..., documentation and drivers for your technical reference material for experienced users or printer are already installed on your country or region. technicians • Supplies and accessories for my printer • Replacement cartridges Dell Printer Supplies Web site-dell.com/supplies You can purchase printer supplies online, by telephone, or in select retail stores. • Safety information...

User Guide
Page 13
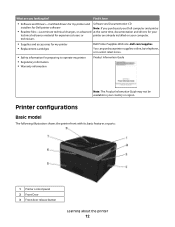
4 System board door 5 Standard 250-sheet tray (Tray 1) 6 Multipurpose feeder door 7 Paper stop 8 Standard exit bin The following illustration shows the printer back with its basic features or parts: 1 Rear door 2 Ethernet port 3 USB port 4 Parallel port 5 Power cord socket 6 Power switch 7 Locking device Learning about the printer 13
4 System board door 5 Standard 250-sheet tray (Tray 1) 6 Multipurpose feeder door 7 Paper stop 8 Standard exit bin The following illustration shows the printer back with its basic features or parts: 1 Rear door 2 Ethernet port 3 USB port 4 Parallel port 5 Power cord socket 6 Power switch 7 Locking device Learning about the printer 13
User Guide
Page 14
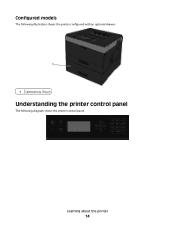
Configured models The following illustration shows the printer configured with an optional drawer: 1 Optional tray (Tray 2) Understanding the printer control panel The following diagram shows the printer control panel: Learning about the printer 14
Configured models The following illustration shows the printer configured with an optional drawer: 1 Optional tray (Tray 2) Understanding the printer control panel The following diagram shows the printer control panel: Learning about the printer 14
User Guide
Page 15
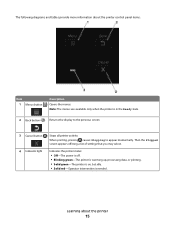
...: The menus are available only when the printer is needed. Then the Stopped screen appears offering a list of settings that you may select. 4 Indicator light Indicates the printer status: • Off-The power is off. • Blinking green-The printer is warming up, processing data, or printing.... • Solid green-The printer is on, but idle. • Solid red-Operator intervention is in...
...: The menus are available only when the printer is needed. Then the Stopped screen appears offering a list of settings that you may select. 4 Indicator light Indicates the printer status: • Off-The power is off. • Blinking green-The printer is warming up, processing data, or printing.... • Solid green-The printer is on, but idle. • Solid red-Operator intervention is in...

User Guide
Page 16
...displays the available values or settings. Settings chosen from a software program can also change or override the user default settings selected from the printer control panel. 3, 4, 5, 6 Navigation buttons Press the up or down arrow buttons to scroll through text that must be resolved. Note... defaults are restored. Item Description 1 Display Shows messages that communicate the status of the printer or that indicate possible printer problems that rolls to another screen. Learning about the printer 16 The display is saved as the new user default setting Note: When a new ...
...displays the available values or settings. Settings chosen from a software program can also change or override the user default settings selected from the printer control panel. 3, 4, 5, 6 Navigation buttons Press the up or down arrow buttons to scroll through text that must be resolved. Note... defaults are restored. Item Description 1 Display Shows messages that communicate the status of the printer or that indicate possible printer problems that rolls to another screen. Learning about the printer 16 The display is saved as the new user default setting Note: When a new ...
User Guide
Page 17
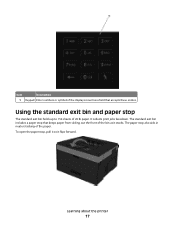
Item Description 1 Keypad Enter numbers or symbols if the display screen has a field that keeps paper from sliding out the front of 20 lb paper. Using the standard exit bin and paper stop , pull it so it stacks. It collects print jobs facedown. To open the paper stop The standard exit bin holds up to 150 sheets of the bin as it flips forward. The standard exit bin includes a paper stop also aids in neater stacking of the paper. Learning about the printer 17 The paper stop that accepts these entries.
Item Description 1 Keypad Enter numbers or symbols if the display screen has a field that keeps paper from sliding out the front of 20 lb paper. Using the standard exit bin and paper stop , pull it so it stacks. It collects print jobs facedown. To open the paper stop The standard exit bin holds up to 150 sheets of the bin as it flips forward. The standard exit bin includes a paper stop also aids in neater stacking of the paper. Learning about the printer 17 The paper stop that accepts these entries.

User Guide
Page 18
Notes: • Do not leave the paper stop is closed. Doing so may cause creases in the transparencies. • When moving the printer to another location, make sure the paper stop in the open position if you are printing on transparencies. Learning about the printer 18
Notes: • Do not leave the paper stop is closed. Doing so may cause creases in the transparencies. • When moving the printer to another location, make sure the paper stop in the open position if you are printing on transparencies. Learning about the printer 18

User Guide
Page 19
... are installed correctly. A user default setting remains in effect, the asterisk appears next to the user default setting on page 30 for the printer, leave enough room to install any setting changes yet, if you have not made any options, leave enough room for more information. If ...you select and save it lists all printer options are listed on the page. Away from direct sunlight, humidity extremes, or temperature fluctuations - The option names appear on page 136 ...
... are installed correctly. A user default setting remains in effect, the asterisk appears next to the user default setting on page 30 for the printer, leave enough room to install any setting changes yet, if you have not made any options, leave enough room for more information. If ...you select and save it lists all printer options are listed on the page. Away from direct sunlight, humidity extremes, or temperature fluctuations - The option names appear on page 136 ...
User Guide
Page 20
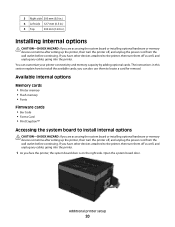
...cards • Bar Code • Forms Card • PrintCryptionTM Accessing the system board to the printer, then turn them off as well, and unplug any cables going into the printer. If you have other devices attached to install the available cards; Open the system board door. ...internal options CAUTION-SHOCK HAZARD: If you are accessing the system board or installing optional hardware or memory devices sometime after setting up the printer, then turn the printer off, and unplug the power cord from the wall outlet before continuing. 3 Right side 200 mm (8.0 in.) 4 Left side ...
...cards • Bar Code • Forms Card • PrintCryptionTM Accessing the system board to the printer, then turn them off as well, and unplug any cables going into the printer. If you have other devices attached to install the available cards; Open the system board door. ...internal options CAUTION-SHOCK HAZARD: If you are accessing the system board or installing optional hardware or memory devices sometime after setting up the printer, then turn the printer off, and unplug the power cord from the wall outlet before continuing. 3 Right side 200 mm (8.0 in.) 4 Left side ...

User Guide
Page 21
... electricity. Warning-Potential Damage: System board electronic components are accessing the system board or installing optional hardware or memory devices sometime after setting up the printer, then turn them off , and unplug the power cord from the wall outlet before touching any system board electronic components or connectors. Touch something metal...
... electricity. Warning-Potential Damage: System board electronic components are accessing the system board or installing optional hardware or memory devices sometime after setting up the printer, then turn them off , and unplug the power cord from the wall outlet before touching any system board electronic components or connectors. Touch something metal...
User Guide
Page 22
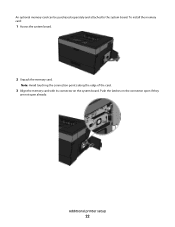
Additional printer setup 22 Note: Avoid touching the connection points along the edge of the card. 3 Align the memory card with its connector on the connector open if they are not open already. Push the latches on the system board. To install the memory card: 1 Access the system board. 2 Unpack the memory card. An optional memory card can be purchased separately and attached to the system board.
Additional printer setup 22 Note: Avoid touching the connection points along the edge of the card. 3 Align the memory card with its connector on the connector open if they are not open already. Push the latches on the system board. To install the memory card: 1 Access the system board. 2 Unpack the memory card. An optional memory card can be purchased separately and attached to the system board.
User Guide
Page 23
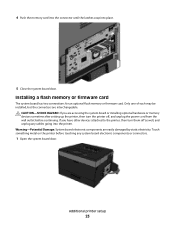
...Warning-Potential Damage: System board electronic components are accessing the system board or installing optional hardware or memory devices sometime after setting up the printer, then turn them off , and unplug the power cord from the wall outlet before touching any cables going into place. 5 Close ...the system board door. CAUTION-SHOCK HAZARD: If you have other devices attached to the printer, then turn the printer off as well, and unplug any system board electronic components or connectors. 1 Open the system board door. Touch something metal on...
...Warning-Potential Damage: System board electronic components are accessing the system board or installing optional hardware or memory devices sometime after setting up the printer, then turn them off , and unplug the power cord from the wall outlet before touching any cables going into place. 5 Close ...the system board door. CAUTION-SHOCK HAZARD: If you have other devices attached to the printer, then turn the printer off as well, and unplug any system board electronic components or connectors. 1 Open the system board door. Touch something metal on...


