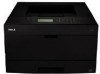

User Guide
Page 2
......25 Installing an optional drawer ...25 Attaching cables...26 Installing the printer on a wired network...27 Installing printer software...29 Verifying printer setup...30 Printing a menu settings page...30 Printing a network setup... page ...30 Loading paper and specialty media 32 Setting the Paper Size and Paper Type...32 Configuring Universal paper settings...32 Loading trays...33 Using the multipurpose feeder...38 Linking and unlinking trays...42 Linking trays...42 Unlinking trays...
......25 Installing an optional drawer ...25 Attaching cables...26 Installing the printer on a wired network...27 Installing printer software...29 Verifying printer setup...30 Printing a menu settings page...30 Printing a network setup... page ...30 Loading paper and specialty media 32 Setting the Paper Size and Paper Type...32 Configuring Universal paper settings...32 Loading trays...33 Using the multipurpose feeder...38 Linking and unlinking trays...42 Linking trays...42 Unlinking trays...
User Guide
Page 6
...137 Printer control panel display is blank or displays only diamonds 137 Solving printing problems...137 Jobs do not print...137 Confidential and other held jobs do not print ...138 Multiple-language PDFs do not print...138 Job takes longer than expected to print ...139 Job prints from the wrong tray ...or on the wrong paper 139 Incorrect characters print...139 Tray linking does not work...139 Large jobs do not collate ...140 Unexpected page breaks occur...140 Envelope seals when ...
...137 Printer control panel display is blank or displays only diamonds 137 Solving printing problems...137 Jobs do not print...137 Confidential and other held jobs do not print ...138 Multiple-language PDFs do not print...138 Job takes longer than expected to print ...139 Job prints from the wrong tray ...or on the wrong paper 139 Incorrect characters print...139 Tray linking does not work...139 Large jobs do not collate ...140 Unexpected page breaks occur...140 Envelope seals when ...

User Guide
Page 13
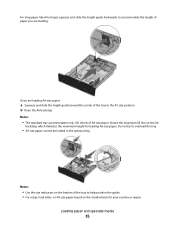
4 System board door 5 Standard 250-sheet tray (Tray 1) 6 Multipurpose feeder door 7 Paper stop 8 Standard exit bin The following illustration shows the printer back with its basic features or parts: 1 Rear door 2 Ethernet port 3 USB port 4 Parallel port 5 Power cord socket 6 Power switch 7 Locking device Learning about the printer 13
4 System board door 5 Standard 250-sheet tray (Tray 1) 6 Multipurpose feeder door 7 Paper stop 8 Standard exit bin The following illustration shows the printer back with its basic features or parts: 1 Rear door 2 Ethernet port 3 USB port 4 Parallel port 5 Power cord socket 6 Power switch 7 Locking device Learning about the printer 13
User Guide
Page 14
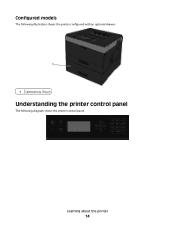
Configured models The following illustration shows the printer configured with an optional drawer: 1 Optional tray (Tray 2) Understanding the printer control panel The following diagram shows the printer control panel: Learning about the printer 14
Configured models The following illustration shows the printer configured with an optional drawer: 1 Optional tray (Tray 2) Understanding the printer control panel The following diagram shows the printer control panel: Learning about the printer 14

User Guide
Page 19
...each factory default setting, but once a user default setting is important to: • Make sure airflow in effect, the asterisk appears next to open trays, covers, and doors. It is in the room meets the latest revision of the ASHRAE 62 standard. • Provide a flat, sturdy, and ...stable surface. • Keep the printer: - Clean, dry, and free of dust • Allow the following recommended amount of air conditioners, heaters, or ventilators - See "Printing a menu settings ...
...each factory default setting, but once a user default setting is important to: • Make sure airflow in effect, the asterisk appears next to open trays, covers, and doors. It is in the room meets the latest revision of the ASHRAE 62 standard. • Provide a flat, sturdy, and ...stable surface. • Keep the printer: - Clean, dry, and free of dust • Allow the following recommended amount of air conditioners, heaters, or ventilators - See "Printing a menu settings ...

User Guide
Page 25
...an optional drawer after setting up the printer, then turn the printer off and unplug the power cord from the wall outlet before continuing 1 Unpack the drawer, and then remove any packing material from the outside of the drawer. 2 Remove the tray from the support unit. 3 Remove... any packing material and tape from inside the tray. 4 Insert the tray into the support unit. 5 Place the drawer in the location chosen for the printer. Installing hardware options Installing an optional drawer The printer supports an optional drawer. Additional printer setup 25 Only one drawer may be installed on...
...an optional drawer after setting up the printer, then turn the printer off and unplug the power cord from the wall outlet before continuing 1 Unpack the drawer, and then remove any packing material from the outside of the drawer. 2 Remove the tray from the support unit. 3 Remove... any packing material and tape from inside the tray. 4 Insert the tray into the support unit. 5 Place the drawer in the location chosen for the printer. Installing hardware options Installing an optional drawer The printer supports an optional drawer. Additional printer setup 25 Only one drawer may be installed on...

User Guide
Page 32
... setting the Paper Size and Paper Type, and linking and unlinking trays. Paper Type appears. 7 Press the left or right arrow button until the correct type appears, and then press . the largest is on and Ready appears. 2 From the printer control panel, press . Setting the Paper Size and Paper Type ...When the Paper Size and Paper Type settings are the same for the specified tray to Universal when the size you do not need to load the paper...
... setting the Paper Size and Paper Type, and linking and unlinking trays. Paper Type appears. 7 Press the left or right arrow button until the correct type appears, and then press . the largest is on and Ready appears. 2 From the printer control panel, press . Setting the Paper Size and Paper Type ...When the Paper Size and Paper Type settings are the same for the specified tray to Universal when the size you do not need to load the paper...

User Guide
Page 33
...a feed direction Short Edge is an available setting. Instructions to support the size, including support for Universal paper settings. Loading trays 1 Pull the tray completely out. Specify the paper height and width Defining a specific height and width measurement for the Universal paper size (in ...the portrait orientation) allows the printer to adjust both . The Feed Direction menu will enter the printer first. 1 From the Universal Setup...
...a feed direction Short Edge is an available setting. Instructions to support the size, including support for Universal paper settings. Loading trays 1 Pull the tray completely out. Specify the paper height and width Defining a specific height and width measurement for the Universal paper size (in ...the portrait orientation) allows the printer to adjust both . The Feed Direction menu will enter the printer first. 1 From the Universal Setup...
User Guide
Page 35
If you are loading A6-size paper: a Squeeze and slide the length guide toward the center of the tray to the A5 size position. Do not try to help position the guide. • For setup, load letter- b Raise the A6 backstop. For long paper ... for your country or region. Loading paper and specialty media 35 Notes: • The standard tray accommodates only 150 sheets of the tray to overload the tray. • A6-size paper cannot be loaded in the optional tray. or A4-size paper based on the standard size for loading A6-size paper. Notice the...
If you are loading A6-size paper: a Squeeze and slide the length guide toward the center of the tray to the A5 size position. Do not try to help position the guide. • For setup, load letter- b Raise the A6 backstop. For long paper ... for your country or region. Loading paper and specialty media 35 Notes: • The standard tray accommodates only 150 sheets of the tray to overload the tray. • A6-size paper cannot be loaded in the optional tray. or A4-size paper based on the standard size for loading A6-size paper. Notice the...

User Guide
Page 36
Do not fold or crease the paper. the tray holds only 150 sheets of A6-size paper. 1 Maximum fill line Load letterhead with the recommended print side facedown. Straighten the edges on the width ... to loosen the sheets, and then fan them. Note: The maximum fill line on a level surface. 4 Load the paper stack toward the back of the tray as shown with the top edge of the sheet toward the front of paper back and forth to the maximum fill line; 3 Flex a stack of...
Do not fold or crease the paper. the tray holds only 150 sheets of A6-size paper. 1 Maximum fill line Load letterhead with the recommended print side facedown. Straighten the edges on the width ... to loosen the sheets, and then fan them. Note: The maximum fill line on a level surface. 4 Load the paper stack toward the back of the tray as shown with the top edge of the sheet toward the front of paper back and forth to the maximum fill line; 3 Flex a stack of...

User Guide
Page 37
5 Squeeze and slide the guides to lightly touch the side of the stack. 6 Insert the tray. 7 If the paper type you loaded differs from the type that was previously loaded in the tray, then change the Paper Type setting for the tray. Loading paper and specialty media 37
5 Squeeze and slide the guides to lightly touch the side of the stack. 6 Insert the tray. 7 If the paper type you loaded differs from the type that was previously loaded in the tray, then change the Paper Type setting for the tray. Loading paper and specialty media 37

User Guide
Page 42
...jobs or multiple copies. When the Size and Type settings are automatically linked. When one linked tray is not bent or wrinkled. 6 From the printer control panel, set from the next linked tray. Paper should lie flat in the multipurpose feeder and is empty, paper feeds from the Paper ...menu. Loading paper and specialty media 42 Linking and unlinking trays In addition to linking trays to each other, you can...
...jobs or multiple copies. When the Size and Type settings are automatically linked. When one linked tray is not bent or wrinkled. 6 From the printer control panel, set from the next linked tray. Paper should lie flat in the multipurpose feeder and is empty, paper feeds from the Paper ...menu. Loading paper and specialty media 42 Linking and unlinking trays In addition to linking trays to each other, you can...
User Guide
Page 43
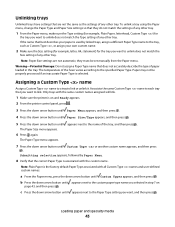
... want to each tray that you selected in the tray. Note: Paper Size settings are not the same as Custom Type , or assign your paper is selected. The temperature of paper loaded in step 7 on and Ready appears. 2 From the printer control panel, press . 3 Press the down arrow... Menu. 8 Verify that the correct Paper Type is associated with the same custom names assigned will link. 1 Make sure the printer is the factory default Paper Type associated with all Custom Type names and user-defined custom names. Unlinking trays Unlinked trays have settings that are not automatic;
... want to each tray that you selected in the tray. Note: Paper Size settings are not the same as Custom Type , or assign your paper is selected. The temperature of paper loaded in step 7 on and Ready appears. 2 From the printer control panel, press . 3 Press the down arrow... Menu. 8 Verify that the correct Paper Type is associated with the same custom names assigned will link. 1 Make sure the printer is the factory default Paper Type associated with all Custom Type names and user-defined custom names. Unlinking trays Unlinked trays have settings that are not automatic;

User Guide
Page 45
...Moisture content The amount of the paper or specialty media before printing. Thick paper may also require a longer conditioning period. Weight The printer trays can cause feeding problems. Smoothness Paper smoothness directly affects print quality. Note: Duplex printing is too smooth, it can degrade its original... wrapper until it is very different from the printer environment. If paper is supported only for paper to 90 g/m2 (24 lb bond) grain long paper. Paper characteristics The following...
...Moisture content The amount of the paper or specialty media before printing. Thick paper may also require a longer conditioning period. Weight The printer trays can cause feeding problems. Smoothness Paper smoothness directly affects print quality. Note: Duplex printing is too smooth, it can degrade its original... wrapper until it is very different from the printer environment. If paper is supported only for paper to 90 g/m2 (24 lb bond) grain long paper. Paper characteristics The following...

User Guide
Page 48
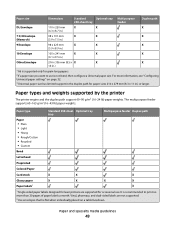
... paper sources, the types of paper they support, and capacities. Paper and specialty media guidelines 48 Paper sizes supported by the printer Paper size Dimensions Standard Optional tray Multipurpose 250-sheet tray feeder Duplex path A4 210 x 297 mm (8.3 x 11.7 in.) A5 148 x 210 mm X (5.8 x 8.3 in.) A61 105 x 148 mm X X (4.1 x 5.8 in.) Executive 184...
... paper sources, the types of paper they support, and capacities. Paper and specialty media guidelines 48 Paper sizes supported by the printer Paper size Dimensions Standard Optional tray Multipurpose 250-sheet tray feeder Duplex path A4 210 x 297 mm (8.3 x 11.7 in.) A5 148 x 210 mm X (5.8 x 8.3 in.) A61 105 x 148 mm X X (4.1 x 5.8 in.) Executive 184...
User Guide
Page 49
...8226; Recycled • Custom Standard 250-sheet Optional tray tray Multipurpose feeder Duplex path Bond Letterhead Preprinted Colored Paper Card stock X X X Glossy paper X X X X Paper labels1 X 1 Single-sided paper labels designed for laser printers are not supported. 2 Use envelopes that lie flat... to use . Paper types and weights supported by the printer The printer engine and the duplex path support 60-90 g/m2 (16-24 lb) paper weights. Paper size Dimensions Standard Optional tray Multipurpose 250-sheet tray feeder Duplex path DL Envelope 110 x 220 mm X ...
...8226; Recycled • Custom Standard 250-sheet Optional tray tray Multipurpose feeder Duplex path Bond Letterhead Preprinted Colored Paper Card stock X X X Glossy paper X X X X Paper labels1 X 1 Single-sided paper labels designed for laser printers are not supported. 2 Use envelopes that lie flat... to use . Paper types and weights supported by the printer The printer engine and the duplex path support 60-90 g/m2 (16-24 lb) paper weights. Paper size Dimensions Standard Optional tray Multipurpose 250-sheet tray feeder Duplex path DL Envelope 110 x 220 mm X ...

User Guide
Page 50
Note: Only one optional drawer may be installed on a table facedown. Paper type Standard 250-sheet Optional tray tray Multipurpose feeder Duplex path Transparencies X X Envelopes (smooth)2 X X X 1 Single-sided paper labels designed for laser printers are supported for occasional use . Paper capacities The capacities of paper labels a month. Paper and specialty media guidelines 50 Use paper...
Note: Only one optional drawer may be installed on a table facedown. Paper type Standard 250-sheet Optional tray tray Multipurpose feeder Duplex path Transparencies X X Envelopes (smooth)2 X X X 1 Single-sided paper labels designed for laser printers are supported for occasional use . Paper capacities The capacities of paper labels a month. Paper and specialty media guidelines 50 Use paper...

User Guide
Page 51
... communication support must be in place so the printer and computer can communicate. The Dell Printer Alert Utility informs you when there are not available with your printer to change the appearance of the list of an output tray (printer options) • User-defined paper sizes (... • Font references • Form associations Dell Printer Alert Utility Note: This application is completed. If you must be in the System Tray. Use the Status Monitor Center to manage multiple Status Monitors. • Double-click a printer name to open a Status Monitor for such things...
... communication support must be in place so the printer and computer can communicate. The Dell Printer Alert Utility informs you when there are not available with your printer to change the appearance of the list of an output tray (printer options) • User-defined paper sizes (... • Font references • Form associations Dell Printer Alert Utility Note: This application is completed. If you must be in the System Tray. Use the Status Monitor Center to manage multiple Status Monitors. • Double-click a printer name to open a Status Monitor for such things...
User Guide
Page 52
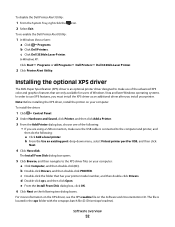
...: Click Start Programs or All Programs Dell Printers Dell 3330dn Laser Printer. 2 Click Printer Alert Utility. To install the driver: 1 Click Control Panel. 2 Under Hardware and Sound, click Printer, and then click Add a Printer. 3 From the Add Printer dialog box, choose one of the following: •... information on the XPS driver, see the XPS readme file on the following : a Click Add a local printer. To disable the Dell Printer Alert Utility: 1 From the System Tray, right click the icon. 2 Select Exit. b From the Use an existing port: drop-down menu, select...
...: Click Start Programs or All Programs Dell Printers Dell 3330dn Laser Printer. 2 Click Printer Alert Utility. To install the driver: 1 Click Control Panel. 2 Under Hardware and Sound, click Printer, and then click Add a Printer. 3 From the Add Printer dialog box, choose one of the following: •... information on the XPS driver, see the XPS readme file on the following : a Click Add a local printer. To disable the Dell Printer Alert Utility: 1 From the System Tray, right click the icon. 2 Select Exit. b From the Use an existing port: drop-down menu, select...

User Guide
Page 54
.... 2 From the print options or Copies & Pages pop-up menu, choose Printer Features. 3 From the Feature Sets pop-up menu, choose Paper. 4 From the Paper type pop-up menu, choose a paper type. 5 Click Print. Printing a document 1 Load paper into a tray or feeder. 2 From the Paper menu, set the Paper Type and Paper... the paper size. Printing 54 Selection and handling of the following: For Windows users a With a document open , click File > Print. Printing This chapter covers printing, printer reports, and job cancelation.
.... 2 From the print options or Copies & Pages pop-up menu, choose Printer Features. 3 From the Feature Sets pop-up menu, choose Paper. 4 From the Paper type pop-up menu, choose a paper type. 5 Click Print. Printing a document 1 Load paper into a tray or feeder. 2 From the Paper menu, set the Paper Type and Paper... the paper size. Printing 54 Selection and handling of the following: For Windows users a With a document open , click File > Print. Printing This chapter covers printing, printer reports, and job cancelation.


