

Dell 3115cn User's Guide
Page 2
...." For help locating your Dell printer Service Tag available. Visit Dell's website, or order Dell printer supplies by pushing the button (right side). 3 Standard 250-sheet tray 4 Optional 550-sheet paper feeder NOTE: Your multifunction printer allows for a maximum of your multifunction printer. Double-click the icon ... feeder 6 Button (right side) 11 Control board cover 12 Automatic Document Feeder (ADF) To order replacement print cartridges or supplies from Dell: 1. 1 Optional duplexer 2 Operator panel 7 Transfer belt unit 8 Front cover NOTE: You can open the front cover by phone....
...." For help locating your Dell printer Service Tag available. Visit Dell's website, or order Dell printer supplies by pushing the button (right side). 3 Standard 250-sheet tray 4 Optional 550-sheet paper feeder NOTE: Your multifunction printer allows for a maximum of your multifunction printer. Double-click the icon ... feeder 6 Button (right side) 11 Control board cover 12 Automatic Document Feeder (ADF) To order replacement print cartridges or supplies from Dell: 1. 1 Optional duplexer 2 Operator panel 7 Transfer belt unit 8 Front cover NOTE: You can open the front cover by phone....

Dell 3115cn User's Guide
Page 9
Press . Use the Dell Printer Configuration Web Tool for your multifunction printer, see "Assign an IP Address ." These pages show the details of the status regarding each printer's IP address. System Settings is printed. When print cartridge is running low, click the Order Supplies link on Job List...Print Volume Use the Print Volume option to keep track of printer interface and necessary conditions for communications. Printer Jobs Use the Printer Jobs menu to contain information on the first screen to use the color mode and the maximum number of jobs being printed, and ...
Press . Use the Dell Printer Configuration Web Tool for your multifunction printer, see "Assign an IP Address ." These pages show the details of the status regarding each printer's IP address. System Settings is printed. When print cartridge is running low, click the Order Supplies link on Job List...Print Volume Use the Print Volume option to keep track of printer interface and necessary conditions for communications. Printer Jobs Use the Printer Jobs menu to contain information on the first screen to use the color mode and the maximum number of jobs being printed, and ...

Dell 3115cn User's Guide
Page 18
... tray. Open Indicates that there is open. Color Laser is empty, a message appears. When a cartridge is displayed normally. Capacity Displays the maximum capacity of the paper tray. Paper Capacity Displays the maximum capacity of the paper tray. Printing Speed Displays the printing speed for the multifunction printer. Values: Paper Trays Status OK Indicates that...
... tray. Open Indicates that there is open. Color Laser is empty, a message appears. When a cartridge is displayed normally. Capacity Displays the maximum capacity of the paper tray. Paper Capacity Displays the maximum capacity of the paper tray. Printing Speed Displays the printing speed for the multifunction printer. Values: Paper Trays Status OK Indicates that...

Dell 3115cn User's Guide
Page 32
...the registration Adjustment automatically. Web Link Select Reorder Regular* Customization URL Displays the URL (http://accessories.us.dell.com/sna ) that Order Supplies at links to use a refilled print cartridge. Envelope Displays the voltage settings of the fuser unit (-2-2) for envelopes. Transparency Displays the temperature settings...unit (-2-2) for envelopes. Set Date Sets the date. The default is 0. Coated Thick Displays the voltage settings of the printer. The default is 0. The default is 0. The default is 0. The default is 0. The default is 0.
...the registration Adjustment automatically. Web Link Select Reorder Regular* Customization URL Displays the URL (http://accessories.us.dell.com/sna ) that Order Supplies at links to use a refilled print cartridge. Envelope Displays the voltage settings of the fuser unit (-2-2) for envelopes. Transparency Displays the temperature settings...unit (-2-2) for envelopes. Set Date Sets the date. The default is 0. Coated Thick Displays the voltage settings of the printer. The default is 0. The default is 0. The default is 0. The default is 0. The default is 0.
Dell 3115cn User's Guide
Page 49
... time format in the RAM disk. When this function restarts the multifunction printer. Values: NonDell Toner Overrides factory print cartridge setting. Initialize PrintMeter Purpose: To initialize the print meter of your multifunction printer. Web Link Customization Non-Dell-brand print cartridges may disable some printer features, reduce print quality and reduce the reliability of the multifunction...
... time format in the RAM disk. When this function restarts the multifunction printer. Values: NonDell Toner Overrides factory print cartridge setting. Initialize PrintMeter Purpose: To initialize the print meter of your multifunction printer. Web Link Customization Non-Dell-brand print cartridges may disable some printer features, reduce print quality and reduce the reliability of the multifunction...

Dell 3115cn User's Guide
Page 84
..., dirt, or oil from the unit belt. Installing the Print Cartridges Installing the Print Cartridges CAUTION: Before performing any of the following procedures, read and follow the safety instructions in your hands on the film of the transfer belt unit ... the tag to remove the seal from your Owner's Manual or Product Information Guide. NOTICE: Ensure nothing touches or scratches the surface (black-colored film) of the print cartridges against bright light, close the front cover within five minutes. If the front cover remains open the front cover. 2. NOTICE: To protect the...
..., dirt, or oil from the unit belt. Installing the Print Cartridges Installing the Print Cartridges CAUTION: Before performing any of the following procedures, read and follow the safety instructions in your hands on the film of the transfer belt unit ... the tag to remove the seal from your Owner's Manual or Product Information Guide. NOTICE: Ensure nothing touches or scratches the surface (black-colored film) of the print cartridges against bright light, close the front cover within five minutes. If the front cover remains open the front cover. 2. NOTICE: To protect the...
Dell 3115cn User's Guide
Page 85
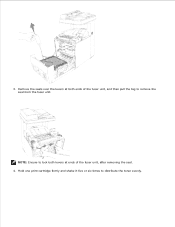
NOTE: Ensure to lock both levers at both ends of the fuser unit, after removing the seal. 4. 3. Remove the seals over the levers at ends of the fuser unit, and then pull the tag to distribute the toner evenly. Hold one print cartridge firmly and shake it five or six times to remove the seal from the fuser unit.
NOTE: Ensure to lock both levers at both ends of the fuser unit, after removing the seal. 4. 3. Remove the seals over the levers at ends of the fuser unit, and then pull the tag to distribute the toner evenly. Hold one print cartridge firmly and shake it five or six times to remove the seal from the fuser unit.

Dell 3115cn User's Guide
Page 86
... slot in the multifunction printer. 6. 5. Pulling the seal diagonally may tear it. 7. NOTE: To protect the drum against bright light, do not remove the orange protective cover of the print cartridge before the cartridge is fully inserted. NOTE: Pull the seal out straight. Remove the print cartridge from the print cartridge by pulling the tab...
... slot in the multifunction printer. 6. 5. Pulling the seal diagonally may tear it. 7. NOTE: To protect the drum against bright light, do not remove the orange protective cover of the print cartridge before the cartridge is fully inserted. NOTE: Pull the seal out straight. Remove the print cartridge from the print cartridge by pulling the tab...

Dell 3115cn User's Guide
Page 87
8. Remove the orange protective covers of the each of the print cartridges, close the front cover. After installing all of the installed print cartridges. 10. Repeat steps 4, 5, 6, and 7 to install the other print cartridges. 9.
8. Remove the orange protective covers of the each of the print cartridges, close the front cover. After installing all of the installed print cartridges. 10. Repeat steps 4, 5, 6, and 7 to install the other print cartridges. 9.

Dell 3115cn User's Guide
Page 106
... Changes . 3. 4. Right-click the mulfunction printer that is using the PS driver, and then select Properties from the displayed list. 3. Mac OS X 1. Installing a Duplexer NOTICE: To protect the drums of the print cartridges against bright light, close the front cover within... five minutes. Click the Device Settings tab, and then select 2-Tray Module for the Paper Tray Configuration item under Installable Options . 4. Click Start Settings Printers . 2. Click Apply , and then click...
... Changes . 3. 4. Right-click the mulfunction printer that is using the PS driver, and then select Properties from the displayed list. 3. Mac OS X 1. Installing a Duplexer NOTICE: To protect the drums of the print cartridges against bright light, close the front cover within... five minutes. Click the Device Settings tab, and then select 2-Tray Module for the Paper Tray Configuration item under Installable Options . 4. Click Start Settings Printers . 2. Click Apply , and then click...

Dell 3115cn User's Guide
Page 176
... the leading edge to prevent labels from edges. Do not use label sheets with paper or transparencies in the same tray. Dell recommends zone coating of the sheet. Do not load labels together with a slick backing material. Do not use label sheets ...shelf, rather than directly on top of the die cut. Partial sheets also contaminate your multifunction printer and your cartridge with adhesive, and could void your multifunction printer and cartridge warranties. Identifying Print Media Sources and Specifications The following guidelines help avoid media feeding problems and ...
... the leading edge to prevent labels from edges. Do not use label sheets with paper or transparencies in the same tray. Dell recommends zone coating of the sheet. Do not load labels together with a slick backing material. Do not use label sheets ...shelf, rather than directly on top of the die cut. Partial sheets also contaminate your multifunction printer and your cartridge with adhesive, and could void your multifunction printer and cartridge warranties. Identifying Print Media Sources and Specifications The following guidelines help avoid media feeding problems and ...

Dell 3115cn User's Guide
Page 263
... NOTICE: When Non-Dell toner is on, you can use print cartridges provided by other companies. Values: Enables the use of refilled print cartridges. On Disables the use the refilled print cartridge or not. This prevents items from being change accidentally. NOTE: Values marked by your ... the installation location of the multifunction printer. 1000m 2000m 3000m Secure Settings Use the Secure Settings menu to set a password to limit access to use of refilled print cartridges. See also: When this setting is used, the multifunction printer may be severely damaged and may...
... NOTICE: When Non-Dell toner is on, you can use print cartridges provided by other companies. Values: Enables the use of refilled print cartridges. On Disables the use the refilled print cartridge or not. This prevents items from being change accidentally. NOTE: Values marked by your ... the installation location of the multifunction printer. 1000m 2000m 3000m Secure Settings Use the Secure Settings menu to set a password to limit access to use of refilled print cartridges. See also: When this setting is used, the multifunction printer may be severely damaged and may...
Dell 3115cn User's Guide
Page 372
... Front Cover & Belt Unit Remove Paper Error NNN-NNN relates to printer problems. Reinsert the specified print cartridge. Insert PrintCart NNN-NNN Insert XXX Cartridge Replace Cart. Order a new print cartridge at the website (www.dell.com/supplies or www.euro.dell.com/supplies). XXX is installed correctly. See "Replacing Print Cartridges". tray number. See "Replacing Print...
... Front Cover & Belt Unit Remove Paper Error NNN-NNN relates to printer problems. Reinsert the specified print cartridge. Insert PrintCart NNN-NNN Insert XXX Cartridge Replace Cart. Order a new print cartridge at the website (www.dell.com/supplies or www.euro.dell.com/supplies). XXX is installed correctly. See "Replacing Print Cartridges". tray number. See "Replacing Print...

Dell 3115cn User's Guide
Page 381
... the documents back into the ADF. 2. Close the document cover. Removing Print Jams From the Multipurpose Feeder NOTICE: To protect the drums of the print cartridges against bright light, close the front cover within five minutes. a.
... the documents back into the ADF. 2. Close the document cover. Removing Print Jams From the Multipurpose Feeder NOTICE: To protect the drums of the print cartridges against bright light, close the front cover within five minutes. a.

Dell 3115cn User's Guide
Page 384
... it is still hard to remove the paper, go to the next step to avoid tearing it from the inside of the multifunction printer. If the front cover remains open for more than five minutes, print quality may deteriorate. Pull the jammed paper out carefully to remove the ...jammed paper from the multifunction printer. 2. Remove all print media from the tray. 3. If it stops. Pull the tray out of the print cartridges against bright light, close the front cover within five minutes. NOTE: To resolve the error ...
... it is still hard to remove the paper, go to the next step to avoid tearing it from the inside of the multifunction printer. If the front cover remains open for more than five minutes, print quality may deteriorate. Pull the jammed paper out carefully to remove the ...jammed paper from the multifunction printer. 2. Remove all print media from the tray. 3. If it stops. Pull the tray out of the print cartridges against bright light, close the front cover within five minutes. NOTE: To resolve the error ...

Dell 3115cn User's Guide
Page 387
... 30 minutes. 2. NOTICE: To protect the drums of the fuser unit, and remove the jammed paper. Lift the levers at both ends of the print cartridges against bright light, close the front cover within five minutes. If the front cover remains open the front cover. 3. Turn off the multifunction...
... 30 minutes. 2. NOTICE: To protect the drums of the fuser unit, and remove the jammed paper. Lift the levers at both ends of the print cartridges against bright light, close the front cover within five minutes. If the front cover remains open the front cover. 3. Turn off the multifunction...

Dell 3115cn User's Guide
Page 389
... film of the print cartridges against bright light, close the front cover. 6. NOTICE: To protect the drums of the transfer belt unit may deteriorate. Removing Print Jams From the Optional Duplexer NOTICE: Ensure nothing touches or scratches the surface (black-colored film) of paper remaining inside the multifunction printer, and then close the...
... film of the print cartridges against bright light, close the front cover. 6. NOTICE: To protect the drums of the transfer belt unit may deteriorate. Removing Print Jams From the Optional Duplexer NOTICE: Ensure nothing touches or scratches the surface (black-colored film) of paper remaining inside the multifunction printer, and then close the...

Dell 3115cn User's Guide
Page 392
Hold the tray with the optional 550-sheet paper feeder. Pull the tray out of the multifunction printer until it from the multifunction printer. Look for more than five minutes, print quality may deteriorate. NOTE: To resolve the error displayed on the operator panel, you from the... print media path. 1. NOTE: Paper in the optional 550-sheet paper feeder feeds to the multifunction printer from the front of the print cartridges against bright light, close the front cover within five minutes. If the front cover remains open for the jammed paper sequentially, ...
Hold the tray with the optional 550-sheet paper feeder. Pull the tray out of the multifunction printer until it from the multifunction printer. Look for more than five minutes, print quality may deteriorate. NOTE: To resolve the error displayed on the operator panel, you from the... print media path. 1. NOTE: Paper in the optional 550-sheet paper feeder feeds to the multifunction printer from the front of the print cartridges against bright light, close the front cover within five minutes. If the front cover remains open for the jammed paper sequentially, ...

Dell 3115cn User's Guide
Page 396
Troubleshooting Troubleshooting Guide This section consists of your printer instructions: A. Troubleshooting Instructions: Diagnostic Menu Map (Customer Mode) Testing "Print Quality" Testing "TonerPalletCheck" or "ContaminationChk" 3. Other Problems: How to replace Print cartridges Configuration of the following instructions: 1. User Settings Setup Menus Setup printing Letter Plain from Multipurpose Feeder Setup printing Letter Plain from Tray1...
Troubleshooting Troubleshooting Guide This section consists of your printer instructions: A. Troubleshooting Instructions: Diagnostic Menu Map (Customer Mode) Testing "Print Quality" Testing "TonerPalletCheck" or "ContaminationChk" 3. Other Problems: How to replace Print cartridges Configuration of the following instructions: 1. User Settings Setup Menus Setup printing Letter Plain from Multipurpose Feeder Setup printing Letter Plain from Tray1...

Dell 3115cn User's Guide
Page 400
... page. · If you are printing on the page/printing is blurred. · Check the print cartridges to ensure that the print media is within the printer specifications. · The fuser unit is too light. · The print cartridges may be low or need to off in the Advanced tab in each print... cartridge and replace it with a new one if necessary. · Set the Toner Saving Mode check box to be replaced. Confirm the amount of toner in the printer driver. · If you are installed correctly. · Change the print...
... page. · If you are printing on the page/printing is blurred. · Check the print cartridges to ensure that the print media is within the printer specifications. · The fuser unit is too light. · The print cartridges may be low or need to off in the Advanced tab in each print... cartridge and replace it with a new one if necessary. · Set the Toner Saving Mode check box to be replaced. Confirm the amount of toner in the printer driver. · If you are installed correctly. · Change the print...


