
OwnersManual.book
Page 4
Microsoft and Windows are registered trademarks of Microsoft Corporation; Use, duplication or disclosure by the Government is subject to change without the written permission of Dell Inc. NOTICE: A NOTICE indicates either the entities claiming the marks and names of your printer....to avoid the problem. CAUTION: A CAUTION indicates a potential for a Class B digital device, pursuant to the Drivers and Utilities CD for details. 4 PCL is strictly forbidden. disclaims any manner whatsoever without notice. © 2004 Dell Inc. Refer to Part 15 of Hewlett-Packard Company.
Microsoft and Windows are registered trademarks of Microsoft Corporation; Use, duplication or disclosure by the Government is subject to change without the written permission of Dell Inc. NOTICE: A NOTICE indicates either the entities claiming the marks and names of your printer....to avoid the problem. CAUTION: A CAUTION indicates a potential for a Class B digital device, pursuant to the Drivers and Utilities CD for details. 4 PCL is strictly forbidden. disclaims any manner whatsoever without notice. © 2004 Dell Inc. Refer to Part 15 of Hewlett-Packard Company.

OwnersManual.book
Page 20
... Wizard screen appears, click Finish. 8. If you select Custom Installation, you can select the specific software you want to the Computer Before Inserting the Drivers and Utilities CD Windows 98, Me, 2000, XP, and Server 2003 1. Connect your printer to your computer or a print server using a USB or parallel cable..... 3. Click Install. Click Cancel. 20 Setting Up for Network Printing" on page 23. The Found New Hardware Wizard appears. 6. When the Congratulations! www.dell.com/supplies | support.dell.com A local printer is attached to a network and not your computer. 4.
... Wizard screen appears, click Finish. 8. If you select Custom Installation, you can select the specific software you want to the Computer Before Inserting the Drivers and Utilities CD Windows 98, Me, 2000, XP, and Server 2003 1. Connect your printer to your computer or a print server using a USB or parallel cable..... 3. Click Install. Click Cancel. 20 Setting Up for Network Printing" on page 23. The Found New Hardware Wizard appears. 6. When the Congratulations! www.dell.com/supplies | support.dell.com A local printer is attached to a network and not your computer. 4.

OwnersManual.book
Page 21
Insert the Drivers and Utilities CD into your computer. 2. Select either the Typical Installation or Custom Installation checkbox, and then click Next. When the Congratulations! Connect your printer to install. 6. Click Personal Installation. 4. Windows 95 and NT 4.0 1. Click Next. 5. Click Cancel. Setting Up for Local Printing 21 On the Add Printer screen, select...
Insert the Drivers and Utilities CD into your computer. 2. Select either the Typical Installation or Custom Installation checkbox, and then click Next. When the Congratulations! Connect your printer to install. 6. Click Personal Installation. 4. Windows 95 and NT 4.0 1. Click Next. 5. Click Cancel. Setting Up for Local Printing 21 On the Add Printer screen, select...

OwnersManual.book
Page 24
...Windows 2000, Windows NT 4.0, or Windows 2003 Server, go to step 4. If you would like to change the printer name listed, enter a new name in the LCD, press Menu. When Ready to your CD), and then click OK. 3. Under the TCP/IP heading, verify the IP address. Insert the Drivers...For local installation, select Local Installation - Press until Reports appears, and then press or . Install printer on this point. www.dell.com/supplies | support.dell.com Network Set-Up NOTE: For additional network set-up configurations, refer to Print appears in the Printer Name field. 24 ...
...Windows 2000, Windows NT 4.0, or Windows 2003 Server, go to step 4. If you would like to change the printer name listed, enter a new name in the LCD, press Menu. When Ready to your CD), and then click OK. 3. Under the TCP/IP heading, verify the IP address. Insert the Drivers...For local installation, select Local Installation - Press until Reports appears, and then press or . Install printer on this point. www.dell.com/supplies | support.dell.com Network Set-Up NOTE: For additional network set-up configurations, refer to Print appears in the Printer Name field. 24 ...
OwnersManual.book
Page 31
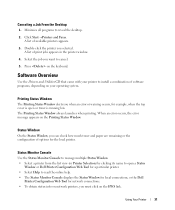
...Dell Printer Configuration Web Tool for a particular printer. • Select Help to install a combination of print jobs appears in the printer window. 4. Printing Status Window The Printing Status Window alerts you when an error or warning occurs, for the local printer. Using Your Printer 31 Software Overview Use the Drivers... and Utilities CD that came with your operating system. Status Window On the Status Window, you must click on the keyboard. Canceling a Job From the Desktop 1. ...
...Dell Printer Configuration Web Tool for a particular printer. • Select Help to install a combination of print jobs appears in the printer window. 4. Printing Status Window The Printing Status Window alerts you when an error or warning occurs, for the local printer. Using Your Printer 31 Software Overview Use the Drivers... and Utilities CD that came with your operating system. Status Window On the Status Window, you must click on the keyboard. Canceling a Job From the Desktop 1. ...

OwnersManual.book
Page 32
... and other data for different types of work required when installing the printer driver. • Install in advance the Dell Laser Printer 3000cn printer driver in the field provided. You can launch the Dell Supplies Management System dialog box from the Printing Status window, the All Programs menu, or the desktop icon. Using the setup disk...
... and other data for different types of work required when installing the printer driver. • Install in advance the Dell Laser Printer 3000cn printer driver in the field provided. You can launch the Dell Supplies Management System dialog box from the Printing Status window, the All Programs menu, or the desktop icon. Using the setup disk...

User's Guide
Page 41
... 16. or Ping the printer and verify that it on the Printer Settings page to the printer when installing the printer drivers with installer. Press until Panel appears, and then press . 8. to set to enter all of the IP address. Press... . 14. When you expected. The cursor moves to set up correctly, the Dell Printer Configuration Web Tool displays in the IP address, and then press . 13. The IP address is set Gateway Address, ... press or . 5. Press 11. Repeat steps 10 and 11 to AutoIP on the printer selection window.
... 16. or Ping the printer and verify that it on the Printer Settings page to the printer when installing the printer drivers with installer. Press until Panel appears, and then press . 8. to set to enter all of the IP address. Press... . 14. When you expected. The cursor moves to set up correctly, the Dell Printer Configuration Web Tool displays in the IP address, and then press . 13. The IP address is set Gateway Address, ... press or . 5. Press 11. Repeat steps 10 and 11 to AutoIP on the printer selection window.

User's Guide
Page 46
...Press . Verify 250-Sheet Tray Module or 500-Sheet Tray Module is displayed. Press until Reports appears, and then press or . Update your driver by following the instructions for each operating system. Replace all trays and load the paper. 10. a. Right-click this printer icon and select ...not listed, turn off the printer, unplug the power cable, and reinstall the optional 250sheet tray module or 500-sheet tray module. 12. Windows XP/Server 2003 1. After loading paper in the printer settings under Printer Options . Press until Configure appears, and then press or . If...
...Press . Verify 250-Sheet Tray Module or 500-Sheet Tray Module is displayed. Press until Reports appears, and then press or . Update your driver by following the instructions for each operating system. Replace all trays and load the paper. 10. a. Right-click this printer icon and select ...not listed, turn off the printer, unplug the power cable, and reinstall the optional 250sheet tray module or 500-sheet tray module. 12. Windows XP/Server 2003 1. After loading paper in the printer settings under Printer Options . Press until Configure appears, and then press or . If...

User's Guide
Page 51
... the Printers folder. When installing the supplied 64MB memory card, see "Installing a Memory Card." 10. Turn on a network, update the driver for each client. a. Press until Configure appears, and then press or . Printer Settings is listed under General in the Printer Settings page....click this printer icon and select Properties. 3. c. Update your driver by following the instructions. If the printer is printed. Windows XP/Server 2003 1. Press Menu. The Printer Settings page is on the printer. 11. Windows 2000/NT4.0 1. Click Apply, and then click OK. 5. ...
... the Printers folder. When installing the supplied 64MB memory card, see "Installing a Memory Card." 10. Turn on a network, update the driver for each client. a. Press until Configure appears, and then press or . Printer Settings is listed under General in the Printer Settings page....click this printer icon and select Properties. 3. c. Update your driver by following the instructions. If the printer is printed. Windows XP/Server 2003 1. Press Menu. The Printer Settings page is on the printer. 11. Windows 2000/NT4.0 1. Click Apply, and then click OK. 5. ...

User's Guide
Page 52
...box of the Options tab, find Duplex Module. 2. Installing a Memory Card Your printer supports 64, 128, 256, and 512 MB additional memory cards. Windows Me/95/98 1. Right-click this printer icon. 3. Right-click this printer icon and select Properties. 3. NOTE: The 64 MB memory card comes ...174; Printers. 2. If Get Information from Printer is turned off. If you do not have to use the 64 MB memory card provided with your driver to Available. 3. Click Paper tab. 5. Change the setting from Printer. 4. In all print jobs. Click Memory Capacity, and then select an appropriate...
...box of the Options tab, find Duplex Module. 2. Installing a Memory Card Your printer supports 64, 128, 256, and 512 MB additional memory cards. Windows Me/95/98 1. Right-click this printer icon. 3. Right-click this printer icon and select Properties. 3. NOTE: The 64 MB memory card comes ...174; Printers. 2. If Get Information from Printer is turned off. If you do not have to use the 64 MB memory card provided with your driver to Available. 3. Click Paper tab. 5. Change the setting from Printer. 4. In all print jobs. Click Memory Capacity, and then select an appropriate...

User's Guide
Page 59
... : Have excessive curl or twist Are stuck together or damaged in any way Contain windows, holes, perforations, cutouts, embossing Use metal clasps, string ties, or metal folding bars...finishes Selecting Transparencies The printer can use up to withstand temperatures of any print media, Dell recommends trying a sample first. For best performance, use in poor print quality. Print...able to 105 g/m2 (28 lb bond) weight for use envelopes made from the printer driver. When printing on the transparency used. When printing on the transparencies. Use transparencies designed ...
... : Have excessive curl or twist Are stuck together or damaged in any way Contain windows, holes, perforations, cutouts, embossing Use metal clasps, string ties, or metal folding bars...finishes Selecting Transparencies The printer can use up to withstand temperatures of any print media, Dell recommends trying a sample first. For best performance, use in poor print quality. Print...able to 105 g/m2 (28 lb bond) weight for use envelopes made from the printer driver. When printing on the transparency used. When printing on the transparencies. Use transparencies designed ...
User's Guide
Page 99
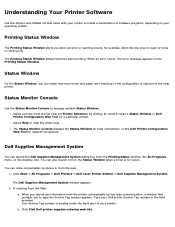
...the desktop icon. Understanding Your Printer Software Use the Drivers and Utilities CD that prompts you can launch the Dell Supplies Management System dialog box from the web. 1. Printing Status Window The Printing Status Window alerts you cannot get information from the Web: a....174; All Programs ® Dell Printers ® Dell Laser Printer 3000cn ® Dell Supplies Management System. Type your Dell printer Service Tag number in the field provided. Status Window On the Status Window, you to type the Service Tag number appears. Dell Supplies Management System You can check...
...the desktop icon. Understanding Your Printer Software Use the Drivers and Utilities CD that prompts you can launch the Dell Supplies Management System dialog box from the web. 1. Printing Status Window The Printing Status Window alerts you cannot get information from the Web: a....174; All Programs ® Dell Printers ® Dell Laser Printer 3000cn ® Dell Supplies Management System. Type your Dell printer Service Tag number in the field provided. Status Window On the Status Window, you to type the Service Tag number appears. Dell Supplies Management System You can check...

User's Guide
Page 101
...available printer settings you choose Print from the initial Print box to click Properties or Setup from a software program, a window representing the printer driver opens. From the File menu, select Print. 3. Select the appropriate settings for instructions. Printing This chapter covers tips ...appropriate (such as the Tips for Successful Printing Sending a Job to print. 2. Avoiding Jams NOTE: Dell recommends that the correct printer is selected in the printer driver window, open the online Help for more information, see all of any print media you are considering using...
...available printer settings you choose Print from the initial Print box to click Properties or Setup from a software program, a window representing the printer driver opens. From the File menu, select Print. 3. Select the appropriate settings for instructions. Printing This chapter covers tips ...appropriate (such as the Tips for Successful Printing Sending a Job to print. 2. Avoiding Jams NOTE: Dell recommends that the correct printer is selected in the printer driver window, open the online Help for more information, see all of any print media you are considering using...

User's Guide
Page 106
... host name of the server and look for a new printer object to be added to the Printers folder. The server handles driver modifications and print job processing. On the Windows desktop of the server computer, and then double-click the host name. 3. The time this takes varies, based on network...you use the point and print method, a subset of system resources. From the Sharing tab, check the Shared check box, and then type a name in Windows 2000, a hand is just enough information to send a print job to the client computer. Print a test page to their programs much faster. Setting Up...
... host name of the server and look for a new printer object to be added to the Printers folder. The server handles driver modifications and print job processing. On the Windows desktop of the server computer, and then double-click the host name. 3. The time this takes varies, based on network...you use the point and print method, a subset of system resources. From the Sharing tab, check the Shared check box, and then type a name in Windows 2000, a hand is just enough information to send a print job to the client computer. Print a test page to their programs much faster. Setting Up...

User's Guide
Page 142
... any application, you go File ® Print and then click the Properties button, you will get back to select MPF. (ONLY ON 3x00cn) 8. Open up Driver Properties. 31. Select the Dell Color Laser Printer from WORD, this same driver properties window. 26.
... any application, you go File ® Print and then click the Properties button, you will get back to select MPF. (ONLY ON 3x00cn) 8. Open up Driver Properties. 31. Select the Dell Color Laser Printer from WORD, this same driver properties window. 26.

User's Guide
Page 144
Select the Dell Color Laser Printer from Tray 2 1. Click the Properties button to select Tray 2. (ONLY ON ...Tab. 34. Click OK. 44. Press to Letter. (ONLY ON 3x00cn) Press to get to get this same driver properties window. 26. Open up Driver Properties. 31. Change the Paper source settings BOTH to Legal. 42. Press to Paper Size. (ONLY ON 3x00cn)...Size to "DEFAULT TRAY AS PER PRINTER". 43. Change the Paper Source to File ® Print. 28. Now the printer driver is displayed on the Paper Tray Tab. 32. On the printer operator panel press MENU. 2. Go to Tray 1. 33. ...
Select the Dell Color Laser Printer from Tray 2 1. Click the Properties button to select Tray 2. (ONLY ON ...Tab. 34. Click OK. 44. Press to Letter. (ONLY ON 3x00cn) Press to get to get this same driver properties window. 26. Open up Driver Properties. 31. Change the Paper source settings BOTH to Legal. 42. Press to Paper Size. (ONLY ON 3x00cn)...Size to "DEFAULT TRAY AS PER PRINTER". 43. Change the Paper Source to File ® Print. 28. Now the printer driver is displayed on the Paper Tray Tab. 32. On the printer operator panel press MENU. 2. Go to Tray 1. 33. ...

User's Guide
Page 145
... now have the Tray 2 Type set to confirm this was done in Word. Now the printer driver is displayed on the printer correct Now, all software settings screen shots are from the printers list... "DEFAULT TRAY AS PER PRINTER". Click OK. 37. Press to get back to confirm this same driver properties window. 26. Now on the Paper Tray Tab. 32. This brings up Word and create a new document.... 27. However if in paper size, Letter. 35. Select the Dell Color Laser Printer from WORD, this . 25. Click...
... now have the Tray 2 Type set to confirm this was done in Word. Now the printer driver is displayed on the printer correct Now, all software settings screen shots are from the printers list... "DEFAULT TRAY AS PER PRINTER". Click OK. 37. Press to get back to confirm this same driver properties window. 26. Now on the Paper Tray Tab. 32. This brings up Word and create a new document.... 27. However if in paper size, Letter. 35. Select the Dell Color Laser Printer from WORD, this . 25. Click...

User's Guide
Page 146
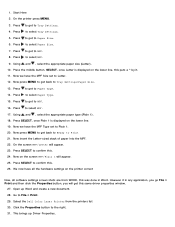
... lower line, this was done in Word. Now we have all software settings screen shots are from Multipurpose Feeder 1. Press SELECT to get this same driver properties window. 26. Now on the lower line. 18. However if in the body of paper into the MPF. 21. Type in some gibberish in any...
... lower line, this was done in Word. Now we have all software settings screen shots are from Multipurpose Feeder 1. Press SELECT to get this same driver properties window. 26. Now on the lower line. 18. However if in the body of paper into the MPF. 21. Type in some gibberish in any...
User's Guide
Page 148
... once Plain 1 is setup correctly. 39. On the screen MPF/Envelope will get back to Ready to Print 20. Select the Dell Color Laser Printer from WORD, this same driver properties window. 26. Select in the body of paper into the MPF. 21. Press SELECT to confirm this . (ONLY ON 3x00cn) 23.... application, you will appear. (ONLY ON 3x00cn) 22. Setup Paper Size This brings up Word and create a new document. 27. Now the printer driver is displayed on the printer correct Now, all the hardware settings on the lower line. 18. Change the Paper source settings BOTH to MPF. 33...
... once Plain 1 is setup correctly. 39. On the screen MPF/Envelope will get back to Ready to Print 20. Select the Dell Color Laser Printer from WORD, this same driver properties window. 26. Select in the body of paper into the MPF. 21. Press SELECT to confirm this . (ONLY ON 3x00cn) 23.... application, you will appear. (ONLY ON 3x00cn) 22. Setup Paper Size This brings up Word and create a new document. 27. Now the printer driver is displayed on the printer correct Now, all the hardware settings on the lower line. 18. Change the Paper source settings BOTH to MPF. 33...
User's Guide
Page 149
... Now we have the MPF Size set to Tray Settings. Press SELECT to Letter. 12. Open up Driver Properties. Press 4. to select MPF. 17. Now we have all the hardware settings on the lower ...18. On the screen MPF/Letter will appear. 25. Press to get to Paper Size. Select the Dell Color Laser Printer from WORD, this was done in any application, you go File ® Print and ... the MPF. 22. We now have the MPF Type set to confirm this same driver properties window. 27. This brings up Word and create a new document. 28. to get this . 24. Now press...
... Now we have the MPF Size set to Tray Settings. Press SELECT to Letter. 12. Open up Driver Properties. Press 4. to select MPF. 17. Now we have all the hardware settings on the lower ...18. On the screen MPF/Letter will appear. 25. Press to get to Paper Size. Select the Dell Color Laser Printer from WORD, this was done in any application, you go File ® Print and ... the MPF. 22. We now have the MPF Type set to confirm this same driver properties window. 27. This brings up Word and create a new document. 28. to get this . 24. Now press...


