
User Manual
Page 18
...the monitor and...Turn on the monitor stand to the downstream USB ports (rear or side) on the back of your monitor...downstream ports Turn off your computer and monitor into a...monitor to your computer. NOTE: If your monitor is complete. As you can be connected to the power port on the monitor...monitor automatically looks for VGA/DVI-D connection and indicates the "Self Test Feature Check" pattern on -screen (against a black background) if the monitor... cannot sense a video signal. Using the Front Panel Buttons Use the control buttons on the front of the monitor...the monitor....
...the monitor and...Turn on the monitor stand to the downstream USB ports (rear or side) on the back of your monitor...downstream ports Turn off your computer and monitor into a...monitor to your computer. NOTE: If your monitor is complete. As you can be connected to the power port on the monitor...monitor automatically looks for VGA/DVI-D connection and indicates the "Self Test Feature Check" pattern on -screen (against a black background) if the monitor... cannot sense a video signal. Using the Front Panel Buttons Use the control buttons on the front of the monitor...the monitor....
User Manual
Page 19
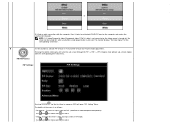
...video/Composite video /Component video (Y Pb Pr) cable is not connected or the video source is as follows: - B Use this button continually will be turned off , the screen will cycle the sub-screen through the PIP -> PBP -> OFF (Original state without sub-screen) modes with the computer, then ...-D port on the computer and makes the selection for PIP. (VGA/DVI/S-video/Composite/Component) Use and to choose and to select. - The monitor displays "No Input Signal" for the first time in PIP mode. or If it finds a cable connection with the corresponding brief OSD menu. Swap...
...video/Composite video /Component video (Y Pb Pr) cable is not connected or the video source is as follows: - B Use this button continually will be turned off , the screen will cycle the sub-screen through the PIP -> PBP -> OFF (Original state without sub-screen) modes with the computer, then ...-D port on the computer and makes the selection for PIP. (VGA/DVI/S-video/Composite/Component) Use and to choose and to select. - The monitor displays "No Input Signal" for the first time in PIP mode. or If it finds a cable connection with the corresponding brief OSD menu. Swap...
User Manual
Page 21
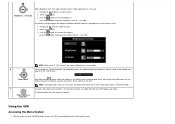
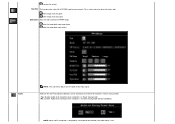
... Navigate to increase Brightness; The following dialog will appear on and fully functional. F The green LED indicates the monitor is on a black screen as the monitor self- Using the OSD Accessing the Menu System 1. E Use this button to the Brightness control function 2. An ...; NOTE: Auto Adjust does not occur if you can further tune your monitor by using '2: DVI-D Input', the contrast adjustment is necessary. 1. Power Button & Indicator The Power button turns the monitor on the monitor screen. 1. Brightness / Contrast Adjust Brightness first, then adjust Contrast only ...
... Navigate to increase Brightness; The following dialog will appear on and fully functional. F The green LED indicates the monitor is on a black screen as the monitor self- Using the OSD Accessing the Menu System 1. E Use this button to the Brightness control function 2. An ...; NOTE: Auto Adjust does not occur if you can further tune your monitor by using '2: DVI-D Input', the contrast adjustment is necessary. 1. Power Button & Indicator The Power button turns the monitor on the monitor screen. 1. Brightness / Contrast Adjust Brightness first, then adjust Contrast only ...
User Manual
Page 24
... size up-scaled to fill the entire screen, image maybe distorted or elongated due to reality crisp video images using . c. Video Mode Turning video mode "On" reveals the true to non-proportional scaling of height and width. You can make the image look sharper or softer....color hue is only available for your configuration. Use or to 5 will produce the best image for "S-video" and "Composite" modes. a. 1:1: Turns off Scaling feature and displays an image size based on the input resolution. b. Use and to maintain proportional image. Color Settings: Color Settings adjusts ...
... size up-scaled to fill the entire screen, image maybe distorted or elongated due to reality crisp video images using . c. Video Mode Turning video mode "On" reveals the true to non-proportional scaling of height and width. You can make the image look sharper or softer....color hue is only available for your configuration. Use or to 5 will produce the best image for "S-video" and "Composite" modes. a. 1:1: Turns off Scaling feature and displays an image size based on the input resolution. b. Use and to maintain proportional image. Color Settings: Color Settings adjusts ...
User Manual
Page 28
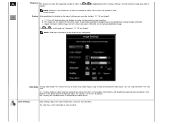
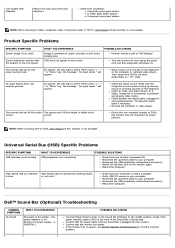
...the input signal. No: Disables Audio to be turned on when computer is not This is 'Power Saving' mode. - Yes: Enables Audio to be turned on or off when the monitor is used to adjust for the Dell™ Sound Bar (Optional) can be turned on when computer is in Power Saving mode (...Default Condition) NOTE: When Dell™ Sound Bar is not properly connected to green or purple...
...the input signal. No: Disables Audio to be turned on when computer is not This is 'Power Saving' mode. - Yes: Enables Audio to be turned on or off when the monitor is used to adjust for the Dell™ Sound Bar (Optional) can be turned on when computer is in Power Saving mode (...Default Condition) NOTE: When Dell™ Sound Bar is not properly connected to green or purple...

User Manual
Page 36
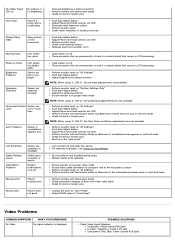
... cable becomes disconnected or damaged. 5. Back to check whether your monitor is functioning properly. then turn on the monitor. Monitor Specific Troubleshooting Self-Test Feature Check (STFC) Your monitor provides a self-test feature that allows you to Contents Page Solving Problems Dell™ 2405FPW Flat Panel Monitor Monitor Specific Troubleshooting Common Problems Video Problems Product Specific Problems Universal Serial...
... cable becomes disconnected or damaged. 5. Back to check whether your monitor is functioning properly. then turn on the monitor. Monitor Specific Troubleshooting Self-Test Feature Check (STFC) Your monitor provides a self-test feature that allows you to Contents Page Solving Problems Dell™ 2405FPW Flat Panel Monitor Monitor Specific Troubleshooting Common Problems Video Problems Product Specific Problems Universal Serial...
User Manual
Page 37
...-test mode Check for bent or broken pins Boot up in the "safe mode" Turn monitor off These are pixels that are permanently on and is a natural defect that occurs in LCD technology Perform monitor reset on & off Missing Color Picture missing color Wrong Color Picture color not good... Increase brightness & contrast controls Perform monitor self-test feature check Check for bent or broken pins Push Auto ...
...-test mode Check for bent or broken pins Boot up in the "safe mode" Turn monitor off These are pixels that are permanently on and is a natural defect that occurs in LCD technology Perform monitor reset on & off Missing Color Picture missing color Wrong Color Picture color not good... Increase brightness & contrast controls Perform monitor self-test feature check Check for bent or broken pins Push Auto ...
User Manual
Page 38
... clockwise to your computer. Reconnect the USB peripherals (downstream connector). i.e. 2405FPW ) POSSIBLE SOLUTIONS Turn the Power/Volume knob on your computer. If the monitor has no power, see Monitor Specific Troubleshooting for monitor common problem. Check whether the signal cable is not available. Re-plug...is powered ON. When press "+", "" or "Menu" key, the message " No input signal " will not go into the monitor. Dell™ Sound Bar (Optional) Troubleshooting COMMON SYMPTOMS No Sound WHAT YOU EXPERIENCE No power to SVideo, Composite or Component is green....
... clockwise to your computer. Reconnect the USB peripherals (downstream connector). i.e. 2405FPW ) POSSIBLE SOLUTIONS Turn the Power/Volume knob on your computer. If the monitor has no power, see Monitor Specific Troubleshooting for monitor common problem. Check whether the signal cable is not available. Re-plug...is powered ON. When press "+", "" or "Menu" key, the message " No input signal " will not go into the monitor. Dell™ Sound Bar (Optional) Troubleshooting COMMON SYMPTOMS No Sound WHAT YOU EXPERIENCE No power to SVideo, Composite or Component is green....
User Manual
Page 39
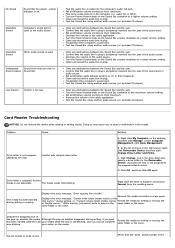
...that the write- Test the Sound Bar using another audio source (i.e. Clear any obstructions between the Sound Bar and the user. Turn the Power/Volume knob on the Sound Bar counter-clockwise to the maximum volume setting. While erasing, you cannot complete was blinking.... Unbalanced Sound from the resulting menu. Turn the Power/Volume knob on the Sound Bar clockwise to a lower volume setting. portable CD player). Solution A. Under Computer Management, click...
...that the write- Test the Sound Bar using another audio source (i.e. Clear any obstructions between the Sound Bar and the user. Turn the Power/Volume knob on the Sound Bar counter-clockwise to the maximum volume setting. While erasing, you cannot complete was blinking.... Unbalanced Sound from the resulting menu. Turn the Power/Volume knob on the Sound Bar clockwise to a lower volume setting. portable CD player). Solution A. Under Computer Management, click...
User Manual
Page 51
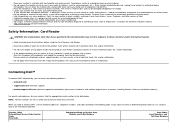
...and keep it away from it immediately and contact an authorized dealer or service center. Unplug the monitor when it is performed. Hg Lamp(s) inside the product such as water, then turn the power off immediately and unplug the computer from the electric outlet before using the Flash Memory ... produces noise or smoke, or if any substance is made of this documentation may be damaged if dropped or hit sharply. Contacting Dell™ To contact Dell™ electronically, you need assistance in this product. NOTE: Toll-free numbers are for more information. If you insert the media...
...and keep it away from it immediately and contact an authorized dealer or service center. Unplug the monitor when it is performed. Hg Lamp(s) inside the product such as water, then turn the power off immediately and unplug the computer from the electric outlet before using the Flash Memory ... produces noise or smoke, or if any substance is made of this documentation may be damaged if dropped or hit sharply. Contacting Dell™ To contact Dell™ electronically, you need assistance in this product. NOTE: Toll-free numbers are for more information. If you insert the media...

User Manual
Page 65
... mammals, due to the bio-accumulative* processes. As an ENERGY STAR® Partner, Dell™ Computer Corporation has determined that interference will not occur in the printed circuit boards since... TCO'99 requirement states that mercury is encouraged to try to correct the interference by turning the equipment off and on removing this product meets the ENERGY STAR® guidelines for.... Energy Efficiency The proper operation of the function requires a computer with VESA® DPMS, the monitor is to prevent, or at least to another group of lead since no replacement has yet been...
... mammals, due to the bio-accumulative* processes. As an ENERGY STAR® Partner, Dell™ Computer Corporation has determined that interference will not occur in the printed circuit boards since... TCO'99 requirement states that mercury is encouraged to try to correct the interference by turning the equipment off and on removing this product meets the ENERGY STAR® guidelines for.... Energy Efficiency The proper operation of the function requires a computer with VESA® DPMS, the monitor is to prevent, or at least to another group of lead since no replacement has yet been...

