User Guide
Page 4
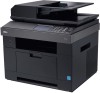
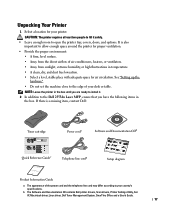
...4 5 6 1. Optional tray 2 cable connector 5. Express šervice code 11. Status LED: Shows the status of your machine. 3. Fax: Enters the fax menu. 3. DADF 2. Operator panel 6. DADF 2. Paper output extension 13. Toner cartridge 15. Optional tray 2 11. USB memory port 12...brightness, the USB memory, language, and job status. 1.Copy: Enters the copy menu. 2. Also you can use my printer Quick Reference Guide Dell 2355dn MFP Quick Reference Guide Quick Reference Guide Quick Reference Guide Front 2 1 Front 3 Front 4 5 11 12 Front 13 6 7 8 1....
...4 5 6 1. Optional tray 2 cable connector 5. Express šervice code 11. Status LED: Shows the status of your machine. 3. Fax: Enters the fax menu. 3. DADF 2. Operator panel 6. DADF 2. Paper output extension 13. Toner cartridge 15. Optional tray 2 11. USB memory port 12...brightness, the USB memory, language, and job status. 1.Copy: Enters the copy menu. 2. Also you can use my printer Quick Reference Guide Dell 2355dn MFP Quick Reference Guide Quick Reference Guide Quick Reference Guide Front 2 1 Front 3 Front 4 5 11 12 Front 13 6 7 8 1....
User Guide
Page 6
Contents DellTM 2355dn Laser MFP User's Guide 1 Contacting Dell 1 Finding Information 3 Unpacking Your Printer 17 About Your Printer 20 Front View 20 Rear View 21 Operator Panel Button Functions 22 Common Keys 22 Function Keys 22 Fax Keys 22 Understanding the Status LED 23 Introducing the Home Screen 24 Touchscreen ... Loading Paper 31 Making Connections 34 Connecting the Telephone Line 34 Connecting the Printer Cable 37 Powering On the Printer 39 Setting fax setup sequence 39 Dell 2355dn Laser MFP Menu Functions 40 Printing the Printer setting and Op-panel Menu setting 41 5
Contents DellTM 2355dn Laser MFP User's Guide 1 Contacting Dell 1 Finding Information 3 Unpacking Your Printer 17 About Your Printer 20 Front View 20 Rear View 21 Operator Panel Button Functions 22 Common Keys 22 Function Keys 22 Fax Keys 22 Understanding the Status LED 23 Introducing the Home Screen 24 Touchscreen ... Loading Paper 31 Making Connections 34 Connecting the Telephone Line 34 Connecting the Printer Cable 37 Powering On the Printer 39 Setting fax setup sequence 39 Dell 2355dn Laser MFP Menu Functions 40 Printing the Printer setting and Op-panel Menu setting 41 5

User Guide
Page 7
...46 Ignoring Blank Pages 47 Ignoring the Toner Low Message (Only for Fax 47 Software Overview 48 Dell Printer Configuration Web Tool 49 Printer Status 50 Printer Settings 50 Printer Server Settings 50 Fax Settings 50 Email Settings 51 Copy Printer Settings 55 Printing Statistics 55 Set... Password 55 Wireless 55 Online Help 55 Installing Software in Microsoft® Windows® Operating System 56 Installing Dell Software for Local Printing 57 Network ...
...46 Ignoring Blank Pages 47 Ignoring the Toner Low Message (Only for Fax 47 Software Overview 48 Dell Printer Configuration Web Tool 49 Printer Status 50 Printer Settings 50 Printer Server Settings 50 Fax Settings 50 Email Settings 51 Copy Printer Settings 55 Printing Statistics 55 Set... Password 55 Wireless 55 Online Help 55 Installing Software in Microsoft® Windows® Operating System 56 Installing Dell Software for Local Printing 57 Network ...
User Guide
Page 8
Uninstalling Software 65 Using the Dell Toner Management System 66 Printer Status Monitor 66 Printer Settings Utility 67 The Directory Section 68 The Fax Setting Section 69 The Setting Section 69 The Layout Section 69 The Paper Option Section 69 The Graphic Section 69 The Emulation Section 69 The ...
Uninstalling Software 65 Using the Dell Toner Management System 66 Printer Status Monitor 66 Printer Settings Utility 67 The Directory Section 68 The Fax Setting Section 69 The Setting Section 69 The Layout Section 69 The Paper Option Section 69 The Graphic Section 69 The Emulation Section 69 The ...

User Guide
Page 11
SmarThru Office 142 Starting SmarThru Office 142 Using SmarThru Office 143 Scanning Using Dell Scan Manager 146 About Dell Scan Manager 146 Setting scan information in Dell Scan Manager 146 Scanning to a PC Application 148 Scanning and Sending an Email 149 Scanning and Sending to SMB Server 150 ...Scanning and Sending to FTP Server 151 Scanning and Sending Custom Email 152 Scan to Fax Server 153 Scanning Using the ...
SmarThru Office 142 Starting SmarThru Office 142 Using SmarThru Office 143 Scanning Using Dell Scan Manager 146 About Dell Scan Manager 146 Setting scan information in Dell Scan Manager 146 Scanning to a PC Application 148 Scanning and Sending an Email 149 Scanning and Sending to SMB Server 150 ...Scanning and Sending to FTP Server 151 Scanning and Sending Custom Email 152 Scan to Fax Server 153 Scanning Using the ...

User Guide
Page 12
...2008 R2. . . . 172 Setting Up a Network-connected Printer 176 1 Via Network Administration Programs 176 2 Via the Operator Panel 176 Faxing Setting the Printer ID 182 Setting the Time and Date 182 Setting Daylight Savings Time 183 Changing the Clock Mode 183 Setting Sounds 184 Speaker..., Dial Tone, Fault, Conflict, and Selection 184 Toll Save Mode 184 Setting up the Fax System 185 Changing the Fax Setup Options 185 Available Fax Defaults Options 185 Testing Fax line connection 187 Sending a Fax 188 Adjusting the Document Contrast 188 Adjusting the Document Resolution 188 Sending...
...2008 R2. . . . 172 Setting Up a Network-connected Printer 176 1 Via Network Administration Programs 176 2 Via the Operator Panel 176 Faxing Setting the Printer ID 182 Setting the Time and Date 182 Setting Daylight Savings Time 183 Changing the Clock Mode 183 Setting Sounds 184 Speaker..., Dial Tone, Fault, Conflict, and Selection 184 Toll Save Mode 184 Setting up the Fax System 185 Changing the Fax Setup Options 185 Available Fax Defaults Options 185 Testing Fax line connection 187 Sending a Fax 188 Adjusting the Document Contrast 188 Adjusting the Document Resolution 188 Sending...
User Guide
Page 13
... 193 Receiving Manually in the Tel Mode 193 Receiving Automatically in the Ans/Fax Mode 193 Receiving Manually Using an Extension Telephone 193 Receiving Faxes Using the DRPD Mode 194 Receiving Faxes in the Memory 195 Automatic Dialing 195 Speed Dialing 195 Group Dialing 197 ...for a Number in the Memory 200 Printing a Phonebook List 201 Other Ways to Fax 201 Sending a Delayed Fax 201 Sending a Priority Fax 202 Adding Documents to a Scheduled Fax 203 Canceling a Scheduled Fax 203 Fax Forward to E-mail addresses 204 Additional Features 205 Using the Secure Receiving Mode 205 ...
... 193 Receiving Manually in the Tel Mode 193 Receiving Automatically in the Ans/Fax Mode 193 Receiving Manually Using an Extension Telephone 193 Receiving Faxes Using the DRPD Mode 194 Receiving Faxes in the Memory 195 Automatic Dialing 195 Speed Dialing 195 Group Dialing 197 ...for a Number in the Memory 200 Printing a Phonebook List 201 Other Ways to Fax 201 Sending a Delayed Fax 201 Sending a Priority Fax 202 Adding Documents to a Scheduled Fax 203 Canceling a Scheduled Fax 203 Fax Forward to E-mail addresses 204 Additional Features 205 Using the Secure Receiving Mode 205 ...
User Guide
Page 16
Fax Problems 290 Copying Problems 292 Scanning Problems 293 Global address problems 294 Common Windows Problems 294 Common Linux Problems 295 Common Macintosh Problems 297 Troubleshooting ...
Fax Problems 290 Copying Problems 292 Scanning Problems 293 Global address problems 294 Common Windows Problems 294 Common Linux Problems 295 Common Macintosh Problems 297 Troubleshooting ...
User Guide
Page 18
...advanced settings. 5 Start button: Initiate operation. 6. Touch Screen Touch Screen Touch Screen 1.Copy: Enters the copy menu. 2. Fax: Enters the fax menu. 3. Setup: Enters the advanced settings. 8. : Return to allow enough space around the printer for proper ventilation. ...4 5 6 1. Power switch 10. Extension telephone socket (EXT) 7. None: You can set the option which is a missing item, contact Dell: Toner cartridge Dell 2355dn MFP Quick Reference Guide Quick Reference Guide Quick Reference Guide Front 2 1 Front 3 Front 4 5 11 12 Front 13 6 7 8 1. ...
...advanced settings. 5 Start button: Initiate operation. 6. Touch Screen Touch Screen Touch Screen 1.Copy: Enters the copy menu. 2. Fax: Enters the fax menu. 3. Setup: Enters the advanced settings. 8. : Return to allow enough space around the printer for proper ventilation. ...4 5 6 1. Power switch 10. Extension telephone socket (EXT) 7. None: You can set the option which is a missing item, contact Dell: Toner cartridge Dell 2355dn MFP Quick Reference Guide Quick Reference Guide Quick Reference Guide Front 2 1 Front 3 Front 4 5 11 12 Front 13 6 7 8 1. ...

User Guide
Page 23
..., and quick reference guide. Start a job. Job status shows the jobs currently running and in the edit area. Fax Keys Press: To: Dial/Enter number. 22 Operator Panel Button Functions Status LED Fax keys Function keys Common keys Common Keys Press: To: Stop an operation at any time, or return to the...
..., and quick reference guide. Start a job. Job status shows the jobs currently running and in the edit area. Fax Keys Press: To: Dial/Enter number. 22 Operator Panel Button Functions Status LED Fax keys Function keys Common keys Common Keys Press: To: Stop an operation at any time, or return to the...

User Guide
Page 25
... the display language on the screen, it shows the home screen. • Copy: Enters the copy menu. • Scan: Enters the scan menu. • Fax: Enters the fax menu. • Setup: You can browse current machine settings or change machine values. • Shortcuts 1, 2, 3: You can change shortcut name as well. Also you...
... the display language on the screen, it shows the home screen. • Copy: Enters the copy menu. • Scan: Enters the scan menu. • Fax: Enters the fax menu. • Setup: You can browse current machine settings or change machine values. • Shortcuts 1, 2, 3: You can change shortcut name as well. Also you...

User Guide
Page 26
... area. • : Deletes the character on the left side of the cursor. • : Saves and closes input result. • : Enters a blank between characters in the fax number. A "," appears on the display. • : Toggles between lowercase keys and uppercase keys or vice versa. • : Switches from the alphanumeric keyboard to the upper...
... area. • : Deletes the character on the left side of the cursor. • : Saves and closes input result. • : Enters a blank between characters in the fax number. A "," appears on the display. • : Toggles between lowercase keys and uppercase keys or vice versa. • : Switches from the alphanumeric keyboard to the upper...
User Guide
Page 32
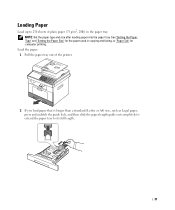
See "Setting the Paper Type" and "Setting the Paper Size" for the paper used in the paper tray. NOTE: Set the paper type and size after loading paper into the paper tray. Loading Paper Load up to 250 sheets of the printer. 2 If you load paper that is longer than a standard (Letter or A4) size, such as Legal paper, press and unlatch the guide lock, and then slide the paper length guide out completely to extend the paper tray to its full length. 31 Load the paper: 1 Pull the paper tray out of plain paper (75 g/m2, 20lb) in copying and faxing, or "Paper Tab" for computer printing.
See "Setting the Paper Type" and "Setting the Paper Size" for the paper used in the paper tray. NOTE: Set the paper type and size after loading paper into the paper tray. Loading Paper Load up to 250 sheets of the printer. 2 If you load paper that is longer than a standard (Letter or A4) size, such as Legal paper, press and unlatch the guide lock, and then slide the paper length guide out completely to extend the paper tray to its full length. 31 Load the paper: 1 Pull the paper tray out of plain paper (75 g/m2, 20lb) in copying and faxing, or "Paper Tab" for computer printing.

User Guide
Page 35
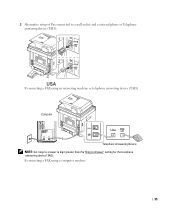
To connect a telephone and/or answering machine to your printer, remove the plug from the extension telephone socket (EXT) ( ) and plug the telephone or answering machine into an active wall jack. 9 Set the paper type and size. For more information, see "Setting the Paper Type" and "Setting the Paper Size". Making Connections Connecting the Telephone Line RJ11 telephone line socket (Line) To the wall jack 1 Plug one end of a telephone line cord into the RJ11 telephone line socket (FAX) and the other end into the extension telephone socket (EXT). 34
To connect a telephone and/or answering machine to your printer, remove the plug from the extension telephone socket (EXT) ( ) and plug the telephone or answering machine into an active wall jack. 9 Set the paper type and size. For more information, see "Setting the Paper Type" and "Setting the Paper Size". Making Connections Connecting the Telephone Line RJ11 telephone line socket (Line) To the wall jack 1 Plug one end of a telephone line cord into the RJ11 telephone line socket (FAX) and the other end into the extension telephone socket (EXT). 34
User Guide
Page 36
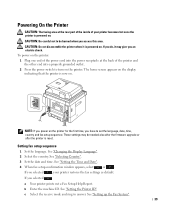
2 Alternative setup of Fax connected to Answer" setting for the telephone answering device (TAD). If connecting a FAX using an answering machine or telephone answering device (TAD): Computer Telephone Answering Device NOTE: Set rings to answer to digit greater than the "Ring to a wall socket and a external phone or Telephone answering device (TAD): If connecting a FAX using a computer modem: 35
2 Alternative setup of Fax connected to Answer" setting for the telephone answering device (TAD). If connecting a FAX using an answering machine or telephone answering device (TAD): Computer Telephone Answering Device NOTE: Set rings to answer to digit greater than the "Ring to a wall socket and a external phone or Telephone answering device (TAD): If connecting a FAX using a computer modem: 35
User Guide
Page 40
...language. If you an electric shock. The home screen appears on the display indicating that the printer is now on . See "Setting up the Fax System". 39 CAUTION: Do not disassemble the printer when it may be burned when you access this area. See "Setting the Printer ID". Powering... printer is reset. NOTE: If you power on . See "Selecting Country". 3 Set the date and time. See "Setting the Time and Date". 4 When fax setup confirmation window appears, select or . These settings may give you selected , your printer becomes hot once the printer is powered on the printer for...
...language. If you an electric shock. The home screen appears on the display indicating that the printer is now on . See "Setting up the Fax System". 39 CAUTION: Do not disassemble the printer when it may be burned when you access this area. See "Setting the Printer ID". Powering... printer is reset. NOTE: If you power on . See "Selecting Country". 3 Set the date and time. See "Setting the Time and Date". 4 When fax setup confirmation window appears, select or . These settings may give you selected , your printer becomes hot once the printer is powered on the printer for...
User Guide
Page 41
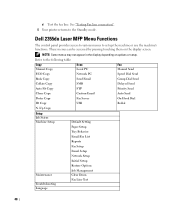
... can be accessed by pressing touching them on options or setup. See "Testing Fax line connection". 5 Your printer returns to the following table: Copy Manual Copy Scan Local PC Fax Manual Send ECO Copy Network PC Speed Dial Send Book Copy Send Email Group Dial...Status Machine Setup Maintenance Troubleshooting Language Default Setting Paper Setup Tray Behavior Email/Fax List Reports Fax Setup Email Setup Network Setup Initial Setup Restore Options Job Management Clear Drum Fax Line Test 40 Dell 2355dn Laser MFP Menu Functions The control panel provides access to various menus ...
... can be accessed by pressing touching them on options or setup. See "Testing Fax line connection". 5 Your printer returns to the following table: Copy Manual Copy Scan Local PC Fax Manual Send ECO Copy Network PC Speed Dial Send Book Copy Send Email Group Dial...Status Machine Setup Maintenance Troubleshooting Language Default Setting Paper Setup Tray Behavior Email/Fax List Reports Fax Setup Email Setup Network Setup Initial Setup Restore Options Job Management Clear Drum Fax Line Test 40 Dell 2355dn Laser MFP Menu Functions The control panel provides access to various menus ...

User Guide
Page 42
... ID using the keyboard. 6 Press the home icon ( ) to return to select Op-panel Menu Tree. If you have installed the fax multi-line kit, you need to select a line first, follow these steps: 1 Press Setup Machine Setup from the home screen. 2 Press the Next ( ) button. 3 Press ... information about using the keyboard on the display. The Printer Settings page prints out. Setting the Machine ID You can set the machine ID and fax number which will be printed at the top of each page.
... ID using the keyboard. 6 Press the home icon ( ) to return to select Op-panel Menu Tree. If you have installed the fax multi-line kit, you need to select a line first, follow these steps: 1 Press Setup Machine Setup from the home screen. 2 Press the Next ( ) button. 3 Press ... information about using the keyboard on the display. The Printer Settings page prints out. Setting the Machine ID You can set the machine ID and fax number which will be printed at the top of each page.

User Guide
Page 44
...= 00 ~ 59 6 Press the home icon ( ) to return to the printer occurs. Setting the Time and Date The time and date are printed on all faxes. To set the clock mode: 1 Press Setup Machine Setup from the home screen. 2 Press the Next ( ) button. 3 Press the up/down arrows to select Initial...
...= 00 ~ 59 6 Press the home icon ( ) to return to the printer occurs. Setting the Time and Date The time and date are printed on all faxes. To set the clock mode: 1 Press Setup Machine Setup from the home screen. 2 Press the Next ( ) button. 3 Press the up/down arrows to select Initial...
User Guide
Page 45
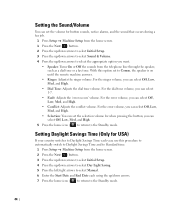
...to Daylight Savings Time and to Standard time. 1 Press Setup Machine Setup from the telephone line through the speaker, such as a dial tone or a fax tone. Setting Daylight Savings Time (Only for USA) If your country switches to Daylight Savings Time each using the up /down arrows. 7 Press the ... Start Date and End Date each year, use this option set the selection volume for button sounds, notice alarms, and the sound that occurs during a fax job. 1 Press Setup Machine Setup from the home screen. 1 Press the Next ( ) button. 2 Press the up/down arrows to select Initial Setup. 3 ...
...to Daylight Savings Time and to Standard time. 1 Press Setup Machine Setup from the telephone line through the speaker, such as a dial tone or a fax tone. Setting Daylight Savings Time (Only for USA) If your country switches to Daylight Savings Time each using the up /down arrows. 7 Press the ... Start Date and End Date each year, use this option set the selection volume for button sounds, notice alarms, and the sound that occurs during a fax job. 1 Press Setup Machine Setup from the home screen. 1 Press the Next ( ) button. 2 Press the up/down arrows to select Initial Setup. 3 ...


