User Guide
Page 15
... in the DADF 260 Clearing Jams in the Paper Tray 264 Paper Feed Jam (tray 1 265 Paper Feed Jam (optional tray 2 266 MPF Jam 268 Fuser Area Jam 268 Paper Exit Jam 269 Duplex Jam 273 Tips for Avoiding Paper Jams 275 Clearing LCD Error Messages 276 Solving Problems 282 Paper...
... in the DADF 260 Clearing Jams in the Paper Tray 264 Paper Feed Jam (tray 1 265 Paper Feed Jam (optional tray 2 266 MPF Jam 268 Fuser Area Jam 268 Paper Exit Jam 269 Duplex Jam 273 Tips for Avoiding Paper Jams 275 Clearing LCD Error Messages 276 Solving Problems 282 Paper...

User Guide
Page 77
... are not recommended for use with chemicals that may contaminate the printer • Preprinted papers that can be affected by the temperature in the printer fuser • Preprinted papers that you have cut or trimmed yourself. • Do not mix print media sizes, weights, or types in the source. • Flex...
... are not recommended for use with chemicals that may contaminate the printer • Preprinted papers that can be affected by the temperature in the printer fuser • Preprinted papers that you have cut or trimmed yourself. • Do not mix print media sizes, weights, or types in the source. • Flex...

User Guide
Page 78
.... • Choose papers that absorb ink, but do not bleed. • Avoid papers with heat-resistant inks which have been designed for use in the fuser. Use inks that are in doubt, contact your paper supplier. Preprinted papers such as letterheads must withstand temperatures of 180° C (356° F) without melting...
.... • Choose papers that absorb ink, but do not bleed. • Avoid papers with heat-resistant inks which have been designed for use in the fuser. Use inks that are in doubt, contact your paper supplier. Preprinted papers such as letterheads must withstand temperatures of 180° C (356° F) without melting...

User Guide
Page 89
... Tray (Face down) The output tray collects printed paper face-down, in use the rear door: Open the rear door by pulling it. CAUTION: The fuser area inside of the rear door of the printer face up ) Using the rear door, the paper comes out of your printer becomes very hot...
... Tray (Face down) The output tray collects printed paper face-down, in use the rear door: Open the rear door by pulling it. CAUTION: The fuser area inside of the rear door of the printer face up ) Using the rear door, the paper comes out of your printer becomes very hot...

User Guide
Page 257
... following items should be installed by a trained service professional. 256 Replacement Parts From time to time, you needs to replace the rollers and fuser unit to maintain top performance and to the paper. We strongly recommend that paper is loaded in the paper tray. 2 Press Setup from worn.... 80,000 pages Tray rubber pad Approx. 100,000 pages Pickup roller Approx. 150,000 pages To purchase replacement parts, contact your Dell dealer or the retailer where you have printed the specified number of the toner cartridge may require cleaning. 1 Before setting the cleaning procedure...
... following items should be installed by a trained service professional. 256 Replacement Parts From time to time, you needs to replace the rollers and fuser unit to maintain top performance and to the paper. We strongly recommend that paper is loaded in the paper tray. 2 Press Setup from worn.... 80,000 pages Tray rubber pad Approx. 100,000 pages Pickup roller Approx. 150,000 pages To purchase replacement parts, contact your Dell dealer or the retailer where you have printed the specified number of the toner cartridge may require cleaning. 1 Before setting the cleaning procedure...

User Guide
Page 265
... path in the Paper Tray When a paper jam occurs, Paper Jam appears on the display. Paper jam in exit area between the duplex unit and fuser area "Duplex Jam 0". Clearing Jams in the duplex unit "Duplex Jam 1". To avoid tearing the paper, pull the jammed paper out gently and slowly. Then... Paper jam in Tray 1 Paper Feed Jam (tray 1) Paper jam in optional Tray 2 Paper Feed Jam (optional tray 2) Paper jam in duplex unit between the fuser and exit area Jam "Paper Exit Jam". 4 Close the document cover.
... path in the Paper Tray When a paper jam occurs, Paper Jam appears on the display. Paper jam in exit area between the duplex unit and fuser area "Duplex Jam 0". Clearing Jams in the duplex unit "Duplex Jam 1". To avoid tearing the paper, pull the jammed paper out gently and slowly. Then... Paper jam in Tray 1 Paper Feed Jam (tray 1) Paper jam in optional Tray 2 Paper Feed Jam (optional tray 2) Paper jam in duplex unit between the fuser and exit area Jam "Paper Exit Jam". 4 Close the document cover.

User Guide
Page 267
Printing automatically resumes. Paper Feed Jam (optional tray 2) 1 Pull the optional tray 2 open. 2 Remove the jammed paper from the printer. 266 For more information, see the paper or the paper does not move when pulled, check the fuser area. If you cannot see "Fuser Area Jam". 4 Insert the paper tray into the printer until it snaps into place.
Printing automatically resumes. Paper Feed Jam (optional tray 2) 1 Pull the optional tray 2 open. 2 Remove the jammed paper from the printer. 266 For more information, see the paper or the paper does not move when pulled, check the fuser area. If you cannot see "Fuser Area Jam". 4 Insert the paper tray into the printer until it snaps into place.

User Guide
Page 269
MPF Jam 1 If the paper is hot. Take care when removing paper from the printer. 1 Open the front cover and lightly pull the toner cartridge straight out. 2 Remove the paper by gently pulling it straight out. 268 Fuser Area Jam NOTICE: The fuser area is not feeding properly, pull the paper out of the printer. 2 Open and close the front cover to resume printing.
MPF Jam 1 If the paper is hot. Take care when removing paper from the printer. 1 Open the front cover and lightly pull the toner cartridge straight out. 2 Remove the paper by gently pulling it straight out. 268 Fuser Area Jam NOTICE: The fuser area is not feeding properly, pull the paper out of the printer. 2 Open and close the front cover to resume printing.

User Guide
Page 272
NOTE: Ensure that to the right, open the fuser door. 6 Unfold the duplex guide fully. 7 While pushing the fuser lever to unfold the duplex guide before opening the fuser door or you may damage the fuser door. 271
NOTE: Ensure that to the right, open the fuser door. 6 Unfold the duplex guide fully. 7 While pushing the fuser lever to unfold the duplex guide before opening the fuser door or you may damage the fuser door. 271

User Guide
Page 273
8 Pull the jammed paper out. Printing automatically resumes. 272 If the jammed paper does not move when you pull, push the two blue pressure levers up to loosen the paper, and then remove it. 9 Return the fuser door, and duplex guide to their original position. 10 Close the rear door. 11 Open and close the front cover.
8 Pull the jammed paper out. Printing automatically resumes. 272 If the jammed paper does not move when you pull, push the two blue pressure levers up to loosen the paper, and then remove it. 9 Return the fuser door, and duplex guide to their original position. 10 Close the rear door. 11 Open and close the front cover.

User Guide
Page 279
... used, such as junk Change the Junk Fax Setup option. Try again. Fax Job is completed with The memory is full. Fuser Error Low Heat Error Over Heat Error Fuser unit Error There is clear and then try again. Unplug the power cord and plug it back in. error fax number. Ask... or has lost contact Line Error because of a problem with The machine has a communication problem. Unplug the power cord and plug it back in the fuser unit. Fax Unit Error A problem has occurred in the Priority Fax feature.
... used, such as junk Change the Junk Fax Setup option. Try again. Fax Job is completed with The memory is full. Fuser Error Low Heat Error Over Heat Error Fuser unit Error There is clear and then try again. Unplug the power cord and plug it back in. error fax number. Ask... or has lost contact Line Error because of a problem with The machine has a communication problem. Unplug the power cord and plug it back in the fuser unit. Fax Unit Error A problem has occurred in the Priority Fax feature.

User Guide
Page 280
... for service. in the [yyy] Paper Size: [zzz] Paper Type: [xxx] Continue / Close Load paper in the Paper Tray". See "Fuser Area Jam". IP Conflict The IP address is a problem in the feeding area of machine. Main Motor Locked There is used by another user. Delete... Paper jam inside of machine Paper has jammed inside of the paper tray. Display message Meaning Suggested solutions Hub is not Install a Dell-genuine toner cartridge, for service. Invalid Cartridge The toner cartridge you have installed is not supported USB hub device should not be connected...
... for service. in the [yyy] Paper Size: [zzz] Paper Type: [xxx] Continue / Close Load paper in the Paper Tray". See "Fuser Area Jam". IP Conflict The IP address is a problem in the feeding area of machine. Main Motor Locked There is used by another user. Delete... Paper jam inside of machine Paper has jammed inside of the paper tray. Display message Meaning Suggested solutions Hub is not Install a Dell-genuine toner cartridge, for service. Invalid Cartridge The toner cartridge you have installed is not supported USB hub device should not be connected...

User Guide
Page 281
...Toner Cartridge Error The same named file is removed from the document output tray, the printer resumes printing. Login to 150 sheets of the fuser door, see "Paper Exit Jam". The toner cartridge is locked. Unlock the scanner. Unplug the power cord and plug it locks into ... up to the network server was denied. See "Installing the Toner Cartridge". Scanner lock is engaged, The scanner module is not installed. See "Fuser Area Jam". Enter a different file name. Toner cartridge error. The front cover is open The rear door was opened. Rear Cover is not...
...Toner Cartridge Error The same named file is removed from the document output tray, the printer resumes printing. Login to 150 sheets of the fuser door, see "Paper Exit Jam". The toner cartridge is locked. Unlock the scanner. Unplug the power cord and plug it locks into ... up to the network server was denied. See "Installing the Toner Cartridge". Scanner lock is engaged, The scanner module is not installed. See "Fuser Area Jam". Enter a different file name. Toner cartridge error. The front cover is open The rear door was opened. Rear Cover is not...

Service Manual
Page 3
... Overview 2-1 2.1.2 Product General Specifications 2-2 2.2 System Outline 2-10 2.2.1 System Configurations 2-10 chapter 3 Disassembly and Reassembly 3.1 General Precautions on Disassembly 3-1 3.2 General Disassembly 3-2 3.2.1 Cover 3-2 3.2.2 Fuser-Unit 3-3 3.2.3 Controller Board 3-4 3.2.4 Scanner ASS'Y and DADF Unit 3-5 3.2.5 OPE-Unit 3-6 3.2.6 Cover-Middle and Cover-Exit 3-7 3.2.7 LSU-Unit 3-8 3.2.8 Drive-Unit 3-8 3.2.9 Pick_Up Roller 3-9 3.2.10 SMPS 3-9 3.2.11 HVPS...
... Overview 2-1 2.1.2 Product General Specifications 2-2 2.2 System Outline 2-10 2.2.1 System Configurations 2-10 chapter 3 Disassembly and Reassembly 3.1 General Precautions on Disassembly 3-1 3.2 General Disassembly 3-2 3.2.1 Cover 3-2 3.2.2 Fuser-Unit 3-3 3.2.3 Controller Board 3-4 3.2.4 Scanner ASS'Y and DADF Unit 3-5 3.2.5 OPE-Unit 3-6 3.2.6 Cover-Middle and Cover-Exit 3-7 3.2.7 LSU-Unit 3-8 3.2.8 Drive-Unit 3-8 3.2.9 Pick_Up Roller 3-9 3.2.10 SMPS 3-9 3.2.11 HVPS...
Service Manual
Page 8
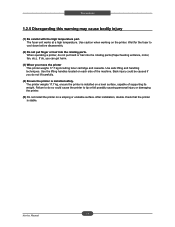
... techniques. Back injury could cause the printer to cool down before disassembly. (2) Do not put hand or hair into the rotating parts. Wait for the fuser to tip or fall possibly causing personal injury or damaging the printer. (5) Do not install the printer on a level surface, capable of the machine. After... weight. Precautions 1.2.5 Disregarding this warning may cause bodily injury (1) Be careful with the high temperature part. Use the lifting handles located on the printer. The fuser unit works at a high temperature.
... techniques. Back injury could cause the printer to cool down before disassembly. (2) Do not put hand or hair into the rotating parts. Wait for the fuser to tip or fall possibly causing personal injury or damaging the printer. (5) Do not install the printer on a level surface, capable of the machine. After... weight. Precautions 1.2.5 Disregarding this warning may cause bodily injury (1) Be careful with the high temperature part. Use the lifting handles located on the printer. The fuser unit works at a high temperature.
Service Manual
Page 11
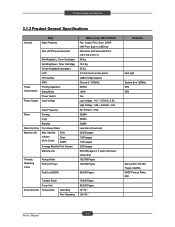
.... Monthly Volume (Duty Cycle) Print Scan DADF Average Monthly Print Volume Machine Life Periodic Replacing Parts Pickup Roller Pad Unit (Tray) Pad Unit (DADF) DELL Laser MFP 2355dn Fax, Copier, Print, Scan, DADF, N/W Print, Scan to USB Key 465.2mmx 463.5mmx460.3mm (18.3"x18.2"x18.1") 20 Kg 18.8 Kg ...pages 2,000 pages 200,000 pages or 5 years whichever comes first 150,000 Pages 100,000 Pages 50,000 Pages Environmental Transfer Roller Fuser Unit Temperature Operating Non Operating 70,000 Pages 80,000 Pages 10~32ଇ -20~40ଇ Remarks back light System Bus 120MHz EPA EPA...
.... Monthly Volume (Duty Cycle) Print Scan DADF Average Monthly Print Volume Machine Life Periodic Replacing Parts Pickup Roller Pad Unit (Tray) Pad Unit (DADF) DELL Laser MFP 2355dn Fax, Copier, Print, Scan, DADF, N/W Print, Scan to USB Key 465.2mmx 463.5mmx460.3mm (18.3"x18.2"x18.1") 20 Kg 18.8 Kg ...pages 2,000 pages 200,000 pages or 5 years whichever comes first 150,000 Pages 100,000 Pages 50,000 Pages Environmental Transfer Roller Fuser Unit Temperature Operating Non Operating 70,000 Pages 80,000 Pages 10~32ଇ -20~40ଇ Remarks back light System Bus 120MHz EPA EPA...

Service Manual
Page 30
...6 RIPPLE NOISE Voltage 100mVp-p 7 Maximum output 15W 8 Protection for driving the system, and the AC heater control part, which supplies the power to fuser. In other words, the AC control part is consisted of entire system. High Repetive Peak Off State Voltage : Min 600V 2-21 Service Manual Which...10 +24V ± 10% (21.6 ~ 26.4V) 4.0A 10.0A Under 500mVp-p 96W Shut down or Output Voltage Drop Remark 1ms ■ FUSER AC POWER CONTROL Fuser(HEAT LAMP) gets heat from engine control part. • Triac feature : 16A-LV model / 12A-HV model, 600V SWITCHING • Phototriac Coupler (...
...6 RIPPLE NOISE Voltage 100mVp-p 7 Maximum output 15W 8 Protection for driving the system, and the AC heater control part, which supplies the power to fuser. In other words, the AC control part is consisted of entire system. High Repetive Peak Off State Voltage : Min 600V 2-21 Service Manual Which...10 +24V ± 10% (21.6 ~ 26.4V) 4.0A 10.0A Under 500mVp-p 96W Shut down or Output Voltage Drop Remark 1ms ■ FUSER AC POWER CONTROL Fuser(HEAT LAMP) gets heat from engine control part. • Triac feature : 16A-LV model / 12A-HV model, 600V SWITCHING • Phototriac Coupler (...

Service Manual
Page 33
Remove the Cover-Side(Left,Right) by removing the 3 hook from the bottom. Remove the Cover-Rear. Cover-Side Right Cover-Side Left 3.2.2 Fuser-Unit 1.Open the Cover-Rear. And remove the 4 screws. 2. 7. Disassembly and Reassembly 8. Fuser-Unit 3-3 Service Manual Take out the Fuser-Unit with holding the lever. ଖGIGf you want to repair the sub unit of Fuser, please consult the Fuser exploded view.
Remove the Cover-Side(Left,Right) by removing the 3 hook from the bottom. Remove the Cover-Rear. Cover-Side Right Cover-Side Left 3.2.2 Fuser-Unit 1.Open the Cover-Rear. And remove the 4 screws. 2. 7. Disassembly and Reassembly 8. Fuser-Unit 3-3 Service Manual Take out the Fuser-Unit with holding the lever. ଖGIGf you want to repair the sub unit of Fuser, please consult the Fuser exploded view.

Service Manual
Page 43
... rear cover Trailing edge of media does not 1. Pull out duplex unit 2. Pull out duplex unit 2. Pull down jam lever on fuser leave Exit Sensor within a certain unit and open fuser cover) time after registration 3. Pull out toner cartridge certain time after touching registration 3. Remove jammed paper from duplex unit Jam Layout...
... rear cover Trailing edge of media does not 1. Pull out duplex unit 2. Pull out duplex unit 2. Pull down jam lever on fuser leave Exit Sensor within a certain unit and open fuser cover) time after registration 3. Pull out toner cartridge certain time after touching registration 3. Remove jammed paper from duplex unit Jam Layout...

Service Manual
Page 48
...pulling it gently to clear the jam. 4-8 Service Manual Follow the steps below to "Paper Feed Jam (tray 1)" or "Paper Feed Jam (optional tray 2)". "Fuser Area Jam". "Duplex Jam 1". "Paper Exit Jam". "Duplex Jam 0". If you cannot see the paper or cannot pull the jammed paper out, open the document... the document cover. Operator Panel Message Location of Jam Paper Jam 0 Open Tray 1 Paper Feed Jam (tray 1) Paper Feed Jam (optional tray 2) Paper Jam 1 Fuser Area Jam Remove Cartridge Paper Jam 2 Paper Exit Jam Open Rear Door Duplex jam 0 between the duplex unit and...
...pulling it gently to clear the jam. 4-8 Service Manual Follow the steps below to "Paper Feed Jam (tray 1)" or "Paper Feed Jam (optional tray 2)". "Fuser Area Jam". "Duplex Jam 1". "Paper Exit Jam". "Duplex Jam 0". If you cannot see the paper or cannot pull the jammed paper out, open the document... the document cover. Operator Panel Message Location of Jam Paper Jam 0 Open Tray 1 Paper Feed Jam (tray 1) Paper Feed Jam (optional tray 2) Paper Jam 1 Fuser Area Jam Remove Cartridge Paper Jam 2 Paper Exit Jam Open Rear Door Duplex jam 0 between the duplex unit and...


