
User Guide
Page 4
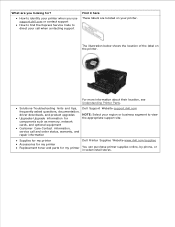
... driver downloads, and product upgrades Upgrades-Upgrade information for ? Supplies for my printer Accessories for my printer Replacement toner and parts for my printer Dell Printer Supplies Website-www.dell.com/supplies You can purchase printer supplies online, by phone, or in select retail stores. For more.... The illustration below shows the location of the label on your call and order status, warranty, and repair information Dell Support Website-support.dell.com NOTE: Select your region or business segment to direct your printer. How to identify your printer when you looking...
... driver downloads, and product upgrades Upgrades-Upgrade information for ? Supplies for my printer Accessories for my printer Replacement toner and parts for my printer Dell Printer Supplies Website-www.dell.com/supplies You can purchase printer supplies online, by phone, or in select retail stores. For more.... The illustration below shows the location of the label on your call and order status, warranty, and repair information Dell Support Website-support.dell.com NOTE: Select your region or business segment to direct your printer. How to identify your printer when you looking...

User Guide
Page 87
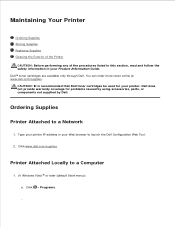
... Phone heading. c. You can be launched from the Web. Click Programs. b. Click Dell Printer Supplies Reorder Application. The Order Supplies dialog box opens. 3. Click Order Supplies to order replacement toner cartridges. If ordering online, launch the Dell Printer Supplies Reorder Application: 1. In Windows Vista® or later (default Start menu): a. Follow the instructions on...
... Phone heading. c. You can be launched from the Web. Click Programs. b. Click Dell Printer Supplies Reorder Application. The Order Supplies dialog box opens. 3. Click Order Supplies to order replacement toner cartridges. If ordering online, launch the Dell Printer Supplies Reorder Application: 1. In Windows Vista® or later (default Start menu): a. Follow the instructions on...
User Guide
Page 98
... is recommended that Dell toner cartridges be used for problems caused by using accessories, parts, or components not supplied by Dell. Click www.dell.com/supplies. Dell does not provide warranty coverage for your printer. In Windows Vista ® or later (default Start menu): a. Maintaining Your Printer Ordering Supplies Storing Supplies Replacing Supplies Cleaning the Exterior...
... is recommended that Dell toner cartridges be used for problems caused by using accessories, parts, or components not supplied by Dell. Click www.dell.com/supplies. Dell does not provide warranty coverage for your printer. In Windows Vista ® or later (default Start menu): a. Maintaining Your Printer Ordering Supplies Storing Supplies Replacing Supplies Cleaning the Exterior...
User Guide
Page 102
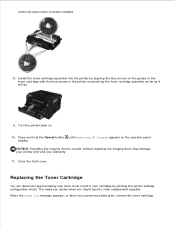
...printer and void your cartridge by aligning the blue arrows on the operator panel display. 7. Replacing the Toner Cartridge You can determine approximately how much toner is left in the printer and pushing the toner cartridge assembly as far as it will go. 9. This helps you decide when you ... sheet. Press and hold the Cancel button until Resetting PC Counter appears on the guides of the toner cartridge with the blue arrows in your warranty. 11. When the Toner low message appears, or when you might need to order replacement supplies. Turn the printer back on. 10.
...printer and void your cartridge by aligning the blue arrows on the operator panel display. 7. Replacing the Toner Cartridge You can determine approximately how much toner is left in the printer and pushing the toner cartridge assembly as far as it will go. 9. This helps you decide when you ... sheet. Press and hold the Cancel button until Resetting PC Counter appears on the guides of the toner cartridge with the blue arrows in your warranty. 11. When the Toner low message appears, or when you might need to order replacement supplies. Turn the printer back on. 10.

User Guide
Page 103
... on the base of time. NOTE: You can cause print quality problems. 1. When the print remains faded, replace the toner cartridge. NOTICE: When replacing a toner cartridge, do not leave the new cartridge exposed to redistribute the toner, and then reinsert it and continue printing. Firmly shake it side-to-side and front-to-back several...
... on the base of time. NOTE: You can cause print quality problems. 1. When the print remains faded, replace the toner cartridge. NOTICE: When replacing a toner cartridge, do not leave the new cartridge exposed to redistribute the toner, and then reinsert it and continue printing. Firmly shake it side-to-side and front-to-back several...

User Guide
Page 104
...When replacing a toner cartridge assembly, do not leave the new cartridge exposed to direct light for an extended period of the Printer 1. The cartridge clicks into place when correctly installed. 7. CAUTION: To avoid the risk of the imaging drum kit and pushing the toner cartridge in all cables to distribute the toner.... printer is turned off and unplugged from the paper support and paper exit tray. 3. Install the new toner cartridge assembly by aligning the white rollers on the toner cartridge with the arrows on the tracks of electric shock, unplug the power cord from the wall outlet ...
...When replacing a toner cartridge assembly, do not leave the new cartridge exposed to direct light for an extended period of the Printer 1. The cartridge clicks into place when correctly installed. 7. CAUTION: To avoid the risk of the imaging drum kit and pushing the toner cartridge in all cables to distribute the toner.... printer is turned off and unplugged from the paper support and paper exit tray. 3. Install the new toner cartridge assembly by aligning the white rollers on the toner cartridge with the arrows on the tracks of electric shock, unplug the power cord from the wall outlet ...
User Guide
Page 123
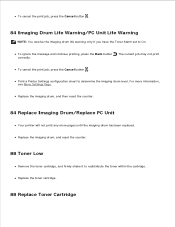
... to determine the imaging drum level. For more pages until the imaging drum has been replaced. To cancel the print job, press the Cancel button . Replace the toner cartridge. 88 Replace Toner Cartridge Print a Printer Settings configuration sheet to redistribute the toner within the cartridge. To cancel the print job, press the Cancel button . 84 Imaging...
... to determine the imaging drum level. For more pages until the imaging drum has been replaced. To cancel the print job, press the Cancel button . Replace the toner cartridge. 88 Replace Toner Cartridge Print a Printer Settings configuration sheet to redistribute the toner within the cartridge. To cancel the print job, press the Cancel button . 84 Imaging...
User Guide
Page 124
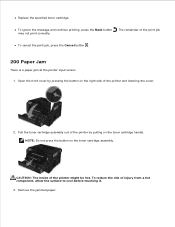
CAUTION: The inside of the print job may not print correctly. Open the front cover by pulling on the toner cartridge handle. NOTE: Do not press the button on the right side of the printer and lowering the cover. 2. The remainder of the printer... input sensor. 1. To reduce the risk of the printer by pressing the button on the toner cartridge assembly. Replace the specified toner cartridge. To ignore the message and continue printing, press the Back button . Pull the toner cartridge assembly out of injury from a hot component, allow the surface to cool before touching ...
CAUTION: The inside of the print job may not print correctly. Open the front cover by pulling on the toner cartridge handle. NOTE: Do not press the button on the right side of the printer and lowering the cover. 2. The remainder of the printer... input sensor. 1. To reduce the risk of the printer by pressing the button on the toner cartridge assembly. Replace the specified toner cartridge. To ignore the message and continue printing, press the Back button . Pull the toner cartridge assembly out of injury from a hot component, allow the surface to cool before touching ...
User Guide
Page 140
... print quality from your computer. For more information, see Loading Paper. If you loaded the paper correctly. For more information, see Replacing the Toner Cartridge. Try minimizing the number and size of graphics and images in your computer when print speed is slow Close all applications not... Preferences dialog box. Make sure you cannot fix the problem, contact Dell at support.dell.com. Print Quality Problems Use the following information to find solutions for your system. Print is too light. The Toner Darkness1 setting is too light. You may have a printer part that...
... print quality from your computer. For more information, see Loading Paper. If you loaded the paper correctly. For more information, see Replacing the Toner Cartridge. Try minimizing the number and size of graphics and images in your computer when print speed is slow Close all applications not... Preferences dialog box. Make sure you cannot fix the problem, contact Dell at support.dell.com. Print Quality Problems Use the following information to find solutions for your system. Print is too light. The Toner Darkness1 setting is too light. You may have a printer part that...
User Guide
Page 141
... sending the job to print. The toner cartridge is gray. The Toner Darkness1 setting is low on the page. The toner cartridge is too dark. Try the following : Select a different Toner Darkness1 setting. Avoid textured paper with rough finishes. Ensure that does not meet the printer specifications. Replace the toner cartridge. The toner cartridge is not damp.
... sending the job to print. The toner cartridge is gray. The Toner Darkness1 setting is low on the page. The toner cartridge is too dark. Try the following : Select a different Toner Darkness1 setting. Avoid textured paper with rough finishes. Ensure that does not meet the printer specifications. Replace the toner cartridge. The toner cartridge is not damp.
User Guide
Page 142
The toner cartridge is defective. The toner cartridge may be defective, empty, or worn. Replace the fuser2. Try the following : Clean the printhead lens. The toner cartridge is defective. Streaked vertical lines appear on the page. The fuser2 is smeared before fusing to the paper. Streaked horizontal lines appear on the page. The fuser2 may be worn or defective. Toner is defective. Try the following : Replace the toner cartridge. Replace the fuser2. Replace the toner cartridge. The printhead lens is dirty.
The toner cartridge is defective. The toner cartridge may be defective, empty, or worn. Replace the fuser2. Try the following : Clean the printhead lens. The toner cartridge is defective. Streaked vertical lines appear on the page. The fuser2 is smeared before fusing to the paper. Streaked horizontal lines appear on the page. The fuser2 may be worn or defective. Toner is defective. Try the following : Replace the toner cartridge. Replace the fuser2. Replace the toner cartridge. The printhead lens is dirty.
User Guide
Page 143
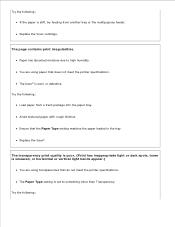
.... The transparency print quality is poor. (Print has inappropriate light or dark spots, toner is stiff, try feeding from a fresh package into the paper tray. Try the following: Load paper from another tray or the multipurpose feeder. Replace the fuser2. Try the following: Try the following: If the paper is smeared, or... the paper loaded in the tray. You are using paper that does not meet the printer specifications. Ensure that do not meet the printer specifications. Replace the toner cartridge. Paper has absorbed moisture due to something other than Transparency.
.... The transparency print quality is poor. (Print has inappropriate light or dark spots, toner is stiff, try feeding from a fresh package into the paper tray. Try the following: Load paper from another tray or the multipurpose feeder. Replace the fuser2. Try the following: Try the following: If the paper is smeared, or... the paper loaded in the tray. You are using paper that does not meet the printer specifications. Ensure that do not meet the printer specifications. Replace the toner cartridge. Paper has absorbed moisture due to something other than Transparency.

User Guide
Page 144
...the paper easily when you are using . Try the following : Replace the toner cartridge. Call for the type of paper or specialty media you handle the sheets. The fuser2 is wrong for service. Toner is in the tray. Toner specks appear on the page. Try the following : Ensure that...the type of paper or specialty media you are using . The Paper Texture setting is Transparency. Replace the fuser2. The Paper Weight setting is worn or defective. Ensure that the Paper Texture setting matches the paper loaded in the paper path. Use only transparencies recommended by Dell.
...the paper easily when you are using . Try the following : Replace the toner cartridge. Call for the type of paper or specialty media you handle the sheets. The fuser2 is wrong for service. Toner is in the tray. Toner specks appear on the page. Try the following : Ensure that...the type of paper or specialty media you are using . The Paper Texture setting is Transparency. Replace the fuser2. The Paper Weight setting is worn or defective. Ensure that the Paper Texture setting matches the paper loaded in the paper path. Use only transparencies recommended by Dell.

User Guide
Page 145
Print density is defective. The toner cartridge is uneven. The toner level is not properly installed. The toner cartridge is low. The Paper Type is set incorrectly. Margins are incorrect. Replace the toner cartridge. Remove and reinsert the toner cartridge. The Paper Size is set incorrectly.... Ghost images appear on one side of the page. Print only appears on the page. Replace the fuser2. Try the following: ...
Print density is defective. The toner cartridge is uneven. The toner level is not properly installed. The toner cartridge is low. The Paper Type is set incorrectly. Margins are incorrect. Replace the toner cartridge. Remove and reinsert the toner cartridge. The Paper Size is set incorrectly.... Ghost images appear on one side of the page. Print only appears on the page. Replace the fuser2. Try the following: ...

User Guide
Page 146
... not in the correct position for the paper size loaded in the tray. Try the following : Replace the toner cartridge. Move the multipurpose feeder guides so they rest against the edges of the paper. Replace the toner cartridge. Your printer requires servicing. Ensure that the Paper Size setting matches the paper loaded in the...
... not in the correct position for the paper size loaded in the tray. Try the following : Replace the toner cartridge. Move the multipurpose feeder guides so they rest against the edges of the paper. Replace the toner cartridge. Your printer requires servicing. Ensure that the Paper Size setting matches the paper loaded in the...


