
User Guide
Page 98
...caused by using accessories, parts, or components not supplied by Dell. Dell does not provide warranty coverage for your Product Information Guide. Maintaining Your Printer Ordering Supplies Storing Supplies Replacing Supplies Cleaning the Exterior of the Printer CAUTION: Before performing any of... the procedures listed in this section, read and follow the safety information in your Web browser to launch the Dell Configuration Web Tool. 2. Ordering Supplies...
...caused by using accessories, parts, or components not supplied by Dell. Dell does not provide warranty coverage for your Product Information Guide. Maintaining Your Printer Ordering Supplies Storing Supplies Replacing Supplies Cleaning the Exterior of the Printer CAUTION: Before performing any of... the procedures listed in this section, read and follow the safety information in your Web browser to launch the Dell Configuration Web Tool. 2. Ordering Supplies...
User Guide
Page 101
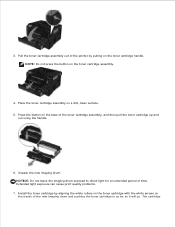
... aligning the white rollers on the toner cartridge with the white arrows on the base of time. NOTE: Do not press the button on a flat, clean surface. 5. 2. 3.
... aligning the white rollers on the toner cartridge with the white arrows on the base of time. NOTE: Do not press the button on a flat, clean surface. 5. 2. 3.

User Guide
Page 104
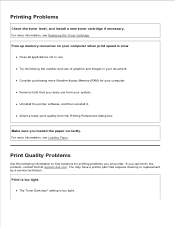
Cleaning the Exterior of the imaging drum kit and pushing the toner cartridge in all cables to distribute the toner. 6. Extended light exposure can cause print ...
Cleaning the Exterior of the imaging drum kit and pushing the toner cartridge in all cables to distribute the toner. 6. Extended light exposure can cause print ...

User Guide
Page 105
NOTICE: Using a damp cloth to clean the interior may damage the finish of the printer, making sure to remove any ink residue that has accumulated on the paper exit tray. 2. 3. Damage to your printer. Make sure the paper support and paper exit tray are dry before beginning a new print job. NOTICE: Do not use household cleaners or detergents, as they may cause damage to the printer caused by not following the correct instructions for cleaning will not be covered under warranty. 5. Dampen a clean, lint-free cloth with water. Wipe only the outside of the printer. 4.
NOTICE: Using a damp cloth to clean the interior may damage the finish of the printer, making sure to remove any ink residue that has accumulated on the paper exit tray. 2. 3. Damage to your printer. Make sure the paper support and paper exit tray are dry before beginning a new print job. NOTICE: Do not use household cleaners or detergents, as they may cause damage to the printer caused by not following the correct instructions for cleaning will not be covered under warranty. 5. Dampen a clean, lint-free cloth with water. Wipe only the outside of the printer. 4.
User Guide
Page 140
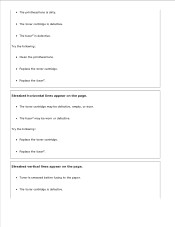
...a new toner cartridge if necessary. For more Random Access Memory (RAM) for printing problems you cannot fix the problem, contact Dell at support.dell.com. Consider purchasing more information, see Loading Paper. Uninstall the printer software, and then reinstall it. Print Quality Problems Use .... Try minimizing the number and size of graphics and images in use from the Printing Preferences dialog box. Remove fonts that requires cleaning or replacement by a service technician. Select a lower print quality from your computer. The Toner Darkness1 setting is too light. If...
...a new toner cartridge if necessary. For more Random Access Memory (RAM) for printing problems you cannot fix the problem, contact Dell at support.dell.com. Consider purchasing more information, see Loading Paper. Uninstall the printer software, and then reinstall it. Print Quality Problems Use .... Try minimizing the number and size of graphics and images in use from the Printing Preferences dialog box. Remove fonts that requires cleaning or replacement by a service technician. Select a lower print quality from your computer. The Toner Darkness1 setting is too light. If...
User Guide
Page 142
Streaked horizontal lines appear on the page. The toner cartridge is defective. Replace the toner cartridge. Streaked vertical lines appear on the page. The fuser2 is defective. The fuser2 may be worn or defective. Toner is defective. The toner cartridge is smeared before fusing to the paper. The toner cartridge may be defective, empty, or worn. Try the following : Replace the toner cartridge. Try the following : Clean the printhead lens. Replace the fuser2. Replace the fuser2. The printhead lens is dirty.
Streaked horizontal lines appear on the page. The toner cartridge is defective. Replace the toner cartridge. Streaked vertical lines appear on the page. The fuser2 is defective. The fuser2 may be worn or defective. Toner is defective. The toner cartridge is smeared before fusing to the paper. The toner cartridge may be defective, empty, or worn. Try the following : Replace the toner cartridge. Try the following : Clean the printhead lens. Replace the fuser2. Replace the fuser2. The printhead lens is dirty.


