
User's Guide (HTML)
Page 10
...Control Panel. Double-click Printers and Faxes. Double-click the printer you want to stop the current print job. From Your Computer 1. Click Printers. In Windows XP (Classic Start menu): Click Start® Settings® Printers and Faxes. In Windows...print jobs appears. 3. Right-click the document you are using to print the job. c. In Windows Vista (Classic Start menu) and all other Windows versions: Click Start® Settings® Printers. 2. Click Hardware and Sound. b. Canceling a Print Job From the Printer Operator Panel Press the Cancel button twice to stop printing...
...Control Panel. Double-click Printers and Faxes. Double-click the printer you want to stop the current print job. From Your Computer 1. Click Printers. In Windows XP (Classic Start menu): Click Start® Settings® Printers and Faxes. In Windows...print jobs appears. 3. Right-click the document you are using to print the job. c. In Windows Vista (Classic Start menu) and all other Windows versions: Click Start® Settings® Printers. 2. Click Hardware and Sound. b. Canceling a Print Job From the Printer Operator Panel Press the Cancel button twice to stop printing...
User's Guide (HTML)
Page 13
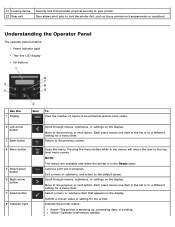
... value or setting for the printer. Yellow-Operator intervention needed. Pressing the menu button while in the list or to exit the printer flat, such as error codes. 2 Left arrow button 3 Back button 4 Menu button 5 Stop/Cancel button 6 Right arrow button 7 Select button 8 Indicator light Scroll through menus, submenus, or settings on the display. Door allows print jobs to a different setting...
... value or setting for the printer. Yellow-Operator intervention needed. Pressing the menu button while in the list or to exit the printer flat, such as error codes. 2 Left arrow button 3 Back button 4 Menu button 5 Stop/Cancel button 6 Right arrow button 7 Select button 8 Indicator light Scroll through menus, submenus, or settings on the display. Door allows print jobs to a different setting...
User's Guide (HTML)
Page 17
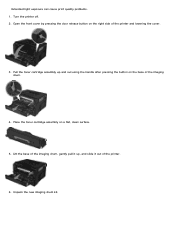
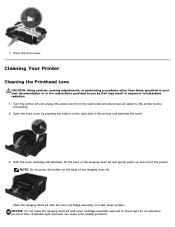
Place the toner cartridge assembly on the base of the printer and lowering the cover. 3. Unpack the new imaging drum kit. Open the front cover by pressing the door release button on the right side of the imaging drum. 4. Pull the toner cartridge assembly up , and slide it up and out using the handle after pressing the button on a flat, clean surface. 5. Lift the base of the imaging drum, gently pull it out of the printer. 6. Turn the printer off. 2. Extended light exposure can cause print quality problems. 1.
Place the toner cartridge assembly on the base of the printer and lowering the cover. 3. Unpack the new imaging drum kit. Open the front cover by pressing the door release button on the right side of the imaging drum. 4. Pull the toner cartridge assembly up , and slide it up and out using the handle after pressing the button on a flat, clean surface. 5. Lift the base of the imaging drum, gently pull it out of the printer. 6. Turn the printer off. 2. Extended light exposure can cause print quality problems. 1.
User's Guide (HTML)
Page 19
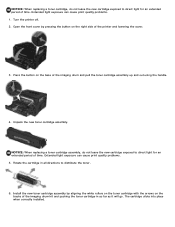
Unpack the new toner cartridge assembly. Extended light exposure can cause print quality problems. 1. Install the new toner cartridge assembly by pressing the button on the right side of the printer and lowering the cover. 3. Press the button on the tracks of the imaging drum kit and pushing the toner cartridge in all directions to distribute the...
Unpack the new toner cartridge assembly. Extended light exposure can cause print quality problems. 1. Install the new toner cartridge assembly by pressing the button on the right side of the printer and lowering the cover. 3. Press the button on the tracks of the imaging drum kit and pushing the toner cartridge in all directions to distribute the...
User's Guide (HTML)
Page 20
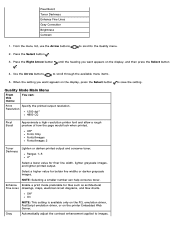
... Dell may result in exposure to the printer before proceeding. 2. Cleaning Your Printer Cleaning the Printhead Lens CAUTION: Using controls, making adjustments, or performing procedures other than those specified in your user documentation or in the instructions provided to you by pressing the button ...printer off and unplug the power cord from the wall outlet and disconnect all cables to hazardous radiation. 1. Extended light exposure can cause print quality problems. 7. Place the imaging drum kit with the toner cartridge assembly on the base of time. NOTE: Do not press the button...
... Dell may result in exposure to the printer before proceeding. 2. Cleaning Your Printer Cleaning the Printhead Lens CAUTION: Using controls, making adjustments, or performing procedures other than those specified in your user documentation or in the instructions provided to you by pressing the button ...printer off and unplug the power cord from the wall outlet and disconnect all cables to hazardous radiation. 1. Extended light exposure can cause print quality problems. 7. Place the imaging drum kit with the toner cartridge assembly on the base of time. NOTE: Do not press the button...

User's Guide (HTML)
Page 24
...print jobs. Press the Select button . 3. Press the Right Arrow button . Paper Mode Main Menu From this menu: You can: Default Source Set a default paper source for each of the listed Default Source option under Tray Configuration. If a print job requests a size or type that is only loaded in the multipurpose feeder, the printer pulls print... Setup Units of the multipurpose feeder. When the setting you want appears on the display, press the Select button to save the setting. Configure Determine when the printer selects paper from the multipurpose feeder for the job.
...print jobs. Press the Select button . 3. Press the Right Arrow button . Paper Mode Main Menu From this menu: You can: Default Source Set a default paper source for each of the listed Default Source option under Tray Configuration. If a print job requests a size or type that is only loaded in the multipurpose feeder, the printer pulls print... Setup Units of the multipurpose feeder. When the setting you want appears on the display, press the Select button to save the setting. Configure Determine when the printer selects paper from the multipurpose feeder for the job.

User's Guide (HTML)
Page 30
... information (e.g., serial number, model name, etc.). Press the Right Arrow button . The page displays specific details about the devices: Standard Network Card Integrated Network Option Settings TCP/IP IPv6 NOTE: The Compi: field that are stored in the printer. Print Fonts Print a sample of all menus Cartridge information List of the device's Display. NOTE: The...
... information (e.g., serial number, model name, etc.). Press the Right Arrow button . The page displays specific details about the devices: Standard Network Card Integrated Network Option Settings TCP/IP IPv6 NOTE: The Compi: field that are stored in the printer. Print Fonts Print a sample of all menus Cartridge information List of the device's Display. NOTE: The...

User's Guide (HTML)
Page 31
... Use the Network menu to PostScript emulation when a print job requires it , regardless of the default printer language. Press the Select button . 3. When the setting you want appears on the display, and then press the Select button 4. Network Mode Main Menu From this menu: You... the Arrow buttons to the printer and query printer status information simultaneously. Press the Right Arrow button . On* Off NPA Mode Send print jobs to scroll the Network menu. 2. until the heading you want appears on the display, press the Select button to PCL emulation when a print job requires...
... Use the Network menu to PostScript emulation when a print job requires it , regardless of the default printer language. Press the Select button . 3. When the setting you want appears on the display, and then press the Select button 4. Network Mode Main Menu From this menu: You... the Arrow buttons to the printer and query printer status information simultaneously. Press the Right Arrow button . On* Off NPA Mode Send print jobs to scroll the Network menu. 2. until the heading you want appears on the display, press the Select button to PCL emulation when a print job requires...

User's Guide (HTML)
Page 32
...Dell 3300 Wireless Print Adapter (Sold separately). On* Off * Factory default setting USB Mode Mode Mode Main Menu USB PCL SmartSwitch PS SmartSwitch NPA Mode USB Buffer MAC Binary PS USB With ENA NOTE: Applicable only to scroll through a USB port. 1. Press the Right Arrow button . Off On Auto* Standard Network Setup Define basic printer...Buffer Assign a size to PCL emulation when a print job SmartSwitch requires it, regardless of the default printer language. until the heading you want appears on the display, press the Select button to save the setting. Auto* Disabled 3K to...
...Dell 3300 Wireless Print Adapter (Sold separately). On* Off * Factory default setting USB Mode Mode Mode Main Menu USB PCL SmartSwitch PS SmartSwitch NPA Mode USB Buffer MAC Binary PS USB With ENA NOTE: Applicable only to scroll through a USB port. 1. Press the Right Arrow button . Off On Auto* Standard Network Setup Define basic printer...Buffer Assign a size to PCL emulation when a print job SmartSwitch requires it, regardless of the default printer language. until the heading you want appears on the display, press the Select button to save the setting. Auto* Disabled 3K to...

User's Guide (HTML)
Page 34
... PS Parallel With ENA Use the Parallel menu to change printer settings on the display, press the Select button to save the setting. From the menu list, use the Arrow buttons to the parallel input buffer. On* Off NPA Mode Send print jobs to the printer and query printer status information at a normal transmission rate if the...
... PS Parallel With ENA Use the Parallel menu to change printer settings on the display, press the Select button to save the setting. From the menu list, use the Arrow buttons to the parallel input buffer. On* Off NPA Mode Send print jobs to the printer and query printer status information at a normal transmission rate if the...

User's Guide (HTML)
Page 36
...press the Select button 4. Press the Select button . 3. Press the Right Arrow button . Alarm control Off Single* Continuous until the heading you want appears on the display, press the Select button... to the General Settings menu. 2. English* Arabic Brazilian Portuguese Czech Danish Dutch Finnish French German Greek Hebrew Iberian Portuguese Italian Japanese (Kanji) Norwegian Polish Russian Simplified Chinese Spanish Swedish Turkish Run Initial Setup Launch a setup wizard when the printer...Use the Arrow buttons to sound when the printer requires operator ...
...press the Select button 4. Press the Select button . 3. Press the Right Arrow button . Alarm control Off Single* Continuous until the heading you want appears on the display, press the Select button... to the General Settings menu. 2. English* Arabic Brazilian Portuguese Czech Danish Dutch Finnish French German Greek Hebrew Iberian Portuguese Italian Japanese (Kanji) Norwegian Polish Russian Simplified Chinese Spanish Swedish Turkish Run Initial Setup Launch a setup wizard when the printer...Use the Arrow buttons to sound when the printer requires operator ...

User's Guide (HTML)
Page 38
... want appears on the display, and then press the Select button 4. Setup Mode Main Menu Setup Mode Main Menu Printer Language Print Area Download Target Resource Save 1. Press the Select button . 3. Press the Right Arrow button . It then deletes those resources associated with the inactive printer language. until memory is needed. If the printer runs out of a line depending on...
... want appears on the display, and then press the Select button 4. Setup Mode Main Menu Setup Mode Main Menu Printer Language Print Area Download Target Resource Save 1. Press the Select button . 3. Press the Right Arrow button . It then deletes those resources associated with the inactive printer language. until memory is needed. If the printer runs out of a line depending on...

User's Guide (HTML)
Page 39
... the back of the page is oriented in relation to save the setting. Press the Select button . 3. Use the Arrow buttons to the Finishing menu. 2. Do Not Print* Print Collation Stack the pages of copies for all print jobs. 1. until the heading you want appears on the front of the page. Finishing Mode Main Menu From...
... the back of the page is oriented in relation to save the setting. Press the Select button . 3. Use the Arrow buttons to the Finishing menu. 2. Do Not Print* Print Collation Stack the pages of copies for all print jobs. 1. until the heading you want appears on the front of the page. Finishing Mode Main Menu From...
User's Guide (HTML)
Page 41
... Boost Approximate a high-resolution printer font and allow a rough preview of how the page would look when printed. Ranges 1-5 4* Select a lower value for bolder line widths or darker grayscale images. Use the Arrow buttons to images. When the setting you want appears on the display, and then press the Select button 4. Off* On NOTE: This...
... Boost Approximate a high-resolution printer font and allow a rough preview of how the page would look when printed. Ranges 1-5 4* Select a lower value for bolder line widths or darker grayscale images. Use the Arrow buttons to images. When the setting you want appears on the display, and then press the Select button 4. Off* On NOTE: This...
User's Guide (HTML)
Page 42
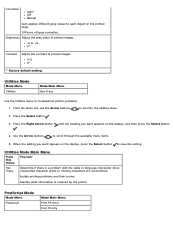
... display, and then press the Select button 4. Utilities Mode Main Menu From this menu: You can: Hex Trace Determine if there is a problem with the cable or language interpreter when unexpected character prints or missing characters are encountered Isolate printing problems and their source Identify what information is received by the printer PostScript Mode Mode...
... display, and then press the Select button 4. Utilities Mode Main Menu From this menu: You can: Hex Trace Determine if there is a problem with the cable or language interpreter when unexpected character prints or missing characters are encountered Isolate printing problems and their source Identify what information is received by the printer PostScript Mode Mode...
User's Guide (HTML)
Page 57
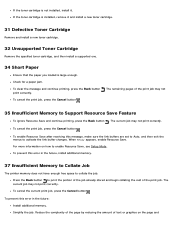
...printing, press the Back button . To enable Resource Save after receiving this message, make sure the link buffers are set to Auto, and then exit the menus to collate the job. To prevent this error in the future, install additional memory. 37 Insufficient Memory to Collate Job The printer... memory does not have enough free space to activate the link buffer changes. Press the Back button to enable Resource Save, see Setup Mode. To cancel the current print job, press the Cancel button . To cancel the print job, press the Cancel button . If the toner ...
...printing, press the Back button . To enable Resource Save after receiving this message, make sure the link buffers are set to Auto, and then exit the menus to collate the job. To prevent this error in the future, install additional memory. 37 Insufficient Memory to Collate Job The printer... memory does not have enough free space to activate the link buffer changes. Press the Back button to enable Resource Save, see Setup Mode. To cancel the current print job, press the Cancel button . To cancel the print job, press the Cancel button . If the toner ...

User's Guide (HTML)
Page 58
...: Simplify the job. Install additional memory. 39 Complex Page, Some Data May Not Have Printed Press the Back button to reset the printer. To cancel the print job, press the Cancel button . 56 Standard Parallel Port Disabled To cancel the print job, press the Cancel button . To prevent this error in the future: Simplify the job. The remainder of texts...
...: Simplify the job. Install additional memory. 39 Complex Page, Some Data May Not Have Printed Press the Back button to reset the printer. To cancel the print job, press the Cancel button . 56 Standard Parallel Port Disabled To cancel the print job, press the Cancel button . To prevent this error in the future: Simplify the job. The remainder of texts...

User's Guide (HTML)
Page 59
...ignore the message and continue printing, press the Back button . Ensure that the Parallel Buffer menu item is not set to clear. Remove the excess trays. To ignore the message and continue printing, press the Back button . The current job may not print correctly. Your printer supports up to 160 MB ...for a non-network printer and 288 MB for the message to Disabled. Turn the printer back on . 81 Engine Code CRC Failure To...
...ignore the message and continue printing, press the Back button . Ensure that the Parallel Buffer menu item is not set to clear. Remove the excess trays. To ignore the message and continue printing, press the Back button . The current job may not print correctly. Your printer supports up to 160 MB ...for a non-network printer and 288 MB for the message to Disabled. Turn the printer back on . 81 Engine Code CRC Failure To...
User's Guide (HTML)
Page 60
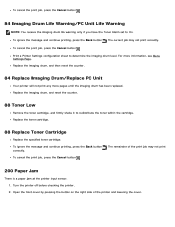
... by pressing the button on the right side of the print job may not print correctly. Print a Printer Settings configuration sheet to On. Turn the printer off before checking the printer. 2. To cancel the print job, press the Cancel button . ...For more pages until the imaging drum has been replaced. Replace the imaging drum, and reset the counter. 88 Toner Low Remove the toner cartridge, and firmly shake it to redistribute the toner within the cartridge. To ignore the message and continue printing, press the Back button...
... by pressing the button on the right side of the print job may not print correctly. Print a Printer Settings configuration sheet to On. Turn the printer off before checking the printer. 2. To cancel the print job, press the Cancel button . ...For more pages until the imaging drum has been replaced. Replace the imaging drum, and reset the counter. 88 Toner Low Remove the toner cartridge, and firmly shake it to redistribute the toner within the cartridge. To ignore the message and continue printing, press the Back button...

User's Guide (HTML)
Page 82
For more information, contact Dell at support.dell.com. If your printer off and back on again. If you are able to print, press the Menu button to print a menu settings page, which lists the printer model type and other information the service representative may need to know. Try turning your printer is still not operating properly, call for service. Is the printer cover closed properly?
For more information, contact Dell at support.dell.com. If your printer off and back on again. If you are able to print, press the Menu button to print a menu settings page, which lists the printer model type and other information the service representative may need to know. Try turning your printer is still not operating properly, call for service. Is the printer cover closed properly?


