User Manual
Page 24
FILE LOCATION: C:\Users\fxstdpc-admin\Desktop\0630_UG??\Mioga_AIO_UG_FM\Mioga_AIO _UG_FM\Mioga-AIO-UGTOC.fm Clearing Paper Jams From the Fuser 672 Clearing Paper Jams From the Duplexer 676 Clearing Paper Jams From the Optional 250-Sheet Feeder 677 Troubleshooting 683 31 Troubleshooting Guide 685 Basic ...
FILE LOCATION: C:\Users\fxstdpc-admin\Desktop\0630_UG??\Mioga_AIO_UG_FM\Mioga_AIO _UG_FM\Mioga-AIO-UGTOC.fm Clearing Paper Jams From the Fuser 672 Clearing Paper Jams From the Duplexer 676 Clearing Paper Jams From the Optional 250-Sheet Feeder 677 Troubleshooting 683 31 Troubleshooting Guide 685 Basic ...

User Manual
Page 42
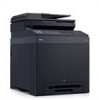
PRE LIMINARY 9/13/10 - FILE LOCATION: C:\Users\fxstdpcadmin\Desktop\0630_UG??\Mioga_AIO_UG_FM\Mioga_AIO_UG_FM\section04.fm Front and Rear View Front View 1 Automatic Document Feeder 7 Duplexer (2155cdn only) (ADF) 2 Side Button 8 Optional 250-Sheet Feeder 3 Power Switch 4 Toner Access Cover (toner cartridges inside) 5 Fuser 9 Standard 250-Sheet Tray 10 Single Sheet Feeder (SSF) 11 Front Cover NOTE: You can open the front cover by pushing the side button (2). FOR PROOF ONLY 40 About the Printer DE LL CONFIDENTIAL -
PRE LIMINARY 9/13/10 - FILE LOCATION: C:\Users\fxstdpcadmin\Desktop\0630_UG??\Mioga_AIO_UG_FM\Mioga_AIO_UG_FM\section04.fm Front and Rear View Front View 1 Automatic Document Feeder 7 Duplexer (2155cdn only) (ADF) 2 Side Button 8 Optional 250-Sheet Feeder 3 Power Switch 4 Toner Access Cover (toner cartridges inside) 5 Fuser 9 Standard 250-Sheet Tray 10 Single Sheet Feeder (SSF) 11 Front Cover NOTE: You can open the front cover by pushing the side button (2). FOR PROOF ONLY 40 About the Printer DE LL CONFIDENTIAL -
User Manual
Page 194
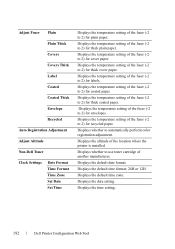
... date format. Displays the default time zone. Displays the temperature setting of the fuser (-2 to 2) for thick plain paper. Displays the date setting. Displays the temperature setting of the fuser (-2 to 2) for envelopes. Displays the time setting. 192 Dell Printer Configuration Web Tool Displays whether to automatically perform color registration adjustment. Displays the...
... date format. Displays the default time zone. Displays the temperature setting of the fuser (-2 to 2) for thick plain paper. Displays the date setting. Displays the temperature setting of the fuser (-2 to 2) for envelopes. Displays the time setting. 192 Dell Printer Configuration Web Tool Displays whether to automatically perform color registration adjustment. Displays the...
User Manual
Page 211
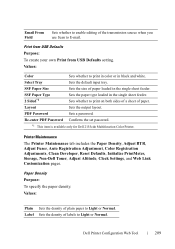
...sheet feeder. Select Tray Sets the default input tray. Values: Plain Sets the density of labels to Light or Normal. Dell Printer Configuration Web Tool 209 Layout Sets the output layout. PDF Password Sets a password. Label Sets the density of .... Printer Maintenance The Printer Maintenance tab includes the Paper Density, Adjust BTR, Adjust Fuser, Auto Registration Adjustment, Color Registration Adjustments, Clean Developer, Reset Defaults, Initialize PrintMeter, Storage, Non-Dell Toner, Adjust Altitude, Clock Settings, and Web Link Customization pages. SSF Paper Size...
...sheet feeder. Select Tray Sets the default input tray. Values: Plain Sets the density of labels to Light or Normal. Dell Printer Configuration Web Tool 209 Layout Sets the output layout. PDF Password Sets a password. Label Sets the density of .... Printer Maintenance The Printer Maintenance tab includes the Paper Density, Adjust BTR, Adjust Fuser, Auto Registration Adjustment, Color Registration Adjustments, Clean Developer, Reset Defaults, Initialize PrintMeter, Storage, Non-Dell Toner, Adjust Altitude, Clock Settings, and Web Link Customization pages. SSF Paper Size...
User Manual
Page 212
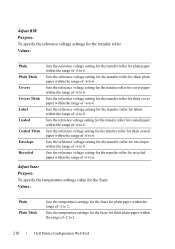
...range of -6 to 6. Sets the reference voltage setting for the transfer roller for labels within the range of -6 to 6. Adjust Fuser Purpose: To specify the temperature settings value for the transfer roller. Sets the reference voltage setting for the transfer roller for recycled paper... within the range of -6 to 2. 210 Dell Printer Configuration Web Tool Sets the reference voltage setting for the transfer roller for thick cover paper within the range of -6 to ...
...range of -6 to 6. Sets the reference voltage setting for the transfer roller for labels within the range of -6 to 6. Adjust Fuser Purpose: To specify the temperature settings value for the transfer roller. Sets the reference voltage setting for the transfer roller for recycled paper... within the range of -6 to 2. 210 Dell Printer Configuration Web Tool Sets the reference voltage setting for the transfer roller for thick cover paper within the range of -6 to ...
User Manual
Page 213
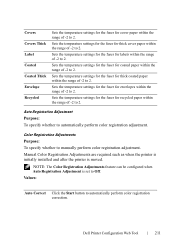
... Sets the temperature settings for the fuser for labels within the range of -2 to 2. Covers Covers Thick Label Coated Coated Thick Envelope Recycled Sets the temperature settings for the fuser for cover paper within the range of -2 to 2. Dell Printer Configuration Web Tool 211 Sets... the temperature settings for the fuser for thick cover paper within the range of -2 to automatically perform color...
... Sets the temperature settings for the fuser for labels within the range of -2 to 2. Covers Covers Thick Label Coated Coated Thick Envelope Recycled Sets the temperature settings for the fuser for cover paper within the range of -2 to 2. Dell Printer Configuration Web Tool 211 Sets... the temperature settings for the fuser for thick cover paper within the range of -2 to automatically perform color...
User Manual
Page 265
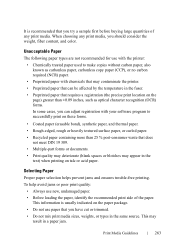
To help avoid jams or poor print quality: • Always use paper that you can be affected by the temperature in the fuser. • Preprinted paper that requires a registration (the precise print location on the page) greater than 25 % post-consumer waste that does not meet DIN 19 ...
To help avoid jams or poor print quality: • Always use paper that you can be affected by the temperature in the fuser. • Preprinted paper that requires a registration (the precise print location on the page) greater than 25 % post-consumer waste that does not meet DIN 19 ...

User Manual
Page 266
FILE LOCATION: C:\Users\fxstdpcadmin\Desktop\0630_UG??\Mioga_AIO_UG_FM\Mioga_AIO_UG_FM\section14.fm • Do not remove the tray while printing is properly loaded in the fuser. Selecting Pre-Printed Media and Letterheads When selecting pre-printed and letterhead paper for the printer: • Use grain long paper for the printer: • ...
FILE LOCATION: C:\Users\fxstdpcadmin\Desktop\0630_UG??\Mioga_AIO_UG_FM\Mioga_AIO_UG_FM\section14.fm • Do not remove the tray while printing is properly loaded in the fuser. Selecting Pre-Printed Media and Letterheads When selecting pre-printed and letterhead paper for the printer: • Use grain long paper for the printer: • ...
User Manual
Page 467
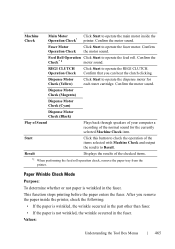
...Wrinkle Check Mode Purpose: To determine whether or not paper is not wrinkled, the wrinkle occurred in the fuser. Values: Understanding the Tool Box Menus 465 Confirm the motor sound. Fuser Motor Operation Check Click Start to operate the main motor inside the printer, check the following: •...; If the paper is wrinkled, the wrinkle occurred in the part other than fuser. • If the paper is wrinkled in the fuser. This function stops printing before the paper enters the fuser. Confirm the motor sound. Confirm the motor sound. Feed Roll Operation Click Start to...
...Wrinkle Check Mode Purpose: To determine whether or not paper is not wrinkled, the wrinkle occurred in the fuser. Values: Understanding the Tool Box Menus 465 Confirm the motor sound. Fuser Motor Operation Check Click Start to operate the main motor inside the printer, check the following: •...; If the paper is wrinkled, the wrinkle occurred in the part other than fuser. • If the paper is wrinkled in the fuser. This function stops printing before the paper enters the fuser. Confirm the motor sound. Confirm the motor sound. Feed Roll Operation Click Start to...
User Manual
Page 516
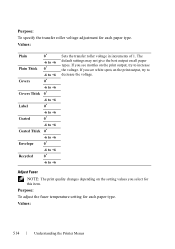
... setting for each paper type. If you select for this item. Adjust Fuser NOTE: The print quality changes depending on the setting values you see white spots on the print output, try to increase the voltage. The default ...
... setting for each paper type. If you select for this item. Adjust Fuser NOTE: The print quality changes depending on the setting values you see white spots on the print output, try to increase the voltage. The default ...
User Manual
Page 517
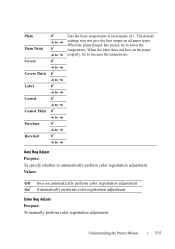
... the printed paper has curled, try to lower the temperature. Understanding the Printer Menus 515 Auto Reg Adjust Purpose: To specify whether to +6 Sets the fuser temperature in increments of 1. Plain Plain Thick Covers Covers Thick Label Coated Coated Thick Envelope Recycled 0* -6 to +6 0* -6 to +6 0* -6 to +6 0* -6 to +6 0* -6 to +6 0* -6 to +6 0* -6 to +6 0* -6 to +6 0* -6 to...
... the printed paper has curled, try to lower the temperature. Understanding the Printer Menus 515 Auto Reg Adjust Purpose: To specify whether to +6 Sets the fuser temperature in increments of 1. Plain Plain Thick Covers Covers Thick Label Coated Coated Thick Envelope Recycled 0* -6 to +6 0* -6 to +6 0* -6 to +6 0* -6 to +6 0* -6 to +6 0* -6 to +6 0* -6 to +6 0* -6 to +6 0* -6 to...
User Manual
Page 592
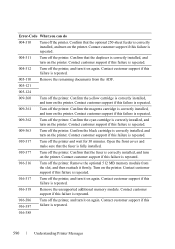
Confirm the magenta cartridge is correctly installed, and turn on the printer. Confirm that the fuser is repeated. 016-316 Turn off the printer. Remove the optional 512 MB memory module from the ADF. 005-121 005-124 009-360 Turn ... printer. Contact customer support if this failure is fully installed. 010-377 Turn off the printer. Open the front cover and make sure that the fuser is correctly installed, and turn on the printer. Contact customer support if this failure is repeated. 009-362 Turn off the printer and wait for...
Confirm the magenta cartridge is correctly installed, and turn on the printer. Confirm that the fuser is repeated. 016-316 Turn off the printer. Remove the optional 512 MB memory module from the ADF. 005-121 005-124 009-360 Turn ... printer. Contact customer support if this failure is fully installed. 010-377 Turn off the printer. Open the front cover and make sure that the fuser is correctly installed, and turn on the printer. Contact customer support if this failure is repeated. 009-362 Turn off the printer and wait for...

User Manual
Page 662
...\fxstdpcadmin\Desktop\0630_UG??\Mioga_AIO_UG_FM\Mioga_AIO_UG_FM\section30.fm • Overtightening the guides may occur along the print media path. 1 Automatic Document Feeder (ADF) 2 Duplexer (2155cdn only) 3 Fuser 4 Optional 250-Sheet Feeder DE LL CONFIDENTIAL - PRE LIMINARY 9/13/10 - FOR PROOF ONLY 660 Clearing Jams Identifying the Location of Paper Jams CAUTION: Do...
...\fxstdpcadmin\Desktop\0630_UG??\Mioga_AIO_UG_FM\Mioga_AIO_UG_FM\section30.fm • Overtightening the guides may occur along the print media path. 1 Automatic Document Feeder (ADF) 2 Duplexer (2155cdn only) 3 Fuser 4 Optional 250-Sheet Feeder DE LL CONFIDENTIAL - PRE LIMINARY 9/13/10 - FOR PROOF ONLY 660 Clearing Jams Identifying the Location of Paper Jams CAUTION: Do...
User Manual
Page 674
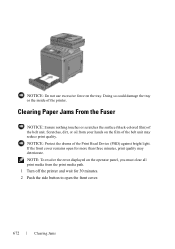
... print media path. 1 Turn off the printer and wait for more than three minutes, print quality may reduce print quality. Clearing Paper Jams From the Fuser NOTICE: Ensure nothing touches or scratches the surface (black-colored film) of the Print Head Device (PHD) against bright light. If the front cover remains...
... print media path. 1 Turn off the printer and wait for more than three minutes, print quality may reduce print quality. Clearing Paper Jams From the Fuser NOTICE: Ensure nothing touches or scratches the surface (black-colored film) of the Print Head Device (PHD) against bright light. If the front cover remains...

User Manual
Page 675
P R E L I M I A L - If you are still unable to remove the paper, go to the next step. D E L L C ON F I D E N T I N A RY 9 / 1 3 / 1 0 - F O R P R O O F O N LY Clearing Jams 673 FILE LOCATION: C:\Users\fxstdpcadmin\Desktop\0630_UG??\Mioga_AIO_UG_FM\Mioga_AIO_UG_FM\section30.fm 3 Open the belt unit. 4 Lift the levers at both ends of the fuser, and remove the jammed paper.
P R E L I M I A L - If you are still unable to remove the paper, go to the next step. D E L L C ON F I D E N T I N A RY 9 / 1 3 / 1 0 - F O R P R O O F O N LY Clearing Jams 673 FILE LOCATION: C:\Users\fxstdpcadmin\Desktop\0630_UG??\Mioga_AIO_UG_FM\Mioga_AIO_UG_FM\section30.fm 3 Open the belt unit. 4 Lift the levers at both ends of the fuser, and remove the jammed paper.

User Manual
Page 676
FILE LOCATION: C:\Users\fxstdpcadmin\Desktop\0630_UG??\Mioga_AIO_UG_FM\Mioga_AIO_UG_FM\section30.fm CAUTION: The fuser is hot. Do not touch it, doing so may cause burns. 5 Open the cover of the fuser and remove the jammed paper. 6 Close the cover of the fuser and press down the levers at both ends of the fuser. PRE LIMINARY 9/13/10 - DE LL CONFIDENTIAL - FOR PROOF ONLY 674 Clearing Jams
FILE LOCATION: C:\Users\fxstdpcadmin\Desktop\0630_UG??\Mioga_AIO_UG_FM\Mioga_AIO_UG_FM\section30.fm CAUTION: The fuser is hot. Do not touch it, doing so may cause burns. 5 Open the cover of the fuser and remove the jammed paper. 6 Close the cover of the fuser and press down the levers at both ends of the fuser. PRE LIMINARY 9/13/10 - DE LL CONFIDENTIAL - FOR PROOF ONLY 674 Clearing Jams
User Manual
Page 701
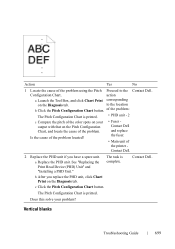
...output with that on the Diagnosis tab. Vertical blanks D E L L C ON F I D E N T I N A RY 9 / 1 3 / 1 0 - P R E L I M I A L - Contact Dell. 2 Replace the PHD unit if you replace the PHD unit, click Chart Print on the Diagnosis tab. See "Replacing the Print Head Device (PHD) Unit...Box, and click Chart Print corresponding on the Pitch Configuration Chart, and locate the cause of the problem. Contact Dell. Is the cause of the problem located? • Fuser Contact Dell and replace the fuser. • Main unit of the printer - b After you have a spare unit. F O R P R...
...output with that on the Diagnosis tab. Vertical blanks D E L L C ON F I D E N T I N A RY 9 / 1 3 / 1 0 - P R E L I M I A L - Contact Dell. 2 Replace the PHD unit if you replace the PHD unit, click Chart Print on the Diagnosis tab. See "Replacing the Print Head Device (PHD) Unit...Box, and click Chart Print corresponding on the Pitch Configuration Chart, and locate the cause of the problem. Contact Dell. Is the cause of the problem located? • Fuser Contact Dell and replace the fuser. • Main unit of the printer - b After you have a spare unit. F O R P R...
User Manual
Page 708
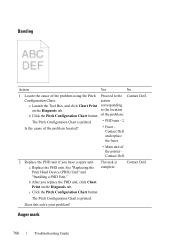
... a spare unit. The Pitch Configuration Chart is printed. • PHD unit - 2 Is the cause of the problem located? • Fuser Contact Dell and replace the fuser. • Main unit of the printer Contact Dell. 2 Replace the PHD unit if you replace the PHD unit, click Chart Print on the Diagnosis tab. Auger mark DE...
... a spare unit. The Pitch Configuration Chart is printed. • PHD unit - 2 Is the cause of the problem located? • Fuser Contact Dell and replace the fuser. • Main unit of the printer Contact Dell. 2 Replace the PHD unit if you replace the PHD unit, click Chart Print on the Diagnosis tab. Auger mark DE...
User Manual
Page 710
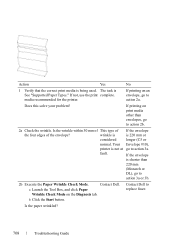
... print media other than 220 mm (Monarch or DL), go to action 2a. fault. Contact Dell. wrinkle is is being used. If printing on the Diagnosis tab. b Click the Start button. Contact Dell to action 3a or 3b. 2b Execute the Paper Wrinkle Check Mode. Is the paper wrinkled?... If not, use the print complete. If the envelope is shorter than envelopes, go to replace fuser. DE LL CONFIDENTIAL - FOR PROOF ONLY 708 Troubleshooting...
... print media other than 220 mm (Monarch or DL), go to action 2a. fault. Contact Dell. wrinkle is is being used. If printing on the Diagnosis tab. b Click the Start button. Contact Dell to action 3a or 3b. 2b Execute the Paper Wrinkle Check Mode. Is the paper wrinkled?... If not, use the print complete. If the envelope is shorter than envelopes, go to replace fuser. DE LL CONFIDENTIAL - FOR PROOF ONLY 708 Troubleshooting...

User Manual
Page 720
...action 2. Go to action 4. Go to action 4. FILE LOCATION: C:\Users\fxstdpcadmin\Desktop\0630_UG??\Mioga_AIO_UG_FM\Mioga_AIO_UG_FM\section31.fm Action 1 Ensure the fuser is complete. - The task is complete. 4 Fan the print media. Go to action 4. Does this solve your problem? FOR PROOF... ONLY 718 Troubleshooting Guide No Contact Dell. Does this solve your problem? The task is feed occurred with a cloth moistened with water. Does this solve your problem? Go...
...action 2. Go to action 4. Go to action 4. FILE LOCATION: C:\Users\fxstdpcadmin\Desktop\0630_UG??\Mioga_AIO_UG_FM\Mioga_AIO_UG_FM\section31.fm Action 1 Ensure the fuser is complete. - The task is complete. 4 Fan the print media. Go to action 4. Does this solve your problem? FOR PROOF... ONLY 718 Troubleshooting Guide No Contact Dell. Does this solve your problem? The task is feed occurred with a cloth moistened with water. Does this solve your problem? Go...


