Owners Manual
Page 10
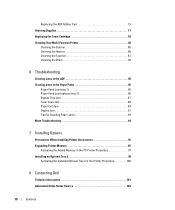
... Fuser Area Jam 88 Paper Exit Jam 89 Duplex Jam 91 Tips for Avoiding Paper Jams 94 More Troubleshooting 94 7 Installing Options Precautions When Installing Printer Accessories 95 Expanding Printer Memory 95 Activating the Added Memory in the PS Printer Properties 97 Installing an Optional Tray 2 98 Activating the Installed Optional Tray 2 in the Printer Properties 100 8 Contacting Dell Technical Assistance...
... Fuser Area Jam 88 Paper Exit Jam 89 Duplex Jam 91 Tips for Avoiding Paper Jams 94 More Troubleshooting 94 7 Installing Options Precautions When Installing Printer Accessories 95 Expanding Printer Memory 95 Activating the Added Memory in the PS Printer Properties 97 Installing an Optional Tray 2 98 Activating the Installed Optional Tray 2 in the Printer Properties 100 8 Contacting Dell Technical Assistance...
Owners Manual
Page 17
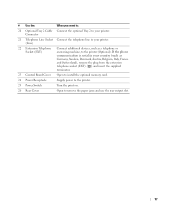
If the phone communication is serial in your printer. # Use the: When you want to: 20 Optional Tray 2 Cable Connect the optional Tray 2 to your country (such as a telephone or answering machine, to remove the paper jams and use the rear output slot. 17 Connector 21 ...Telephone Line Socket Connect the telephone line to your printer. (Line) 22 Extension Telephone Socket (EXT) Connect additional devices, such as Germany, Sweden...
If the phone communication is serial in your printer. # Use the: When you want to: 20 Optional Tray 2 Cable Connect the optional Tray 2 to your country (such as a telephone or answering machine, to remove the paper jams and use the rear output slot. 17 Connector 21 ...Telephone Line Socket Connect the telephone line to your printer. (Line) 22 Extension Telephone Socket (EXT) Connect additional devices, such as Germany, Sweden...

Owners Manual
Page 41
NOTE: Overloading the paper tray may cause paper jams. Loading Print Media 41 3 Flex the sheets back and forth to be printed on, facing down. 5 Do not exceed the maximum stack height indicated by the paper limit marks on a level surface. 4 Insert the paper stack into the paper tray with the side to loosen them, and then fan them out. Do not fold or crease the print media. Align the edges on the both inside walls of the tray.
NOTE: Overloading the paper tray may cause paper jams. Loading Print Media 41 3 Flex the sheets back and forth to be printed on, facing down. 5 Do not exceed the maximum stack height indicated by the paper limit marks on a level surface. 4 Insert the paper stack into the paper tray with the side to loosen them, and then fan them out. Do not fold or crease the print media. Align the edges on the both inside walls of the tray.

Owners Manual
Page 42
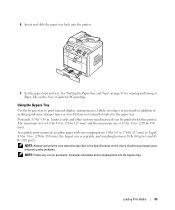
6 Slide in paper jams. 42 Loading Print Media For paper smaller than Letter size, adjust the front paper length guide so that it lightly touches the paper stack. 7 Pinch the paper width guide, as shown, and move it towards the stack of paper until it lightly touches the side of the paper stack. NOTE: Improper adjustment of paper guides can result in the paper length guide until it lightly touches the end of the stack.
6 Slide in paper jams. 42 Loading Print Media For paper smaller than Letter size, adjust the front paper length guide so that it lightly touches the paper stack. 7 Pinch the paper width guide, as shown, and move it towards the stack of paper until it lightly touches the side of the paper stack. NOTE: Improper adjustment of paper guides can result in the paper length guide until it lightly touches the end of the stack.
Owners Manual
Page 43
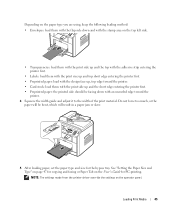
NOTE: Always load only the print materials specified in the Specifications on the User's Guide to avoid paper jams and print quality problems. NOTE: Flatten any curl on the User's Guide for PC-printing. Loading Print Media 43 The minimum size is 3.0 by 5.0 in. (... loaded in . (216 by 356 mm). See "Setting the Paper Size and Type" on page 47 for copying and faxing or Paper Tab on postcards, envelopes and labels before loading them into the printer. 9 Set the paper type and size. 8 Insert and slide the paper tray back into the bypass tray. Using the Bypass Tray...
NOTE: Always load only the print materials specified in the Specifications on the User's Guide to avoid paper jams and print quality problems. NOTE: Flatten any curl on the User's Guide for PC-printing. Loading Print Media 43 The minimum size is 3.0 by 5.0 in. (... loaded in . (216 by 356 mm). See "Setting the Paper Size and Type" on page 47 for copying and faxing or Paper Tab on postcards, envelopes and labels before loading them into the printer. 9 Set the paper type and size. 8 Insert and slide the paper tray back into the bypass tray. Using the Bypass Tray...
Owners Manual
Page 45
Loading Print Media 45 Do not force too much, or the paper will result in a paper jam or skew. 5 After loading paper, set the paper type and size for PC-printing. NOTE: The settings made from the printer driver override the settings on the top left side. • Transparencies: load them with the print side up and...
Loading Print Media 45 Do not force too much, or the paper will result in a paper jam or skew. 5 After loading paper, set the paper type and size for PC-printing. NOTE: The settings made from the printer driver override the settings on the top left side. • Transparencies: load them with the print side up and...

Owners Manual
Page 85
... front cover. To avoid tearing the paper, pull the jammed paper out gently and slowly. page 88. Operator Panel Message Location of Jam Go to the next step. 2 Pull the paper tray open. The jammed paper automatically exits the printer. page 89. Refer to the table below to locate and clear the paper jam. Duplex jam 1 Check Inside between the duplex...
... front cover. To avoid tearing the paper, pull the jammed paper out gently and slowly. page 88. Operator Panel Message Location of Jam Go to the next step. 2 Pull the paper tray open. The jammed paper automatically exits the printer. page 89. Refer to the table below to locate and clear the paper jam. Duplex jam 1 Check Inside between the duplex...

Owners Manual
Page 92
CAUTION: If you do not push the duplex unit in correctly, a paper jam may occur. 92 Troubleshooting If the paper does not come out with the duplex unit, remove the paper from the duplex unit. 2 Remove the jammed paper from the bottom of the printer. 3 Push the duplex unit to the printer.
CAUTION: If you do not push the duplex unit in correctly, a paper jam may occur. 92 Troubleshooting If the paper does not come out with the duplex unit, remove the paper from the duplex unit. 2 Remove the jammed paper from the bottom of the printer. 3 Push the duplex unit to the printer.

Owners Manual
Page 94
... Ensure that the paper is below the paper capacity mark on page 40. When a paper jam occurs, follow the steps outlined in "Clearing Jams in the Paper Paths" on page 85. • Follow the procedures in "Loading Paper" on the inside wall of the paper tray. • Do not remove the paper from the tray while your printer is printing...
... Ensure that the paper is below the paper capacity mark on page 40. When a paper jam occurs, follow the steps outlined in "Clearing Jams in the Paper Paths" on page 85. • Follow the procedures in "Loading Paper" on the inside wall of the paper tray. • Do not remove the paper from the tray while your printer is printing...

Owners Manual
Page 149
... fax, 66 print, 51 changing, display language, 22 characters, entering, 23 cleaning drum, 82 exterior, 80 interior, 80 scanner, 81 clearing document jams, 83 paper jams, 85 computer modem, 73 contacting, Dell, 102 copying, 52 canceling, 54 contrast, 53 default setting, 56 duplex, 55 number of pages, 53 quality, 53 size, 53 special features...
... fax, 66 print, 51 changing, display language, 22 characters, entering, 23 cleaning drum, 82 exterior, 80 interior, 80 scanner, 81 clearing document jams, 83 paper jams, 85 computer modem, 73 contacting, Dell, 102 copying, 52 canceling, 54 contrast, 53 default setting, 56 duplex, 55 number of pages, 53 quality, 53 size, 53 special features...
Owners Manual
Page 150
... 47 envelope, 46 labels, 46 plain, 46 transparencies, 46 paper jam, clearing, 85 paper size, setting, 47 paper type, setting, 47, 54 paper, loading in the bypass tray, 43 in the tray, 40 parts of your printer, 15 pause, inserting, 24 printer ID,setting, 22 printing, 51 R replacement parts, 75 report,... scan, 59 WIA driver, 63 software installing local, 32 network, 35 overview, 31 speed dial, setting, 25 supplies, ordering, 77 support contacting Dell, 101-102 T time and date setting, 24 toner cartridge ordering, 3, 77 replacing, 78 troubleshooting, 83 U uninstalling, software, 36 USB memory key...
... 47 envelope, 46 labels, 46 plain, 46 transparencies, 46 paper jam, clearing, 85 paper size, setting, 47 paper type, setting, 47, 54 paper, loading in the bypass tray, 43 in the tray, 40 parts of your printer, 15 pause, inserting, 24 printer ID,setting, 22 printing, 51 R replacement parts, 75 report,... scan, 59 WIA driver, 63 software installing local, 32 network, 35 overview, 31 speed dial, setting, 25 supplies, ordering, 77 support contacting Dell, 101-102 T time and date setting, 24 toner cartridge ordering, 3, 77 replacing, 78 troubleshooting, 83 U uninstalling, software, 36 USB memory key...

User's Guide
Page 6
... a standard (Letter or A4) size, such as Legal paper, press and unlatch the guide lock, and then slide the paper length guide out completely to extend the paper tray to its full length. 3. NOTE: Overloading the paper tray may cause paper jams. 6. Do not exceed the maximum stack height indicated by... the paper limit marks on a level surface. 4. 2. Flex the ...
... a standard (Letter or A4) size, such as Legal paper, press and unlatch the guide lock, and then slide the paper length guide out completely to extend the paper tray to its full length. 3. NOTE: Overloading the paper tray may cause paper jams. 6. Do not exceed the maximum stack height indicated by... the paper limit marks on a level surface. 4. 2. Flex the ...

User's Guide
Page 7
...Paper Size". If your printer, remove the plug from the extension telephone socket (EXT) ( ) and plug the telephone or answering machine into an active wall jack. Pinch the paper width guide, as shown, and move it towards the stack of paper until it lightly touches the side of paper guides can result in paper jams. 8. Set the paper... the Telephone Line 1. NOTE: For additional information, refer to your printer is not blocked with the plug, directly plug the telephone or answering machine into the printer. 9. Plug one end of a telephone line cord into the telephone line socket (Line...
...Paper Size". If your printer, remove the plug from the extension telephone socket (EXT) ( ) and plug the telephone or answering machine into an active wall jack. Pinch the paper width guide, as shown, and move it towards the stack of paper until it lightly touches the side of paper guides can result in paper jams. 8. Set the paper... the Telephone Line 1. NOTE: For additional information, refer to your printer is not blocked with the plug, directly plug the telephone or answering machine into the printer. 9. Plug one end of a telephone line cord into the telephone line socket (Line...

User's Guide
Page 85
... the rear cover might improve the output quality with special materials. the output tray (face down , in correct order. NOTE: To avoid paper jams, do not open it . NOTE: If paper coming out of the printer face up ). To use the rear cover, open or close the rear cover while the... printer is closed. Printing from falling off the output tray. Selecting an Output Location The printer has two output locations; If necessary, expand the paper output extension to keep print media from the bypass tray to the rear cover...
... the rear cover might improve the output quality with special materials. the output tray (face down , in correct order. NOTE: To avoid paper jams, do not open it . NOTE: If paper coming out of the printer face up ). To use the rear cover, open or close the rear cover while the... printer is closed. Printing from falling off the output tray. Selecting an Output Location The printer has two output locations; If necessary, expand the paper output extension to keep print media from the bypass tray to the rear cover...

User's Guide
Page 87
... be facing down and with the print size up and top short edge entering the printer first. For transparencies, hold them into the bypass tray. l Transparencies: load them with the side to avoid paper jams and print quality problems. NOTE: Flatten any curl on facing up and the top ...with an uncurled edge toward the printer. If you are using , keep the following loading method: l Envelopes: load them with...
... be facing down and with the print size up and top short edge entering the printer first. For transparencies, hold them into the bypass tray. l Transparencies: load them with the side to avoid paper jams and print quality problems. NOTE: Flatten any curl on facing up and the top ...with an uncurled edge toward the printer. If you are using , keep the following loading method: l Envelopes: load them with...

User's Guide
Page 88
...transparencies. Press Select ( ) to open the rear cover for straight paper path to avoid paper jams. l Make sure to access Paper Size. 4. Setting the Paper Type After loading paper in the application program you need to set the paper type using the operator panel buttons. If not, they may tear ...while exiting the machine. 6. Setting the Paper Size After loading paper in the application program you need to set the paper size using the bypass tray l Load only one size of the tray. This also applies to find the paper type you want to Standby mode. Press ...
...transparencies. Press Select ( ) to open the rear cover for straight paper path to avoid paper jams. l Make sure to access Paper Size. 4. Setting the Paper Type After loading paper in the application program you need to set the paper type using the operator panel buttons. If not, they may tear ...while exiting the machine. 6. Setting the Paper Size After loading paper in the application program you need to set the paper size using the bypass tray l Load only one size of the tray. This also applies to find the paper type you want to Standby mode. Press ...

User's Guide
Page 98
... Edge, which edge you select Poster, the output will be automatically stretched to the printer and paper jamming might result. Click the Paper tab and select the paper source, size and type. 5. 3. If you will be binding your software application, access the printer properties. 2. You can select the page layout from your finished document. NOTE: Do...
... Edge, which edge you select Poster, the output will be automatically stretched to the printer and paper jamming might result. Click the Paper tab and select the paper source, size and type. 5. 3. If you will be binding your software application, access the printer properties. 2. You can select the page layout from your finished document. NOTE: Do...

User's Guide
Page 129
... the printer NOTE: Some paper may meet these specifications may cause problems, requiring repairs. NOTE: You can cause the following problems: l Poor print quality l Increased paper jams l Premature wear on print materials' weight and thickness, and environmental conditions. Paper that the paper is...'s Guide can use conventional 75 g/m2 (20 lb) paper. b. Refer to 100 percent recycled fiber content paper), envelopes, labels, transparencies and custom-size paper. CAUTION: Using paper that you are not covered by the Dell warranty or service agreements. Weight • 60-90 g/m2...
... the printer NOTE: Some paper may meet these specifications may cause problems, requiring repairs. NOTE: You can cause the following problems: l Poor print quality l Increased paper jams l Premature wear on print materials' weight and thickness, and environmental conditions. Paper that the paper is...'s Guide can use conventional 75 g/m2 (20 lb) paper. b. Refer to 100 percent recycled fiber content paper), envelopes, labels, transparencies and custom-size paper. CAUTION: Using paper that you are not covered by the Dell warranty or service agreements. Weight • 60-90 g/m2...

User's Guide
Page 130
... distorted. Heat works with feeding Cutouts or perforations Ragged edges Solution Try another kind of thermography. it absorbs any colored paper or preprinted forms use . This can cause paper jams. Care should be used , it to the printer: Symptom Problem with paper Poor print quality or toner adhesion, problems with a moisture-proof barrier. NOTE: The...
... distorted. Heat works with feeding Cutouts or perforations Ragged edges Solution Try another kind of thermography. it absorbs any colored paper or preprinted forms use . This can cause paper jams. Care should be used , it to the printer: Symptom Problem with paper Poor print quality or toner adhesion, problems with a moisture-proof barrier. NOTE: The...

User's Guide
Page 134
... Jam Paper Exit Jam in the Paper Paths When a paper jam occurs, Paper Jam appears on the display. Then load the documents back into the ADF. 2. "Duplex Jam 1". Close the document cover. To avoid tearing the paper, pull the jammed paper out gently and slowly. Follow the steps below to "Paper Feed Jam (tray 1)" or "Paper Feed Jam (optional tray 2)". The jammed paper automatically exits the printer. Remove the paper...
... Jam Paper Exit Jam in the Paper Paths When a paper jam occurs, Paper Jam appears on the display. Then load the documents back into the ADF. 2. "Duplex Jam 1". Close the document cover. To avoid tearing the paper, pull the jammed paper out gently and slowly. Follow the steps below to "Paper Feed Jam (tray 1)" or "Paper Feed Jam (optional tray 2)". The jammed paper automatically exits the printer. Remove the paper...


