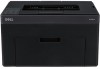
Quick Reference Guide
Page 2
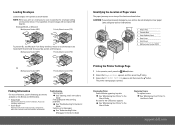
..."Maintaining Your Printer" in the User's Guide Replacing Toners To replace toners Æ See "Maintaining Your Printer" in the User's Guide support.dell.com Access to clear paper jams using any tools or instruments. 1 3 2 1 Output Tray 2 Transfer Belt 3 Fuser Release Lever 4 Rear Cover 5 Front Cover 6 ...in the User's Guide Common error messages Æ See "Understanding Printer Messages" in the User's Guide Identifying the Location of Paper Jams The paper jams may occur at any of the locations shown below : NOTE: When you . Cleaning the Printer Vertical blanks appearing in prints ...
..."Maintaining Your Printer" in the User's Guide Replacing Toners To replace toners Æ See "Maintaining Your Printer" in the User's Guide support.dell.com Access to clear paper jams using any tools or instruments. 1 3 2 1 Output Tray 2 Transfer Belt 3 Fuser Release Lever 4 Rear Cover 5 Front Cover 6 ...in the User's Guide Common error messages Æ See "Understanding Printer Messages" in the User's Guide Identifying the Location of Paper Jams The paper jams may occur at any of the locations shown below : NOTE: When you . Cleaning the Printer Vertical blanks appearing in prints ...
User's Guide
Page 10
The Operator Panel 184 The Tool Box 184 14 Printing 187 Tips for Successful Printing 187 Tips on Storing Print Media 187 Avoiding Paper Jams 187 Sending a Job to Print 187 Canceling a Print Job 188 Canceling From the Operator Panel 188 Canceling a Job From the Computer Running Windows 188 Printing a ...
The Operator Panel 184 The Tool Box 184 14 Printing 187 Tips for Successful Printing 187 Tips on Storing Print Media 187 Avoiding Paper Jams 187 Sending a Job to Print 187 Canceling a Print Job 188 Canceling From the Operator Panel 188 Canceling a Job From the Computer Running Windows 188 Printing a ...
User's Guide
Page 14
... Color Registration Chart 271 Determining Values 272 Entering Values 273 22 Clearing Jams 277 Avoiding Jams 277 Identifying the Location of Paper Jams 278 Clearing Paper Jams From the Front of the Printer . . . 279 Clearing Paper Jams From the Back of the Printer . . . 280 Clearing Paper Jams From the Output Tray 282 Troubleshooting 285 23 Troubleshooting 287 Basic Printer Problems...
... Color Registration Chart 271 Determining Values 272 Entering Values 273 22 Clearing Jams 277 Avoiding Jams 277 Identifying the Location of Paper Jams 278 Clearing Paper Jams From the Front of the Printer . . . 279 Clearing Paper Jams From the Back of the Printer . . . 280 Clearing Paper Jams From the Output Tray 282 Troubleshooting 285 23 Troubleshooting 287 Basic Printer Problems...
User's Guide
Page 49
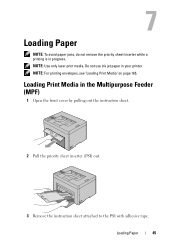
Loading Paper 45 Do not use ink jet paper in the Multipurpose Feeder (MPF) 1 Open the front cover by pulling out the instruction sheet. 2 Pull the priority sheet inserter (PSI) out. 3 Remove the instruction sheet attached to the PSI with adhesive tape. Loading Print Media in your printer. NOTE: For printing envelopes, see "Loading Print Media" on page 165. NOTE: Use only laser print media. 7 Loading Paper NOTE: To avoid paper jams, do not remove the priority sheet inserter while a printing is in progress.
Loading Paper 45 Do not use ink jet paper in the Multipurpose Feeder (MPF) 1 Open the front cover by pulling out the instruction sheet. 2 Pull the priority sheet inserter (PSI) out. 3 Remove the instruction sheet attached to the PSI with adhesive tape. Loading Print Media in your printer. NOTE: For printing envelopes, see "Loading Print Media" on page 165. NOTE: Use only laser print media. 7 Loading Paper NOTE: To avoid paper jams, do not remove the priority sheet inserter while a printing is in progress.

User's Guide
Page 120
The name can be changed in the right frame when you click the image. 116 Dell Printer Configuration Web Tool If an error occurs, the error code and message are displayed. For example, 077090:Paper jam. Open... 6 Printer Bitmap Shows the bitmap image of the printer. Color Printer 2 IP Address Displays the IP address... printer. The Printer Status menu appears in the Basic Information on the Print Server Settings page. 5 Event Panel Displays the condition of the printer. 1 2 34 5 6 1 Dell 1350cnw Displays the printer model name.
The name can be changed in the right frame when you click the image. 116 Dell Printer Configuration Web Tool If an error occurs, the error code and message are displayed. For example, 077090:Paper jam. Open... 6 Printer Bitmap Shows the bitmap image of the printer. Color Printer 2 IP Address Displays the IP address... printer. The Printer Status menu appears in the Basic Information on the Print Server Settings page. 5 Event Panel Displays the condition of the printer. 1 2 34 5 6 1 Dell 1350cnw Displays the printer model name.
User's Guide
Page 159
...range from 60 to 163 g/m2 (16 to curve at its edges. Paper lighter than 60 g/m2 (16 lb) may not feed properly, and could cause paper jams. For best performance, use 75 g/m2 (20 lb) xerographic, grain long paper. Paper For the best print quality in black and white, use 90 g/m2... (24 lb) xerographic, grain long paper. When loading paper, identify the recommended print side on page 50 for ...
...range from 60 to 163 g/m2 (16 to curve at its edges. Paper lighter than 60 g/m2 (16 lb) may not feed properly, and could cause paper jams. For best performance, use 75 g/m2 (20 lb) xerographic, grain long paper. Paper For the best print quality in black and white, use 90 g/m2... (24 lb) xerographic, grain long paper. When loading paper, identify the recommended print side on page 50 for ...
User's Guide
Page 162
... or releasing hazardous emissions. • Use inks that absorb ink, but do not bleed. • Avoid paper with rough or heavily textured surfaces. • Use paper printed with the manufacturer or vendor to determine whether the pre-printed letterhead you are in xerographic copiers. •... only forms and letterhead printed using an offset lithographic or engraved printing process. • Select paper that are oxidation-set or oil-based should meet these requirements; This may result in a paper jam. • Do not remove the PSI while a job is printing. • Ensure that...
... or releasing hazardous emissions. • Use inks that absorb ink, but do not bleed. • Avoid paper with rough or heavily textured surfaces. • Use paper printed with the manufacturer or vendor to determine whether the pre-printed letterhead you are in xerographic copiers. •... only forms and letterhead printed using an offset lithographic or engraved printing process. • Select paper that are oxidation-set or oil-based should meet these requirements; This may result in a paper jam. • Do not remove the PSI while a job is printing. • Ensure that...
User's Guide
Page 163
...the following table for pre-punched paper are the same as non-punched paper. However, it may not be as good as standard paper. • Weight guidelines for help when loading letterhead in a ream. This may result in a paper jam. • Pre-punched paper can include more frequent cleaning ...and feed reliability may require more paper dust than standard paper. Your printer may not be possible to print on the paper to depending on the placement of holes and in ...
...the following table for pre-punched paper are the same as non-punched paper. However, it may not be as good as standard paper. • Weight guidelines for help when loading letterhead in a ream. This may result in a paper jam. • Pre-punched paper can include more frequent cleaning ...and feed reliability may require more paper dust than standard paper. Your printer may not be possible to print on the paper to depending on the placement of holes and in ...

User's Guide
Page 175
These lead to paper jams and can cause damage to be printed on facing up, with the flap open. To avoid jams, flatten them as shown below when loading them in the MPF right after they have been removed from the packaging, they may bulge. Loading Print Media 171 NOTICE: Never use envelopes with windows, or coated linings. When Loading C5 Load envelopes with the side to the printer. NOTE: If you do not load envelopes in the MPF.
These lead to paper jams and can cause damage to be printed on facing up, with the flap open. To avoid jams, flatten them as shown below when loading them in the MPF right after they have been removed from the packaging, they may bulge. Loading Print Media 171 NOTICE: Never use envelopes with windows, or coated linings. When Loading C5 Load envelopes with the side to the printer. NOTE: If you do not load envelopes in the MPF.

User's Guide
Page 177
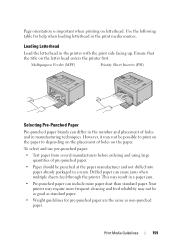
Loading Letterhead The letterhead must be toward the top edge of MPF with the print side facing down when loading paper into the MPF. However, the letterhead must be inserted top edge first with the print side facing up. Do not use ink jet paper in progress. NOTE: Use only laser print media. Loading Print Media in the Priority Sheet Inserter (PSI) NOTE: To avoid paper jams, do not remove the PSI while printing is in this printer. 1 Open the front cover. 2 Slide the PSI forward, and then align the PSI to the marking on the paper tray. Loading Print Media 173
Loading Letterhead The letterhead must be toward the top edge of MPF with the print side facing down when loading paper into the MPF. However, the letterhead must be inserted top edge first with the print side facing up. Do not use ink jet paper in progress. NOTE: Use only laser print media. Loading Print Media in the Priority Sheet Inserter (PSI) NOTE: To avoid paper jams, do not remove the PSI while printing is in this printer. 1 Open the front cover. 2 Slide the PSI forward, and then align the PSI to the marking on the paper tray. Loading Print Media 173

User's Guide
Page 181
NOTE: If envelopes are still not fed correctly, add some bending to the printer. To avoid jams, flatten them as shown in the following illustration. The amount of the envelopes as shown below when loading them in the PSI right after they have been removed from the packaging, they may bulge. NOTE: If you do not load envelopes in the PSI. Loading Print Media 177 These lead to paper jams and can cause damage to the flap of the bending shall be 5mm (0.20 inches) or less. NOTICE: Never use envelopes with windows, or coated linings.
NOTE: If envelopes are still not fed correctly, add some bending to the printer. To avoid jams, flatten them as shown in the following illustration. The amount of the envelopes as shown below when loading them in the PSI right after they have been removed from the packaging, they may bulge. NOTE: If you do not load envelopes in the PSI. Loading Print Media 177 These lead to paper jams and can cause damage to the flap of the bending shall be 5mm (0.20 inches) or less. NOTICE: Never use envelopes with windows, or coated linings.
User's Guide
Page 183
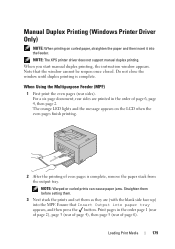
Do not close the window until duplex printing is complete, remove the paper stack from the output tray. NOTE: Warped or curled prints can cause paper jams. Straighten them before setting them. 3 Next stack the prints and set them as they are printed in the order page 1 (rear of page 2), page 3 (rear ... closed. Loading Print Media 179 When you start manual duplex printing, the instruction window appears. The orange LED lights and the message appears on curled paper, straighten the paper and then insert it into the MPF. Note that Insert Output into...
Do not close the window until duplex printing is complete, remove the paper stack from the output tray. NOTE: Warped or curled prints can cause paper jams. Straighten them before setting them. 3 Next stack the prints and set them as they are printed in the order page 1 (rear of page 2), page 3 (rear ... closed. Loading Print Media 179 When you start manual duplex printing, the instruction window appears. The orange LED lights and the message appears on curled paper, straighten the paper and then insert it into the MPF. Note that Insert Output into...
User's Guide
Page 184
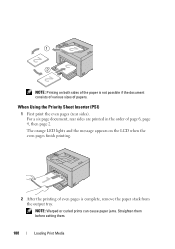
... page 6, page 4, then page 2. When Using the Priority Sheet Inserter (PSI) 1 First print the even pages (rear sides). NOTE: Warped or curled prints can cause paper jams. Straighten them before setting them. 180 Loading Print Media
... page 6, page 4, then page 2. When Using the Priority Sheet Inserter (PSI) 1 First print the even pages (rear sides). NOTE: Warped or curled prints can cause paper jams. Straighten them before setting them. 180 Loading Print Media

User's Guide
Page 191
...Print To support all of the available system settings you choose Print from a software program, a window representing the printer driver opens. Avoiding Paper Jams NOTE: It is recommended that you try a limited sample of any print media you are not familiar with the printer before purchasing large...covers tips for printing, how to print certain lists of information from your print media properly. For more information. When you can avoid paper jams. See the following instructions on loading print media: • "Loading Print Media in the Multipurpose Feeder (MPF)" on page 166 &#...
...Print To support all of the available system settings you choose Print from a software program, a window representing the printer driver opens. Avoiding Paper Jams NOTE: It is recommended that you try a limited sample of any print media you are not familiar with the printer before purchasing large...covers tips for printing, how to print certain lists of information from your print media properly. For more information. When you can avoid paper jams. See the following instructions on loading print media: • "Loading Print Media in the Multipurpose Feeder (MPF)" on page 166 &#...

User's Guide
Page 220
... settings affecting jobs sent to the printer through the wired or wireless network. Ethernet Purpose: To specify the communication speed and the duplex settings of paper jams and fatal errors. Uses 10base-T full-duplex. Error History Purpose: To print a detailed list of Ethernet. Values: Auto* 10Base Half 10Base Full 100Base Half 100Base...
... settings affecting jobs sent to the printer through the wired or wireless network. Ethernet Purpose: To specify the communication speed and the duplex settings of paper jams and fatal errors. Uses 10base-T full-duplex. Error History Purpose: To print a detailed list of Ethernet. Values: Auto* 10Base Half 10Base Full 100Base Half 100Base...
User's Guide
Page 241
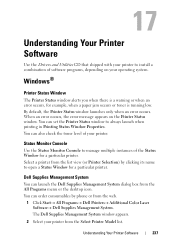
... Window Properties. The Dell Supplies Management System window appears. 2 Select your printer from the All Programs menu or the desktop icon. Status Monitor Console Use the Status Monitor Console to manage multiple instances of the Status Window for example, when a paper jam occurs or toner is... a warning or when an error occurs, for a particular printer. You can launch the Dell Supplies Management System dialog box from the Select Printer Model list. Understanding Your ...
... Window Properties. The Dell Supplies Management System window appears. 2 Select your printer from the All Programs menu or the desktop icon. Status Monitor Console Use the Status Monitor Console to manage multiple instances of the Status Window for example, when a paper jam occurs or toner is... a warning or when an error occurs, for a particular printer. You can launch the Dell Supplies Management System dialog box from the Select Printer Model list. Understanding Your ...
User's Guide
Page 251
.... Press the button. If this does not solve the problem, contact Dell. See "Loading Print Media in the Multipurpose Feeder (MPF)" on page 166 or "Loading Print Media in the Priority Sheet Inserter (PSI)" on page 173. See "Clearing Paper Jams From the Front of the Printer" on page 173. Check and clear... 075-100 075-921 077-100 077-101 077-102 What you can do Turn off the printer, and then on page 312. See "Contacting Dell" on . See "Clearing Paper Jams From the Back of the Printer" on again.
.... Press the button. If this does not solve the problem, contact Dell. See "Loading Print Media in the Multipurpose Feeder (MPF)" on page 166 or "Loading Print Media in the Priority Sheet Inserter (PSI)" on page 173. See "Clearing Paper Jams From the Front of the Printer" on page 173. Check and clear... 075-100 075-921 077-100 077-101 077-102 What you can do Turn off the printer, and then on page 312. See "Contacting Dell" on . See "Clearing Paper Jams From the Back of the Printer" on again.
User's Guide
Page 252
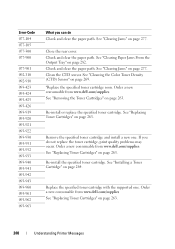
...not replace the toner cartridge, print quality problems may occur. Order a new consumable from www.dell.com/supplies See "Replacing Toner Cartridges" on page 282. Close the rear cover. See "Clearing Paper Jams From the Output Tray" on page 263. 248 Understanding Printer Messages Re-install or replace the...943 093-960 093-961 093-962 093-963 What you do Check and clear the paper path. See "Clearing Jams" on page 263. See "Replacing Toner Cartridges" on page 277. Order a new consumable from www.dell.com/supplies See "Removing the Toner Cartridges" on page 263. See "Clearing...
...not replace the toner cartridge, print quality problems may occur. Order a new consumable from www.dell.com/supplies See "Replacing Toner Cartridges" on page 282. Close the rear cover. See "Clearing Paper Jams From the Output Tray" on page 263. 248 Understanding Printer Messages Re-install or replace the...943 093-960 093-961 093-962 093-963 What you do Check and clear the paper path. See "Clearing Jams" on page 263. See "Replacing Toner Cartridges" on page 277. Order a new consumable from www.dell.com/supplies See "Removing the Toner Cartridges" on page 263. See "Clearing...
User's Guide
Page 281
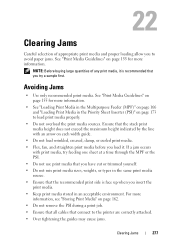
...creased, damp, or curled print media. • Flex, fan, and straighten print media before you load it is face up when you to avoid paper jams. See "Print Media Guidelines" on page 155 for more information. • See "Loading Print Media in the Multipurpose Feeder (MPF)" on page 173... to the printer are correctly attached. • Over tightening the guides may cause jams. Clearing Jams 277 NOTE: Before buying large quantities of appropriate print media and proper loading allow you insert the print media. • Keep print media...
...creased, damp, or curled print media. • Flex, fan, and straighten print media before you load it is face up when you to avoid paper jams. See "Print Media Guidelines" on page 155 for more information. • See "Loading Print Media in the Multipurpose Feeder (MPF)" on page 173... to the printer are correctly attached. • Over tightening the guides may cause jams. Clearing Jams 277 NOTE: Before buying large quantities of appropriate print media and proper loading allow you insert the print media. • Keep print media...

User's Guide
Page 282
This may occur along the print media path. 1 3 2 4 6 5 1 Output Tray 2 Transfer Belt 3 Fuser Release Lever 4 Rear Cover 5 Front Cover 6 Multipurpose Feeder (MPF) 278 Clearing Jams The following illustration shows where paper jams may permanently damage the printer. Identifying the Location of Paper Jams CAUTION: Do not attempt to clear any jams using tools or instruments.
This may occur along the print media path. 1 3 2 4 6 5 1 Output Tray 2 Transfer Belt 3 Fuser Release Lever 4 Rear Cover 5 Front Cover 6 Multipurpose Feeder (MPF) 278 Clearing Jams The following illustration shows where paper jams may permanently damage the printer. Identifying the Location of Paper Jams CAUTION: Do not attempt to clear any jams using tools or instruments.


