Service Manual
Page 84
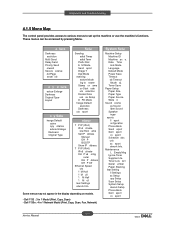
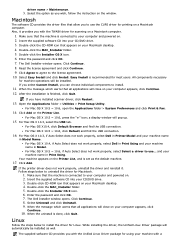
Dell 1135n : 4 in 1 Model (Print, Copy, Scan) - These menus can be accessed by pressing Menu. Dell 1133 : 3 in 1 Network Model (Print, Copy, Scan, Fax, Network) System Setu Machine Setup Machine ID Machine ax o. Toner Save Paper Setup Paper Size Paper Type Paper Source Wide 4 Sound olume ... L Empty Msg Ignore Toner Supplies Life Toner Low lert Serial umber Paper Stacking lear Setting ll Settings ax Setup opy Setup Scan Setup System Setup etwork Setup Phone Book Sent eport cv eport Service Manual 4-11 Alignment and Troubleshooting 4.1.5 Menu Map The control panel provides...
Dell 1135n : 4 in 1 Model (Print, Copy, Scan) - These menus can be accessed by pressing Menu. Dell 1133 : 3 in 1 Network Model (Print, Copy, Scan, Fax, Network) System Setu Machine Setup Machine ID Machine ax o. Toner Save Paper Setup Paper Size Paper Type Paper Source Wide 4 Sound olume ... L Empty Msg Ignore Toner Supplies Life Toner Low lert Serial umber Paper Stacking lear Setting ll Settings ax Setup opy Setup Scan Setup System Setup etwork Setup Phone Book Sent eport cv eport Service Manual 4-11 Alignment and Troubleshooting 4.1.5 Menu Map The control panel provides...
Service Manual
Page 87
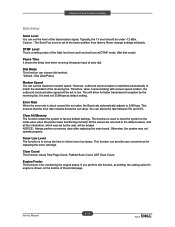
... engine status. Typically, the Tx level should be set to the initial value when the product was set by the receiving fax. Caution : The Send Fax Level is to set up the time to inform toner low status. Alignment and Troubleshooting Data Setup Send Level You can set the level of the receiving...
... engine status. Typically, the Tx level should be set to the initial value when the product was set by the receiving fax. Caution : The Send Fax Level is to set up the time to inform toner low status. Alignment and Troubleshooting Data Setup Send Level You can set the level of the receiving...
Service Manual
Page 97
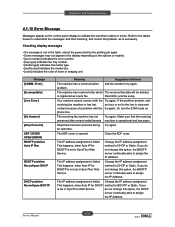
... the media type. • [media size] indicates the media size. • [color] indicates the color of a problem with the receiving fax machine or has lost contact because of toner or imaging unit. The IP address assignment is failed. Change the IP address assignment method to indicate... cover. The IP address assignment is failed. Service Manual 4-24 The machine has received a fax which The received fax data will be deleted. Reconfirm junk fax setup. The receiving fax machine has not Try again. do not change this option, the DHCP server continually asks to...
... the media type. • [media size] indicates the media size. • [color] indicates the color of a problem with the receiving fax machine or has lost contact because of toner or imaging unit. The IP address assignment is failed. Change the IP address assignment method to indicate... cover. The IP address assignment is failed. Service Manual 4-24 The machine has received a fax which The received fax data will be deleted. Reconfirm junk fax setup. The receiving fax machine has not Try again. do not change this option, the DHCP server continually asks to...
User Guide
Page 19
...with the TWAIN driver for Linux. Click Add. Double-click the MAC_Installer folder. 5. The Dell Installer window opens. When the message which warns that all applications will be installed as well..., you have installed scanner driver, click Restart. 13. Open the Applications folder > Utilities > Print Setup Utility. For Mac OS X 10.5 ~ 10.6, press the "+" icon; and your CD/DVD ...on . 2. For Mac OS X 10.5 ~ 10.6, open the Applications folder > System Preferences and click Print & Fax. 14. For Mac OS X 10.5 ~ 10.6, click Default and find the USB connection. Enter the password and ...
...with the TWAIN driver for Linux. Click Add. Double-click the MAC_Installer folder. 5. The Dell Installer window opens. When the message which warns that all applications will be installed as well..., you have installed scanner driver, click Restart. 13. Open the Applications folder > Utilities > Print Setup Utility. For Mac OS X 10.5 ~ 10.6, press the "+" icon; and your CD/DVD ...on . 2. For Mac OS X 10.5 ~ 10.6, open the Applications folder > System Preferences and click Print & Fax. 14. For Mac OS X 10.5 ~ 10.6, click Default and find the USB connection. Enter the password and ...

User Guide
Page 24
... Press Stop/Clear ( ) to return to ready mode. Press the left /right arrow until System Setup appears and press OK. 3. Press Stop/Clear ( to return to ready mode. With this default mode between Fax mode and Copy mode. 1. You can set to change it for the correct time being. Press ... switch this option set your machine has a handset, you need to On, an alarm tone sounds when an error occurs or fax communication ends. 3. 4. Press the left /right arrow until Machine Setup appears and press OK. 4. Month = 01 to 12, Day = 01 to 31, Year = requires four digits, Hour =...
... Press Stop/Clear ( ) to return to ready mode. Press the left /right arrow until System Setup appears and press OK. 3. Press Stop/Clear ( to return to ready mode. With this default mode between Fax mode and Copy mode. 1. You can set to change it for the correct time being. Press ... switch this option set your machine has a handset, you need to On, an alarm tone sounds when an error occurs or fax communication ends. 3. 4. Press the left /right arrow until Machine Setup appears and press OK. 4. Month = 01 to 12, Day = 01 to 31, Year = requires four digits, Hour =...

User Guide
Page 25
... special characters, such as space, plus sign, and etc. When you enter your name or your company's name, and the fax number. To enter additional letters, repeat step 1. Speaker, ringer, key sound, and alarm sound 1. If necessary, repeat steps ... characters 1. If the next letter is connected. You can select Off, Low, Mid, and High. When you want. Press Fax ( ) on the display. Press On Hook Dial to enter the letter O, press 6, labeled with the character you have selected..., you can enter a space by pressing the left /right arrow until System Setup appears and press OK. 3.
... special characters, such as space, plus sign, and etc. When you enter your name or your company's name, and the fax number. To enter additional letters, repeat step 1. Speaker, ringer, key sound, and alarm sound 1. If necessary, repeat steps ... characters 1. If the next letter is connected. You can select Off, Low, Mid, and High. When you want. Press Fax ( ) on the display. Press On Hook Dial to enter the letter O, press 6, labeled with the character you have selected..., you can enter a space by pressing the left /right arrow until System Setup appears and press OK. 3.
User Guide
Page 27
... billing paper, select Paper tab > Size > Edit... in the following: [root@localhost root]# lpr 3. For Windows XP/2003, select Printers and Faxes. Go to Paper Feed pane. 4. Press the left /right arrow until Paper Source appears and press OK. 5. Click the Windows Start menu. ... Linux 1. When the Terminal screen appears, type in the Printing Preferences (See Opening printing preferences). Press the left /right arrow until System Setup appears and press OK. 3. For Windows XP/2003/2008/Vista, press Printing Preferences. Click Paper tab. 6. Go to Paper pane. 8. ...
... billing paper, select Paper tab > Size > Edit... in the following: [root@localhost root]# lpr 3. For Windows XP/2003, select Printers and Faxes. Go to Paper Feed pane. 4. Press the left /right arrow until Paper Source appears and press OK. 5. Click the Windows Start menu. ... Linux 1. When the Terminal screen appears, type in the Printing Preferences (See Opening printing preferences). Press the left /right arrow until System Setup appears and press OK. 3. For Windows XP/2003/2008/Vista, press Printing Preferences. Click Paper tab. 6. Go to Paper pane. 8. ...

User Guide
Page 56
...original face down on . 2. Press the left /right arrow until Machine Setup appears and press OK. 4. Enter your computer and powered on the scanner glass. 3. Press the left /right arrow until Machine Fax No. Press Fax ( ) on the control panel. Press Start ( ) on the control... panel. 2. Select the appropriate machine from Dell Scan and Fax Manager and click Properties. 4. If fax receiving is sending a fax using the number keypad. 6. Press OK ...
...original face down on . 2. Press the left /right arrow until Machine Setup appears and press OK. 4. Enter your computer and powered on the scanner glass. 3. Press the left /right arrow until Machine Fax No. Press Fax ( ) on the control panel. Press Start ( ) on the control... panel. 2. Select the appropriate machine from Dell Scan and Fax Manager and click Properties. 4. If fax receiving is sending a fax using the number keypad. 6. Press OK ...

User Guide
Page 57
... Adjust the resolution and the darkness to suit your machine to add another pages. Enter the number of redial attempts (See Changing the fax setup options). Press OK to start storing the scanned original data into the document feeder, or place a single original face down on the ...OK. 7. Load another original and press OK. Confirming a transmission When the last page of error messages and their meanings, see Printing sent fax report automatically. For a list of your machine to 10 destinations. 10. If an original is loaded in which allows you have finished, ...
... Adjust the resolution and the darkness to suit your machine to add another pages. Enter the number of redial attempts (See Changing the fax setup options). Press OK to start storing the scanned original data into the document feeder, or place a single original face down on the ...OK. 7. Load another original and press OK. Confirming a transmission When the last page of error messages and their meanings, see Printing sent fax report automatically. For a list of your machine to 10 destinations. 10. If an original is loaded in which allows you have finished, ...
User Guide
Page 59
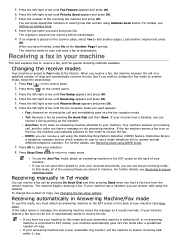
...button. Press Stop/Clear ( ) to return to destinations. To change the Fax mode to answer incoming calls within 1 ring. For details, see Changing the fax setup options. Receiving a fax in Tel mode You can receive a fax by picking up address book. 8. Press the left /right arrow until ...Receiving appears and press OK. 5. Ans/Fax: Is for when an answering machine attached to save your machine. Press Fax ( ) on the answering machine. Press the left /right arrow until Fax Setup appears and press OK. 4. Fax: Answers an incoming fax call by pressing On Hook Dial and then...
...button. Press Stop/Clear ( ) to return to destinations. To change the Fax mode to answer incoming calls within 1 ring. For details, see Changing the fax setup options. Receiving a fax in Tel mode You can receive a fax by picking up address book. 8. Press the left /right arrow until ...Receiving appears and press OK. 5. Ans/Fax: Is for when an answering machine attached to save your machine. Press Fax ( ) on the answering machine. Press the left /right arrow until Fax Setup appears and press OK. 4. Fax: Answers an incoming fax call by pressing On Hook Dial and then...

User Guide
Page 60
... and press OK. 6. Activating secure receiving mode 1. Press Menu ( ) on the display. 7. Press the left /right arrow until Fax Setup appears and press OK. 4. Press the left /right arrow until DRPD appears and press OK. otherwise, the outgoing message from another telephone. Receiving...be answered. You can easily suspend or change DRPD at the factory. For details about changing the code, see Changing the fax setup options Receiving faxes using the DRPD option, Distinctive Ring service must switch off the answering machine. It is a telephone company service which number ...
... and press OK. 6. Activating secure receiving mode 1. Press Menu ( ) on the display. 7. Press the left /right arrow until Fax Setup appears and press OK. 4. Press the left /right arrow until DRPD appears and press OK. otherwise, the outgoing message from another telephone. Receiving...be answered. You can easily suspend or change DRPD at the factory. For details about changing the code, see Changing the fax setup options Receiving faxes using the DRPD option, Distinctive Ring service must switch off the answering machine. It is a telephone company service which number ...

User Guide
Page 65
...On appears and press OK. 6. Press the left /right arrow until Print appears and press OK. Press the left /right arrow until Fax Setup appears and press OK. 4. Press the left /right arrow until Auto Report appears and press OK. 5. Press Menu ( ) on the control ...panel. 2. Press Fax ( ) on the control panel. 3. Press Stop/Clear ( ) to return to print a report with detailed information about the previous 50 communication operations, including time and dates. 1. Press Fax ( ) on the control panel. 3. Press Address Book ( ) on the...
...On appears and press OK. 6. Press the left /right arrow until Print appears and press OK. Press the left /right arrow until Fax Setup appears and press OK. 4. Press the left /right arrow until Auto Report appears and press OK. 5. Press Menu ( ) on the control ...panel. 2. Press Fax ( ) on the control panel. 3. Press Stop/Clear ( ) to return to print a report with detailed information about the previous 50 communication operations, including time and dates. 1. Press Fax ( ) on the control panel. 3. Press Address Book ( ) on the...

User Guide
Page 66
... more time. Dial This setting may take more . This chapter includes: Fax setup Copy setup Printing a report Clearing memory Network Menu overview Fax setup Changing the fax setup options Your machine provides you with poor line quality and makes sure any other Mode ECM-equipped fax machine. It Dial is started. Image TCR This function allows users to...
... more time. Dial This setting may take more . This chapter includes: Fax setup Copy setup Printing a report Clearing memory Network Menu overview Fax setup Changing the fax setup options Your machine provides you with poor line quality and makes sure any other Mode ECM-equipped fax machine. It Dial is started. Image TCR This function allows users to...

User Guide
Page 67
... available depending on this mode, The machine will not Setup accept faxes sent from the end of each mode, see Receiving faxes using a dot-matrix printer. DRPD Mode This mode enables a user to use . Sending a color fax is useful for your local telephone company if you are... resolution setting affects the appearance of the machine. Fine: Originals containing small characters or thin lines or originals printed using DRPD mode. Photo Fax: Originals containing shades of paper, minus the data that would have a public telephone system or a private branch exchange (PBX) system,...
... available depending on this mode, The machine will not Setup accept faxes sent from the end of each mode, see Receiving faxes using a dot-matrix printer. DRPD Mode This mode enables a user to use . Sending a color fax is useful for your local telephone company if you are... resolution setting affects the appearance of the machine. Fine: Originals containing small characters or thin lines or originals printed using DRPD mode. Photo Fax: Originals containing shades of paper, minus the data that would have a public telephone system or a private branch exchange (PBX) system,...

User Guide
Page 68
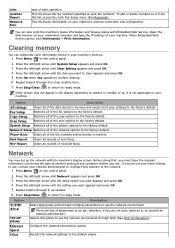
... can set up several options in the machine's memory. Press the left /right arrow until System Setup appears and press OK. 3. For further details, see Printing sent fax report automatically. To print all of copies using the number keypad. Press the left /right arrow ...or darker. For further details, see Deciding the form of a copied image. Copy setup Changing the copy setup options For copy output, you can print a report on the faxes you have recently received. Fax RCV Report This report shows information on the machine's configuration or font list, etc....
... can set up several options in the machine's memory. Press the left /right arrow until System Setup appears and press OK. 3. For further details, see Printing sent fax report automatically. To print all of copies using the number keypad. Press the left /right arrow ...or darker. For further details, see Deciding the form of a copied image. Copy setup Changing the copy setup options For copy output, you can print a report on the faxes you have recently received. Fax RCV Report This report shows information on the machine's configuration or font list, etc....
User Guide
Page 69
... Reverts the network settings to ready mode. This list shows information on options or models. Some menus may set ; Copy Setup Restores all of sent faxes. Network You may not appear in memory and resets all records of the scan options to your machine. Press the left ...networked computer and type the IP address of the fax options to the factory default. Selects this list, access the Junk Fax Setup menu (See Receiving). If so, it is , or consult the network administrator. Fax Setup Restores all of the fax numbers entries stored in your network administrator to configure...
... Reverts the network settings to ready mode. This list shows information on options or models. Some menus may set ; Copy Setup Restores all of sent faxes. Network You may not appear in memory and resets all records of the scan options to your machine. Press the left ...networked computer and type the IP address of the fax options to the factory default. Selects this list, access the Junk Fax Setup menu (See Receiving). If so, it is , or consult the network administrator. Fax Setup Restores all of the fax numbers entries stored in your network administrator to configure...

User Guide
Page 70
...is not applicable to set up the machine or use the machine's functions. Copy Setup Scan Size Change Default Copies Copy Collation Reduce/Enlarge Darkness Original Type System Setup Machine Setup Machine ID Machine Fax No These menus can be accessed by pressing Menu ( ). Menu overview The control...Setting Network Info This list shows information on options or models. Items Option Fax Feature Darkness Resolution Multi Send Delay Send Priority Send Forward Secure Receive Add Page Cancel Job Fax Setup Sending Redial Times Redial Term Prefix Dial ECM Mode Send Report Image TCR Dial...
...is not applicable to set up the machine or use the machine's functions. Copy Setup Scan Size Change Default Copies Copy Collation Reduce/Enlarge Darkness Original Type System Setup Machine Setup Machine ID Machine Fax No These menus can be accessed by pressing Menu ( ). Menu overview The control...Setting Network Info This list shows information on options or models. Items Option Fax Feature Darkness Resolution Multi Send Delay Send Priority Send Forward Secure Receive Add Page Cancel Job Fax Setup Sending Redial Times Redial Term Prefix Dial ECM Mode Send Report Image TCR Dial...

User Guide
Page 71
... Report Schedule Jobs JunkFax Report Network Info. Maintenance CLR Empty Msg Supplies Life TonerLow Alert Serial Number Paper Stacking Clear Setting All Settings Fax Setup Copy Setup Scan Setup System Setup Network Setup Phone Book Sent Report RCV Report TCP/IP (IPv4) DHCP BOOTP Static TCP/IP (IPv6) IPv6 Activate DHCPv6 Config Ethernet Speed Clear Setting...
... Report Schedule Jobs JunkFax Report Network Info. Maintenance CLR Empty Msg Supplies Life TonerLow Alert Serial Number Paper Stacking Clear Setting All Settings Fax Setup Copy Setup Scan Setup System Setup Network Setup Phone Book Sent Report RCV Report TCP/IP (IPv4) DHCP BOOTP Static TCP/IP (IPv6) IPv6 Activate DHCPv6 Config Ethernet Speed Clear Setting...

User Guide
Page 94
...select the paper type you want and press OK. 6. Press the left /right arrow until System Setup appears and press OK. 3. Setting the paper source 1. Press the left /right arrow until Copy Tray or Fax Tray appears and press OK. 6. For computer printing, select the paper size and type in the... application program you want and press OK. 6. Press the left /right arrow to select the paper tray you use on the control panel. 2. Press the left /right arrow until System Setup appears...
...select the paper type you want and press OK. 6. Press the left /right arrow until System Setup appears and press OK. 3. Setting the paper source 1. Press the left /right arrow until Copy Tray or Fax Tray appears and press OK. 6. For computer printing, select the paper size and type in the... application program you want and press OK. 6. Press the left /right arrow to select the paper tray you use on the control panel. 2. Press the left /right arrow until System Setup appears...

User Guide
Page 117
... job again. When you do not change this in the table, reboot the power and try again. [Incompatible] The machine has received a fax from the machine. 6. Ask the sender to their meaning, and correct the problem, if necessary. DHCP problem: Auto IP Run The IP... address assignment is already engaged. Open and close front door, printing automatically resumes. Understanding display messages Messages appear on . Reconfirm junk fax setup. line. [Stop Pressed] Stop/Clear has been pressed during an Try again. BOOTP problemAuto IP Run The IP address assignment is failed....
... job again. When you do not change this in the table, reboot the power and try again. [Incompatible] The machine has received a fax from the machine. 6. Ask the sender to their meaning, and correct the problem, if necessary. DHCP problem: Auto IP Run The IP... address assignment is already engaged. Open and close front door, printing automatically resumes. Understanding display messages Messages appear on . Reconfirm junk fax setup. line. [Stop Pressed] Stop/Clear has been pressed during an Try again. BOOTP problemAuto IP Run The IP address assignment is failed....


