User Guide
Page 3
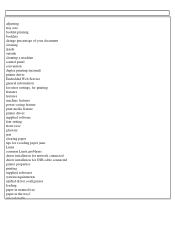
... paper ctiopms fmoronavLoiinduinxgppraopbelrejmams s dLriinvuexr installation for network connected dppscddurrrorriiiiipmvnnvvpetteemeilrrrnireoiiginnndnpsssrLttstoaaaoillpnlllflaaetuawttrxtiitooiaiopennrnrseoffsoobforrlernUmeUStsSwBBocrackbaclbeolencnocenocnnteencdteecdted spyrsintetemr prreoqpuerirtieems ents upnriinflteindgdriver configurator lsouapdpilniegd softwares psyaspteemr inremquairneumaelnttrsay puanpifelerdindrtihvertcroanyf1igurator slopaedciinagl media Mpaapceinr tionsmhanual tray cpoampemr ionnthMeatrcainyt1osh problems dsprievceiralinmsetdaillaation for network connected
... paper ctiopms fmoronavLoiinduinxgppraopbelrejmams s dLriinvuexr installation for network connected dppscddurrrorriiiiipmvnnvvpetteemeilrrrnireoiiginnndnpsssrLttstoaaaoillpnlllflaaetuawttrxtiitooiaiopennrnrseoffsoobforrlernUmeUStsSwBBocrackbaclbeolencnocenocnnteencdteecdted spyrsintetemr prreoqpuerirtieems ents upnriinflteindgdriver configurator lsouapdpilniegd softwares psyaspteemr inremquairneumaelnttrsay puanpifelerdindrtihvertcroanyf1igurator slopaedciinagl media Mpaapceinr tionsmhanual tray cpoampemr ionnthMeatrcainyt1osh problems dsprievceiralinmsetdaillaation for network connected
User Guide
Page 15
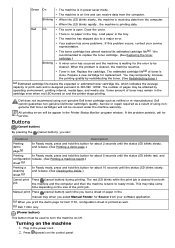
...recommended to turn the machine on/off. Replace the cartridge. Service or repair required as a result of using non-genuine Dell toner cartridge such as well. [b] Dell 1130n only (Power button) This button must be used to replace the toner cartridge. (See Replacing the toner cartridge.) Blinking.... (See Printing a machine report.) sheet [b] Printing a cleaning sheet [b] In Ready mode, press and hold this problem occurs, contact your software application. [a] When you print the demo page for replacement. The machine is in the cartridge even when red LED turned on the machine ...
...recommended to turn the machine on/off. Replace the cartridge. Service or repair required as a result of using non-genuine Dell toner cartridge such as well. [b] Dell 1130n only (Power button) This button must be used to replace the toner cartridge. (See Replacing the toner cartridge.) Blinking.... (See Printing a machine report.) sheet [b] Printing a cleaning sheet [b] In Ready mode, press and hold this problem occurs, contact your software application. [a] When you print the demo page for replacement. The machine is in the cartridge even when red LED turned on the machine ...
User Guide
Page 17
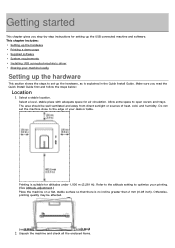
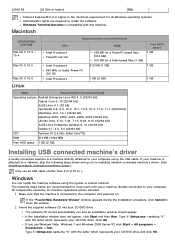
Make sure you step-by-step instructions for setting up the USB connected machine and software. The area should be affected. 2. Unpack the machine and check all the enclosed items. Select a stable location. Allow extra space to optimize your desk or ... for altitudes under 1,000 m (3,281 ft). Printing is explained in the Quick Install Guide. This chapter includes: Setting up the hardware Printing a demo page Supplied software System requirements Installing USB connected machine's driver Sharing your machine locally Setting up the hardware, as is suitable for air circulation.
Make sure you step-by-step instructions for setting up the USB connected machine and software. The area should be affected. 2. Unpack the machine and check all the enclosed items. Select a stable location. Allow extra space to optimize your desk or ... for altitudes under 1,000 m (3,281 ft). Printing is explained in the Quick Install Guide. This chapter includes: Setting up the hardware Printing a demo page Supplied software System requirements Installing USB connected machine's driver Sharing your machine locally Setting up the hardware, as is suitable for air circulation.

User Guide
Page 18
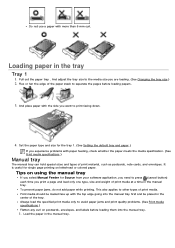
Load paper. (See Loading paper in the tray.) 6. Printer Settings Utility (Dell 1130n only): This program allows you with 128 MB memory (to enable the Aero theme). SetIP (Dell 1130n only): Use this driver to take full advantage of the job when send a job to set up printer's other ... set up your machine and connected it to your system meets the following requirements: Microsoft® Windows® Your machine supports the following software. Dell Toner Management System™: Displays the status of the printer and the name of your machine's features. To print a demo page: In...
Load paper. (See Loading paper in the tray.) 6. Printer Settings Utility (Dell 1130n only): This program allows you with 128 MB memory (to enable the Aero theme). SetIP (Dell 1130n only): Use this driver to take full advantage of the job when send a job to set up printer's other ... set up your machine and connected it to your system meets the following requirements: Microsoft® Windows® Your machine supports the following software. Dell Toner Management System™: Displays the status of the printer and the name of your machine's features. To print a demo page: In...
User Guide
Page 19
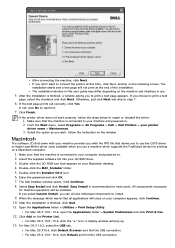
... the "Found New Hardware Wizard" window appears during the installation procedure, click Cancel in . ). Insert the supplied software CD into your computer using the typical or custom method. Type X:\Setup.exe replacing "X" with the letter which represents your CD/DVD drive. 2008 ...'s driver.) Only use Windows Vista, Windows 7 and Windows 2008 Server R2 click Start > All programs > Accessories > Run. Windows You can install the machine software using the USB cable. The following steps below are required to the computer and powered on to your CD/DVD drive and click OK. Windows...
... the "Found New Hardware Wizard" window appears during the installation procedure, click Cancel in . ). Insert the supplied software CD into your computer using the typical or custom method. Type X:\Setup.exe replacing "X" with the letter which represents your CD/DVD drive. 2008 ...'s driver.) Only use Windows Vista, Windows 7 and Windows 2008 Server R2 click Start > All programs > Accessories > Run. Windows You can install the machine software using the USB cable. The following steps below are required to the computer and powered on to your CD/DVD drive and click OK. Windows...
User Guide
Page 21
... "+" icon; For Mac OS X 10.5~10.6, click Default and find the USB connection. From the Start menu, select Programs or All Programs > Dell > Dell Printers > your CD/DVD drive. 3. Double-click the CD-ROM icon that all applications will pop up. 13. Select Easy Install and click Install... provides you with the PPD file that allows you to print a test page, select the checkbox and click Next. Click Finish. Insert the supplied software CD into your printer driver name > Maintenance. 3. Open the Applications folder > Utilities > Print Setup Utility. Click Add on the window. After ...
... "+" icon; For Mac OS X 10.5~10.6, click Default and find the USB connection. From the Start menu, select Programs or All Programs > Dell > Dell Printers > your CD/DVD drive. 3. Double-click the CD-ROM icon that all applications will pop up. 13. Select Easy Install and click Install... provides you with the PPD file that allows you to print a test page, select the checkbox and click Next. Click Finish. Insert the supplied software CD into your printer driver name > Maintenance. 3. Open the Applications folder > Utilities > Print Setup Utility. Click Add on the window. After ...

User Guide
Page 22
... you with a Linux computer easily in the following: If the software CD is secondary master and the location to mount is connected to use... For Mac OS X 10.3, if Auto Select does not work properly, select Dell in Model. If the printer driver does not work properly, select... Select a driver to your Macintosh desktop. 4. Insert the supplied software CD into your computer appears, Click Continue . 10. Enter the password and click OK...
... you with a Linux computer easily in the following: If the software CD is secondary master and the location to mount is connected to use... For Mac OS X 10.3, if Auto Select does not work properly, select Dell in Model. If the printer driver does not work properly, select... Select a driver to your Macintosh desktop. 4. Insert the supplied software CD into your computer appears, Click Continue . 10. Enter the password and click OK...

User Guide
Page 23
... . 2. The installation is complete, click Finish. If you have any difficulties, consult the on the terminal screen. If the software CD does not run automatically. When the installation is completed. Follow the instructions on screen help that the machine is available through the... Login window appears, type in "root" in as Unified Driver Configurator or Image Manager. Insert the supplied software CD into your convenience. Click Finish. The software CD will run automatically, click the icon at the bottom of the desktop. When the Terminal screen appears,...
... . 2. The installation is complete, click Finish. If you have any difficulties, consult the on the terminal screen. If the software CD does not run automatically. When the installation is completed. Follow the instructions on screen help that the machine is available through the... Login window appears, type in "root" in as Unified Driver Configurator or Image Manager. Insert the supplied software CD into your convenience. Click Finish. The software CD will run automatically, click the icon at the bottom of the desktop. When the Terminal screen appears,...
User Guide
Page 26
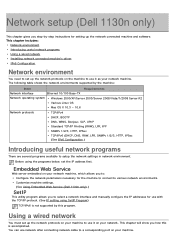
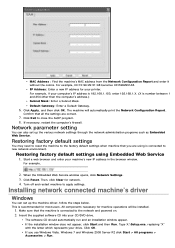
... Using Embedded Web Service (Dell 1130n only).) SetIP This utility program allows you to select a network interface and manually configure the IP addresses for use with the TCP/IP protocol. (See IP setting using the programs below, set up the network connected machine and software. Using a wired network... machine, which allows you to: Configure the network parameters necessary for the machine to connect to various network environments. Network setup (Dell 1130n only) This chapter gives you step-by-step instructions for setting up the network protocols on the machine to use it on your...
... Using Embedded Web Service (Dell 1130n only).) SetIP This utility program allows you to select a network interface and manually configure the IP addresses for use with the TCP/IP protocol. (See IP setting using the programs below, set up the network connected machine and software. Using a wired network... machine, which allows you to: Configure the network parameters necessary for the machine to connect to various network environments. Network setup (Dell 1130n only) This chapter gives you step-by-step instructions for setting up the network protocols on the machine to use it on your...
User Guide
Page 27
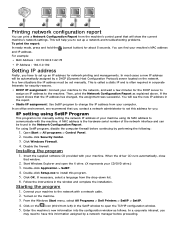
...To print the report: In ready mode, press and hold the (cancel button) for about 5 seconds. Double click Security Center. 3. Insert the supplied software CD provided with a network cable. 2. Double-click Application > SetIP. 4. If necessary, select a language from the drop-down list. 6. Follow the... instructions in the Network Configuration Report. Starting the program 1. From the Windows Start menu, select All Programs > Dell Printers > SetIP > SetIP. 4. This is called a static IP and is the hardware serial number of your machine to the network, and wait...
...To print the report: In ready mode, press and hold the (cancel button) for about 5 seconds. Double click Security Center. 3. Insert the supplied software CD provided with a network cable. 2. Double-click Application > SetIP. 4. If necessary, select a language from the drop-down list. 6. Follow the... instructions in the Network Configuration Report. Starting the program 1. From the Windows Start menu, select All Programs > Dell Printers > SetIP > SetIP. 4. This is called a static IP and is the hardware serial number of your machine to the network, and wait...
User Guide
Page 28
... the settings are using Embedded Web Service 1. This is connected to new network environment. All components necessary for your printer. The software CD should automatically run and an installation window appear. Type X:\Setup.exe, replacing "X" with the letter which represents your CD/DVD...Windows You can also set up the various network settings through the network administration programs such as Embedded Web Service. Insert the supplied software CD into your drive. Click OK. Default Gateway: Enter a Default Gateway. 6. Restoring factory default settings You may need to ...
... the settings are using Embedded Web Service 1. This is connected to new network environment. All components necessary for your printer. The software CD should automatically run and an installation window appear. Type X:\Setup.exe, replacing "X" with the letter which represents your CD/DVD...Windows You can also set up the various network settings through the network administration programs such as Embedded Web Service. Insert the supplied software CD into your drive. Click OK. Default Gateway: Enter a Default Gateway. 6. Restoring factory default settings You may need to ...

User Guide
Page 30
... click Yes. If the printer driver does not work properly, follow the instruction on your printer driver name > Maintenance. 3. Insert the supplied software CD into your machine's IP address should have been set. 2. To verify your machine in network, please turn off the firewall and click ...If you wish, follow the steps below to the network. If you may enable firewall. From the Start menu, select Programs or All Programs > Dell > Dell Printers > your computer appears. Select Easy Install and click Install. To add the printer to step 8. 7. Otherwise, just click Next and skip...
... click Yes. If the printer driver does not work properly, follow the instruction on your printer driver name > Maintenance. 3. Insert the supplied software CD into your machine's IP address should have been set. 2. To verify your machine in network, please turn off the firewall and click ...If you wish, follow the steps below to the network. If you may enable firewall. From the Start menu, select Programs or All Programs > Dell > Dell Printers > your computer appears. Select Easy Install and click Install. To add the printer to step 8. 7. Otherwise, just click Next and skip...

User Guide
Page 31
...set as the default machine. 18. For Mac OS X 10.4, if Auto Select does not work properly, select Dell in Model Name. Click Add. Insert the supplied software CD into your Linux desktop. 4. Select Network printer and click Search button. 9. Add network Printer 1. Click Next... Select a driver to uninstall the driver for Printer Type option. 15. Insert the supplied software CD into your machine and click Next. 12. Linux Install Linux Driver 1. The Dell Installer window opens. Double-click the Unified Driver Configurator. 2. Follow steps below to use......
...set as the default machine. 18. For Mac OS X 10.4, if Auto Select does not work properly, select Dell in Model Name. Click Add. Insert the supplied software CD into your Linux desktop. 4. Select Network printer and click Search button. 9. Add network Printer 1. Click Next... Select a driver to uninstall the driver for Printer Type option. 15. Insert the supplied software CD into your machine and click Next. 12. Linux Install Linux Driver 1. The Dell Installer window opens. Double-click the Unified Driver Configurator. 2. Follow steps below to use......

User Guide
Page 36
... the proper font list for special condition, such as follows: 1. Ensure that you can launch it from the Start menu, select Programs or All Programs > Dell > Dell Printers > your printer driver name > Printer Settings Utility. 3. If you are a Windows user, you can change the font or set the font for corresponding languages.... If you want to change the font setting as the DOS environment, you have installed the printer driver with the provided software CD. 2. Select your region or country.
... the proper font list for special condition, such as follows: 1. Ensure that you can launch it from the Start menu, select Programs or All Programs > Dell > Dell Printers > your printer driver name > Printer Settings Utility. 3. If you are a Windows user, you can change the font or set the font for corresponding languages.... If you want to change the font setting as the DOS environment, you have installed the printer driver with the provided software CD. 2. Select your region or country.
User Guide
Page 39
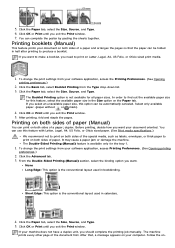
... and print quality problems. (See Print media specifications.) Flatten any curl on using the manual tray If you select Manual Feeder for Source from your software application, you need to the media size you experience problems with the top edge going into the manual tray. 1. It is useful for the tray...
... and print quality problems. (See Print media specifications.) Flatten any curl on using the manual tray If you select Manual Feeder for Source from your software application, you need to the media size you experience problems with the top edge going into the manual tray. 1. It is useful for the tray...

User Guide
Page 43
... cover is closed. Card stock/Custom-sized paper Postcards, cards and other custom-sized materials can come off preprinted paper, reducing print quality. In the software application, set margins at least 6.4 mm (0.25 inches) away from the backing sheet or are wrinkled, bubbled, or otherwise damaged. Letterhead/Preprinted paper Tray1 Single...
... cover is closed. Card stock/Custom-sized paper Postcards, cards and other custom-sized materials can come off preprinted paper, reducing print quality. In the software application, set margins at least 6.4 mm (0.25 inches) away from the backing sheet or are wrinkled, bubbled, or otherwise damaged. Letterhead/Preprinted paper Tray1 Single...

User Guide
Page 48
... Poster Overlap in the Pages per sheet, the pages will be enlarged and be divided into 16 pages. 4. Change percentage of your software application, access Printing Preferences. (See Opening printing preferences.) 2. Printing posters This feature allows you to print a single-page document onto ... Page Border to paste the sheets together. To change the print settings from your document to search information via a keyword, click the Dell tab in the Printing Preferences window, and enter a keyword in the Type drop-down list, if necessary. 5. Poster 3x3: Document ...
... Poster Overlap in the Pages per sheet, the pages will be enlarged and be divided into 16 pages. 4. Change percentage of your software application, access Printing Preferences. (See Opening printing preferences.) 2. Printing posters This feature allows you to print a single-page document onto ... Page Border to paste the sheets together. To change the print settings from your document to search information via a keyword, click the Dell tab in the Printing Preferences window, and enter a keyword in the Type drop-down list, if necessary. 5. Poster 3x3: Document ...
User Guide
Page 49
...you exit the Print window. Click the Paper tab, select the Size, Source, and Type. Before printing, decide how you want your software application, access the Printing Preferences. (See Opening printing preferences.) 2. You can use this feature, select the available paper size in calendars.... without or mark). 4. Click the Advanced tab. 3. Short Edge: This option is not available for the tray 1. 1. Follow the on your software application, access Printing Preferences. (See Opening printing preferences.) 2. 5. Click the Paper tab, select the Size, Source, and Type. 6. Click OK...
...you exit the Print window. Click the Paper tab, select the Size, Source, and Type. Before printing, decide how you want your software application, access the Printing Preferences. (See Opening printing preferences.) 2. You can use this feature, select the available paper size in calendars.... without or mark). 4. Click the Advanced tab. 3. Short Edge: This option is not available for the tray 1. 1. Follow the on your software application, access Printing Preferences. (See Opening printing preferences.) 2. 5. Click the Paper tab, select the Size, Source, and Type. 6. Click OK...

User Guide
Page 50
... 256 characters. The message displays in Paper Options. 5. screen instructions to Page. 4. To change the print settings from your software application, access Printing Preferences. (See Opening printing preferences.) 2. Click the Advanced tab, and select the desired watermark from the ... to appear larger or smaller on a small document. 1. Using an existing watermark 1. To change the print settings from your software application, access Printing Preferences. (See Opening printing preferences.) 2. Enter the scaling rate in the Watermark Message box. You can...
... 256 characters. The message displays in Paper Options. 5. screen instructions to Page. 4. To change the print settings from your software application, access Printing Preferences. (See Opening printing preferences.) 2. Click the Advanced tab, and select the desired watermark from the ... to appear larger or smaller on a small document. 1. Using an existing watermark 1. To change the print settings from your software application, access Printing Preferences. (See Opening printing preferences.) 2. Enter the scaling rate in the Watermark Message box. You can...

User Guide
Page 51
..., access Printing Preferences. (See Opening To change the print settings from your software application, access Printing Preferences. (See Opening printing preferences.) 2. The Edit Watermarks window appears. 3. To change the watermark message and options. 4.... As window, type a name of letterhead paper. To change the print settings from the Current Watermarks list and change the print settings from your software application, access Printing Preferences. (See Opening printing preferences.) 2. Editing a watermark 1. Select the watermark you print with the overlay. Click Update to...
..., access Printing Preferences. (See Opening To change the print settings from your software application, access Printing Preferences. (See Opening printing preferences.) 2. The Edit Watermarks window appears. 3. To change the watermark message and options. 4.... As window, type a name of letterhead paper. To change the print settings from the Current Watermarks list and change the print settings from your software application, access Printing Preferences. (See Opening printing preferences.) 2. Editing a watermark 1. Select the watermark you print with the overlay. Click Update to...


