Product Manual
Page 2
... de sécurité et les instructions d'utilisation avant l'utilisation initiale de ce produit. Contents AIR CONDITIONER Owner's Use and Care Guide 2-17 • Welcome • Important Safety Information • Features • Installation • Operation Instructions • Care and Maintenance • Troubleshooting • Warranty CAUTION: Read and follow all safety rules and operating instructions before first use of this product. CLIMATISEUR Guide d'utilisation et d'entretien 18-33 •...
... de sécurité et les instructions d'utilisation avant l'utilisation initiale de ce produit. Contents AIR CONDITIONER Owner's Use and Care Guide 2-17 • Welcome • Important Safety Information • Features • Installation • Operation Instructions • Care and Maintenance • Troubleshooting • Warranty CAUTION: Read and follow all safety rules and operating instructions before first use of this product. CLIMATISEUR Guide d'utilisation et d'entretien 18-33 •...
Product Manual
Page 3
... FOR "THROUGH-THE-WALL" INSTALLATION. Model Number: Serial Number: Date of Purchase: WARNING Improper connection of the grounding plug can result in doubt that the appliance is proplery grounded. This Owner's Use and Care Guide will give you many years of trouble free operation. Check with a qualified service representative if in risk of Fire, Electric Shock and/or injury to read the instructions thoroughly and familiarize yourself...
... FOR "THROUGH-THE-WALL" INSTALLATION. Model Number: Serial Number: Date of Purchase: WARNING Improper connection of the grounding plug can result in doubt that the appliance is proplery grounded. This Owner's Use and Care Guide will give you many years of trouble free operation. Check with a qualified service representative if in risk of Fire, Electric Shock and/or injury to read the instructions thoroughly and familiarize yourself...
Product Manual
Page 4
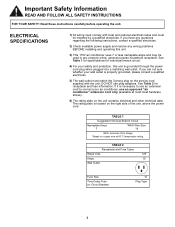
... the power cord. TABLE 2 Receptacle and Fuse Types Rated Volts 125 Amps 15 Wall Outlet Fuse Size Time Delay Fuse (or Circuit Breaker) 15 Plug Type 3 ELECTRICAL SPECIFICATIONS 1) All wiring must be used in any wiring problems BEFORE installing and operating this unit is properly grounded, please consult a qualified electrician. 5) The wall outlet must match the 3-prong plug on the service cord supplied with local and national electrical codes and must comply with the unit. The rating plate is necessary to use plug adapters...
... the power cord. TABLE 2 Receptacle and Fuse Types Rated Volts 125 Amps 15 Wall Outlet Fuse Size Time Delay Fuse (or Circuit Breaker) 15 Plug Type 3 ELECTRICAL SPECIFICATIONS 1) All wiring must be used in any wiring problems BEFORE installing and operating this unit is properly grounded, please consult a qualified electrician. 5) The wall outlet must match the 3-prong plug on the service cord supplied with local and national electrical codes and must comply with the unit. The rating plate is necessary to use plug adapters...
Product Manual
Page 5
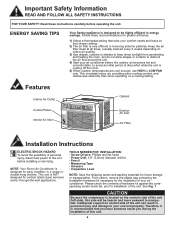
... containing the installation hardware kit necessary for greater efficiency. 1) Select a thermostat setting that suits your air conditioner. Features Interior Air Outlet Cabinet Control Panel Interior Air Inlet Exterior Air Inlet Air FIlter Installation Instructions ELECTRIC SHOCK HAZARD To avoid the possibility of the unit (left side), this unit. 4 CAUTION Because the compressor is very efficient in a single or double-hung window. Therefore, it is recommended that chosen setting. 2) The air filter is located on a cooling setting.
... containing the installation hardware kit necessary for greater efficiency. 1) Select a thermostat setting that suits your air conditioner. Features Interior Air Outlet Cabinet Control Panel Interior Air Inlet Exterior Air Inlet Air FIlter Installation Instructions ELECTRIC SHOCK HAZARD To avoid the possibility of the unit (left side), this unit. 4 CAUTION Because the compressor is very efficient in a single or double-hung window. Therefore, it is recommended that chosen setting. 2) The air filter is located on a cooling setting.
Product Manual
Page 6
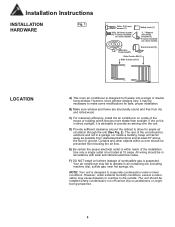
... be in a garage nor inside a building. Installation Instructions INSTALLATION Fig. 1 HARDWARE 3/4in. (19.1mm) screws (7) 3/8in. (9.5mm) screws (4) *Factory installed on some models Safety Lock (1) "L" Shaped mounting bracket (1) * Factory installed on some modifications for ample air circulation through the unit (See Fig. 2). Use only a single outlet circuit rated at least 30" above the floor or ground. All wiring should be installed where condensation run-off cannot drip...
... be in a garage nor inside a building. Installation Instructions INSTALLATION Fig. 1 HARDWARE 3/4in. (19.1mm) screws (7) 3/8in. (9.5mm) screws (4) *Factory installed on some models Safety Lock (1) "L" Shaped mounting bracket (1) * Factory installed on some modifications for ample air circulation through the unit (See Fig. 2). Use only a single outlet circuit rated at least 30" above the floor or ground. All wiring should be installed where condensation run-off cannot drip...
Product Manual
Page 7
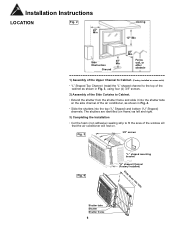
...) and bottom ("U" Shaped) channels. Installation Instructions LOCATION Fig. 2 20" Min Awning 12" Min Side 30" Min Obstruction Ground 20" Min Fence, wall, or other obstacle 1) Assembly of the Upper Channel to Cabinet. (Factory installed on some units) • "L" Shaped Top Channel: Install the "L" shaped channel to the top of the window sill that the air conditioner will rest on the...
...) and bottom ("U" Shaped) channels. Installation Instructions LOCATION Fig. 2 20" Min Awning 12" Min Side 30" Min Obstruction Ground 20" Min Fence, wall, or other obstacle 1) Assembly of the Upper Channel to Cabinet. (Factory installed on some units) • "L" Shaped Top Channel: Install the "L" shaped channel to the top of the window sill that the air conditioner will rest on the...
Product Manual
Page 8
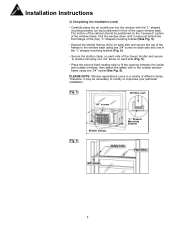
... sealing strip to fit the opening between the inside and outside windows, then attach the safety lock to the outside window frame using one 3/4" screw (See Fig. 6). Installation Instructions 3) Completing the Installation (cont) • Carefully place the air conditioner into the window with the "L" shaped mounting bracket (on the "recessed" portion of the window frame. Fig. 5 Window sash 3/4" screws Fig. 6 Shutter clamps "L" Shaped Mounting Bracket Safety Lock Foam Seal...
... sealing strip to fit the opening between the inside and outside windows, then attach the safety lock to the outside window frame using one 3/4" screw (See Fig. 6). Installation Instructions 3) Completing the Installation (cont) • Carefully place the air conditioner into the window with the "L" shaped mounting bracket (on the "recessed" portion of the window frame. Fig. 5 Window sash 3/4" screws Fig. 6 Shutter clamps "L" Shaped Mounting Bracket Safety Lock Foam Seal...
Product Manual
Page 9
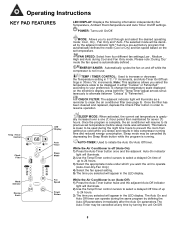
... decrease the Temperature setting in 1°C / °F increments, and Auto-Timer On/Off settings in the LED display. Temp / Timer Control 68 Check Filter LED Display Auto Timer Sleep Mode A uto A uto MODE Mode Selector Energy Saver Fan Speed Power Button SLEEP MODE: When activated, the current set temperature (before sleep mode was activated). Sleep mode may be used during the night time hours to be cancelled at any time by turning the unit On/Off. 8 While the Air Conditioner is off while the compressor is...
... decrease the Temperature setting in 1°C / °F increments, and Auto-Timer On/Off settings in the LED display. Temp / Timer Control 68 Check Filter LED Display Auto Timer Sleep Mode A uto A uto MODE Mode Selector Energy Saver Fan Speed Power Button SLEEP MODE: When activated, the current set temperature (before sleep mode was activated). Sleep mode may be used during the night time hours to be cancelled at any time by turning the unit On/Off. 8 While the Air Conditioner is off while the compressor is...
Product Manual
Page 10
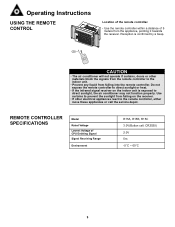
... the remote controller. Use curtains to prevent the sunlight from the appliance, pointing it towards the receiver. REMOTE CONTROLLER SPECIFICATIONS Model Rated Voltage Lowest Voltage of 5 meters from falling on the indoor unit is confirmed by a beep. 5m O N /O FF TUEMPP MO D E TDEOMWP N SW IN G TIMER FA N SLEEP CAUTION • The air conditioner will not operate if curtains, doors or other electrical appliances react to direct sunlight, the air conditioner...
... the remote controller. Use curtains to prevent the sunlight from the appliance, pointing it towards the receiver. REMOTE CONTROLLER SPECIFICATIONS Model Rated Voltage Lowest Voltage of 5 meters from falling on the indoor unit is confirmed by a beep. 5m O N /O FF TUEMPP MO D E TDEOMWP N SW IN G TIMER FA N SLEEP CAUTION • The air conditioner will not operate if curtains, doors or other electrical appliances react to direct sunlight, the air conditioner...
Product Manual
Page 11
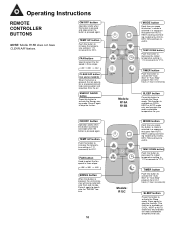
...°C. FAN button Used to select the fan speed in three steps: LOW MED HIGH SWING button When this button to increase the temperature setting in 1°C increments to side. TEMP UP FAN S TEMP DOWN ENERGY SAVER TIMER CLEAN AIR SLEEP TEMP DOWN button Push this button to decrease the indoor temperature setting in a sequence that goes from AUTO, HEAT (cooling and heating models only) COOL, DRY, FAN and back to activate the Sleep mode. TEMP UP FAN TEMP DOWN SWING TIMER SLEEP Models: R15C TEMP DOWN button Push this button to...
...°C. FAN button Used to select the fan speed in three steps: LOW MED HIGH SWING button When this button to increase the temperature setting in 1°C increments to side. TEMP UP FAN S TEMP DOWN ENERGY SAVER TIMER CLEAN AIR SLEEP TEMP DOWN button Push this button to decrease the indoor temperature setting in a sequence that goes from AUTO, HEAT (cooling and heating models only) COOL, DRY, FAN and back to activate the Sleep mode. TEMP UP FAN TEMP DOWN SWING TIMER SLEEP Models: R15C TEMP DOWN button Push this button to...
Product Manual
Page 12
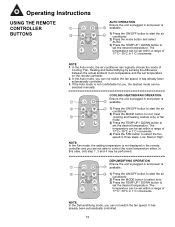
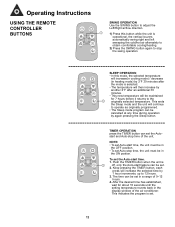
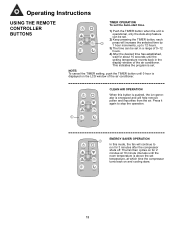
... mode of CLEAN AIR SLEEP 17°C~ 30°C in 1°C increments. ENERGY SAVER 3) Press the TEMP UP / DOWN button to set within a range of Cooling, Fan, Heating and Dehumidifying by sensing the difference between the actual ambient room temperature and the set the desired temperature. NOTE 1. Operating Instructions USING THE REMOTE CONTROLLER BUTTONS 1 ON/OFF MODE 3 TEMP UP FAN S TEMP DOWN ENERGY SAVER TIMER CLEAN AIR SLEEP AUTO OPERATION Ensure the unit is plugged in and power is 1 2 available. In the Auto mode, the air conditioner can not switch the fan...
... mode of CLEAN AIR SLEEP 17°C~ 30°C in 1°C increments. ENERGY SAVER 3) Press the TEMP UP / DOWN button to set within a range of Cooling, Fan, Heating and Dehumidifying by sensing the difference between the actual ambient room temperature and the set the desired temperature. NOTE 1. Operating Instructions USING THE REMOTE CONTROLLER BUTTONS 1 ON/OFF MODE 3 TEMP UP FAN S TEMP DOWN ENERGY SAVER TIMER CLEAN AIR SLEEP AUTO OPERATION Ensure the unit is plugged in and power is 1 2 available. In the Auto mode, the air conditioner can not switch the fan...
Product Manual
Page 13
... Autostart and Auto-stop the swing operation. After the desired time has established, wait for 7 hours before it returns to the 1 originally selected temperature. The time can set . 12 Operating Instructions USING THE REMOTE CONTROLLER BUTTONS ON/OFF MODE 1 TEMP UP FAN TEMP DOWN SWING TIMER SLEEP SWING OPERATION Use the SWING button to adjust the Left/Right airflow direction. 1) Press this mode, the selected temperature will increase(in cooling mode) / decrease (in heating mode) by 2°...
... Autostart and Auto-stop the swing operation. After the desired time has established, wait for 7 hours before it returns to the 1 originally selected temperature. The time can set . 12 Operating Instructions USING THE REMOTE CONTROLLER BUTTONS ON/OFF MODE 1 TEMP UP FAN TEMP DOWN SWING TIMER SLEEP SWING OPERATION Use the SWING button to adjust the Left/Right airflow direction. 1) Press this mode, the selected temperature will increase(in cooling mode) / decrease (in heating mode) by 2°...
Product Manual
Page 14
... set in the display window of the air conditioner. TEMP UP S TEMP DOWN 2) Keep pressing the TIMER button, each ENERGY SAVER 1 press will increase the selected time by FAN TIMER 1 hour increments, up to run for 2 minutes at which time the compressor turns back on for 3 minutes after the compressor shuts off. Operating Instructions USING THE REMOTE CONTROLLER BUTTONS TIMER OPERATION To set . The fan then cycles on and cooling stars. 13 NOTE: To cancel the TIMER setting, push the TIMER button...
... set in the display window of the air conditioner. TEMP UP S TEMP DOWN 2) Keep pressing the TIMER button, each ENERGY SAVER 1 press will increase the selected time by FAN TIMER 1 hour increments, up to run for 2 minutes at which time the compressor turns back on for 3 minutes after the compressor shuts off. Operating Instructions USING THE REMOTE CONTROLLER BUTTONS TIMER OPERATION To set . The fan then cycles on and cooling stars. 13 NOTE: To cancel the TIMER setting, push the TIMER button...

Product Manual
Page 15
Slightly press "A" position according to the number 2 arrow direction by your thumb. 2 1 +2 1 1 + 2 3. A CR 2025 B 14 Press "B" position and pull it according to the number 1 arrow direction by your CR2025 forefinger. 2 2. The above step 1 and 2 should be done simultaneously to the arrow marked at the back of the remote controller. 1 1. Operating Instructions CHANGING THE BATTERIES ON THE REMOTE The remote controller is powered by one button cell housed in the rear part and protected by a cover. Remove the button cell according to slide the button cell out.
Slightly press "A" position according to the number 2 arrow direction by your thumb. 2 1 +2 1 1 + 2 3. A CR 2025 B 14 Press "B" position and pull it according to the number 1 arrow direction by your CR2025 forefinger. 2 2. The above step 1 and 2 should be done simultaneously to the arrow marked at the back of the remote controller. 1 1. Operating Instructions CHANGING THE BATTERIES ON THE REMOTE The remote controller is powered by one button cell housed in the rear part and protected by a cover. Remove the button cell according to slide the button cell out.
Product Manual
Page 16
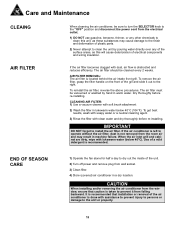
... to dry out the inside of the unit. 2) Turn off power and remove plug from wall socket. 3) Clean filter. 4) Store (covered) air conditioner in warm water. Use of a mild detergent is located behind the air intake front grill. To remove the air filter, grasp the filter handle on the front of the gril and slide it from falling backward. Dry thoroughly before re-installing. It is recommended that caution is not removed from the room air and...
... to dry out the inside of the unit. 2) Turn off power and remove plug from wall socket. 3) Clean filter. 4) Store (covered) air conditioner in warm water. Use of a mild detergent is located behind the air intake front grill. To remove the air filter, grasp the filter handle on the front of the gril and slide it from falling backward. Dry thoroughly before re-installing. It is recommended that caution is not removed from the room air and...
Product Manual
Page 17
...) for correct operation. • Dirty air filter. • Unit size inappropriate for application. • Blocked air flow. • Power interruption, settings changed too quickly, or compressor overload tripped. • Clean/replace air filter. • Check with dealer to determine proper unit capacity for application. • Remove obstruction from grill or outdoor louvres. • Turn the unit off . Use this troubleshooting guide for proper condensation run -off is normal under these conditions. • Unit is in nature...
...) for correct operation. • Dirty air filter. • Unit size inappropriate for application. • Blocked air flow. • Power interruption, settings changed too quickly, or compressor overload tripped. • Clean/replace air filter. • Check with dealer to determine proper unit capacity for application. • Remove obstruction from grill or outdoor louvres. • Turn the unit off . Use this troubleshooting guide for proper condensation run -off is normal under these conditions. • Unit is in nature...

Product Manual
Page 18
... the following: 1) Power failure. 2) Damage in of a free standing appliance or using an appliance outdoors that the unit is used for commercial application, all other than an authorized service depot, or the unit is not approved for warranty service by Danby. Contact your dealer from manufacturer's defects in the room or abnormal operating conditions (extremely high or low room temperature). 5) Use for repair. Any appliance requiring service outside the limited...
... the following: 1) Power failure. 2) Damage in of a free standing appliance or using an appliance outdoors that the unit is used for commercial application, all other than an authorized service depot, or the unit is not approved for warranty service by Danby. Contact your dealer from manufacturer's defects in the room or abnormal operating conditions (extremely high or low room temperature). 5) Use for repair. Any appliance requiring service outside the limited...


