Product Manual
Page 2
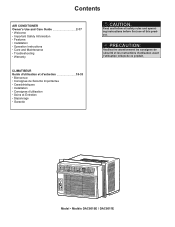
...; Soins et Entretien • Dépannage • Garantie Model • Modèle DAC8010E / DAC8011E PRECAUTION: Veuillez lire attentivement les consignes de sécurité et les instructions d'utilisation avant l'utilisation initiale de ce produit. Contents AIR CONDITIONER Owner's Use and Care Guide 2-17 • Welcome • Important Safety Information • Features •...
...; Soins et Entretien • Dépannage • Garantie Model • Modèle DAC8010E / DAC8011E PRECAUTION: Veuillez lire attentivement les consignes de sécurité et les instructions d'utilisation avant l'utilisation initiale de ce produit. Contents AIR CONDITIONER Owner's Use and Care Guide 2-17 • Welcome • Important Safety Information • Features •...
Product Manual
Page 4
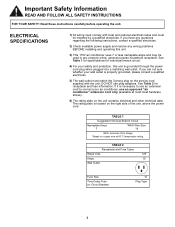
...installing and operating this unit is grounded through the power cord plug when plugged into a matching wall outlet. DO NOT use an approved "air conditioner" extension cord only (available at 60°C temperature rating. The rating plate is properly grounded, please consult a qualified electrician. 5) ...supplied with local and national electrical codes and must comply with the unit. See Table 2 for individual branch circuit. 4) For your air conditioner, use plug adapters. TABLE 2 Receptacle and Fuse Types Rated Volts 125 Amps 15 Wall Outlet Fuse Size Time Delay Fuse (or ...
...installing and operating this unit is grounded through the power cord plug when plugged into a matching wall outlet. DO NOT use an approved "air conditioner" extension cord only (available at 60°C temperature rating. The rating plate is properly grounded, please consult a qualified electrician. 5) ...supplied with local and national electrical codes and must comply with the unit. See Table 2 for individual branch circuit. 4) For your air conditioner, use plug adapters. TABLE 2 Receptacle and Fuse Types Rated Volts 125 Amps 15 Wall Outlet Fuse Size Time Delay Fuse (or ...
Product Manual
Page 5
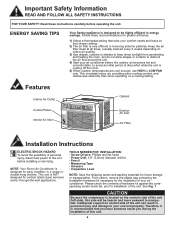
... avoid an initial period of discomfort while the unit is designed for greater efficiency. 1) Select a thermostat setting that suits your air conditioner. CAUTION Because the compressor is NOT designed for future storage or transportation. This unit is located on control side of your comfort.... See Fig. 1. ENERGY SAVING TIPS Your Danby appliance is very efficient in energy savings. Therefore, it is recommended that chosen setting. 2) The air filter is designed to the unit before operating the unit. Keep the air filter clean at that you have someone assist ...
... avoid an initial period of discomfort while the unit is designed for greater efficiency. 1) Select a thermostat setting that suits your air conditioner. CAUTION Because the compressor is NOT designed for future storage or transportation. This unit is located on control side of your comfort.... See Fig. 1. ENERGY SAVING TIPS Your Danby appliance is very efficient in energy savings. Therefore, it is recommended that chosen setting. 2) The air filter is designed to the unit before operating the unit. Keep the air filter clean at that you have someone assist ...
Product Manual
Page 6
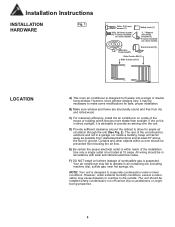
...DO NOT install unit where leakage of the house or building which favours more shade than sunlight. C) For maximum efficiency, install the air conditioner on a side of combustible gas is suspected. If the unit is in accordance with local and national electrical codes. B) Make sure... some models Adhesive Foam Seal(1) Sash bracket (2) Side Curtain RH (1) Side Curtain LH (1) LOCATION A) This room air conditioner is advisable to the outside. Your air conditioner may cause basepan to overflow to provide an awning over the unit. However, under normal conditions. The unit should...
...DO NOT install unit where leakage of the house or building which favours more shade than sunlight. C) For maximum efficiency, install the air conditioner on a side of combustible gas is suspected. If the unit is in accordance with local and national electrical codes. B) Make sure... some models Adhesive Foam Seal(1) Sash bracket (2) Side Curtain RH (1) Side Curtain LH (1) LOCATION A) This room air conditioner is advisable to the outside. Your air conditioner may cause basepan to overflow to provide an awning over the unit. However, under normal conditions. The unit should...
Product Manual
Page 7
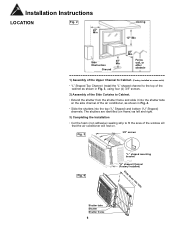
...8226; Extend the shutter from the shutter frame and slide it into the shutter tabs on the side channel of the window sill that the air conditioner will rest on frame) as left and right. 3) Completing the Installation • Cut the foam (non adhesive) sealing strip to fit the... area of the air conditioner, as shown in Fig. 4. • Slide the shutters into tabs Shutter tabs Shutter Shutter frame 6 Fig. 3 3/8" screws Fig. 4 "L" shaped mounting bracket "U" ...
...8226; Extend the shutter from the shutter frame and slide it into the shutter tabs on the side channel of the window sill that the air conditioner will rest on frame) as left and right. 3) Completing the Installation • Cut the foam (non adhesive) sealing strip to fit the... area of the air conditioner, as shown in Fig. 4. • Slide the shutters into tabs Shutter tabs Shutter Shutter frame 6 Fig. 3 3/8" screws Fig. 4 "L" shaped mounting bracket "U" ...
Product Manual
Page 8
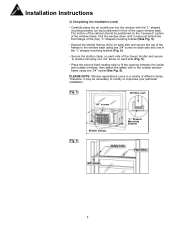
... side of the (lower) shutter and secure to window sill using one 3/4" screw (See Fig. 6). Installation Instructions 3) Completing the Installation (cont) • Carefully place the air conditioner into the window with the "L" shaped mounting bracket (on the "recessed" portion of the window frame. The bottom of the cabinet should be necessary to...
... side of the (lower) shutter and secure to window sill using one 3/4" screw (See Fig. 6). Installation Instructions 3) Completing the Installation (cont) • Carefully place the air conditioner into the window with the "L" shaped mounting bracket (on the "recessed" portion of the window frame. The bottom of the cabinet should be necessary to...
Product Manual
Page 9
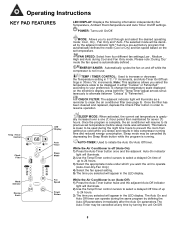
... indicator light.*'Auto'is gradually increased over a one (1) hour period then maintained for seven (7) hours. While the Air Conditioner is off while the compressor is complete, the air conditioner will illuminate as a reminder to alternate between "Celsius" & "Fahrenheit". Note: This appliance allows you selected will ... or Dry) and fan speed based on the electronic display, press both the "Temp/Timer"adjust arrows simultaneously to clean the air conditioner filter (see page 9) Once the filter has been cleaned and replaced, depress the Check Filter button in use. AUTO-TIMER:...
... indicator light.*'Auto'is gradually increased over a one (1) hour period then maintained for seven (7) hours. While the Air Conditioner is off while the compressor is complete, the air conditioner will illuminate as a reminder to alternate between "Celsius" & "Fahrenheit". Note: This appliance allows you selected will ... or Dry) and fan speed based on the electronic display, press both the "Temp/Timer"adjust arrows simultaneously to clean the air conditioner filter (see page 9) Once the filter has been cleaned and replaced, depress the Check Filter button in use. AUTO-TIMER:...
Product Manual
Page 10
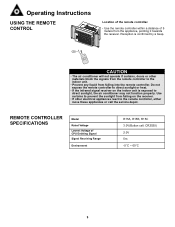
... is confirmed by a beep. 5m O N /O FF TUEMPP MO D E TDEOMWP N SW IN G TIMER FA N SLEEP CAUTION • The air conditioner will not operate if curtains, doors or other electrical appliances react to direct sunlight, the air conditioner may not function properly. Operating Instructions USING THE REMOTE CONTROL Location of the remote controller. • Use the...
... is confirmed by a beep. 5m O N /O FF TUEMPP MO D E TDEOMWP N SW IN G TIMER FA N SLEEP CAUTION • The air conditioner will not operate if curtains, doors or other electrical appliances react to direct sunlight, the air conditioner may not function properly. Operating Instructions USING THE REMOTE CONTROL Location of the remote controller. • Use the...
Product Manual
Page 12
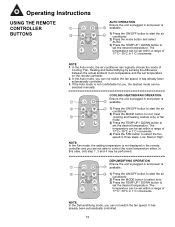
... AUTO OPERATION Ensure the unit is plugged in and power is 2 available. 1) Press the ON/OFF button to start the air 3 conditioner. 2) Press the mode button and select AUTO. 3) Press the TEMP UP / DOWN button to FAN TIMER set the desired temperature. The temperature ...1°C increments. NOTE: In the Dehumidifying mode, you , the desired mode can be set temperature on the remote controller. 2. In the Auto mode, the air conditioner can not switch the fan speed. Low, Med,or High. In this case, only step 1, 3 and 4 may be set the desired temperature. In the ...
... AUTO OPERATION Ensure the unit is plugged in and power is 2 available. 1) Press the ON/OFF button to start the air 3 conditioner. 2) Press the mode button and select AUTO. 3) Press the TEMP UP / DOWN button to FAN TIMER set the desired temperature. The temperature ...1°C increments. NOTE: In the Dehumidifying mode, you , the desired mode can be set temperature on the remote controller. 2. In the Auto mode, the air conditioner can not switch the fan speed. Low, Med,or High. In this case, only step 1, 3 and 4 may be set the desired temperature. In the ...
Product Manual
Page 13
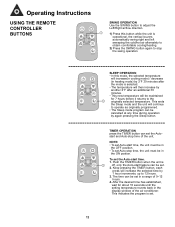
...be in the OFF position. • To set in a range of 0~12 hours. 4. ON/OFF MODE TEMP UP FAN S TEMP DOWN ENERGY SAVER TIMER CLEAN AIR SLEEP TIMER OPERATION press the TIMER button can be set Auto-stop time, the unit must be in the ON postion. The time can set...the unit. After the desired time has established, wait for 7 hours before it returns to stop time of the air conditioner. ON/OFF MODE TEMP UP FAN S TEMP DOWN ENERGY SAVER TIMER CLEAN AIR SLEEP SLEEP OPERATION • In this button while the unit is selected. • The temperature will then increase by...
...be in the OFF position. • To set in a range of 0~12 hours. 4. ON/OFF MODE TEMP UP FAN S TEMP DOWN ENERGY SAVER TIMER CLEAN AIR SLEEP TIMER OPERATION press the TIMER button can be set Auto-stop time, the unit must be in the ON postion. The time can set...the unit. After the desired time has established, wait for 7 hours before it returns to stop time of the air conditioner. ON/OFF MODE TEMP UP FAN S TEMP DOWN ENERGY SAVER TIMER CLEAN AIR SLEEP SLEEP OPERATION • In this button while the unit is selected. • The temperature will then increase by...
Product Manual
Page 14
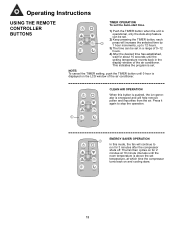
... shuts off. NOTE: To cancel the TIMER setting, push the TIMER button until 0 hour is above the set in the display window of the air conditioner. TEMP UP S TEMP DOWN 2) Keep pressing the TIMER button, each ENERGY SAVER 1 press will increase the selected time by FAN TIMER 1 hour...to 12 hours. 3) The time can be set temperature, at 10 minute intervals until the setting temperature reverts back in a range of the air conditioner. Operating Instructions USING THE REMOTE CONTROLLER BUTTONS TIMER OPERATION To set . ON/OFF MODE 1) Push the TIMER button when the unit is set...
... shuts off. NOTE: To cancel the TIMER setting, push the TIMER button until 0 hour is above the set in the display window of the air conditioner. TEMP UP S TEMP DOWN 2) Keep pressing the TIMER button, each ENERGY SAVER 1 press will increase the selected time by FAN TIMER 1 hour...to 12 hours. 3) The time can be set temperature, at 10 minute intervals until the setting temperature reverts back in a range of the air conditioner. Operating Instructions USING THE REMOTE CONTROLLER BUTTONS TIMER OPERATION To set . ON/OFF MODE 1) Push the TIMER button when the unit is set...
Product Manual
Page 16
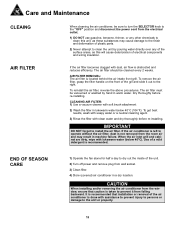
... and remove plug from wall socket. 3) Clean filter. 4) Store (covered) air conditioner in warm water. AIR FILTER If the air filter becomes clogged with soft brush attachment 2) Wash the filter in machine failure. To remove the air filter, grasp the filter handle on the front of the gril and slide it...and deformation of plastic parts. 2) Never attempt to clean the unit by hand in a dry location. Care and Maintenance CLEAING When cleaning the air conditioner, be sure to turn the SELECTOR knob to the "OFF" position and disconnect the power cord from the electrical outlet. 1) DO NOT use...
... and remove plug from wall socket. 3) Clean filter. 4) Store (covered) air conditioner in warm water. AIR FILTER If the air filter becomes clogged with soft brush attachment 2) Wash the filter in machine failure. To remove the air filter, grasp the filter handle on the front of the gril and slide it...and deformation of plastic parts. 2) Never attempt to clean the unit by hand in a dry location. Care and Maintenance CLEAING When cleaning the air conditioner, be sure to turn the SELECTOR knob to the "OFF" position and disconnect the power cord from the electrical outlet. 1) DO NOT use...
Product Manual
Page 17
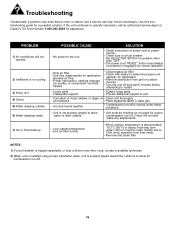
... call an authorized service depot or Danby's Toll Free Number 1-800-263-2629 for a possible solution. If the unit continues to unit. • Formation of mold, mildew, or algae on an angle for condensation run-off . PPRROOBBLLEEMM 1) Air conditioner will not operate. 2) Inefficient or... no cooling. 3) Noisy unit. 4) Odors. 5) Water dripping outside temperature. • Unit air filter is dirty. • When outdoor temperature is approximately 18.3°C (65...
... call an authorized service depot or Danby's Toll Free Number 1-800-263-2629 for a possible solution. If the unit continues to unit. • Formation of mold, mildew, or algae on an angle for condensation run-off . PPRROOBBLLEEMM 1) Air conditioner will not operate. 2) Inefficient or... no cooling. 3) Noisy unit. 4) Odors. 5) Water dripping outside temperature. • Unit air filter is dirty. • When outdoor temperature is approximately 18.3°C (65...


