Product Manual
Page 2
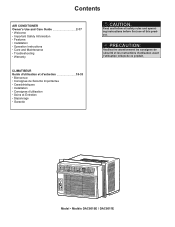
Contents AIR CONDITIONER Owner's Use and Care Guide 2-17 • Welcome • Important Safety Information • Features • Installation • Operation Instructions • Care and Maintenance • Troubleshooting... • Caractéristiques • Installation • Consignes d'utilisation • Soins et Entretien • Dépannage • Garantie Model • Modèle DAC8010E / DAC8011E PRECAUTION: Veuillez lire attentivement les consignes de sécurité et les instructions d'utilisation avant l'utilisation initiale de ce produit.
Contents AIR CONDITIONER Owner's Use and Care Guide 2-17 • Welcome • Important Safety Information • Features • Installation • Operation Instructions • Care and Maintenance • Troubleshooting... • Caractéristiques • Installation • Consignes d'utilisation • Soins et Entretien • Dépannage • Garantie Model • Modèle DAC8010E / DAC8011E PRECAUTION: Veuillez lire attentivement les consignes de sécurité et les instructions d'utilisation avant l'utilisation initiale de ce produit.
Product Manual
Page 4
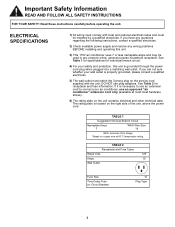
... power supply and resolve any wiring problems BEFORE installing and operating this unit is necessary to use an extension cord to connect your air conditioner, use plug adapters. TABLE 1 Suggested Individual Branch Circuit Nameplate Amps 7 *AWG Wire Size 16 AWG- If it is grounded ...amps and may be installed by a qualified electrician. ELECTRICAL SPECIFICATIONS 1) All wiring must comply with the unit. DO NOT use an approved "air conditioner" extension cord only (available at 60°C temperature rating. See Table 2 for individual branch circuit. 4) For your wall outlet is ...
... power supply and resolve any wiring problems BEFORE installing and operating this unit is necessary to use an extension cord to connect your air conditioner, use plug adapters. TABLE 1 Suggested Individual Branch Circuit Nameplate Amps 7 *AWG Wire Size 16 AWG- If it is grounded ...amps and may be installed by a qualified electrician. ELECTRICAL SPECIFICATIONS 1) All wiring must comply with the unit. DO NOT use an approved "air conditioner" extension cord only (available at 60°C temperature rating. See Table 2 for individual branch circuit. 4) For your wall outlet is ...
Product Manual
Page 5
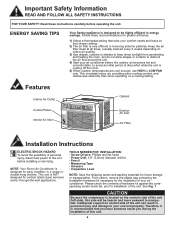
...room, but do not allow drapes or curtains to obstruct the air flow around the unit. 4) Start your air conditioner before the outdoor air becomes hot and uncomfortable, to your air conditioner. This circulates indoor air, providing some cooling comfort, and utilizes less electricity than when ... temperatures are cool enough, use HIGH or LOW FAN only. NOTE: Your Room Air Conditioner is NOT designed for future storage or transportation. See Fig. 1. ENERGY SAVING TIPS Your Danby appliance is very efficient in energy savings. Follow these instructions carefully before installing or ...
...room, but do not allow drapes or curtains to obstruct the air flow around the unit. 4) Start your air conditioner before the outdoor air becomes hot and uncomfortable, to your air conditioner. This circulates indoor air, providing some cooling comfort, and utilizes less electricity than when ... temperatures are cool enough, use HIGH or LOW FAN only. NOTE: Your Room Air Conditioner is NOT designed for future storage or transportation. See Fig. 1. ENERGY SAVING TIPS Your Danby appliance is very efficient in energy savings. Follow these instructions carefully before installing or ...
Product Manual
Page 6
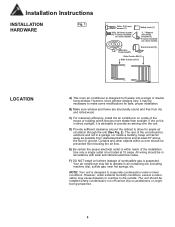
... as possible from dry and rotted wood. However, under normal conditions. C) For maximum efficiency, install the air conditioner on a side of the installation. Your air conditioner may cause basepan to overflow to allow for safe, proper installation. Installation Instructions INSTALLATION Fig. 1 HARDWARE 3/... some models Adhesive Foam Seal(1) Sash bracket (2) Side Curtain RH (1) Side Curtain LH (1) LOCATION A) This room air conditioner is designed to evaporate condensation under extreme humidity conditions, excess condensation may fail to provide an awning over the unit....
... as possible from dry and rotted wood. However, under normal conditions. C) For maximum efficiency, install the air conditioner on a side of the installation. Your air conditioner may cause basepan to overflow to allow for safe, proper installation. Installation Instructions INSTALLATION Fig. 1 HARDWARE 3/... some models Adhesive Foam Seal(1) Sash bracket (2) Side Curtain RH (1) Side Curtain LH (1) LOCATION A) This room air conditioner is designed to evaporate condensation under extreme humidity conditions, excess condensation may fail to provide an awning over the unit....
Product Manual
Page 7
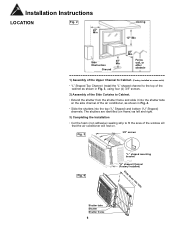
.... 3) Completing the Installation • Cut the foam (non adhesive) sealing strip to fit the area of the window sill that the air conditioner will rest on the side channel of the air conditioner, as shown in Fig. 3, using four (4) 3/8" screws. 2) Assembly of the Side Curtains to the top of the Upper Channel to Cabinet...
.... 3) Completing the Installation • Cut the foam (non adhesive) sealing strip to fit the area of the window sill that the air conditioner will rest on the side channel of the air conditioner, as shown in Fig. 3, using four (4) 3/8" screws. 2) Assembly of the Side Curtains to the top of the Upper Channel to Cabinet...
Product Manual
Page 8
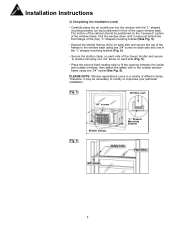
.... 6). Fig. 5 Window sash 3/4" screws Fig. 6 Shutter clamps "L" Shaped Mounting Bracket Safety Lock Foam Seal 3/4" screw 7 Installation Instructions 3) Completing the Installation (cont) • Carefully place the air conditioner into the window with the "L" shaped mounting bracket (on each side of the (lower) shutter and secure to window sill using one 3/4" screw on top...
.... 6). Fig. 5 Window sash 3/4" screws Fig. 6 Shutter clamps "L" Shaped Mounting Bracket Safety Lock Foam Seal 3/4" screw 7 Installation Instructions 3) Completing the Installation (cont) • Carefully place the air conditioner into the window with the "L" shaped mounting bracket (on each side of the (lower) shutter and secure to window sill using one 3/4" screw on top...
Product Manual
Page 9
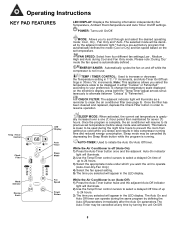
... initiate the Auto On/ Auto Off timer. increments. Sleep mode may be cancelled by turning the unit On/Off. 8 While the Air Conditioner is complete, the air conditioner will appear in less compressor running . The Auto On and Auto Off timer can operate during Cool and Fan Only mode. FAN SPEED...on (Auto-Off): 1) Press the Auto-Timer button twice and the adjacent Auto-Off indicator light will illuminate as a reminder to clean the air conditioner filter (see page 9) Once the filter has been cleaned and replaced, depress the Check Filter button in order to your preference.To change ...
... initiate the Auto On/ Auto Off timer. increments. Sleep mode may be cancelled by turning the unit On/Off. 8 While the Air Conditioner is complete, the air conditioner will appear in less compressor running . The Auto On and Auto Off timer can operate during Cool and Fan Only mode. FAN SPEED...on (Auto-Off): 1) Press the Auto-Timer button twice and the adjacent Auto-Off indicator light will illuminate as a reminder to clean the air conditioner filter (see page 9) Once the filter has been cleaned and replaced, depress the Check Filter button in order to your preference.To change ...
Product Manual
Page 10
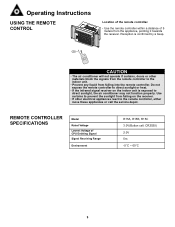
...confirmed by a beep. 5m O N /O FF TUEMPP MO D E TDEOMWP N SW IN G TIMER FA N SLEEP CAUTION • The air conditioner will not operate if curtains, doors or other electrical appliances react to the indoor unit. • Prevent any liquid from the appliance, pointing it... Model Rated Voltage Lowest Voltage of 5 meters from falling into the remote controller. Reception is exposed to direct sunlight, the air conditioner may not function properly. Operating Instructions USING THE REMOTE CONTROL Location of the remote controller. • Use the remote controller within...
...confirmed by a beep. 5m O N /O FF TUEMPP MO D E TDEOMWP N SW IN G TIMER FA N SLEEP CAUTION • The air conditioner will not operate if curtains, doors or other electrical appliances react to the indoor unit. • Prevent any liquid from the appliance, pointing it... Model Rated Voltage Lowest Voltage of 5 meters from falling into the remote controller. Reception is exposed to direct sunlight, the air conditioner may not function properly. Operating Instructions USING THE REMOTE CONTROL Location of the remote controller. • Use the remote controller within...
Product Manual
Page 12
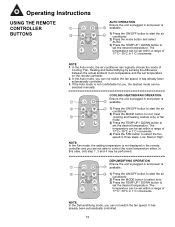
... is not displayed in and power is 1 2 available. In the Auto mode, the air conditioner can be set the desired temperature. ON/OFF MODE 3 3 1) Press the ON/OFF button to start the air TEMP UP S TEMP DOWN conditioner. 2) Press the MODE button to cool, heat 4 ENERGY SAVER (cooling and heating models... AUTO OPERATION Ensure the unit is plugged in and power is 2 available. 1) Press the ON/OFF button to start the air 3 conditioner. 2) Press the mode button and select AUTO. 3) Press the TEMP UP / DOWN button to set within a range of 17°C~ 30°C in 1°C ...
... is not displayed in and power is 1 2 available. In the Auto mode, the air conditioner can be set the desired temperature. ON/OFF MODE 3 3 1) Press the ON/OFF button to start the air TEMP UP S TEMP DOWN conditioner. 2) Press the MODE button to cool, heat 4 ENERGY SAVER (cooling and heating models... AUTO OPERATION Ensure the unit is plugged in and power is 2 available. 1) Press the ON/OFF button to start the air 3 conditioner. 2) Press the mode button and select AUTO. 3) Press the TEMP UP / DOWN button to set within a range of 17°C~ 30°C in 1°C ...
Product Manual
Page 13
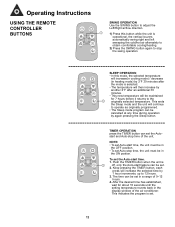
...the unit must be in the OFF position. • To set Auto-stop time, the unit must be set in the display window of the air conditioner. Keep pressing the TIMER button, each press will increase(in cooling mode) / decrease (in heating mode) by 2°F 30 minutes after an...returns to the 1 originally selected temperature. This indicates the program is operational, the vertical louvers automatically swing right and left sweeping the cold/hot air alternately to obtain comfortable cooling/heating. 2) Press the SWING button again to stop time of 0~12 hours. 4. The time can be cancelled ...
...the unit must be in the OFF position. • To set Auto-stop time, the unit must be set in the display window of the air conditioner. Keep pressing the TIMER button, each press will increase(in cooling mode) / decrease (in heating mode) by 2°F 30 minutes after an...returns to the 1 originally selected temperature. This indicates the program is operational, the vertical louvers automatically swing right and left sweeping the cold/hot air alternately to obtain comfortable cooling/heating. 2) Press the SWING button again to stop time of 0~12 hours. 4. The time can be cancelled ...
Product Manual
Page 14
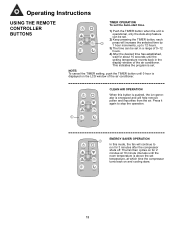
... the Auto-stop the operation. 1 ON/OFF MODE TEMP UP FAN S TEMP DOWN ENERGY SAVER TIMER CLEAN AIR SLEEP ENERGY SAVER OPERATION In this mode, the fan will increase the selected time by FAN TIMER 1 hour ... is set temperature, at 10 minute intervals until the setting temperature reverts back in a range of the air conditioner. CLEAN AIR SLEEP 4) After the desired time has established, wait for about 10 seconds until the room temperature is ... To set in the display window of the air conditioner. The fan then cycles on for 3 minutes after the compressor shuts off.
... the Auto-stop the operation. 1 ON/OFF MODE TEMP UP FAN S TEMP DOWN ENERGY SAVER TIMER CLEAN AIR SLEEP ENERGY SAVER OPERATION In this mode, the fan will increase the selected time by FAN TIMER 1 hour ... is set temperature, at 10 minute intervals until the setting temperature reverts back in a range of the air conditioner. CLEAN AIR SLEEP 4) After the desired time has established, wait for about 10 seconds until the room temperature is ... To set in the display window of the air conditioner. The fan then cycles on for 3 minutes after the compressor shuts off.
Product Manual
Page 16
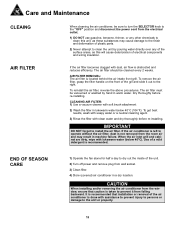
... detergent is located behind the air intake front grill. To reinstall the air filter, reverse the above procedures. If the air conditioner is left to operate without the air filter, dust is obstructed and reduces efficiency. AIR FILTER REMOVAL: The air filter is recommended. CLEANING AIR FILTER: 1) Use a vacuum cleaner with dust, air flow is not removed from the...
... detergent is located behind the air intake front grill. To reinstall the air filter, reverse the above procedures. If the air conditioner is left to operate without the air filter, dust is obstructed and reduces efficiency. AIR FILTER REMOVAL: The air filter is recommended. CLEANING AIR FILTER: 1) Use a vacuum cleaner with dust, air flow is not removed from the...
Product Manual
Page 17
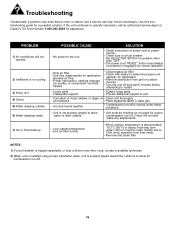
Troubleshooting Occasionally a problem may arise that is minor in nature, and a service call an authorized service depot or Danby's Toll Free Number 1-800-263-2629 for a possible solution. SSOOLLUUTTIIOONNS • Check connection of power cord to power source. ...• When outdoor temperature is approximately 18.3°C (65°F) or below, frost may not be installed on • Clean unit thoroughly. PPRROOBBLLEEMM 1) Air conditioner will not operate. 2) Inefficient or no cooling. 3) Noisy unit. 4) Odors. 5) Water dripping outside . • Unit must always be pushed in ...
Troubleshooting Occasionally a problem may arise that is minor in nature, and a service call an authorized service depot or Danby's Toll Free Number 1-800-263-2629 for a possible solution. SSOOLLUUTTIIOONNS • Check connection of power cord to power source. ...• When outdoor temperature is approximately 18.3°C (65°F) or below, frost may not be installed on • Clean unit thoroughly. PPRROOBBLLEEMM 1) Air conditioner will not operate. 2) Inefficient or no cooling. 3) Noisy unit. 4) Odors. 5) Water dripping outside . • Unit must always be pushed in ...


