Installation Guide
Page 4
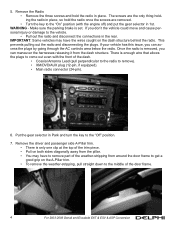
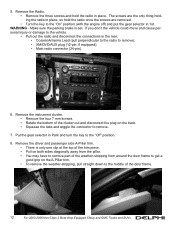
... engine off) and put the gear selector in place. Make sure the parking brake is enough wire that allows the plugs to remove). • XM/DVD/AUX plug (12-pin, if equipped). • Main radio connector (24-pin). 6. Put the gear selector in the rear. WARNING - If you don't the vehicle... could move and cause personal injury or damage to the vehicle. • Pull out the radio and disconnect the connections in Park and turn the key to the middle of the door frame. 4 For 2003-2006 Denali and Escalade EXT & ESV & ASP Conversion IMPORTANT: Some...
... engine off) and put the gear selector in place. Make sure the parking brake is enough wire that allows the plugs to remove). • XM/DVD/AUX plug (12-pin, if equipped). • Main radio connector (24-pin). 6. Put the gear selector in the rear. WARNING - If you don't the vehicle... could move and cause personal injury or damage to the vehicle. • Pull out the radio and disconnect the connections in Park and turn the key to the middle of the door frame. 4 For 2003-2006 Denali and Escalade EXT & ESV & ASP Conversion IMPORTANT: Some...
Installation Guide
Page 8
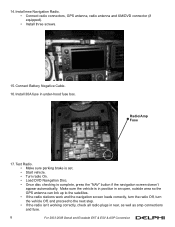
...17. Test Radio. • Make sure parking brake is set. • Start vehicle. • Turn radio On. • Load DVD Navigation Disc. • Once disc checking is in position in an open, outside area so the GPS antenna can link up to the satellites.... Make sure the vehicle is complete, press the "NAV" button if the navigation screen doesn't appear automatically. 14. Connect Battery Negative Cable. 16. Install new Navigation Radio. • Connect radio connectors, GPS antenna, radio antenna and XM/DVD connector (if equipped). • Install three screws. 15. Install 30A fuse ...
...17. Test Radio. • Make sure parking brake is set. • Start vehicle. • Turn radio On. • Load DVD Navigation Disc. • Once disc checking is in position in an open, outside area so the GPS antenna can link up to the satellites.... Make sure the vehicle is complete, press the "NAV" button if the navigation screen doesn't appear automatically. 14. Connect Battery Negative Cable. 16. Install new Navigation Radio. • Connect radio connectors, GPS antenna, radio antenna and XM/DVD connector (if equipped). • Install three screws. 15. Install 30A fuse ...
Installation Guide
Page 9
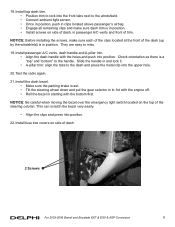
... lock it. • A-pillar trim: align the tabs to the dash and press the metal clip into the front tabs next to the windshield. • Connect ambient light sensor. • Once in position, push in clips located above passenger's airbag. • Engage all remaining clips and make sure each of the...
... lock it. • A-pillar trim: align the tabs to the dash and press the metal clip into the front tabs next to the windshield. • Connect ambient light sensor. • Once in position, push in clips located above passenger's airbag. • Engage all remaining clips and make sure each of the...

Installation Guide
Page 10
Finished. Refer to the Owner's Manual for operation. • If everything works correctly, then continue. • If something doesn't work correctly, check the connections or something that may have been moved or bumped from the last time you tested. 24. 23. NOTES: 10 For 2003-2006 Denali and Escalade EXT & ESV & ASP Conversion Test Radio, A/C and Instrument Cluster for setting up and operating the Navigation Radio. 25.
Finished. Refer to the Owner's Manual for operation. • If everything works correctly, then continue. • If something doesn't work correctly, check the connections or something that may have been moved or bumped from the last time you tested. 24. 23. NOTES: 10 For 2003-2006 Denali and Escalade EXT & ESV & ASP Conversion Test Radio, A/C and Instrument Cluster for setting up and operating the Navigation Radio. 25.
Installation Guide
Page 12
... vehicle could move and cause personal injury or damage to the vehicle. • Pull out the radio and disconnect the connections in Park and turn the key to remove). • XM/DVD/AUX plug (12-pin, if equipped). • Main radio connector (24-pin). 6. 5. Put the gear selector in the rear. •...
... vehicle could move and cause personal injury or damage to the vehicle. • Pull out the radio and disconnect the connections in Park and turn the key to remove). • XM/DVD/AUX plug (12-pin, if equipped). • Main radio connector (24-pin). 6. 5. Put the gear selector in the rear. •...
Installation Guide
Page 16
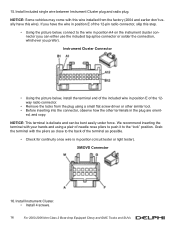
...Cluster plug and radio plug. NOTICE: This terminal is in position A4 on the instrument cluster connector (you can be bent easily under force. XM/DVD Connector 16. NOTICE: Some vehicles may come with this wire). Install Instrument Cluster. • Install 4 screws. 16 For 2003-2006 Non-Class... terminal as possible. • Check for continuity once wire is delicate and can either use the included tap splice connector or solder the connection, whichever you prefer). We recommend inserting the terminal with the pliers as close to the back of the 12-pin radio connector, skip ...
...Cluster plug and radio plug. NOTICE: This terminal is in position A4 on the instrument cluster connector (you can be bent easily under force. XM/DVD Connector 16. NOTICE: Some vehicles may come with this wire). Install Instrument Cluster. • Install 4 screws. 16 For 2003-2006 Non-Class... terminal as possible. • Check for continuity once wire is delicate and can either use the included tap splice connector or solder the connection, whichever you prefer). We recommend inserting the terminal with the pliers as close to the back of the 12-pin radio connector, skip ...
Installation Guide
Page 17
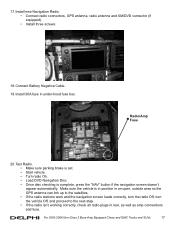
17. Make sure the vehicle is complete, press the "NAV" button if the navigation screen doesn't appear automatically. Install new Navigation Radio. • Connect radio connectors, GPS antenna, radio antenna and XM/DVD connector (if equipped). • Install three screws. 18. For 2003-2006 Non-Class 2 Bose Amp .../Amp Fuse 20. Install 30A fuse in rear, as well as amp connections and fuse. Test Radio. • Make sure parking brake is set. • Start vehicle. • Turn radio On. • Load DVD Navigation Disc. • Once disc checking is in position in an open, ...
17. Make sure the vehicle is complete, press the "NAV" button if the navigation screen doesn't appear automatically. Install new Navigation Radio. • Connect radio connectors, GPS antenna, radio antenna and XM/DVD connector (if equipped). • Install three screws. 18. For 2003-2006 Non-Class 2 Bose Amp .../Amp Fuse 20. Install 30A fuse in rear, as well as amp connections and fuse. Test Radio. • Make sure parking brake is set. • Start vehicle. • Turn radio On. • Load DVD Navigation Disc. • Once disc checking is in position in an open, ...
Installation Guide
Page 18
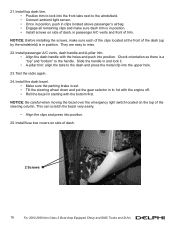
..., make sure dash trim is a "top" and "bottom" to the dash and press the metal clip into the front tabs next to the windshield. • Connect ambient light sensor. • Once in position, push in clips located above passenger's airbag. • Engage all remaining clips and make sure each of the...
..., make sure dash trim is a "top" and "bottom" to the dash and press the metal clip into the front tabs next to the windshield. • Connect ambient light sensor. • Once in position, push in clips located above passenger's airbag. • Engage all remaining clips and make sure each of the...
Installation Guide
Page 19
Refer to the Owner's Manual for operation. • If everything works correctly, then continue. • If something doesn't work correctly, check the connections or something that may have been moved or bumped from the last time you tested. 27. Test Radio, A/C and Instrument Cluster for setting up and operating the Navigation Radio. 28. Finished. NOTES: For 2003-2006 Non-Class 2 Bose Amp Equipped Chevy and GMC Trucks and SUVs 19 26.
Refer to the Owner's Manual for operation. • If everything works correctly, then continue. • If something doesn't work correctly, check the connections or something that may have been moved or bumped from the last time you tested. 27. Test Radio, A/C and Instrument Cluster for setting up and operating the Navigation Radio. 28. Finished. NOTES: For 2003-2006 Non-Class 2 Bose Amp Equipped Chevy and GMC Trucks and SUVs 19 26.