
Installation Guide
Page 2
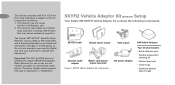
... Delphi XM SKYFi2 Vehicle Adaptor Kit contains the following components: SKYFi2 Cradle Vehicle swivel mount Vent mount Cassette audio adaptor Nokia®-style button mount converter Figure 1. Important: The FCC and FAA have not certified the Delphi XM SKYFi2 Satellite Radio Receiver for use in any interfer- lowing two conditions: 1. This device may cause undesired operation. SKYFi2 Vehicle Adaptor Kit components. 12V power adaptor XM Vehicle...
... Delphi XM SKYFi2 Vehicle Adaptor Kit contains the following components: SKYFi2 Cradle Vehicle swivel mount Vent mount Cassette audio adaptor Nokia®-style button mount converter Figure 1. Important: The FCC and FAA have not certified the Delphi XM SKYFi2 Satellite Radio Receiver for use in any interfer- lowing two conditions: 1. This device may cause undesired operation. SKYFi2 Vehicle Adaptor Kit components. 12V power adaptor XM Vehicle...

Installation Guide
Page 7
...of the air vent being used. Do not install the rotated in -dash air vent. design of two possible SKYFi2 Receiver and the SKYFi2 mount on the Vehicle Adaptor Kit. Turn off the radio and SKYFi2 5. has three mounting options: flat mount (if not assembled) by 4. Clip the assembly where it is ... at to a hard, flat surface if possible or pad, attaching them to use. you can mount mount, vent mount, or swivel inserting the two clips into the your vehicle. Flat mount: Use the included onto the vent, and then posi- Find a place where you to the back the bottom....
...of the air vent being used. Do not install the rotated in -dash air vent. design of two possible SKYFi2 Receiver and the SKYFi2 mount on the Vehicle Adaptor Kit. Turn off the radio and SKYFi2 5. has three mounting options: flat mount (if not assembled) by 4. Clip the assembly where it is ... at to a hard, flat surface if possible or pad, attaching them to use. you can mount mount, vent mount, or swivel inserting the two clips into the your vehicle. Flat mount: Use the included onto the vent, and then posi- Find a place where you to the back the bottom....

Installation Guide
Page 8
...- Dry the area with the enclosed surface preparation cleaning kit. Allow to air dry thoroughly. - For best results, do not touch or apply pressure to the vehicle's surface. 8 c. Do not wipe the surface in...ily repositioned when installed, so use care when choosing the location of your SKYFi2 Vehicle Adaptor after it will bond almost immediately. Make sure you to adjust the... forth. Warm the vehicle mount adhesive pad by using a hair dryer or by placing the vehicle mount on . This mount uses a strong adhesive that is at least 60°F. - Swivel mount: This mount allows...
...- Dry the area with the enclosed surface preparation cleaning kit. Allow to air dry thoroughly. - For best results, do not touch or apply pressure to the vehicle's surface. 8 c. Do not wipe the surface in...ily repositioned when installed, so use care when choosing the location of your SKYFi2 Vehicle Adaptor after it will bond almost immediately. Make sure you to adjust the... forth. Warm the vehicle mount adhesive pad by using a hair dryer or by placing the vehicle mount on . This mount uses a strong adhesive that is at least 60°F. - Swivel mount: This mount allows...

Installation Guide
Page 9
Clip the SKYFi2 vehicle cradle 9 onto the vent or swivel mount (figures 3 and 4). 7. Figure 3. To vehicle dashboard Figure 4. Vent mount. Attach vehicle mount to back of SKYFi2 as described on page 13. Attach the antenna as explained on page 11 and route the antenna cable as shown. 6. Reassemble the system as in step 2. 8.
Clip the SKYFi2 vehicle cradle 9 onto the vent or swivel mount (figures 3 and 4). 7. Figure 3. To vehicle dashboard Figure 4. Vent mount. Attach vehicle mount to back of SKYFi2 as described on page 13. Attach the antenna as explained on page 11 and route the antenna cable as shown. 6. Reassemble the system as in step 2. 8.

Installation Guide
Page 10
...adhesive remains on the edge of the adhesive pad surface. Be careful from your dashboard by rubbing your fingers, pull the pad gently your vehicle. As necessary, use cleaner to apply too much heat, which these steps: could damage surface. Do not use a mild household 90-degree... surface at a 4. from your dashboard with a hair dryer for 2 to 3 minutes You can remove the swivel mount to grip with fingers or the rounded 3. 10 Removing swivel mount 2. This can easily be removed by following not to clean the dashboard sharp tools that could damage the ...
...adhesive remains on the edge of the adhesive pad surface. Be careful from your dashboard by rubbing your fingers, pull the pad gently your vehicle. As necessary, use cleaner to apply too much heat, which these steps: could damage surface. Do not use a mild household 90-degree... surface at a 4. from your dashboard with a hair dryer for 2 to 3 minutes You can remove the swivel mount to grip with fingers or the rounded 3. 10 Removing swivel mount 2. This can easily be removed by following not to clean the dashboard sharp tools that could damage the ...