
User Guide
Page 9
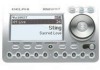
... FM frequency While tuned to three bars) Category name or clock customized. Your SKYFi2 display can be Mode (DIRECT, Preset A, Preset B, or Preset C) Signal strength indicator (zero to an XM channel, the 8 SKYFi2 default display contains information about that channel and the SKYFi2 settings. Channel name Channel number Artist name Song title Additional information (such...
... FM frequency While tuned to three bars) Category name or clock customized. Your SKYFi2 display can be Mode (DIRECT, Preset A, Preset B, or Preset C) Signal strength indicator (zero to an XM channel, the 8 SKYFi2 default display contains information about that channel and the SKYFi2 settings. Channel name Channel number Artist name Song title Additional information (such...

User Guide
Page 15
... menu and then again modulator that has no FM frequency by repeating the process station or the least amount of the 14 audio signal to your SKYFi2. "FM Frequency." Press Listening to confirm. Turn on a boat using the wireless FM 6. Tune the FM radio to each ...of above. If the in a vehicle, in your SKYFi2 is not clear or you are not using the and 107.9. Turn on your FM radio. Press the "XM" button to XM SKYFi2's audio jack. interference. 5. interference or static, try another appropriate kit. 4. Advanced Features You can use the ...
... menu and then again modulator that has no FM frequency by repeating the process station or the least amount of the 14 audio signal to your SKYFi2. "FM Frequency." Press Listening to confirm. Turn on a boat using the wireless FM 6. Tune the FM radio to each ...of above. If the in a vehicle, in your SKYFi2 is not clear or you are not using the and 107.9. Turn on your FM radio. Press the "XM" button to XM SKYFi2's audio jack. interference. 5. interference or static, try another appropriate kit. 4. Advanced Features You can use the ...

User Guide
Page 18
... Antenna 1. Use the scroll wheel (or remote) to normal operation. Press the "XM" button to confirm 1. method: Press the "XM" button to confirm selection. Use the scroll wheel (or remote) to the main menu and then again signal bars will change. Press the "menu" button to return The "Satellite" and "... to return to the home antenna using the following select "Auto-Off/Sleep Timer." Press the 17 Advanced Features select the time period. "XM" button to confirm selection. 3. position that gives the strongest signal strength on either "Satellite" or "Terrestrial." 4.
... Antenna 1. Use the scroll wheel (or remote) to normal operation. Press the "XM" button to confirm 1. method: Press the "XM" button to confirm selection. Use the scroll wheel (or remote) to the main menu and then again signal bars will change. Press the "menu" button to return The "Satellite" and "... to return to the home antenna using the following select "Auto-Off/Sleep Timer." Press the 17 Advanced Features select the time period. "XM" button to confirm selection. 3. position that gives the strongest signal strength on either "Satellite" or "Terrestrial." 4.
User Guide
Page 29
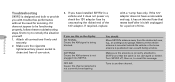
... area, e.g., an underground garage. Turn SKYFi2 off, then on the display: NO SIGNAL Cause: the XM signal is correctly attached to SKYFi2 and that without the need for a period of corrosion. Troubleshooting 3. Make sure the vehicle antenna is mounted outside the vehicle or the home antenna is left unplugged ...functioning 12V adaptor. clean and free of time. If you have a removable you see this message. If the 12V SKYFi2 is designed and built to provide vehicle and it is positioned near a south-facing window. Attach all connections firmly and securely. 2.
... area, e.g., an underground garage. Turn SKYFi2 off, then on the display: NO SIGNAL Cause: the XM signal is correctly attached to SKYFi2 and that without the need for a period of corrosion. Troubleshooting 3. Make sure the vehicle antenna is mounted outside the vehicle or the home antenna is left unplugged ...functioning 12V adaptor. clean and free of time. If you have a removable you see this message. If the 12V SKYFi2 is designed and built to provide vehicle and it is positioned near a south-facing window. Attach all connections firmly and securely. 2.
Installation Guide
Page 11
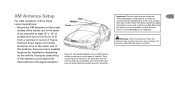
...in reception. Trunk mounting of the antenna is an alternative only for installation depending on the vehicle. Mounting the antenna on a nonmetallic surface will likely experience signal interruption issues and must be avoided. Rear Middle Front Figure 5. Warning: Failure to properly install...of this antenna, there are many types of vehicles. All other vehicles should have roof mounting. Figure 5 shows three typical mounting locations. The design flexibility of your XM Antenna allows mounting on many possible locations for hard- XM Antenna Setup For best reception, follow these ...
...in reception. Trunk mounting of the antenna is an alternative only for installation depending on the vehicle. Mounting the antenna on a nonmetallic surface will likely experience signal interruption issues and must be avoided. Rear Middle Front Figure 5. Warning: Failure to properly install...of this antenna, there are many types of vehicles. All other vehicles should have roof mounting. Figure 5 shows three typical mounting locations. The design flexibility of your XM Antenna allows mounting on many possible locations for hard- XM Antenna Setup For best reception, follow these ...

Installation Guide
Page 17
...bars) on the SKYFi2 Receiver. 2. Slowly turn and tilt the antenna. Press the "XM" button to select the "Antenna Aiming" option. The "satellite" and "terrestrial" signal bars will remain on until you have determined the proper position to receive the best possible signal, press the "menu...plenty of time to normal operation. 3. This display will again, so you press the "menu" button Figure 10. Aiming the XM Home Antenna change. Signal strength indicator. Use the scroll wheel to confirm selection. Press the "menu" button on either "satellite" or "terrestrial." 4....
...bars) on the SKYFi2 Receiver. 2. Slowly turn and tilt the antenna. Press the "XM" button to select the "Antenna Aiming" option. The "satellite" and "terrestrial" signal bars will remain on until you have determined the proper position to receive the best possible signal, press the "menu...plenty of time to normal operation. 3. This display will again, so you press the "menu" button Figure 10. Aiming the XM Home Antenna change. Signal strength indicator. Use the scroll wheel to confirm selection. Press the "menu" button on either "satellite" or "terrestrial." 4....