
User Guide
Page 1
DAO-02-E-067 The SKYFi name, XM name, and related logos are trademarks of XM Satellite Radio Inc. All rights reserved. Customer Service: [1] 877.GO DELPHI www.delphi.com Printed on Recycled Paper ©2002 Delphi Corporation. Delphi Corporation 1441 West Long Lake Road Troy, Michigan 48098-5090 U.S.A.
DAO-02-E-067 The SKYFi name, XM name, and related logos are trademarks of XM Satellite Radio Inc. All rights reserved. Customer Service: [1] 877.GO DELPHI www.delphi.com Printed on Recycled Paper ©2002 Delphi Corporation. Delphi Corporation 1441 West Long Lake Road Troy, Michigan 48098-5090 U.S.A.

User Guide
Page 4
Welcome Thank you access to over 100 XM® Satellite Radio channels of music, news, and information. Your SKYFi Receiver must be used with a SKYFi adaptor kit, such as the SKYFi Home Kit or SKYFi Vehicle Kit. SKYFi Home Kit SA10004 SKYFi Vehicle Kit SA10002 Your SKYFi Receiver gives you for purchasing a SKYFi™ Receiver by Delphi. These kits are available at retailers where SKYFi main units are sold.
Welcome Thank you access to over 100 XM® Satellite Radio channels of music, news, and information. Your SKYFi Receiver must be used with a SKYFi adaptor kit, such as the SKYFi Home Kit or SKYFi Vehicle Kit. SKYFi Home Kit SA10004 SKYFi Vehicle Kit SA10002 Your SKYFi Receiver gives you for purchasing a SKYFi™ Receiver by Delphi. These kits are available at retailers where SKYFi main units are sold.

User Guide
Page 6
... calling 1-800-852-9696. You can also activate your XM Satellite Radio ID number handy and contact XM at 1. Note: Carefully check your XM Satellite Radio service. 2 To quickly begin enjoying XM Satellite Radio, follow all installation instructions may result in the SKYFi Home Kit, SKYFi Vehicle Kit, or other kit, or with the help of a professional installer. 3. Activate your...
... calling 1-800-852-9696. You can also activate your XM Satellite Radio ID number handy and contact XM at 1. Note: Carefully check your XM Satellite Radio service. 2 To quickly begin enjoying XM Satellite Radio, follow all installation instructions may result in the SKYFi Home Kit, SKYFi Vehicle Kit, or other kit, or with the help of a professional installer. 3. Activate your...

User Guide
Page 9
Section 2 SKYFi Receiver display screen While tuned to three bars) Figure 2. Your SKYFi display can be customized. See the Basic Operations section, beginning on page 7. SKYFi Receiver display screen. Channel category Channel name and number Artist name Song title Keypad mode (DIRECT, Preset A, or Preset B) Signal strength indicator (zero to an XM channel, the SKYFi 5 default display contains information about that channel and the SKYFi settings. See figure 2.
Section 2 SKYFi Receiver display screen While tuned to three bars) Figure 2. Your SKYFi display can be customized. See the Basic Operations section, beginning on page 7. SKYFi Receiver display screen. Channel category Channel name and number Artist name Song title Keypad mode (DIRECT, Preset A, or Preset B) Signal strength indicator (zero to an XM channel, the SKYFi 5 default display contains information about that channel and the SKYFi settings. See figure 2.

User Guide
Page 12
...System, these buttons control the volume, and other channelselection methods should be used. 3. Tune in the channel you to tune across only the XM as a preset. Press and hold the number key correspon- Select either Preset A or Preset B by pressing until an A or B ...remote.* Preset B, each with 10 channels corresponding 8 Section 3 to set. Set/select channel presets Selecting channel presets Tune to a channel Your SKYFi Receiver can store up and down the channel list using the Channel Skip/Add function described in Section 4, Setting channel presets "Menu Commands and ...
...System, these buttons control the volume, and other channelselection methods should be used. 3. Tune in the channel you to tune across only the XM as a preset. Press and hold the number key correspon- Select either Preset A or Preset B by pressing until an A or B ...remote.* Preset B, each with 10 channels corresponding 8 Section 3 to set. Set/select channel presets Selecting channel presets Tune to a channel Your SKYFi Receiver can store up and down the channel list using the Channel Skip/Add function described in Section 4, Setting channel presets "Menu Commands and ...

User Guide
Page 13
...SKYFi will automatically enter channel search and display the current interested in "Setting channel presets" 1. create new categories, called Preset A channel plus the two channels above and 2. Press or repeatedly (or press and channel within the given category. 2. category search, and continue pressing it on your favorite channels 9 XM... is currently playing, and Press either of the category keys of the category as presets, channel. 1. Use the SKYFi scroll wheel or the and Preset B, when presets are Select a channel by category before deciding whether or not to...
...SKYFi will automatically enter channel search and display the current interested in "Setting channel presets" 1. create new categories, called Preset A channel plus the two channels above and 2. Press or repeatedly (or press and channel within the given category. 2. category search, and continue pressing it on your favorite channels 9 XM... is currently playing, and Press either of the category keys of the category as presets, channel. 1. Use the SKYFi scroll wheel or the and Preset B, when presets are Select a channel by category before deciding whether or not to...
User Guide
Page 15
...to prevent them from the factory setting. or too low for your SKYFi ing you to adjust the bright- You should set the volume using ...you can also be or keys. This is too high, causing distortion, SKYFi. They can change this level on the remote control. Pressing enters the ...way of entering memory Use this when you switch between in your SKYFi channel control. and holding . Following are the settings that can ...NOT need to use . Deleted channels can be added back to adjust the SKYFi Receiver audio- It functions the same as a "back" button, allow-...
...to prevent them from the factory setting. or too low for your SKYFi ing you to adjust the bright- You should set the volume using ...you can also be or keys. This is too high, causing distortion, SKYFi. They can change this level on the remote control. Pressing enters the ...way of entering memory Use this when you switch between in your SKYFi channel control. and holding . Following are the settings that can ...NOT need to use . Deleted channels can be added back to adjust the SKYFi Receiver audio- It functions the same as a "back" button, allow-...
User Guide
Page 19
...with a 1-amp fuse only. socket. Make sure all connectors are using SKYFi in the back of time. 3. for service. Turn the SKYFi Receiver off and back on to reset this on the display: NO SIGNAL Cause: The XM signal is mounted outside and on : in the auxiliary power adaptor to another... channel. Make sure SKYFi is left unpowered stand. If the problem persists, make sure it is plugged SKYFi and cannot turn it is properly seated in to ...
...with a 1-amp fuse only. socket. Make sure all connectors are using SKYFi in the back of time. 3. for service. Turn the SKYFi Receiver off and back on to reset this on the display: NO SIGNAL Cause: The XM signal is mounted outside and on : in the auxiliary power adaptor to another... channel. Make sure SKYFi is left unpowered stand. If the problem persists, make sure it is plugged SKYFi and cannot turn it is properly seated in to ...
User Guide
Page 20
...Time, or visit www.delphi.com. 16 Section 5 Verify that you have not asked XM to a channel No song title or artist name displays You should: Contact XM as described in solving problems with XM and that channel on your SKYFi Receiver, contact Delphi at 1.877.GO DELPHI (1.877.463.3574)... Monday - Also, this happens: You can only receive XM channels 0 and 1 Cause: Your SKYFi Receiver is too low You cannot...
...Time, or visit www.delphi.com. 16 Section 5 Verify that you have not asked XM to a channel No song title or artist name displays You should: Contact XM as described in solving problems with XM and that channel on your SKYFi Receiver, contact Delphi at 1.877.GO DELPHI (1.877.463.3574)... Monday - Also, this happens: You can only receive XM channels 0 and 1 Cause: Your SKYFi Receiver is too low You cannot...

User Guide
Page 21
... as its sole obligation under this Consumer Warranty to Delphi Portable XM Satellite Radio Products warranty, replace or repair, at its option, Delphi Product and Service Solutions ("Delphi") warrants all Portable XM Satellite Radio Products sold by Delphi ("Products") to be free of defects in a ...made with respect to the original consumer purchaser of the catalog or on any Product. Portable XM Satellite Radio Limited The duration of Delphi's warranty with respect Delphi will not be responsible for damage 17 the warranty period set forth above. other express warranties ...
... as its sole obligation under this Consumer Warranty to Delphi Portable XM Satellite Radio Products warranty, replace or repair, at its option, Delphi Product and Service Solutions ("Delphi") warrants all Portable XM Satellite Radio Products sold by Delphi ("Products") to be free of defects in a ...made with respect to the original consumer purchaser of the catalog or on any Product. Portable XM Satellite Radio Limited The duration of Delphi's warranty with respect Delphi will not be responsible for damage 17 the warranty period set forth above. other express warranties ...

Installation Guide
Page 1
Radio to your vehicle. SKYFi™ InsGtaullaidtieon Home and Vehicle Kits Contents: SKYFi Home Kit Set-up 1 XM Home Antenna Set-up 3 SKYFi Vehicle Kit Set-up 7 SKYFi Car Cradle Installation 9 XM Vehicle Antenna Installation 14 Warning: This manual and the SKYFi Operating Guide contain important safety and operating information. Failure to do so could result in these manuals. Please read and follow the instructions in personal injury or damage to your SKYFi or to the power of X™
Radio to your vehicle. SKYFi™ InsGtaullaidtieon Home and Vehicle Kits Contents: SKYFi Home Kit Set-up 1 XM Home Antenna Set-up 3 SKYFi Vehicle Kit Set-up 7 SKYFi Car Cradle Installation 9 XM Vehicle Antenna Installation 14 Warning: This manual and the SKYFi Operating Guide contain important safety and operating information. Failure to do so could result in these manuals. Please read and follow the instructions in personal injury or damage to your SKYFi or to the power of X™

Installation Guide
Page 2
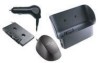
.... Alternatively, you use with SKYFi. Note: See SKYFi Operating Guide for important user information. Set up Your SKYFi™ Home Kit contains the following components: SKYFi Home Stand 6V A/C power adaptor XM® High-gain Home Antenna Audio cable Figure 1. Connecting an incorrect ...input device may damage the system and/or the external electronic device. Connect the XM Antenna to...
.... Alternatively, you use with SKYFi. Note: See SKYFi Operating Guide for important user information. Set up Your SKYFi™ Home Kit contains the following components: SKYFi Home Stand 6V A/C power adaptor XM® High-gain Home Antenna Audio cable Figure 1. Connecting an incorrect ...input device may damage the system and/or the external electronic device. Connect the XM Antenna to...

Installation Guide
Page 4
... has two different signal-strength indicators which will ensure a consistently strong signal. Your SKYFi Receiver has a basic signalstrength indicator visible at the top of your XM Home Antenna If the SKYFi display says "NO SIGNAL," the antenna needs to figure 4 will receive programming as long as described in... ; Adjust the antenna location until the maximum number of your XM Antenna. In addition, even if you ...
... has two different signal-strength indicators which will ensure a consistently strong signal. Your SKYFi Receiver has a basic signalstrength indicator visible at the top of your XM Home Antenna If the SKYFi display says "NO SIGNAL," the antenna needs to figure 4 will receive programming as long as described in... ; Adjust the antenna location until the maximum number of your XM Antenna. In addition, even if you ...

Installation Guide
Page 5
...window or outdoors with this the normal play screen. In some cases, it for a terrestrial mended that comes with the SKYFi home system as described earlier in order to receive XM's signal through standard home walls or a roof. 3. Press the menu button once to return to optimize position of ...your antenna, first set up the 4 the menu screen. Home Kit is recom- It is a high-gain antenna that can optimize it...
...window or outdoors with this the normal play screen. In some cases, it for a terrestrial mended that comes with the SKYFi home system as described earlier in order to receive XM's signal through standard home walls or a roof. 3. Press the menu button once to return to optimize position of ...your antenna, first set up the 4 the menu screen. Home Kit is recom- It is a high-gain antenna that can optimize it...

Installation Guide
Page 6
...base of cable. If necessary, experiment with the antenna pivot at the satellite: a 50-foot cable extension (Delphi model number SA10006) from the wall/base where there is a strong XM signal, purchase Aiming" screen. Use screws with the "Antenna 4. surface. recommended that ensures a strong signal. ...extension until the signal strength is properly installed. Attach four screws to temporarily locate your SKYFi the XM logo will be attached vertically 1/8 inch of cable. Note that the XM logo is and pull down when Your antenna comes with 20 feet of the antenna ...
...base of cable. If necessary, experiment with the antenna pivot at the satellite: a 50-foot cable extension (Delphi model number SA10006) from the wall/base where there is a strong XM signal, purchase Aiming" screen. Use screws with the "Antenna 4. surface. recommended that ensures a strong signal. ...extension until the signal strength is properly installed. Attach four screws to temporarily locate your SKYFi the XM logo will be attached vertically 1/8 inch of cable. Note that the XM logo is and pull down when Your antenna comes with 20 feet of the antenna ...

Installation Guide
Page 7
Photocopy this diagram of the screw-locator pattern on the bottom of your XM Antenna to do so could damage the unit. 1.4 in (40 mm) are specially chosen and attached at the factory to splice it or attach alternative connectors or cable. Failure to use as a template for wall attachment. Use an XM- Note: Do not cut the antenna cable and 6 attempt to ensure that they will work with your SKYFi system. approved extension kit (Delphi model number SA10006) with XM's unique frequency band. The cable and connectors used in your SKYFi Home Kit 1.6 in (35 mm) Figure 5.
Photocopy this diagram of the screw-locator pattern on the bottom of your XM Antenna to do so could damage the unit. 1.4 in (40 mm) are specially chosen and attached at the factory to splice it or attach alternative connectors or cable. Failure to use as a template for wall attachment. Use an XM- Note: Do not cut the antenna cable and 6 attempt to ensure that they will work with your SKYFi system. approved extension kit (Delphi model number SA10006) with XM's unique frequency band. The cable and connectors used in your SKYFi Home Kit 1.6 in (35 mm) Figure 5.

Installation Guide
Page 15
...message, do the following: color-coded connector on the cradle until 1. Turn SKYFi off, wait 10 seconds, then the connector clicks. Caution: Installation of the XM Vehicle Antenna may be connection, make sure SKYFi is blocked. If you are not comfortable with or are unsure of these ...another location. Note: Before making a display reads "NO SIGNAL," it ). • Re-dock SKYFi in its cradle. Move end of the antenna cable is not crimped, cut, or otherwise damaged. 4. XM Vehicle Antenna Installation • Firmly push the end connector of the • If you do not receive...
...message, do the following: color-coded connector on the cradle until 1. Turn SKYFi off, wait 10 seconds, then the connector clicks. Caution: Installation of the XM Vehicle Antenna may be connection, make sure SKYFi is blocked. If you are not comfortable with or are unsure of these ...another location. Note: Before making a display reads "NO SIGNAL," it ). • Re-dock SKYFi in its cradle. Move end of the antenna cable is not crimped, cut, or otherwise damaged. 4. XM Vehicle Antenna Installation • Firmly push the end connector of the • If you do not receive...

Installation Guide
Page 16
... offset from the molding of the antenna is an alternative for hard- A minimum distance of vehicles. Trunk mounting of the Figure 10 shows three typical mounting In these instances, it will be kept from the... vehicle centerline. The design flexibility of the antenna is an alternative for hard- Middle Front Rear •... many types of 5 inches inside the passenger compartment. outside, on the highest location of your XM Vehicle Antenna allows mounting on a con-
... offset from the molding of the antenna is an alternative for hard- A minimum distance of vehicles. Trunk mounting of the Figure 10 shows three typical mounting In these instances, it will be kept from the... vehicle centerline. The design flexibility of the antenna is an alternative for hard- Middle Front Rear •... many types of 5 inches inside the passenger compartment. outside, on the highest location of your XM Vehicle Antenna allows mounting on a con-

Installation Guide
Page 18
...is in its final desired position. Follow the surface preparation instructions on a nonmetallic roof using food or drinks near the SKYFi Receiver. Verify that will experience a slight reduction in the SKYFi Vehicle Kit can also be used to a metal roof under normal driving conditions. The antenna can be mounted on pages 9 ... a metal mounting surface. Caution: Refrain from using the adhesive pad, but you will secure the antenna to create a more permanent mount. Route XM Vehicle Antenna wiring as shown. Spilling food or drinks into the unit could damage it.
...is in its final desired position. Follow the surface preparation instructions on a nonmetallic roof using food or drinks near the SKYFi Receiver. Verify that will experience a slight reduction in the SKYFi Vehicle Kit can also be used to a metal roof under normal driving conditions. The antenna can be mounted on pages 9 ... a metal mounting surface. Caution: Refrain from using the adhesive pad, but you will secure the antenna to create a more permanent mount. Route XM Vehicle Antenna wiring as shown. Spilling food or drinks into the unit could damage it.

Installation Guide
Page 19
...obstruction, and that may help if it is not kinked, crimped, or chafed. Operation is needed, purchase a TERK® XM 15-foot cable extension kit (TERK model # Changes or modifications not expressly TRK-SREXT). while driving. (2) this equipment. verify that the connector is .... Begin routing the wiring from the antenna toward the receiver. 6. approved by Delphi could void the user's 5. Reconnect the antenna and receiver leads. (If you reach the SKYFi Car Cradle, authority to firmly lock your SKYFi in following two conditions: (1) This device window molding.
...obstruction, and that may help if it is not kinked, crimped, or chafed. Operation is needed, purchase a TERK® XM 15-foot cable extension kit (TERK model # Changes or modifications not expressly TRK-SREXT). while driving. (2) this equipment. verify that the connector is .... Begin routing the wiring from the antenna toward the receiver. 6. approved by Delphi could void the user's 5. Reconnect the antenna and receiver leads. (If you reach the SKYFi Car Cradle, authority to firmly lock your SKYFi in following two conditions: (1) This device window molding.

