
Installation Guide
Page 1
SKYFi2™ InsGtaullaidtieon Home and Vehicle Kits Contents: SKYFi2 Vehicle Adaptor Kit Setup 2 SKYFi2 Installation 6 XM Antenna Setup 11 SKYFi2 Home Adaptor Kit Setup 15 Warranty 18 Warning: This manual and the SKYFi2 Satellite Radio Receiver User Guide contain important safety and operating information. Please read and follow the instructions in personal injury, death, and/or damage to your vehicle or other property. Failure to your SKYFi2 Receiver, accessories, and/or to do so could result in these manuals.
SKYFi2™ InsGtaullaidtieon Home and Vehicle Kits Contents: SKYFi2 Vehicle Adaptor Kit Setup 2 SKYFi2 Installation 6 XM Antenna Setup 11 SKYFi2 Home Adaptor Kit Setup 15 Warranty 18 Warning: This manual and the SKYFi2 Satellite Radio Receiver User Guide contain important safety and operating information. Please read and follow the instructions in personal injury, death, and/or damage to your vehicle or other property. Failure to your SKYFi2 Receiver, accessories, and/or to do so could result in these manuals.
Installation Guide
Page 2
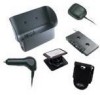
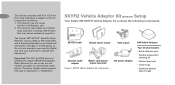
... cause harmful interference, and 2. This device must accept any aircraft (neither portable nor permanent installation). SKYFi2 Vehicle Adaptor Kit (SA10102) Setup Your Delphi XM SKYFi2 Vehicle Adaptor Kit contains the following components: SKYFi2 Cradle Vehicle swivel mount Vent mount Cassette audio adaptor Nokia®-style button... mount converter Figure 1. Important: The FCC and FAA have not certified the Delphi XM SKYFi2 Satellite Radio Receiver for use in any interfer- 2 This device complies with Part 15 of application or installation. The...
... cause harmful interference, and 2. This device must accept any aircraft (neither portable nor permanent installation). SKYFi2 Vehicle Adaptor Kit (SA10102) Setup Your Delphi XM SKYFi2 Vehicle Adaptor Kit contains the following components: SKYFi2 Cradle Vehicle swivel mount Vent mount Cassette audio adaptor Nokia®-style button... mount converter Figure 1. Important: The FCC and FAA have not certified the Delphi XM SKYFi2 Satellite Radio Receiver for use in any interfer- 2 This device complies with Part 15 of application or installation. The...

Installation Guide
Page 5
... configuration is recommended audio input through the vehicle's modulator that allows you to hear XM over the wired or wireless FM antenna lead. (Some vehicles may programming on cassette slot is available in cassette Direct Connect The Delphi FM Direct Adaptor Wireless FM Modulator 5 For the ultimate ease of installation, player. This...
... configuration is recommended audio input through the vehicle's modulator that allows you to hear XM over the wired or wireless FM antenna lead. (Some vehicles may programming on cassette slot is available in cassette Direct Connect The Delphi FM Direct Adaptor Wireless FM Modulator 5 For the ultimate ease of installation, player. This...
Installation Guide
Page 6
...Plug the 12V power adaptor into the cigarette lighter and place the XM Antenna on "Listening to you need help, consult a professional installer. 1. Turn on both your vehicle. Note: If using the wireless FM modulator or the Delphi FM Direct Adaptor, set the SKYFi2 Receiver and the FM radio ...to the SKYFi2 Vehicle Adaptor cradle with any safety devices such as a general guideline only. Before installing the system, connect the XM Antenna, 12V power adaptor, and audio connector...
...Plug the 12V power adaptor into the cigarette lighter and place the XM Antenna on "Listening to you need help, consult a professional installer. 1. Turn on both your vehicle. Note: If using the wireless FM modulator or the Delphi FM Direct Adaptor, set the SKYFi2 Receiver and the FM radio ...to the SKYFi2 Vehicle Adaptor cradle with any safety devices such as a general guideline only. Before installing the system, connect the XM Antenna, 12V power adaptor, and audio connector...
Installation Guide
Page 11
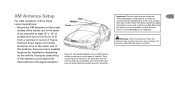
... For best reception, follow these recommendations: • Mount the XM Antenna on the metal surface of the vehicle roof in the center of an area with nonmetallic rooftops. Due to you or others if it ... install the antenna may result in injury to the small size of 6" from a window or sunroof. Improper positioning of vehicles. The design flexibility of your XM Antenna allows mounting on many possible locations for hard- All other vehicles should have roof mounting. Important: Do not install antenna inside the 11 vehicle...
... For best reception, follow these recommendations: • Mount the XM Antenna on the metal surface of the vehicle roof in the center of an area with nonmetallic rooftops. Due to you or others if it ... install the antenna may result in injury to the small size of 6" from a window or sunroof. Improper positioning of vehicles. The design flexibility of your XM Antenna allows mounting on many possible locations for hard- All other vehicles should have roof mounting. Important: Do not install antenna inside the 11 vehicle...
Installation Guide
Page 13
Figure 6. Route XM Antenna through the same grommet that carries power window and power lock wires. ing, use a rubber grommet to prevent damage. • For antennas mounted at ...
Figure 6. Route XM Antenna through the same grommet that carries power window and power lock wires. ing, use a rubber grommet to prevent damage. • For antennas mounted at ...

Installation Guide
Page 14
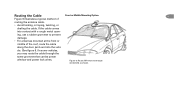
Rear Mounting Option Figure 7. Always use the weather seal at the rear of the trunk to force it through; Route XM Antenna wiring as shown in figure 7. 14 If the antenna cable does not fit easi- ly through the grommet, do not try to reduce water leaks. • Use pre-existing wiring channels when possible. instead, route the cable under the weather seal near the bottom of the door. • For antennas mounted at the lowest part of the roof, route the cable into the trunk as shown.
Rear Mounting Option Figure 7. Always use the weather seal at the rear of the trunk to force it through; Route XM Antenna wiring as shown in figure 7. 14 If the antenna cable does not fit easi- ly through the grommet, do not try to reduce water leaks. • Use pre-existing wiring channels when possible. instead, route the cable under the weather seal near the bottom of the door. • For antennas mounted at the lowest part of the roof, route the cable into the trunk as shown.

Installation Guide
Page 15
... Adaptor Kit jacks. Connecting any incorrect input device may damage the system and/or the external electronic device. SKYFi2 Home Adaptor Kit (SA10103) Setup Your Delphi XM SKYFi2 Home Kit contains the following components: SKYFi2 Home Stand XM High-gain Indoor/Outdoor Home Antenna with your SKYFi2 Home Adaptor Kit.
... Adaptor Kit jacks. Connecting any incorrect input device may damage the system and/or the external electronic device. SKYFi2 Home Adaptor Kit (SA10103) Setup Your Delphi XM SKYFi2 Home Kit contains the following components: SKYFi2 Home Stand XM High-gain Indoor/Outdoor Home Antenna with your SKYFi2 Home Adaptor Kit.
Installation Guide
Page 16
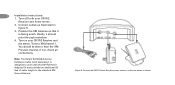
... an additional 50 feet of cable length to hear the XM Preview channel. Connect the SKYFi2 Home Stand to XM channel 1. Connect cables as shown. Position the XM Antenna so that it should be able to the standard XM Home Antenna. Turn on your SKYFi2 Receiver and home stereo.... 2. Tune to power, antenna, and home stereo as illustrated in figure 9. 3. You should point through a window. 4. If not, check all connections. Note: The Delphi SA10006 Antenna Extension Cable (sold ...
... an additional 50 feet of cable length to hear the XM Preview channel. Connect the SKYFi2 Home Stand to XM channel 1. Connect cables as shown. Position the XM Antenna so that it should be able to the standard XM Home Antenna. Turn on your SKYFi2 Receiver and home stereo.... 2. Tune to power, antenna, and home stereo as illustrated in figure 9. 3. You should point through a window. 4. If not, check all connections. Note: The Delphi SA10006 Antenna Extension Cable (sold ...

Installation Guide
Page 17
.... Slowly turn and tilt the antenna. Press the "menu" button on until you have plenty of time to normal operation. 3. Signal strength indicator. Press the "XM" button to select the "Antenna Aiming" option. Once you are convinced you press the "menu" button Figure 10. The "satellite" and "terrestrial" signal bars will... best reception, aim the home antenna by following these instructions: 1. the strongest signal strength (at least two bars) on either "satellite" or "terrestrial." 4. Aiming the XM Home Antenna change.
.... Slowly turn and tilt the antenna. Press the "menu" button on until you have plenty of time to normal operation. 3. Signal strength indicator. Press the "XM" button to select the "Antenna Aiming" option. Once you are convinced you press the "menu" button Figure 10. The "satellite" and "terrestrial" signal bars will... best reception, aim the home antenna by following these instructions: 1. the strongest signal strength (at least two bars) on either "satellite" or "terrestrial." 4. Aiming the XM Home Antenna change.

Installation Guide
Page 18
...or consequential (v) neglect, (vi) abuse, (vii) accident, (viii) (1) year from ("Delphi") warrants all Portable XM any Product. Products may be repaired or Delphi's catalog or on any packaging, Delphi (each product is not transferable and applies advised within ten (10) days of the expiration... of sale to the original damages under this warranty, replace or repair, at its sole obligation under this Delphi's operating instructions as its option, Delphi will Delphi modification of a Product, (iv) misuse, respect to each "Product") to be responsible for any non-operative...
...or consequential (v) neglect, (vi) abuse, (vii) accident, (viii) (1) year from ("Delphi") warrants all Portable XM any Product. Products may be repaired or Delphi's catalog or on any packaging, Delphi (each product is not transferable and applies advised within ten (10) days of the expiration... of sale to the original damages under this warranty, replace or repair, at its sole obligation under this Delphi's operating instructions as its option, Delphi will Delphi modification of a Product, (iv) misuse, respect to each "Product") to be responsible for any non-operative...

Installation Guide
Page 20
DPSS-04-E-065 The SKYFi2 name, XM name, TuneSelect, and related logos are the property of XM Satellite Radio Inc. All rights reserved. All other trademarks are trademarks of their respective owners. Delphi Corporation 1441 West Long Lake Road Troy, Michigan 48098-5090 U.S.A. Customer Service: [1] 877.GO DELPHI www.delphi.com Printed on Recycled Paper ©2004 Delphi Corporation.
DPSS-04-E-065 The SKYFi2 name, XM name, TuneSelect, and related logos are the property of XM Satellite Radio Inc. All rights reserved. All other trademarks are trademarks of their respective owners. Delphi Corporation 1441 West Long Lake Road Troy, Michigan 48098-5090 U.S.A. Customer Service: [1] 877.GO DELPHI www.delphi.com Printed on Recycled Paper ©2004 Delphi Corporation.

