
Installation Guide
Page 1
SKYFi2™ InsGtaullaidtieon Home and Vehicle Kits Contents: SKYFi2 Vehicle Adaptor Kit Setup 2 SKYFi2 Installation 6 XM Antenna Setup 11 SKYFi2 Home Adaptor Kit Setup 15 Warranty 18 Warning: This manual and the SKYFi2 Satellite Radio Receiver User Guide contain important safety and operating information. Failure to do so could result in these manuals. Please read and follow the instructions in personal injury, death, and/or damage to your SKYFi2 Receiver, accessories, and/or to your vehicle or other property.
SKYFi2™ InsGtaullaidtieon Home and Vehicle Kits Contents: SKYFi2 Vehicle Adaptor Kit Setup 2 SKYFi2 Installation 6 XM Antenna Setup 11 SKYFi2 Home Adaptor Kit Setup 15 Warranty 18 Warning: This manual and the SKYFi2 Satellite Radio Receiver User Guide contain important safety and operating information. Failure to do so could result in these manuals. Please read and follow the instructions in personal injury, death, and/or damage to your SKYFi2 Receiver, accessories, and/or to your vehicle or other property.
Installation Guide
Page 2
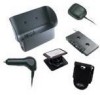
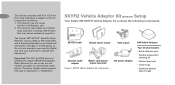
Therefore, Delphi cannot support this equipment. This device may cause undesired operation. SKYFi2 Vehicle Adaptor Kit (SA10102) Setup Your Delphi XM SKYFi2 Vehicle Adaptor Kit contains the following components: SKYFi2 Cradle Vehicle swivel mount Vent mount Cassette audio adaptor Nokia®-style button mount converter Figure 1. 2 This device complies with Part 15 of application or installation. SKYFi2 Vehicle Adaptor Kit components. 12V power adaptor XM Vehicle Antenna Your kit also includes: •...
Therefore, Delphi cannot support this equipment. This device may cause undesired operation. SKYFi2 Vehicle Adaptor Kit (SA10102) Setup Your Delphi XM SKYFi2 Vehicle Adaptor Kit contains the following components: SKYFi2 Cradle Vehicle swivel mount Vent mount Cassette audio adaptor Nokia®-style button mount converter Figure 1. 2 This device complies with Part 15 of application or installation. SKYFi2 Vehicle Adaptor Kit components. 12V power adaptor XM Vehicle Antenna Your kit also includes: •...

Installation Guide
Page 3
Connect accessories to 6V conversion power adaptor that came with your SKYFi2 Cradle as shown. It is recommended that you use only the 12V to your SKYFi2 Vehicle Adaptor Kit. Figure 2. Connecting any incorrect input devices may damage the system and/ or the external electronic device. Hooking up Your SKYFi2 Receiver Cradle 3 Caution: Connect only appropriate input devices to the SKYFi2 Vehicle Adaptor Kit.
Connect accessories to 6V conversion power adaptor that came with your SKYFi2 Cradle as shown. It is recommended that you use only the 12V to your SKYFi2 Vehicle Adaptor Kit. Figure 2. Connecting any incorrect input devices may damage the system and/ or the external electronic device. Hooking up Your SKYFi2 Receiver Cradle 3 Caution: Connect only appropriate input devices to the SKYFi2 Vehicle Adaptor Kit.

Installation Guide
Page 4
FM Modulator: Direct Connect: Review and consider your vehicle's radio. 4 Audio Quality Good Better Best The SKYFi2 Vehicle Adaptor Kit offers you many ways of connecting your SKYFi2 to your own unique situation when choosing from the three options. Cassette Adaptor: All options provide excellent sound quality and stereo separation.
FM Modulator: Direct Connect: Review and consider your vehicle's radio. 4 Audio Quality Good Better Best The SKYFi2 Vehicle Adaptor Kit offers you many ways of connecting your SKYFi2 to your own unique situation when choosing from the three options. Cassette Adaptor: All options provide excellent sound quality and stereo separation.

Installation Guide
Page 5
... configuration is recommended audio input through the vehicle's modulator that allows you to its superior audio quality, (SA10112) (sold separately) can provide SKYFi2 has a built-in the vehicle. See the SKYFi2 Satellite Radio Receiver User Guide for more details. Cassette Adaptor For vehicles with a built-in cassette Direct Connect The Delphi FM Direct Adaptor Wireless FM Modulator 5 For the ultimate ease of installation, player.
... configuration is recommended audio input through the vehicle's modulator that allows you to its superior audio quality, (SA10112) (sold separately) can provide SKYFi2 has a built-in the vehicle. See the SKYFi2 Satellite Radio Receiver User Guide for more details. Cassette Adaptor For vehicles with a built-in cassette Direct Connect The Delphi FM Direct Adaptor Wireless FM Modulator 5 For the ultimate ease of installation, player.
Installation Guide
Page 6
... User Guide section on "Listening to XM channel 1. Before installing the system, connect the XM Antenna, 12V power adaptor, and audio connector or cassette adaptor (if used) to the same frequency. Note: If using the wireless FM modulator or the Delphi FM Direct Adaptor, set the SKYFi2 Receiver and the FM radio to the SKYFi2 Vehicle Adaptor cradle with any safety devices such as a general guideline only. If you live. 2. Plug...
... User Guide section on "Listening to XM channel 1. Before installing the system, connect the XM Antenna, 12V power adaptor, and audio connector or cassette adaptor (if used) to the same frequency. Note: If using the wireless FM modulator or the Delphi FM Direct Adaptor, set the SKYFi2 Receiver and the FM radio to the SKYFi2 Vehicle Adaptor cradle with any safety devices such as a general guideline only. If you live. 2. Plug...

Installation Guide
Page 7
Turn off the radio and SKYFi2 5. you can mount mount, vent mount, or swivel inserting the two clips into the your vehicle. main piece. The orientation of to a horizontal in one of both the your SKYFi2 Vehicle Adaptor mount. Be careful when installing and removing the vent mount clips to the back the bottom. Vent mount: Assemble the 7 Receiver. Do not...
Turn off the radio and SKYFi2 5. you can mount mount, vent mount, or swivel inserting the two clips into the your vehicle. main piece. The orientation of to a horizontal in one of both the your SKYFi2 Vehicle Adaptor mount. Be careful when installing and removing the vent mount clips to the back the bottom. Vent mount: Assemble the 7 Receiver. Do not...

Installation Guide
Page 8
... preparation cleaning kit. Do not install this mount on the first try since in one direction only. Do not wipe the surface in one direction only. Clean the mounting surface with a clean, dry cloth. Warm the vehicle mount adhesive pad by using a hair dryer or by placing the vehicle mount on top of and placing the mount. 8 c. Swivel mount: This mount allows...
... preparation cleaning kit. Do not install this mount on the first try since in one direction only. Do not wipe the surface in one direction only. Clean the mounting surface with a clean, dry cloth. Warm the vehicle mount adhesive pad by using a hair dryer or by placing the vehicle mount on top of and placing the mount. 8 c. Swivel mount: This mount allows...

Installation Guide
Page 9
To vehicle dashboard Figure 4. Attach vehicle mount to back of SKYFi2 as in step 2. 8. Reassemble the system as shown. 6. Attach the antenna as explained on page 11 and route the antenna cable as described on page 13. Figure 3. Clip the SKYFi2 vehicle cradle 9 onto the vent or swivel mount (figures 3 and 4). 7. Vent mount.
To vehicle dashboard Figure 4. Attach vehicle mount to back of SKYFi2 as in step 2. 8. Reassemble the system as shown. 6. Attach the antenna as explained on page 11 and route the antenna cable as described on page 13. Figure 3. Clip the SKYFi2 vehicle cradle 9 onto the vent or swivel mount (figures 3 and 4). 7. Vent mount.

Installation Guide
Page 10
...spoon. gently with a hair dryer for 2 to 3 minutes You can damage the unit or your dashboard by rubbing your fingers, pull the pad gently your thumb or finger across it from the mounting surface at a 4. Repeat step 1. If any adhesive remains on the edge of...dashboard sharp tools that could damage the mounting 1. the vehicle's interior. from your dashboard with fingers or the rounded 3. As necessary, use a commercial heat gun or a paint-stripping gun. Caution: Never use a mild household 90-degree angle. Do not use cleaner to apply too much heat, ...
...spoon. gently with a hair dryer for 2 to 3 minutes You can damage the unit or your dashboard by rubbing your fingers, pull the pad gently your thumb or finger across it from the mounting surface at a 4. Repeat step 1. If any adhesive remains on the edge of...dashboard sharp tools that could damage the mounting 1. the vehicle's interior. from your dashboard with fingers or the rounded 3. As necessary, use a commercial heat gun or a paint-stripping gun. Caution: Never use a mild household 90-degree angle. Do not use cleaner to apply too much heat, ...
Installation Guide
Page 11
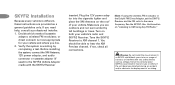
... have roof mounting. XM Antenna Setup For best reception, follow these recommendations: • Mount the XM Antenna on the metal surface of the vehicle roof in the center of an area with nonmetallic rooftops. Improper positioning of the antenna could cause brief interruptions in injury to properly install the antenna may result in the signal reception. Trunk mounting of your XM Antenna allows mounting on...
... have roof mounting. XM Antenna Setup For best reception, follow these recommendations: • Mount the XM Antenna on the metal surface of the vehicle roof in the center of an area with nonmetallic rooftops. Improper positioning of the antenna could cause brief interruptions in injury to properly install the antenna may result in the signal reception. Trunk mounting of your XM Antenna allows mounting on...

Installation Guide
Page 12
... roof racks or skid Note that the cable is free to move and not prone to wear. ribs, you use the wireless FM modulator, If an appropriate antenna mounting installation location and reception place the antenna as possible. or soft-top convertible, then the antenna can be assumed by the user. Ensure that the antenna does not interfere with the opening...
... roof racks or skid Note that the cable is free to move and not prone to wear. ribs, you use the wireless FM modulator, If an appropriate antenna mounting installation location and reception place the antenna as possible. or soft-top convertible, then the antenna can be assumed by the user. Ensure that the antenna does not interfere with the opening...
Installation Guide
Page 13
... a typical method of the roof, route the cable along the door jamb and into contact with a rough metal open- ing, use a rubber grommet to prevent damage. • For antennas mounted at the front or middle of routing the antenna cable. • Avoid kinking, crimping, twisting, or chafing the cable. Route XM Antenna through the same grommet that carries power window and power lock wires.
... a typical method of the roof, route the cable along the door jamb and into contact with a rough metal open- ing, use a rubber grommet to prevent damage. • For antennas mounted at the front or middle of routing the antenna cable. • Avoid kinking, crimping, twisting, or chafing the cable. Route XM Antenna through the same grommet that carries power window and power lock wires.

Installation Guide
Page 14
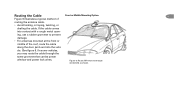
instead, route the cable under the weather seal near the bottom of the door. • For antennas mounted at the lowest part of the roof, route the cable into the trunk as shown. Rear Mounting Option Figure 7. ly through the grommet, do not try to reduce water leaks. • Use pre-existing wiring channels when possible. 14 If the antenna cable does not fit easi- Always use the weather seal at the rear of the trunk to force it through; Route XM Antenna wiring as shown in figure 7.
instead, route the cable under the weather seal near the bottom of the door. • For antennas mounted at the lowest part of the roof, route the cable into the trunk as shown. Rear Mounting Option Figure 7. ly through the grommet, do not try to reduce water leaks. • Use pre-existing wiring channels when possible. 14 If the antenna cable does not fit easi- Always use the weather seal at the rear of the trunk to force it through; Route XM Antenna wiring as shown in figure 7.

Installation Guide
Page 15
... contain a unified polarity-type jack, identified by the symbol. SKYFi2 Home Adaptor Kit components. cable 6V AC power adaptor Audio cable Hooking up Your 15 SKYFi2 Receiver Home Stand Note: See SKYFi2 User Guide for important user information. Caution: Connect only the appropriate input devices to use only the AC power adaptor that you need to the SKYFi2 Home Adaptor Kit jacks. Connecting any incorrect input device may damage the system...
... contain a unified polarity-type jack, identified by the symbol. SKYFi2 Home Adaptor Kit components. cable 6V AC power adaptor Audio cable Hooking up Your 15 SKYFi2 Receiver Home Stand Note: See SKYFi2 User Guide for important user information. Caution: Connect only the appropriate input devices to use only the AC power adaptor that you need to the SKYFi2 Home Adaptor Kit jacks. Connecting any incorrect input device may damage the system...
Installation Guide
Page 16
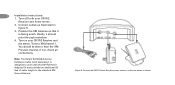
... connections. Note: The Delphi SA10006 Antenna Extension Cable (sold separately) is facing south. Figure 9. You should point through a window. 4. Connect the SKYFi2 Home Stand to hear the XM Preview channel. Connect cables as shown. Turn on your SKYFi2 Receiver and home stereo. 2. Position the XM Antenna so that it should be able to power, antenna, and home stereo as illustrated in figure 9. 3. Tune to the standard XM Home Antenna. 16 Installation instructions: 1. Turn...
... connections. Note: The Delphi SA10006 Antenna Extension Cable (sold separately) is facing south. Figure 9. You should point through a window. 4. Connect the SKYFi2 Home Stand to hear the XM Preview channel. Connect cables as shown. Turn on your SKYFi2 Receiver and home stereo. 2. Position the XM Antenna so that it should be able to power, antenna, and home stereo as illustrated in figure 9. 3. Tune to the standard XM Home Antenna. 16 Installation instructions: 1. Turn...

Installation Guide
Page 17
... proper position to receive the best possible signal, press the "menu" button to return to aim the antenna. Find the position that gives 17 For best reception, aim the home antenna by following these instructions: 1. Signal strength indicator. Aiming the XM Home Antenna change. Press the "menu" button on either "satellite" or "terrestrial." 4. again, so you have plenty of time to normal operation. 3. This display will
... proper position to receive the best possible signal, press the "menu" button to return to aim the antenna. Find the position that gives 17 For best reception, aim the home antenna by following these instructions: 1. Signal strength indicator. Aiming the XM Home Antenna change. Press the "menu" button on either "satellite" or "terrestrial." 4. again, so you have plenty of time to normal operation. 3. This display will

Installation Guide
Page 18
... the expiration only to the original damages under this warranty, replace or repair, at its option, Delphi will Delphi modification of replaced with new or with refurbished labels, or other literature provided with parts. 18 Delphi Limited Consumer Warranty Delphi Product and Service Solutions Delphi will, as printed in Satellite Radio Accessory Products sold by anyone other respect to the following conditions: defects...
... the expiration only to the original damages under this warranty, replace or repair, at its option, Delphi will Delphi modification of replaced with new or with refurbished labels, or other literature provided with parts. 18 Delphi Limited Consumer Warranty Delphi Product and Service Solutions Delphi will, as printed in Satellite Radio Accessory Products sold by anyone other respect to the following conditions: defects...

Installation Guide
Page 19
...repair/replacement of any time during rights. NO PERSON required to furnish a sales receipt/proof of IS AUTHORIZED BY DELPHI TO MODIFY purchase indicating the date of purchase. If exclusion or the limitation of purchase. If This warranty gives you specific legal warranty service is required from Delphi, you may call Delphi...the original place of incidental or further clarification or additional information consequential damages. is needed at : 1.877.GO DELPHI (1.877.463.3574). How you (the Customer) can get service: How state law relates to the warranty: 19 To...
...repair/replacement of any time during rights. NO PERSON required to furnish a sales receipt/proof of IS AUTHORIZED BY DELPHI TO MODIFY purchase indicating the date of purchase. If exclusion or the limitation of purchase. If This warranty gives you specific legal warranty service is required from Delphi, you may call Delphi...the original place of incidental or further clarification or additional information consequential damages. is needed at : 1.877.GO DELPHI (1.877.463.3574). How you (the Customer) can get service: How state law relates to the warranty: 19 To...

Installation Guide
Page 20
Customer Service: [1] 877.GO DELPHI www.delphi.com Printed on Recycled Paper ©2004 Delphi Corporation. DPSS-04-E-065 The SKYFi2 name, XM name, TuneSelect, and related logos are the property of XM Satellite Radio Inc. All rights reserved. All other trademarks are trademarks of their respective owners. Delphi Corporation 1441 West Long Lake Road Troy, Michigan 48098-5090 U.S.A.
Customer Service: [1] 877.GO DELPHI www.delphi.com Printed on Recycled Paper ©2004 Delphi Corporation. DPSS-04-E-065 The SKYFi2 name, XM name, TuneSelect, and related logos are the property of XM Satellite Radio Inc. All rights reserved. All other trademarks are trademarks of their respective owners. Delphi Corporation 1441 West Long Lake Road Troy, Michigan 48098-5090 U.S.A.

