User Manual
Page 3
... 14 Configuration Upgrade & Backup > Configuration Restore from TFTP 14 i Table of Contents D-Link DXS-1210 Series User Manual Table of Contents Table of Contents ...i About This Guide...1 Terms/Usage...1 Copyright and Trademarks ...1 1 Product Introduction ...2 DXS-1210-10TS...2 Front Panel ...3 Rear Panel...3 DXS-1210-12TC...3 Front Panel ...3 Rear Panel...4 DXS-1210-12SC ...4 Front Panel ...4 Rear Panel...4 2 Hardware Installation ...5 Safety Cautions ...5 Step 1: Unpacking...
... 14 Configuration Upgrade & Backup > Configuration Restore from TFTP 14 i Table of Contents D-Link DXS-1210 Series User Manual Table of Contents Table of Contents ...i About This Guide...1 Terms/Usage...1 Copyright and Trademarks ...1 1 Product Introduction ...2 DXS-1210-10TS...2 Front Panel ...3 Rear Panel...3 DXS-1210-12TC...3 Front Panel ...3 Rear Panel...4 DXS-1210-12SC ...4 Front Panel ...4 Rear Panel...4 2 Hardware Installation ...5 Safety Cautions ...5 Step 1: Unpacking...
User Manual
Page 4
Table of Contents D-Link DXS-1210 Series User Manual Configuration Upgrade & Backup > Configuration Backup to HTTP 15 Configuration Upgrade & Backup > Configuration Backup to TFTP 15 Log Backup > Log Backup to HTTP...15 Log Backup >... > RMON History Settings 31 Management > RMON > RMON Alarm Settings 31 Management > RMON > RMON Event Settings 32 Management > Telnet/Web ...33 Management > Session Timeout ...33 Management > D-Link Discover Protocol Settings 34 L2 Features > FDB > Static FDB > Unicast Static FDB 34 L2 Features > FDB > Static FDB > Multicast Static FDB 35 L2 Features > FDB...
Table of Contents D-Link DXS-1210 Series User Manual Configuration Upgrade & Backup > Configuration Backup to HTTP 15 Configuration Upgrade & Backup > Configuration Backup to TFTP 15 Log Backup > Log Backup to HTTP...15 Log Backup >... > RMON History Settings 31 Management > RMON > RMON Alarm Settings 31 Management > RMON > RMON Event Settings 32 Management > Telnet/Web ...33 Management > Session Timeout ...33 Management > D-Link Discover Protocol Settings 34 L2 Features > FDB > Static FDB > Unicast Static FDB 34 L2 Features > FDB > Static FDB > Multicast Static FDB 35 L2 Features > FDB...

User Manual
Page 5
Table of Contents D-Link DXS-1210 Series User Manual L2 Features > STP > MST Configuration Identification 41 L2 Features > STP > STP Instance ...42 L2 Features > STP > MSTP Port Information 42 L2 Features > Loopback Detection ...42 L2 Features > Link Aggregation ...43 L2 Features > L2 Multicast Control > IGMP Snooping > IGMP Snooping Settings 44 L2 Features > L2 Multicast Control > IGMP...
Table of Contents D-Link DXS-1210 Series User Manual L2 Features > STP > MST Configuration Identification 41 L2 Features > STP > STP Instance ...42 L2 Features > STP > MSTP Port Information 42 L2 Features > Loopback Detection ...42 L2 Features > Link Aggregation ...43 L2 Features > L2 Multicast Control > IGMP Snooping > IGMP Snooping Settings 44 L2 Features > L2 Multicast Control > IGMP...

User Manual
Page 6
... ...110 Physical & Environment ...110 Emission (EMI) Certifications ...110 Safety Certifications...111 Features ...111 L2 Features ...111 L3 Features ...111 D-Link Green Technology ...111 VLAN ...111 QoS (Quality of Contents D-Link DXS-1210 Series User Manual Security > Trusted Host...91 Security > Traffic Segmentation Settings 92 Security > Storm Control Settings ...92 Security > DoS Attack Prevention Settings 93...
... ...110 Physical & Environment ...110 Emission (EMI) Certifications ...110 Safety Certifications...111 Features ...111 L2 Features ...111 L3 Features ...111 D-Link Green Technology ...111 VLAN ...111 QoS (Quality of Contents D-Link DXS-1210 Series User Manual Security > Trusted Host...91 Security > Traffic Segmentation Settings 92 Security > Storm Control Settings ...92 Security > DoS Attack Prevention Settings 93...

User Manual
Page 7
... this document is divided into four parts: 1. All rights reserved. About This Guide D-Link DXS-1210 Series User Manual About This Guide This guide provides installation and instructions for basic switch installation and settings. 3. Hardware Installation: Step-by-step hardware installation procedures. 2. D-Link Network Assistant: An introduction to terms "switch", "bridge" and "switching hubs" interchangeably...
... this document is divided into four parts: 1. All rights reserved. About This Guide D-Link DXS-1210 Series User Manual About This Guide This guide provides installation and instructions for basic switch installation and settings. 3. Hardware Installation: Step-by-step hardware installation procedures. 2. D-Link Network Assistant: An introduction to terms "switch", "bridge" and "switching hubs" interchangeably...

User Manual
Page 8
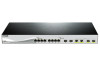
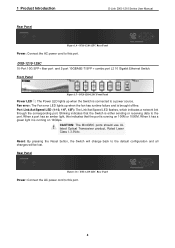
..., enabling users to access and configure easily from everywhere via TELNET. Port Security is D-Link's latest 10G switch which provides 8 ports, 10 ports 10GBASE-T and 12 ports SFP+ models. DXS-1210-10TS 8-Port 10GBASE-T and 2-Port SFP + Fiber port L2 10 Gigabit Ethernet Switch....Direct Attach Cable (DAC) feature. 1 Product Introduction D-Link DXS-1210 Series User Manual 1 Product Introduction Thank you and congratulations on DXS-1210 series such as reducing power when a port does not have advantage of ease-of D-Link 10 Gigabit Ethernet Switches provide growing businesses with other ...
..., enabling users to access and configure easily from everywhere via TELNET. Port Security is D-Link's latest 10G switch which provides 8 ports, 10 ports 10GBASE-T and 12 ports SFP+ models. DXS-1210-10TS 8-Port 10GBASE-T and 2-Port SFP + Fiber port L2 10 Gigabit Ethernet Switch....Direct Attach Cable (DAC) feature. 1 Product Introduction D-Link DXS-1210 Series User Manual 1 Product Introduction Thank you and congratulations on DXS-1210 series such as reducing power when a port does not have advantage of ease-of D-Link 10 Gigabit Ethernet Switches provide growing businesses with other ...

User Manual
Page 9
...Switch will change back to the port. When the port LED glows amber, it indicates the port is connected to a power source. DXS-1210-12TC Front Panel Power LED : The Power LED lights up when the Switch is running at 10Gbps. Fan error: The Fan error LED ...runtime failure and is running at 100M or 1000M. When a port has an amber light, this port. 1 Product Introduction Front Panel D-Link DXS-1210 Series User Manual Figure 1.1 - DXS-1210-12TC 8-port 10GBASE-T and 2-port 10G SFP+ also with additional 2-port 10GBASE-T/SFP+ combo port L2 10 Gigabit Ethernet Switch. When it ...
...Switch will change back to the port. When the port LED glows amber, it indicates the port is connected to a power source. DXS-1210-12TC Front Panel Power LED : The Power LED lights up when the Switch is running at 10Gbps. Fan error: The Fan error LED ...runtime failure and is running at 100M or 1000M. When a port has an amber light, this port. 1 Product Introduction Front Panel D-Link DXS-1210 Series User Manual Figure 1.1 - DXS-1210-12TC 8-port 10GBASE-T and 2-port 10G SFP+ also with additional 2-port 10GBASE-T/SFP+ combo port L2 10 Gigabit Ethernet Switch. When it ...
User Manual
Page 10
..., 11F, 12F): The Link/Act/Speed LED flashes, which indicates a network link through the corresponding port. DXS-1210-12SC Rear Panel Power: Connect the AC power cord to the port. CAUTION: The MiniGBIC ports should use UL listed Optical Transceiver product, Rated Laser Class I. 3.3Vdc. 1 Product Introduction Rear Panel D-Link DXS-1210 Series User Manual Figure 1.4 - Front Panel...
..., 11F, 12F): The Link/Act/Speed LED flashes, which indicates a network link through the corresponding port. DXS-1210-12SC Rear Panel Power: Connect the AC power cord to the port. CAUTION: The MiniGBIC ports should use UL listed Optical Transceiver product, Rated Laser Class I. 3.3Vdc. 1 Product Introduction Rear Panel D-Link DXS-1210 Series User Manual Figure 1.4 - Front Panel...

User Manual
Page 11
...or plugs. If you follow your system, purchase a power cable that they cannot be rated for the product and for the D-Link DXS-1210 Series Switch. route cables so that is damaged. • An object has fallen into properly grounded electrical outlets. • ...peripheral power cables into the product. • The product has been exposed to help ensure proper grounding. 2 Hardware Installation D-Link DXS-1210 Series User Manual 2 Hardware Installation This chapter provides unpacking and installation information for the voltage and current marked on the product's electrical ratings ...
...or plugs. If you follow your system, purchase a power cable that they cannot be rated for the product and for the D-Link DXS-1210 Series Switch. route cables so that is damaged. • An object has fallen into properly grounded electrical outlets. • ...peripheral power cables into the product. • The product has been exposed to help ensure proper grounding. 2 Hardware Installation D-Link DXS-1210 Series User Manual 2 Hardware Installation This chapter provides unpacking and installation information for the voltage and current marked on the product's electrical ratings ...

User Manual
Page 12
2 Hardware Installation D-Link DXS-1210 Series User Manual • When connecting or disconnecting power to hot-pluggable power supplies, if offered with your local D-Link reseller for replacement. ensure that it . Do not place heavy objects on each corner of power, disconnect power... supplies. • Move products with other equipment. Step 1: Unpacking Open the shipping carton and carefully unpack its contents. One D-Link DXS-1210 Series switch One Multilingual Getting Started Guide User Guide CD with 8 M3*6.0 size screws). Attach the adhesive rubber pads to the bottom...
2 Hardware Installation D-Link DXS-1210 Series User Manual • When connecting or disconnecting power to hot-pluggable power supplies, if offered with your local D-Link reseller for replacement. ensure that it . Do not place heavy objects on each corner of power, disconnect power... supplies. • Move products with other equipment. Step 1: Unpacking Open the shipping carton and carefully unpack its contents. One D-Link DXS-1210 Series switch One Multilingual Getting Started Guide User Guide CD with 8 M3*6.0 size screws). Attach the adhesive rubber pads to the bottom...

User Manual
Page 13
Figure 2.3 - 2 Hardware Installation D-Link DXS-1210 Series User Manual Then, use the screws provided with the equipment rack to mount the switch in case of the switch and to an electrical outlet (preferably one that is resumed, plug the switch back in. 7 Figure 2.4 -Plugging the switch into the rear of power failure. Plugging in the rack or chassis Step 3 - Mount the Switch in the AC Power Cord Users may now connect the AC power cord into an outlet Power Failure As a precaution, the switch should be unplugged in the rack. When power is grounded and surge protected).
Figure 2.3 - 2 Hardware Installation D-Link DXS-1210 Series User Manual Then, use the screws provided with the equipment rack to mount the switch in case of the switch and to an electrical outlet (preferably one that is resumed, plug the switch back in. 7 Figure 2.4 -Plugging the switch into the rear of power failure. Plugging in the rack or chassis Step 3 - Mount the Switch in the AC Power Cord Users may now connect the AC power cord into an outlet Power Failure As a precaution, the switch should be unplugged in the rack. When power is grounded and surge protected).

User Manual
Page 14
...Ethernet cable Connect the Ethernet cable to any PC using the Web-based Management, or through any of the ports on the front panel of D-Link DXS-1210 Series Switch. Figure 3.1 - Each switch must have an IP address in the same subnet as the switch. There are two ways to ... to four users to launch the Web-based Management. 8 A PC with the Web-Based Management or a SNMP network manager. 3 Getting Started D-Link DXS-1210 Series User Manual 3 Getting Started This chapter introduces the management interface of the switch and to the Ethernet port on the PC. The PC should have an...
...Ethernet cable Connect the Ethernet cable to any PC using the Web-based Management, or through any of the ports on the front panel of D-Link DXS-1210 Series Switch. Figure 3.1 - Each switch must have an IP address in the same subnet as the switch. There are two ways to ... to four users to launch the Web-based Management. 8 A PC with the Web-Based Management or a SNMP network manager. 3 Getting Started D-Link DXS-1210 Series User Manual 3 Getting Started This chapter introduces the management interface of the switch and to the Ethernet port on the PC. The PC should have an...

User Manual
Page 15
... Chapter 4 Configuration for details. The switch supports 10 languages including English, Traditional Chinese, Simplified Chinese, German, Spanish, French, Italian, Portuguese, Japanese and Russian. 3 Getting Started D-Link DXS-1210 Series User Manual Figure 3.2 -Enter the IP address 10.90.90.90 in the Smart Wizard, you through essential settings of the...
... Chapter 4 Configuration for details. The switch supports 10 languages including English, Traditional Chinese, Simplified Chinese, German, Spanish, French, Italian, Portuguese, Japanese and Russian. 3 Getting Started D-Link DXS-1210 Series User Manual Figure 3.2 -Enter the IP address 10.90.90.90 in the Smart Wizard, you through essential settings of the...

User Manual
Page 16
Select Static, to manually enter a new IP Address, Netmask and Gateway address, or select DHCP to skip wizard setting when the switch boots up. Figure 4.1 - The default SNMP Setting ... for the IP Information, access password, and SNMP. IPv4 Information in Smart Wizard NOTE: The IPv4 Information of the D-Link DXS-1210 Series Switch. 4 Configuration D-Link DXS-1210 Series User Manual 4 Configuration The features and functions of the D-Link DXS-1210 Series Switch can click on 3 steps for optimum use through essential settings of Smart Wizard does not support IPv6...
Select Static, to manually enter a new IP Address, Netmask and Gateway address, or select DHCP to skip wizard setting when the switch boots up. Figure 4.1 - The default SNMP Setting ... for the IP Information, access password, and SNMP. IPv4 Information in Smart Wizard NOTE: The IPv4 Information of the D-Link DXS-1210 Series Switch. 4 Configuration D-Link DXS-1210 Series User Manual 4 Configuration The features and functions of the D-Link DXS-1210 Series Switch can click on 3 steps for optimum use through essential settings of Smart Wizard does not support IPv6...

User Manual
Page 17
Click Apply & Save to quickly specify the user account function. User Accounts Setting in Smart Wizard Web-based Management After clicking the Exit button in Smart Wizard User Accounts Settings The User Accounts Settings page allows you will see the screen below: 11 Figure 4.3 - Enter the User Name, Privilege, Password Type and Password. SNMP Settings in the Smart Wizard you to save the configuration. 4 Configuration D-Link DXS-1210 Series User Manual Figure 4.2 -
Click Apply & Save to quickly specify the user account function. User Accounts Setting in Smart Wizard Web-based Management After clicking the Exit button in Smart Wizard User Accounts Settings The User Accounts Settings page allows you will see the screen below: 11 Figure 4.3 - Enter the User Name, Privilege, Password Type and Password. SNMP Settings in the Smart Wizard you to save the configuration. 4 Configuration D-Link DXS-1210 Series User Manual Figure 4.2 -

User Manual
Page 18
... to switch's non-volatile RAM. 12 The Tool Bar provides a quick and convenient way for essential utility functions like firmware and configuration management. Click the D-Link logo at the upper-left corner of the function tree. Save Menu Save Configuration Select to be displayed. The three main areas are the Tool... without clicking the Logout button first, then it will be seen as an abnormal exit and the login session will be redirected to the local D-Link website. 4 Configuration D-Link DXS-1210 Series User Manual Figure 4.4 -
... to switch's non-volatile RAM. 12 The Tool Bar provides a quick and convenient way for essential utility functions like firmware and configuration management. Click the D-Link logo at the upper-left corner of the function tree. Save Menu Save Configuration Select to be displayed. The three main areas are the Tool... without clicking the Logout button first, then it will be seen as an abnormal exit and the login session will be redirected to the local D-Link website. 4 Configuration D-Link DXS-1210 Series User Manual Figure 4.4 -

User Manual
Page 19
... Configuration Information Display the configuration information on the Switch. Tool Menu Firmware Information Display the firmware information for the 2-image ID. Figure 4.10 - 4 Configuration D-Link DXS-1210 Series User Manual Figure 4.6 - Figure 4.7 - Tool Menu > Firmware Upgrade & Backup > Firmware Upgrade from HTTP. Save Configuration Destination: Select the configuration destination to be uploaded to be saved...
... Configuration Information Display the configuration information on the Switch. Tool Menu Firmware Information Display the firmware information for the 2-image ID. Figure 4.10 - 4 Configuration D-Link DXS-1210 Series User Manual Figure 4.6 - Figure 4.7 - Tool Menu > Firmware Upgrade & Backup > Firmware Upgrade from HTTP. Save Configuration Destination: Select the configuration destination to be uploaded to be saved...

User Manual
Page 20
... to TFTP To save a backup of the firmware using TFTP, enter the TFTP server IP address, the source URL, and the destination URL. 4 Configuration D-Link DXS-1210 Series User Manual Note: The Switch will reboot after restoring, and all current configurations will be lost Firmware Backup to HTTP & Backup > Firmware Backup to enable the...
... to TFTP To save a backup of the firmware using TFTP, enter the TFTP server IP address, the source URL, and the destination URL. 4 Configuration D-Link DXS-1210 Series User Manual Note: The Switch will reboot after restoring, and all current configurations will be lost Firmware Backup to HTTP & Backup > Firmware Backup to enable the...

User Manual
Page 21
... and click Backup. Tool Menu > Log Backup > Log Backup to TFTP TFTP Server IP: Select IPv4 or IPv6 and enter the IP address. 4 Configuration D-Link DXS-1210 Series User Manual Figure 4.15 - Figure 4.17 - Figure 4.18 - Destination URL: Enter the destination URL. 15 Tool Menu > Configuration Upgrade & Backup > Configuration Backup to HTTP Configuration Upgrade...
... and click Backup. Tool Menu > Log Backup > Log Backup to TFTP TFTP Server IP: Select IPv4 or IPv6 and enter the IP address. 4 Configuration D-Link DXS-1210 Series User Manual Figure 4.15 - Figure 4.17 - Figure 4.18 - Destination URL: Enter the destination URL. 15 Tool Menu > Configuration Upgrade & Backup > Configuration Backup to HTTP Configuration Upgrade...

User Manual
Page 22
... make any changes. User Guide can find online resources such as updated firmware; Figure 4.22 - Figure 4.23 - 4 Configuration D-Link DXS-1210 Series User Manual Ping To ping a computer or device, enter either Target IPv4 or IPv6 Address, Ping Times and Timeout. Tool Menu > Reboot ...System Destination: Select the configuration destination to the D-Link website where you can offer an immediate reference for the feature definition or configuration...
... make any changes. User Guide can find online resources such as updated firmware; Figure 4.22 - Figure 4.23 - 4 Configuration D-Link DXS-1210 Series User Manual Ping To ping a computer or device, enter either Target IPv4 or IPv6 Address, Ping Times and Timeout. Tool Menu > Reboot ...System Destination: Select the configuration destination to the D-Link website where you can offer an immediate reference for the feature definition or configuration...


