
Product Manual
Page 2
... to notify any person or organization of their respective companies. D-Link DWR-2101 User Manual i All other company or product names mentioned herein are trademarks or registered trademarks of D-Link Corporation or its subsidiaries in part, without obligation to make changes... in the content hereof without prior expressed written permission from D-Link Corporation, Inc. Revision 6.0 Manual Revisions Date November 21, 2023 Description Removed Speed Test feature Trademarks D-Link and the D-Link logo are trademarks or registered trademarks of such revisions or changes...
... to notify any person or organization of their respective companies. D-Link DWR-2101 User Manual i All other company or product names mentioned herein are trademarks or registered trademarks of D-Link Corporation or its subsidiaries in part, without obligation to make changes... in the content hereof without prior expressed written permission from D-Link Corporation, Inc. Revision 6.0 Manual Revisions Date November 21, 2023 Description Removed Speed Test feature Trademarks D-Link and the D-Link logo are trademarks or registered trademarks of such revisions or changes...

Product Manual
Page 3
... configure your device . 30 Homescreen 31 Applications 32 Connection Guide 33 Connecting Your Devices Manually 33 Connecting Your Devices via WPS 34 Power Saving 35 D-Link DWR-2101 User Manual ii
... configure your device . 30 Homescreen 31 Applications 32 Connection Guide 33 Connecting Your Devices Manually 33 Connecting Your Devices via WPS 34 Power Saving 35 D-Link DWR-2101 User Manual ii
Product Manual
Page 4
... 54 Configuring the NAT Settings 54 Enabling Port Forwarding 55 Firewall Settings 56 Enabling Firewall 56 View and Edit Firewall Entries 57 LAN Settings 58 D-Link DWR-2101 User Manual iv
... 54 Configuring the NAT Settings 54 Enabling Port Forwarding 55 Firewall Settings 56 Enabling Firewall 56 View and Edit Firewall Entries 57 LAN Settings 58 D-Link DWR-2101 User Manual iv
Product Manual
Page 5
Table of Contents Changing your LAN Settings 58 SMS 59 Viewing Your Messages 59 Writing an SMS 59 Firmware Upgrade 60 Checking Your Firmware 60 Upgrading Your Firmware 60 Account Configuration 61 Changing the Web UI Password 61 Setting the Screen Off Timer 61 About 62 Accessing the About Page 62 Factory Reset 63 Factory Resetting the Device 63 Troubleshooting 64 Networking Basics 65 Check your IP address 65 Statically Assign an IP address 66 Technical Specifications 68 Regulatory Information 70 D-Link DWR-2101 User Manual iv
Table of Contents Changing your LAN Settings 58 SMS 59 Viewing Your Messages 59 Writing an SMS 59 Firmware Upgrade 60 Checking Your Firmware 60 Upgrading Your Firmware 60 Account Configuration 61 Changing the Web UI Password 61 Setting the Screen Off Timer 61 About 62 Accessing the About Page 62 Factory Reset 63 Factory Resetting the Device 63 Troubleshooting 64 Networking Basics 65 Check your IP address 65 Statically Assign an IP address 66 Technical Specifications 68 Regulatory Information 70 D-Link DWR-2101 User Manual iv
Product Manual
Page 6
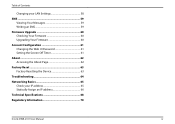
D-Link DWR-2101 User Manual 1 use it in a cafe to send emails while your friend reads the news, or at the airport so you can work while waiting for all your Wi-Fi again. Bring revolutionary 5G speeds into your home and unleash the full power of Wi-Fi 6 for your connection anywhere; Never go anywhere without your connected devices. Section 1 - The convenient size means you and your co-workers can share your plane. About the Device About the Device Meet the DWR-2101, the world's first 5G and Wi-Fi 6 harnessing mobile hotspot.
D-Link DWR-2101 User Manual 1 use it in a cafe to send emails while your friend reads the news, or at the airport so you can work while waiting for all your Wi-Fi again. Bring revolutionary 5G speeds into your home and unleash the full power of Wi-Fi 6 for your connection anywhere; Never go anywhere without your connected devices. Section 1 - The convenient size means you and your co-workers can share your plane. About the Device About the Device Meet the DWR-2101, the world's first 5G and Wi-Fi 6 harnessing mobile hotspot.
Product Manual
Page 7
...1.8 Gbps (574 + 1200 Mbps), you 're heading away for long periods of time, and it's plug-and-play with the DWR-2101 is quick, easy, and convenient. D-Link DWR-2101 User Manual 2 all in Wi-Fi 6 hotspot offering combined speeds up to 32 devices, a built-in Gigabit port, and the ... video streaming, low-latency VR gaming, cloud storage, multiple IoT devices, cell phones, tablets, and more - Take Your Network With You The DWR-2101 is secure, encrypted and easily scalable. Wi-Fi 6 is powerful enough to set up your home. intensive environments, which means that fits easily...
...1.8 Gbps (574 + 1200 Mbps), you 're heading away for long periods of time, and it's plug-and-play with the DWR-2101 is quick, easy, and convenient. D-Link DWR-2101 User Manual 2 all in Wi-Fi 6 hotspot offering combined speeds up to 32 devices, a built-in Gigabit port, and the ... video streaming, low-latency VR gaming, cloud storage, multiple IoT devices, cell phones, tablets, and more - Take Your Network With You The DWR-2101 is secure, encrypted and easily scalable. Wi-Fi 6 is powerful enough to set up your home. intensive environments, which means that fits easily...

Product Manual
Page 8
Subject to download the latest version. D-Link DWR-2101 User Manual 3 Visit www.java.com to services and service terms available from your carrier. Computer with mobile data service. Section 2 - System Requirements System Requirements ...
Subject to download the latest version. D-Link DWR-2101 User Manual 3 Visit www.java.com to services and service terms available from your carrier. Computer with mobile data service. Section 2 - System Requirements System Requirements ...
Product Manual
Page 9
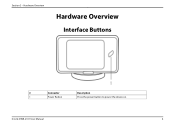
Hardware Overview Hardware Overview Interface Buttons # Connector Description 1 Power Button Press the power button to power the device on. D-Link DWR-2101 User Manual 4 Section 3 -
Hardware Overview Hardware Overview Interface Buttons # Connector Description 1 Power Button Press the power button to power the device on. D-Link DWR-2101 User Manual 4 Section 3 -

Product Manual
Page 10
Hardware Overview # Connector Description 1 Reboot Button Short press this button to reboot device Long press (over 3 seconds) this button to factory reset D-Link DWR-2101 User Manual 5 Section 3 -
Hardware Overview # Connector Description 1 Reboot Button Short press this button to reboot device Long press (over 3 seconds) this button to factory reset D-Link DWR-2101 User Manual 5 Section 3 -
Product Manual
Page 11
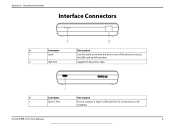
Gigabit RJ-45 port for charging. D-Link DWR-2101 User Manual 6 Hardware Overview Interface Connectors # Connector 1 Latch 2 LAN Port Description Use this latch to remove the back cover of the device to connect a Type-C USB cable for PC connections or for data. # Connector Description 1 Type-C Port Port to access the SIM card and the battery. Section 3 -
Gigabit RJ-45 port for charging. D-Link DWR-2101 User Manual 6 Hardware Overview Interface Connectors # Connector 1 Latch 2 LAN Port Description Use this latch to remove the back cover of the device to connect a Type-C USB cable for PC connections or for data. # Connector Description 1 Type-C Port Port to access the SIM card and the battery. Section 3 -
Product Manual
Page 12
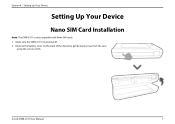
D-Link DWR-2101 User Manual 7 Setting Up Your Device Setting Up Your Device Nano SIM Card Installation Note: The DWR-2101 is powered off. 2. Remove the battery cover on the back of the device by gently prying it up from the case using the corner notch. Make sure the DWR-2101 is only compatible with Nano SIM cards. 1. Section 4 -
D-Link DWR-2101 User Manual 7 Setting Up Your Device Setting Up Your Device Nano SIM Card Installation Note: The DWR-2101 is powered off. 2. Remove the battery cover on the back of the device by gently prying it up from the case using the corner notch. Make sure the DWR-2101 is only compatible with Nano SIM cards. 1. Section 4 -
Product Manual
Page 13
Section 4 - D-Link DWR-2101 User Manual 8 Insert the Nano SIM card into the Nano SIM card slot, following the orientation diagram next to the slot for proper positioning. Setting Up Your Device 3.
Section 4 - D-Link DWR-2101 User Manual 8 Insert the Nano SIM card into the Nano SIM card slot, following the orientation diagram next to the slot for proper positioning. Setting Up Your Device 3.

Product Manual
Page 14
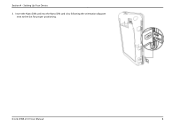
Setting Up Your Device 4. Ensure that the back cover is aligned correctly. D-Link DWR-2101 User Manual 9 Replace the back cover. Section 4 -
Setting Up Your Device 4. Ensure that the back cover is aligned correctly. D-Link DWR-2101 User Manual 9 Replace the back cover. Section 4 -
Product Manual
Page 15
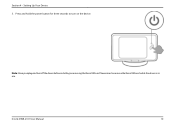
Press and hold the power button for three seconds to turn on the device. Note: AlwaysunplugandturnoffthedevicebeforeinstallingorremovingtheNanoSIMcard.NeverinsertorremovetheNanoSIMcard while the device is in use. D-Link DWR-2101 User Manual 10 Section 4 - Setting Up Your Device 5.
Press and hold the power button for three seconds to turn on the device. Note: AlwaysunplugandturnoffthedevicebeforeinstallingorremovingtheNanoSIMcard.NeverinsertorremovetheNanoSIMcard while the device is in use. D-Link DWR-2101 User Manual 10 Section 4 - Setting Up Your Device 5.
Product Manual
Page 16
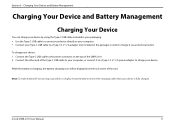
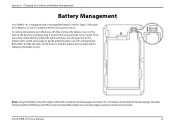
..., or connect it to a Type-C 5 V / 2 A power adapter to charge it is charging, the battery charging icon will be displayed on the top of the unit. D-Link DWR-2101 User Manual 11 Note: To make battery life last as long as possible, it via an electrical outlet. Charging Your Device and Battery Management Charging...
..., or connect it to a Type-C 5 V / 2 A power adapter to charge it is charging, the battery charging icon will be displayed on the top of the unit. D-Link DWR-2101 User Manual 11 Note: To make battery life last as long as possible, it via an electrical outlet. Charging Your Device and Battery Management Charging...
Product Manual
Page 17
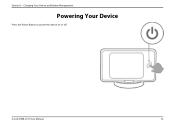
D-Link DWR-2101 User Manual 12 Section 5 - Charging Your Device and Battery Management Powering Your Device Press the Power Button to power the device on or off.
D-Link DWR-2101 User Manual 12 Section 5 - Charging Your Device and Battery Management Powering Your Device Press the Power Button to power the device on or off.
Product Manual
Page 18
... in the packaging). Improper chargingmethodsofthedeviceandtheuseofanincompatiblechargermaycausedamagetoyourdeviceandvoid its compartment. Section 5 - Charging Your Device and Battery Management Battery Management Your DWR-2101 is equipped with a Type-C USB cable (included in the packaging) and a Type-C 5 V / 2 A adapter (not included in place before replacing the battery cover. Note: Charge the battery only with a rechargeable battery. D-Link DWR-2101 User Manual 13
... in the packaging). Improper chargingmethodsofthedeviceandtheuseofanincompatiblechargermaycausedamagetoyourdeviceandvoid its compartment. Section 5 - Charging Your Device and Battery Management Battery Management Your DWR-2101 is equipped with a Type-C USB cable (included in the packaging) and a Type-C 5 V / 2 A adapter (not included in place before replacing the battery cover. Note: Charge the battery only with a rechargeable battery. D-Link DWR-2101 User Manual 13
Product Manual
Page 19
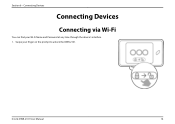
D-Link DWR-2101 User Manual 14 Connecting Devices Connecting Devices Connecting via Wi-Fi You can find your finger on the prompt to unlock the DWR-2101. Swipe your Wi-Fi Name and Password at any time through the device's interface. 1. Section 6 -
D-Link DWR-2101 User Manual 14 Connecting Devices Connecting Devices Connecting via Wi-Fi You can find your finger on the prompt to unlock the DWR-2101. Swipe your Wi-Fi Name and Password at any time through the device's interface. 1. Section 6 -
Product Manual
Page 20
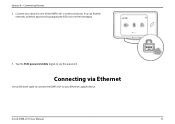
You can find the networks and their passwords by tapping the SSID icon on the homepage. 3. Connecting via Ethernet Use an Ethernet cable to connect the DWR-2101 to your device to see the password. Tap the SSID password visible toggle to one of the DWR-2101's wireless networks. Section 6 - D-Link DWR-2101 User Manual 15 Connecting Devices 2. Connect your Ethernet capable device.
You can find the networks and their passwords by tapping the SSID icon on the homepage. 3. Connecting via Ethernet Use an Ethernet cable to connect the DWR-2101 to your device to see the password. Tap the SSID password visible toggle to one of the DWR-2101's wireless networks. Section 6 - D-Link DWR-2101 User Manual 15 Connecting Devices 2. Connect your Ethernet capable device.
Product Manual
Page 21
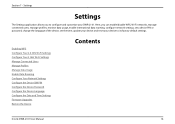
... Configure the Device SIM PIN Configure the Device Password Configure the Device Language Configure the Date and Time Settings Firmware Upgrades Restore the Device Contents D-Link DWR-2101 User Manual 16 Settings Settings The Settings application allows you can enable/disable WPS, Wi-Fi networks, manage connected users, manage profiles, monitor data usage... a device PIN or password, change the language of the device, set the time, update your device and reset your device to configure and customize your DWR-2101.
... Configure the Device SIM PIN Configure the Device Password Configure the Device Language Configure the Date and Time Settings Firmware Upgrades Restore the Device Contents D-Link DWR-2101 User Manual 16 Settings Settings The Settings application allows you can enable/disable WPS, Wi-Fi networks, manage connected users, manage profiles, monitor data usage... a device PIN or password, change the language of the device, set the time, update your device and reset your device to configure and customize your DWR-2101.


