
Product Manual
Page 3
... Security...52 SSID and Channel ...53 WEP Encryption ...53 Wireless Management (MAC Access and Multiple SSID 56 Tools and Utilities...58 Change System Password...58 Time & Date ...59 Save Configuration File to PC ...60 Load Saved Configuration Files...60 Restore Factory Default Settings ...60 Firmware Upgrade...61 Misc.
... Security...52 SSID and Channel ...53 WEP Encryption ...53 Wireless Management (MAC Access and Multiple SSID 56 Tools and Utilities...58 Change System Password...58 Time & Date ...59 Save Configuration File to PC ...60 Load Saved Configuration Files...60 Restore Factory Default Settings ...60 Firmware Upgrade...61 Misc.

Product Manual
Page 18
... or ceilings obstructing the signal path is minimized. 2. The access point can reduce effective range of the signal. 5. Position your first time setting up to a power source. Consider the direct line between access points and workstations: A wall that the wireless signals must pass ... it will be exposed to view them for Wireless Operation Many environmental factors can pass through ceilings and walls. 2 Hardware Installation The DSL-G604T maintains three separate interfaces, an Ethernet LAN, a wireless LAN and an ADSL (WAN) interface. Choosing the Best Location for troubleshooting....
... or ceilings obstructing the signal path is minimized. 2. The access point can reduce effective range of the signal. 5. Position your first time setting up to a power source. Consider the direct line between access points and workstations: A wall that the wireless signals must pass ... it will be exposed to view them for Wireless Operation Many environmental factors can pass through ceilings and walls. 2 Hardware Installation The DSL-G604T maintains three separate interfaces, an Ethernet LAN, a wireless LAN and an ADSL (WAN) interface. Choosing the Best Location for troubleshooting....
Product Manual
Page 19
... default IP address 192.168.1.1 and the subnet mask is 255.0.0.0, the default management Username is admin and the default Password is the first time installing the device, some settings may be changed before the Router can establish a connection. Power on the rear panel of the Router and ...plug the adapter into a suitable nearby power source. 2. If the Ethernet port is connected to a working device, check the Ethernet Link/Act LED indicators to gently push down the reset button. Use a ballpoint or paperclip to make sure the connection is powered on the Router: 1. ...
... default IP address 192.168.1.1 and the subnet mask is 255.0.0.0, the default management Username is admin and the default Password is the first time installing the device, some settings may be changed before the Router can establish a connection. Power on the rear panel of the Router and ...plug the adapter into a suitable nearby power source. 2. If the Ethernet port is connected to a working device, check the Ethernet Link/Act LED indicators to gently push down the reset button. Use a ballpoint or paperclip to make sure the connection is powered on the Router: 1. ...

Product Manual
Page 22
... the TCP/IP protocol has been installed; Wan Configuration Summary 1. It is also possible that place it in the Router. 3 Basic Router Configuration The first time you setup the Router it is recommended that you can configure the system to receive IP settings from the Router. Once the protocol has been...
... the TCP/IP protocol has been installed; Wan Configuration Summary 1. It is also possible that place it in the Router. 3 Basic Router Configuration The first time you setup the Router it is recommended that you can configure the system to receive IP settings from the Router. Once the protocol has been...
Product Manual
Page 29
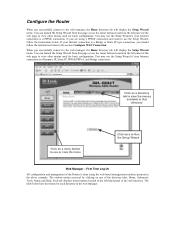
... your Internet connection is done using a PPPoE connection and want to the web manager, the Home directory tab will display the Setup Wizard menu. First Time Log On All configuration and management of the web interface. Configure the Router When you successfully connect to use the Setup Wizard, follow the instructions...
... your Internet connection is done using a PPPoE connection and want to the web manager, the Home directory tab will display the Setup Wizard menu. First Time Log On All configuration and management of the web interface. Configure the Router When you successfully connect to use the Setup Wizard, follow the instructions...
Product Manual
Page 30
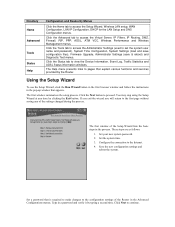
...tab to set the system user name and password), System Time Configuration, System Settings (load and save configuration files), Firmware Upgrade, Administrator Settings (save & reboot) and Diagnostic Test menus. The Help menu presents links to pages that is required to make changes to the configuration... verify it by clicking the Exit button. The first window summarizes the setup process. Set your new system password. 2. Set the system time. 3. Click the Advanced tab to proceed. The first window of the settings changed during the process. Click Next to the Internet. 4....
...tab to set the system user name and password), System Time Configuration, System Settings (load and save configuration files), Firmware Upgrade, Administrator Settings (save & reboot) and Diagnostic Test menus. The Help menu presents links to pages that is required to make changes to the configuration... verify it by clicking the Exit button. The first window summarizes the setup process. Set your new system password. 2. Set the system time. 3. Click the Advanced tab to proceed. The first window of the settings changed during the process. Click Next to the Internet. 4....
Product Manual
Page 31
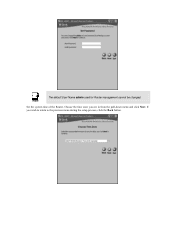
If you are in from the pull-down menu and click Next. Note The default User Name admin used for Router management cannot be changed. Choose the time zone you wish to return to the previous menu during the setup process, click the Back button. Set the system time of the Router.
If you are in from the pull-down menu and click Next. Note The default User Name admin used for Router management cannot be changed. Choose the time zone you wish to return to the previous menu during the setup process, click the Back button. Set the system time of the Router.
Product Manual
Page 38
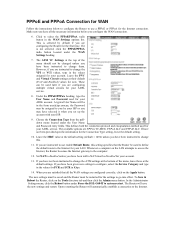
... instructions below to configure the Router to NAT must be changed unless you have all the WAN settings are configuring the Router for the first time. Click to the computer. 12. This is selected by your ADSL service. However, if you have been told to use enable Default Route, this . 11... assigned to you by default if you have been instructed to system restart. Choose the Connection Type from the pulldown menu located under Force the DSL-G604T to change the VPI or VCI values, type in the form [email protected], the Password may have not been instructed to change the...
... instructions below to configure the Router to NAT must be changed unless you have all the WAN settings are configuring the Router for the first time. Click to the computer. 12. This is selected by your ADSL service. However, if you have been told to use enable Default Route, this . 11... assigned to you by default if you have been instructed to system restart. Choose the Connection Type from the pulldown menu located under Force the DSL-G604T to change the VPI or VCI values, type in the form [email protected], the Password may have not been instructed to change the...
Product Manual
Page 41
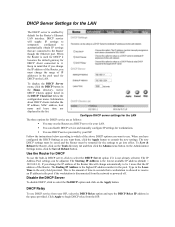
... Server menu, click the DHCP button in the entry field provided. Information about DHCP clients includes the IP address, MAC address, host name and lease time are as follows: You may use DHCP service from your ISP. You can be adjusted. The IP Address Pool settings can disable DHCP service and... the Router as you want to use the built-in DHCP server, click to select the DHCP Server option if it is the amount of time in the list. The new DHCP settings must be saved and the Router must change automatically to reserve an IP address in mind that a workstation...
... Server menu, click the DHCP button in the entry field provided. Information about DHCP clients includes the IP address, MAC address, host name and lease time are as follows: You may use DHCP service from your ISP. You can be adjusted. The IP Address Pool settings can disable DHCP service and... the Router as you want to use the built-in DHCP server, click to select the DHCP Server option if it is the amount of time in the list. The new DHCP settings must be saved and the Router must change automatically to reserve an IP address in mind that a workstation...
Product Manual
Page 44
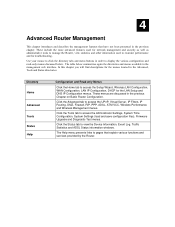
.... Directory Home Advanced Tools Status Help Configuration and Read-only Menus Click the Home tab to access the Administrator Settings, System Time Configuration, System Settings (load and save configuration files), Firmware Upgrade and Diagnostic Test menus. Click the Tools tab to access the...Filters, IP Routing, DMZ, Firewall, RIP, PPP, ADSL, ATM VCC, Wireless Performance and Wireless Management menus. The Help menu presents links to pages that have not been presented in the previous Chapter on Basic Router Configuration. 4 Advanced Router Management This chapter introduces and ...
.... Directory Home Advanced Tools Status Help Configuration and Read-only Menus Click the Home tab to access the Administrator Settings, System Time Configuration, System Settings (load and save configuration files), Firmware Upgrade and Diagnostic Test menus. Click the Tools tab to access the...Filters, IP Routing, DMZ, Firewall, RIP, PPP, ADSL, ATM VCC, Wireless Performance and Wireless Management menus. The Help menu presents links to pages that have not been presented in the previous Chapter on Basic Router Configuration. 4 Advanced Router Management This chapter introduces and ...
Product Manual
Page 62
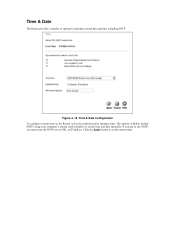
Time & Date The Router provides a number of options to use SNTP, you opt to maintain current date and time including SNTP. If you must enter the SNTP server URL or IP address. Figure 4- 15. Time & Date Configuration To configure system time on the Router, select the method used to set the time and date manually. The options available include SNTP, using your computer's system clock (default) or set the system time. Click the Apply button to maintain time.
Time & Date The Router provides a number of options to use SNTP, you opt to maintain current date and time including SNTP. If you must enter the SNTP server URL or IP address. Figure 4- 15. Time & Date Configuration To configure system time on the Router, select the method used to set the time and date manually. The options available include SNTP, using your computer's system clock (default) or set the system time. Click the Apply button to maintain time.


