
Product Manual
Page 3
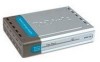
If any of the above USB Hard Drive(s) An available Ethernet port on the network D-Link Systems, Inc. 3 DNS-120 User's Manual Package Contents Package Contents D-Link DNS-120 Network Storage Adapter CD-ROM with Manual and ...Software Ethernet (CAT5 UTP/Straight-Through) Cable 5V 2.5A Power Supply Note: Using a power supply with a different voltage than the one included with Windows...
If any of the above USB Hard Drive(s) An available Ethernet port on the network D-Link Systems, Inc. 3 DNS-120 User's Manual Package Contents Package Contents D-Link DNS-120 Network Storage Adapter CD-ROM with Manual and ...Software Ethernet (CAT5 UTP/Straight-Through) Cable 5V 2.5A Power Supply Note: Using a power supply with a different voltage than the one included with Windows...

Product Manual
Page 11
...Name that it is accessible from the My Computer screen. Click Finish D-Link Systems, Inc. \\DNS-120\Shared folder 11 Please see the following instructions for mapping a USB drive so that you can access the DNS-120's USB drive(s) by mapping the shared folders as drives in the Confi...guration Utility. Click Tools and click Map Network Drive. DNS-120 User's Manual Mapping a Drive Mapping a Drive (continued) As an alternate method, you entered into the Setup Wizard or in the Home>LAN screen in Windows...
...Name that it is accessible from the My Computer screen. Click Finish D-Link Systems, Inc. \\DNS-120\Shared folder 11 Please see the following instructions for mapping a USB drive so that you can access the DNS-120's USB drive(s) by mapping the shared folders as drives in the Confi...guration Utility. Click Tools and click Map Network Drive. DNS-120 User's Manual Mapping a Drive Mapping a Drive (continued) As an alternate method, you entered into the Setup Wizard or in the Home>LAN screen in Windows...
Product Manual
Page 30
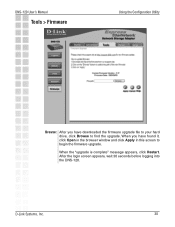
D-Link Systems, Inc. 30 When the "upgrade is complete" message appears, click Restart. After the login screen appears, wait 30 seconds before logging into the DNS-120. When you have found it, click Open in the browser window and click Apply in this screen to find the upgrade. DNS-120 User's Manual Tools > Firmware Using the Configuration Utility Browse: After you have downloaded the firmware upgrade file to your hard drive, click Browse to begin the firmware upgrade.
D-Link Systems, Inc. 30 When the "upgrade is complete" message appears, click Restart. After the login screen appears, wait 30 seconds before logging into the DNS-120. When you have found it, click Open in the browser window and click Apply in this screen to find the upgrade. DNS-120 User's Manual Tools > Firmware Using the Configuration Utility Browse: After you have downloaded the firmware upgrade file to your hard drive, click Browse to begin the firmware upgrade.

Product Manual
Page 35
...(e.g. Click on the Open button to the DNS-120. Incremental Backup: By default all completed,... it is displayed, click on the USB drive(s). If you want is valid ...is correct, click on the button, a window will appear with identical names will let ...to an attached USB drive on the plus sign next to the USB drive name to...USB drive connected to begin the browsing process. To select a folder, click on DNS-120. This means that appear as "Full Backup"). The current date and time according the DNS-120... Backup option is checked, then DNS-120 will be written over by Last...
...(e.g. Click on the Open button to the DNS-120. Incremental Backup: By default all completed,... it is displayed, click on the USB drive(s). If you want is valid ...is correct, click on the button, a window will appear with identical names will let ...to an attached USB drive on the plus sign next to the USB drive name to...USB drive connected to begin the browsing process. To select a folder, click on DNS-120. This means that appear as "Full Backup"). The current date and time according the DNS-120... Backup option is checked, then DNS-120 will be written over by Last...

Product Manual
Page 37
this field is optional. To rename the computer and join a domain, Click Change. D-Link Systems, Inc. 37 DNS-120 User's Manual Networking Basics Networking Basics To name your computer n Windows® XP, please follow these directions. Click Start (in the lower left corner of the screen). Right-click on My Computer. Select Properties and click. Select the Computer Name Tab in the System Properties window. You may enter a Computer Description if you wish;
this field is optional. To rename the computer and join a domain, Click Change. D-Link Systems, Inc. 37 DNS-120 User's Manual Networking Basics Networking Basics To name your computer n Windows® XP, please follow these directions. Click Start (in the lower left corner of the screen). Right-click on My Computer. Select Properties and click. Select the Computer Name Tab in the System Properties window. You may enter a Computer Description if you wish;

Product Manual
Page 38
D-Link Systems, Inc. 38 DNS-120 User's Manual Networking Basics In this window, enter the Computer name. Select Workgroup and enter the name of the Workgroup. All computers on your network must have the same Workgroup name. Click OK.
D-Link Systems, Inc. 38 DNS-120 User's Manual Networking Basics In this window, enter the Computer name. Select Workgroup and enter the name of the Workgroup. All computers on your network must have the same Workgroup name. Click OK.

Product Manual
Page 39
DNS-120 User's Manual Networking Basics Checking the IP Address in Windows® XP The adapter-equipped computers in your IP address, subnet mask, and the default gateway. Click Close. D-Link Systems, Inc. 39 To check the IP Address of IP Address Range). This screen will appear: Click the Support tab. This window will...
DNS-120 User's Manual Networking Basics Checking the IP Address in Windows® XP The adapter-equipped computers in your IP address, subnet mask, and the default gateway. Click Close. D-Link Systems, Inc. 39 To check the IP Address of IP Address Range). This screen will appear: Click the Support tab. This window will...

Product Manual
Page 40
D-Link Systems, Inc. 40 DNS-120 User's Manual Networking Basics Assigning a Static IP Address in Windows® XP/2000 Note: DHCP-enabled routers will automatically assign IP addresses to the computers on the network, using a DHCP-capable router you will not ...
D-Link Systems, Inc. 40 DNS-120 User's Manual Networking Basics Assigning a Static IP Address in Windows® XP/2000 Note: DHCP-enabled routers will automatically assign IP addresses to the computers on the network, using a DHCP-capable router you will not ...

Product Manual
Page 42
.... Checking the Connection by your DNS server addresses. A good connection will appear. Type ping xxx.xxx.xxx.xxx, where xxx is the IP address of the default gateway. A window similar to Start > Run > type cmd. D-Link Systems, Inc. 42 DNS-120 User's Manual Networking Basics ...; Input your ISP (Internet Service Provider.) Click OK. Note: If you are entering a DNS server, you must enter the IP address of...
.... Checking the Connection by your DNS server addresses. A good connection will appear. Type ping xxx.xxx.xxx.xxx, where xxx is the IP address of the default gateway. A window similar to Start > Run > type cmd. D-Link Systems, Inc. 42 DNS-120 User's Manual Networking Basics ...; Input your ISP (Internet Service Provider.) Click OK. Note: If you are entering a DNS server, you must enter the IP address of...