
Product Manual
Page 2
DNS-120 User's Manual Table of Contents Table of Contents Package Contents 3 Introduction 4 Features and Benefits 5 Hardware Overview 6 Getting Started 8 Hardware Installation 9 Mapping a Drive 10 Using the Easy Search Utility 13 Using the Configuration Utility 14 Setup Wizard 15 IP Settings 18 Device Settings 19 User Creation 20 Network Access...
DNS-120 User's Manual Table of Contents Table of Contents Package Contents 3 Introduction 4 Features and Benefits 5 Hardware Overview 6 Getting Started 8 Hardware Installation 9 Mapping a Drive 10 Using the Easy Search Utility 13 Using the Configuration Utility 14 Setup Wizard 15 IP Settings 18 Device Settings 19 User Creation 20 Network Access...

Product Manual
Page 4
... utility, discover all stored files. The DNS-120 Network Storage Adapter can connect up PC-to-drive or drive-to-drive backups. Additional setup options can also prevent any data loss by safely removing the USB drives using the built-in USB hard drives or flash drives. D-Link Systems, Inc. 4 You can be con...
... utility, discover all stored files. The DNS-120 Network Storage Adapter can connect up PC-to-drive or drive-to-drive backups. Additional setup options can also prevent any data loss by safely removing the USB drives using the built-in USB hard drives or flash drives. D-Link Systems, Inc. 4 You can be con...

Product Manual
Page 5
...DNS-120 does not require you 're away. D-Link Systems, Inc. 5 Connect up to Drives on the network. Simply connect the DNS-120 to a 10/100 Fast Ethernet port on your network router or switch, plug in USB hard drives or flash drives, and configure additional setup options using the built-in FTP Server The DNS-120... can also prevent any data loss by safely removing the USB drives using the Disconnect button on ...
...DNS-120 does not require you 're away. D-Link Systems, Inc. 5 Connect up to Drives on the network. Simply connect the DNS-120 to a 10/100 Fast Ethernet port on your network router or switch, plug in USB hard drives or flash drives, and configure additional setup options using the built-in FTP Server The DNS-120... can also prevent any data loss by safely removing the USB drives using the Disconnect button on ...

Product Manual
Page 11
... USB drive so that you can access the DNS-120's USB drive(s) by mapping the shared folders as drives in the Configuration Utility. Right-click Start and click Explore. DNS-120 User's Manual Mapping a Drive Mapping a Drive (continued) As an alternate method, you entered into the Setup Wizard... and click Browse to locate your shared DNS-120 folder. Click Tools and click Map Network Drive. You will find the DNS-120 shared folder under the Workgroup Name that it is accessible from the My Computer screen. Click Finish D-Link Systems, Inc. \\DNS-120\Shared folder 11
... USB drive so that you can access the DNS-120's USB drive(s) by mapping the shared folders as drives in the Configuration Utility. Right-click Start and click Explore. DNS-120 User's Manual Mapping a Drive Mapping a Drive (continued) As an alternate method, you entered into the Setup Wizard... and click Browse to locate your shared DNS-120 folder. Click Tools and click Map Network Drive. You will find the DNS-120 shared folder under the Workgroup Name that it is accessible from the My Computer screen. Click Finish D-Link Systems, Inc. \\DNS-120\Shared folder 11
Product Manual
Page 15
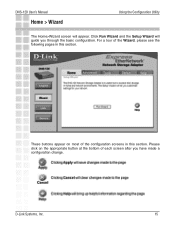
For a tour of the Wizard, please see the following pages in this section. Click Run Wizard and the Setup Wizard will appear. Please click on most of each screen after you through the basic configuration. These buttons appear on the appropriate button at the bottom of the configuration screens in this section. DNS-120 User's Manual Home > Wizard Using the Configuration Utility The Home>Wizard screen will guide you have made a configuration change. D-Link Systems, Inc. 15
For a tour of the Wizard, please see the following pages in this section. Click Run Wizard and the Setup Wizard will appear. Please click on most of each screen after you through the basic configuration. These buttons appear on the appropriate button at the bottom of the configuration screens in this section. DNS-120 User's Manual Home > Wizard Using the Configuration Utility The Home>Wizard screen will guide you have made a configuration change. D-Link Systems, Inc. 15

Product Manual
Page 16
DNS-120 User's Manual Using the Setup Wizard The Wizard will guide you through five steps: - Additional settings Click Next Create a new password for your Time Zone from the drop-down menu. Click Next D-Link Systems, Inc. Click Next Select your DNS-120. Password - LAN Connection - Using the Configuration Utility 16 Time Zone -
DNS-120 User's Manual Using the Setup Wizard The Wizard will guide you through five steps: - Additional settings Click Next Create a new password for your Time Zone from the drop-down menu. Click Next D-Link Systems, Inc. Click Next Select your DNS-120. Password - LAN Connection - Using the Configuration Utility 16 Time Zone -

Product Manual
Page 17
Enter a name and a description for the DNS-120. Using the Configuration Utility Click Next Enter the workgroup name of the DNS-120 using the setup wizard! Click Next Click Restart You have completed the basic configuration of your network contains a DHCP server or router. DNS-120 User's Manual Using the Setup Wizard (continued) Leave DHCP Client enabled if your network. D-Link Systems, Inc. 17 The IP address must be used. If not, select Static IP and enter the IP address information to be in the same range as your network.
Enter a name and a description for the DNS-120. Using the Configuration Utility Click Next Enter the workgroup name of the DNS-120 using the setup wizard! Click Next Click Restart You have completed the basic configuration of your network contains a DHCP server or router. DNS-120 User's Manual Using the Setup Wizard (continued) Leave DHCP Client enabled if your network. D-Link Systems, Inc. 17 The IP address must be used. If not, select Static IP and enter the IP address information to be in the same range as your network.