
Product Manual
Page 1
Port Keyboard, Video, and Mouse Switch User's Guide Rev. 1.0 DKVM-8E 8-
Port Keyboard, Video, and Mouse Switch User's Guide Rev. 1.0 DKVM-8E 8-

Product Manual
Page 3
... Switch or PCs n No DIP-switch setting needed and auto detect daisy chain bank. n Switches PCs by On-Screen Display, push button or - 1 - Introduction The DKVM-8E gives you the ultimate in control of 8 PCs from one keyboard, mouse and monitor. Product Feature n Allows users to control eight computers from one of... n No software required, each channel contains a microprocessor emulation to name and select computers n Supports eight characters password protection and search PC Server name. n Daisy-Chain ports allows control over as many as 64 computers through 8 banks of them.
... Switch or PCs n No DIP-switch setting needed and auto detect daisy chain bank. n Switches PCs by On-Screen Display, push button or - 1 - Introduction The DKVM-8E gives you the ultimate in control of 8 PCs from one keyboard, mouse and monitor. Product Feature n Allows users to control eight computers from one of... n No software required, each channel contains a microprocessor emulation to name and select computers n Supports eight characters password protection and search PC Server name. n Daisy-Chain ports allows control over as many as 64 computers through 8 banks of them.
Product Manual
Page 4
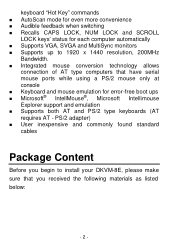
... conversion technology allows connection of AT type computers that have serial mouse ports while using a PS/2 mouse only at console n Keyboard and mouse emulation for each computer automatically n Supports VGA, SVGA and MultiSync monitors n Supports up to install your DKVM-8E, please make sure that you begin to 1920 x 1440 resolution, 200MHz Bandwidth...
... conversion technology allows connection of AT type computers that have serial mouse ports while using a PS/2 mouse only at console n Keyboard and mouse emulation for each computer automatically n Supports VGA, SVGA and MultiSync monitors n Supports up to install your DKVM-8E, please make sure that you begin to 1920 x 1440 resolution, 200MHz Bandwidth...

Product Manual
Page 6
First the layout of front and rear panel will explain how to connect the console and the computers to the DKVM-4 switch unit. Front Panel Layout Current Active Bank Display Current Active Port Display Bank Select Port Select Power Switch - 4 - Hardware Installation This section will be shown.
First the layout of front and rear panel will explain how to connect the console and the computers to the DKVM-4 switch unit. Front Panel Layout Current Active Bank Display Current Active Port Display Bank Select Port Select Power Switch - 4 - Hardware Installation This section will be shown.
Product Manual
Page 7
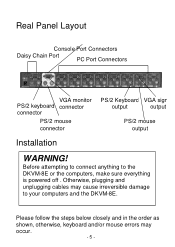
Otherwise, plugging and unplugging cables may occur. - 5 - Before attempting to connect anything to your computers and the DKVM-8E. Please follow the steps below closely and in the order as shown, otherwise, keyboard and/or mouse errors may cause irreversible damage to the DKVM-8E or the computers, make sure everything is powered off . Real Panel Layout Console Port Connectors Daisy Chain Port PC Port Connectors VGA monitor PS/2 keyboard connector connector PS/2 mouse connector PS/2 Keyboard VGA signal output output PS/2 mouse output Installation WARNING!
Otherwise, plugging and unplugging cables may occur. - 5 - Before attempting to connect anything to your computers and the DKVM-8E. Please follow the steps below closely and in the order as shown, otherwise, keyboard and/or mouse errors may cause irreversible damage to the DKVM-8E or the computers, make sure everything is powered off . Real Panel Layout Console Port Connectors Daisy Chain Port PC Port Connectors VGA monitor PS/2 keyboard connector connector PS/2 mouse connector PS/2 Keyboard VGA signal output output PS/2 mouse output Installation WARNING!
Product Manual
Page 8
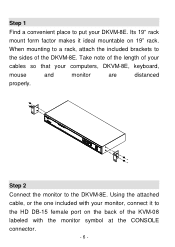
...rack mount form factor makes it to the sides of the KVM-08 labeled with your computers, DKVM-8E, keyboard, mouse and monitor are distanced properly. Step 2 Connect the monitor to put your DKVM-8E. Using the attached cable, or the one included with the monitor symbol at the CONSOLE connector.... - 6 - When mounting to a rack, attach the included brackets to the HD DB-15 female port on 19" rack. Step 1 Find a convenient...
...rack mount form factor makes it to the sides of the KVM-08 labeled with your computers, DKVM-8E, keyboard, mouse and monitor are distanced properly. Step 2 Connect the monitor to put your DKVM-8E. Using the attached cable, or the one included with the monitor symbol at the CONSOLE connector.... - 6 - When mounting to a rack, attach the included brackets to the HD DB-15 female port on 19" rack. Step 1 Find a convenient...

Product Manual
Page 10
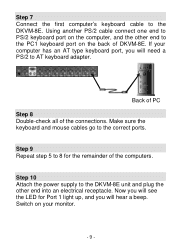
... the connector labeled VGA. If using a PS/2 cable, connect one end to a DB-9 serial port on the back of the DKVM-8E. If using a serial mouse cable, connect one end to the PS/2 mouse port on the back of DKVM-8E. Back of PC - 8 - Now the PC connections will be made with the Male side to... both of the PC and the rear panel of the DKVM-8E unit to the PC1 PS/2 mouse port on the computer, and the other end to the DKVM-8E. Connect a VGA cable (15-pin HDDB Male / Male) with the monitor (VGA) connections first.
... the connector labeled VGA. If using a PS/2 cable, connect one end to a DB-9 serial port on the back of the DKVM-8E. If using a serial mouse cable, connect one end to the PS/2 mouse port on the back of DKVM-8E. Back of PC - 8 - Now the PC connections will be made with the Male side to... both of the PC and the rear panel of the DKVM-8E unit to the PC1 PS/2 mouse port on the computer, and the other end to the DKVM-8E. Connect a VGA cable (15-pin HDDB Male / Male) with the monitor (VGA) connections first.
Product Manual
Page 11
Step 10 Attach the power supply to the PC1 keyboard port on the back of DKVM-8E. Back of PC Step 8 Double-check all of the computers. Switch on the computer, and the other end to the DKVM-8E unit and plug the other end into an electrical receptacle. Using another PS/2 cable ...connect one end to PS/2 keyboard port on your computer has an AT type keyboard port, you will need a PS/2 to the DKVM-8E. Step 9 Repeat step 5 to the correct ports. Make sure the keyboard and mouse cables go to 8 for Port 1 light up, and you will hear a beep. Step 7...
Step 10 Attach the power supply to the PC1 keyboard port on the back of DKVM-8E. Back of PC Step 8 Double-check all of the computers. Switch on the computer, and the other end to the DKVM-8E unit and plug the other end into an electrical receptacle. Using another PS/2 cable ...connect one end to PS/2 keyboard port on your computer has an AT type keyboard port, you will need a PS/2 to the DKVM-8E. Step 9 Repeat step 5 to the correct ports. Make sure the keyboard and mouse cables go to 8 for Port 1 light up, and you will hear a beep. Step 7...
Product Manual
Page 12
...the push button of KVM switch or run hot key) while the computers are able to support enough power to the stand alone switch, DKVM-8E still needs a power adapter for proper connections before going to the trouble shooting section of daisy chain, it will cause communication errors or ...power adapter. Although the PCs connected to plug in the same way. NOTE: Please don't switch the PC port (i.e. Step 11 Now power up process, each PC will be remind to DKVM-8E are under their boot-up . The first computer will communicate with the keyboard and mouse. If this manual...
...the push button of KVM switch or run hot key) while the computers are able to support enough power to the stand alone switch, DKVM-8E still needs a power adapter for proper connections before going to the trouble shooting section of daisy chain, it will cause communication errors or ...power adapter. Although the PCs connected to plug in the same way. NOTE: Please don't switch the PC port (i.e. Step 11 Now power up process, each PC will be remind to DKVM-8E are under their boot-up . The first computer will communicate with the keyboard and mouse. If this manual...

Product Manual
Page 13
keep the default eight zero (00000000) value. Note: Before you are not familiar with the operation of DKVM-8E When you will ask for the password, the default password value is eight zero -" 00000000 ". Usage The power on state of OSD manual, ... the password and unfortunately forget the password, you power on KVM switch, it will need to contact supplier (D-Link) to have set . i.e. The Push Buttons Pressing the button cyclically through all the ports. 1 2 3 4 5 6 7 8 Port Status Port Select - 11 - Please key in eight zero and enter the same value at retype field.
keep the default eight zero (00000000) value. Note: Before you are not familiar with the operation of DKVM-8E When you will ask for the password, the default password value is eight zero -" 00000000 ". Usage The power on state of OSD manual, ... the password and unfortunately forget the password, you power on KVM switch, it will need to contact supplier (D-Link) to have set . i.e. The Push Buttons Pressing the button cyclically through all the ports. 1 2 3 4 5 6 7 8 Port Status Port Select - 11 - Please key in eight zero and enter the same value at retype field.
Product Manual
Page 14
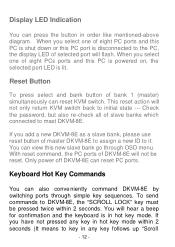
... within 2 seconds. Check the password, but also re-check all of DKVM-8E will hear a beep for confirmation and the keyboard is lit. Only power off DKVM-8E can also conve niently command DKVM-8E by switching ports through OSD menu. This reset action will flash. You will not be... pressed twice within 2 seconds (It means to it. With reset command, the PC ports of slave banks which connected to...
... within 2 seconds. Check the password, but also re-check all of DKVM-8E will hear a beep for confirmation and the keyboard is lit. Only power off DKVM-8E can also conve niently command DKVM-8E by switching ports through OSD menu. This reset action will flash. You will not be... pressed twice within 2 seconds (It means to it. With reset command, the PC ports of slave banks which connected to...

Product Manual
Page 15
P+ort N+o. 0 Lock" "Scroll Lock" key), the keyboard will back to speed up arrow key" or "down arrow key" to under Operation System control state. Below are the different hot key commands within 2 seconds Scroll Lock + Scroll Lock + = Previous Channel Scroll Lock + Scroll Lock + = Next Channel Note: You also could press "up selecting the destination port) Scroll Lock + Scroll Lock + Scroll Lock + Scroll Lock + Page Up= Previous Bank Page Do=wnNext Bank Scroll Lock + Scroll + Lock Bank No.+ 1~8 Port No. = select PC port 1~8 ( 8 port ) - 13 -
P+ort N+o. 0 Lock" "Scroll Lock" key), the keyboard will back to speed up arrow key" or "down arrow key" to under Operation System control state. Below are the different hot key commands within 2 seconds Scroll Lock + Scroll Lock + = Previous Channel Scroll Lock + Scroll Lock + = Next Channel Note: You also could press "up selecting the destination port) Scroll Lock + Scroll Lock + Scroll Lock + Scroll Lock + Page Up= Previous Bank Page Do=wnNext Bank Scroll Lock + Scroll + Lock Bank No.+ 1~8 Port No. = select PC port 1~8 ( 8 port ) - 13 -
Product Manual
Page 16
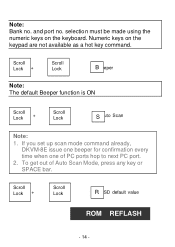
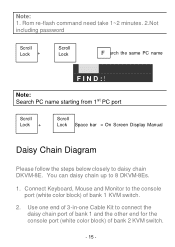
and port no . Numeric keys on the keyboard. selection must be made using the numeric keys on the keypad are not available as a hot key command. Scroll Lock + Scroll Lock + R= OSD default value ROM REFLASH - 14 - Scroll Lock + Scroll Lock + =BBeeper Note: The default Beeper function is ON Scroll Lock + Scroll Lock + =S Auto Scan Note: 1. Note: Bank no . If you set up scan mode command already, DKVM-8E issue one beeper for confirmation every time when one of Auto Scan Mode, press any key or SPACE bar. To get out of PC ports hop to next PC port. 2.
and port no . Numeric keys on the keyboard. selection must be made using the numeric keys on the keypad are not available as a hot key command. Scroll Lock + Scroll Lock + R= OSD default value ROM REFLASH - 14 - Scroll Lock + Scroll Lock + =BBeeper Note: The default Beeper function is ON Scroll Lock + Scroll Lock + =S Auto Scan Note: 1. Note: Bank no . If you set up scan mode command already, DKVM-8E issue one beeper for confirmation every time when one of Auto Scan Mode, press any key or SPACE bar. To get out of PC ports hop to next PC port. 2.
Product Manual
Page 17
... color block) of bank 1 KVM switch. 2. Use one end of 3-in-one Cable Kit to the console port (white color block) of bank 2 KVM switch. - 15 - Rom re-flash command need take 1~2 minutes. 2.Not including password Scroll Lock + Scroll Lock + =FSearch the ...same PC name F I N D : ¦ Note: Search PC name starting from 1st PC port Scroll Lock + Scroll Lock + Space bar = On Screen Display Manual Daisy Chain Diagram Please follow the steps below closely to 8 DKVM-8Es. 1. You can daisy chain up to daisy chain...
... color block) of bank 1 KVM switch. 2. Use one end of 3-in-one Cable Kit to the console port (white color block) of bank 2 KVM switch. - 15 - Rom re-flash command need take 1~2 minutes. 2.Not including password Scroll Lock + Scroll Lock + =FSearch the ...same PC name F I N D : ¦ Note: Search PC name starting from 1st PC port Scroll Lock + Scroll Lock + Space bar = On Screen Display Manual Daisy Chain Diagram Please follow the steps below closely to 8 DKVM-8Es. 1. You can daisy chain up to daisy chain...

Product Manual
Page 19
... attempting to support " Hot Plug " function. If you apply "Hot Plug" to this kind of the DKVM-8E without having to power it off as long as it is active and selected, you must switch to a different port before you change the configuration, and then you can switch back to the pass through... port. 2. You may unplug the mouse or the keyboard from the console port and plug it back in at any time. and software driver supports...
... attempting to support " Hot Plug " function. If you apply "Hot Plug" to this kind of the DKVM-8E without having to power it off as long as it is active and selected, you must switch to a different port before you change the configuration, and then you can switch back to the pass through... port. 2. You may unplug the mouse or the keyboard from the console port and plug it back in at any time. and software driver supports...

Product Manual
Page 20
zCHANGE PASSWORD ySCAN:10 SEC.{CONSOLE ON/OFF |ESC: QUIT ENTER: TAB: NEXT INSERT: EDIT Ç/È: SELECT PORT PgDn / PgUp: BANK SELECT u The 1ST line bar is your PC name in maximum 8 characters. You can define your PC system name list. On Screen ...
zCHANGE PASSWORD ySCAN:10 SEC.{CONSOLE ON/OFF |ESC: QUIT ENTER: TAB: NEXT INSERT: EDIT Ç/È: SELECT PORT PgDn / PgUp: BANK SELECT u The 1ST line bar is your PC name in maximum 8 characters. You can define your PC system name list. On Screen ...

Product Manual
Page 21
You can modify it from one PC port hopped to the next PC port. The default SCAN time is 10 sec and the maximum scan time is 8 digits " 00000000 ". The default password is 99 sec. z "CHANGE PASSWORD" allows the ... the scan interval from 05 sec to access all PC systems connected. The factory default value is another window for confirming your monitor. default of 8 port KVM switch PC name is eight digits. The maximum password is from "SYSTEM 01", "SYSTEM 02",..., "SYSTEM 08". y "SCAN TIME" is powered on your typed...
You can modify it from one PC port hopped to the next PC port. The default SCAN time is 10 sec and the maximum scan time is 8 digits " 00000000 ". The default password is 99 sec. z "CHANGE PASSWORD" allows the ... the scan interval from 05 sec to access all PC systems connected. The factory default value is another window for confirming your monitor. default of 8 port KVM switch PC name is eight digits. The maximum password is from "SYSTEM 01", "SYSTEM 02",..., "SYSTEM 08". y "SCAN TIME" is powered on your typed...
Product Manual
Page 23
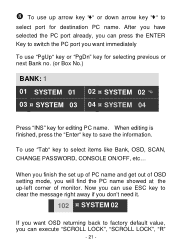
..., you can press the ENTER Key to switch the PC port you will find the PC name showed at the up-left corner of OSD setting mode, you want OSD returning back to factory default value, ... use up of PC name and get out of monitor. When you finish the set up arrow key "-" or down arrow key "˜" to select port for editing PC name. Now you can execute "SCROLL LOCK", "SCROLL LOCK", "R" - 21 - When editing is finished, press the "Enter" key to save the information...
..., you can press the ENTER Key to switch the PC port you will find the PC name showed at the up-left corner of OSD setting mode, you want OSD returning back to factory default value, ... use up of PC name and get out of monitor. When you finish the set up arrow key "-" or down arrow key "˜" to select port for editing PC name. Now you can execute "SCROLL LOCK", "SCROLL LOCK", "R" - 21 - When editing is finished, press the "Enter" key to save the information...

Product Manual
Page 27
... IRQ) is enabled. ?Make sure the mouse is working properly. A: ?Check the cables and make sure they are inserted properly in the correct ports. ?Make sure the keyboard works when directly plugged into the computers. ?Try a different keyboard, but the keyboard does not work. Q: The computers boot up . PS/2 ... or 104-key keyboards. ?Make sure that the keyboard driver is for 101, 102 or 104-key keyboards, and not old XT keyboards. ?Check to a DKVM-8E. PC, whether stand-alone or connected to make sure that the power adapter is plugged in and is directly plugged into the - 25 -
... IRQ) is enabled. ?Make sure the mouse is working properly. A: ?Check the cables and make sure they are inserted properly in the correct ports. ?Make sure the keyboard works when directly plugged into the computers. ?Try a different keyboard, but the keyboard does not work. Q: The computers boot up . PS/2 ... or 104-key keyboards. ?Make sure that the keyboard driver is for 101, 102 or 104-key keyboards, and not old XT keyboards. ?Check to a DKVM-8E. PC, whether stand-alone or connected to make sure that the power adapter is plugged in and is directly plugged into the - 25 -

Product Manual
Page 28
.... A: ?Check the cables and make sure that the power adapter is plugged in the correct ports. ?Make sure the mouse works when plugged into the computer. Q: When I do I switch from one port to the problem PC port and power on . If the computer still does not detect the mouse, then your PS/2... mouse port or the mouse itself has a problem. ?Try a different mouse. ?Make sure the mouse is ...
.... A: ?Check the cables and make sure that the power adapter is plugged in the correct ports. ?Make sure the mouse works when plugged into the computer. Q: When I do I switch from one port to the problem PC port and power on . If the computer still does not detect the mouse, then your PS/2... mouse port or the mouse itself has a problem. ?Try a different mouse. ?Make sure the mouse is ...


